Dacia Solenza (engine E7J). Manual — part 128

71
CARRIAGE BODY INSIDE TRIMS
71 - 7
DISMOUNTING
Dismount :
- dashboard (see chapter 57);
- driving post cross beam (see chapter 42);
- central console (see chapter 58);
- distributor of the air ventilation climate maintenance RACV (see chapter 61);
- attaching screw of the steering column support on the driving post cross-beam;
- pedals support (see chapter 37);
- partially the floor carpet ( in the noise absorbent covering area).
Detach the noise absorbent (2) from the cowl panel clips (1).
Cowl panel noise absorbent
REMOUNTING
Perform in the reverse order the dismounting operations.
A maximum 3 daN clips attaching effort is necessary for the noise absorbent attach-
ment clips.
2
1

CARRIAGE BODY INSIDE TRIMS
71
71 - 8
1 – cockpit carpet
2 – clip
DISMOUNTING
Dismount :
- front seats (see chapter 78);
- rear bench seat (see chapter 78);
- front seat belts lockers (see chap-
ter 59)
- central console (see chapter 58);
- distributor of the air ventilation/cli-
mate maintenance RACV (see chapter 61);
- front safety belts at lower part;
- acceleration pedal limiter.
Detach from clips the cockpit carpet (1).
REMOUNTING
Perform the dismounting operations in the
reverse order.
The clips attaching is to be performed with
a maximum force of 3 daN.
Cockpit carpet
1
2
72
72 - 1
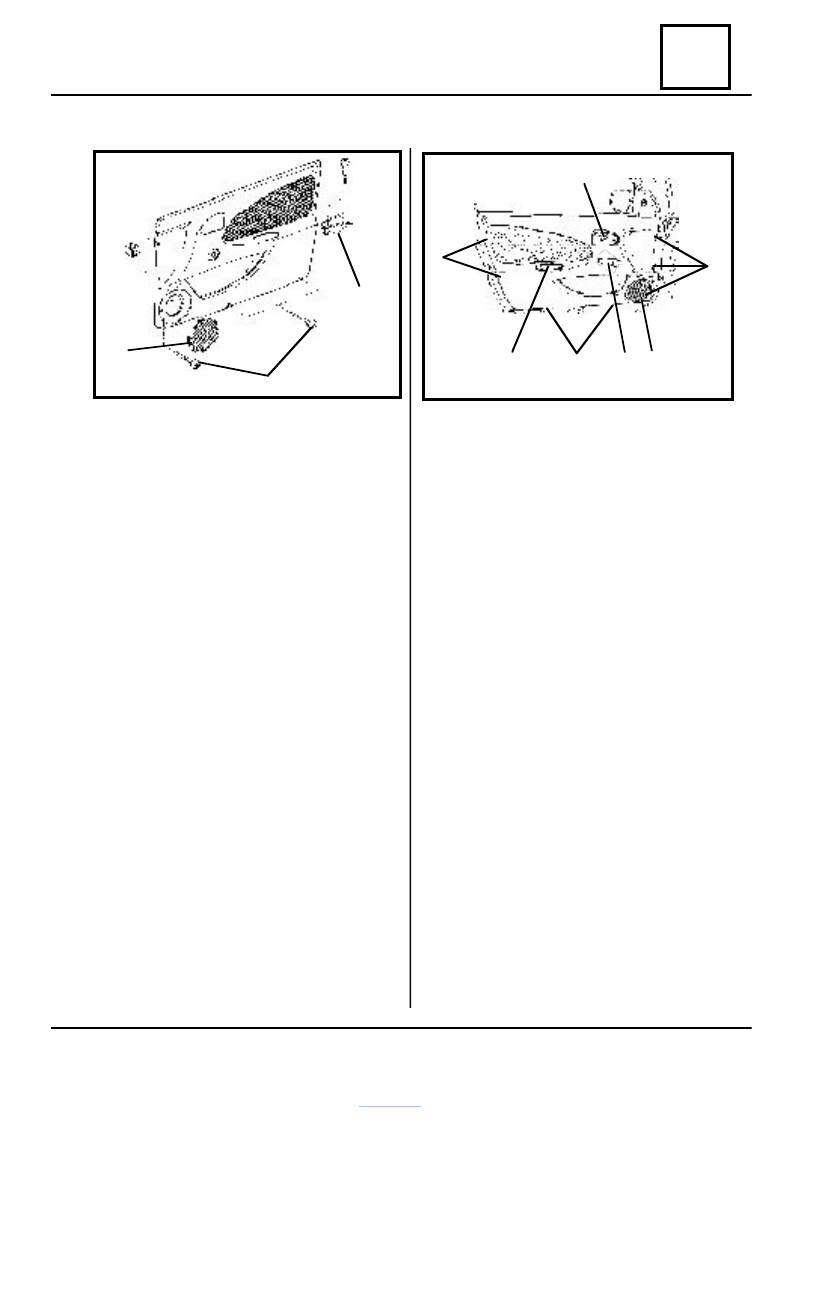
LATERAL OPENINGS TRIMS
Front door panel
DISMOUNTING
Disconnect the battery.
Dismount:
- window regulator crank (A) for glass
lifting, that is mounted by clips attachment on
the window regulator axle ( in case of the
vehicles provided with glass hand-drive lifting);
- attachment screw of the opening
mechanism from inside (B), consequently the
mechanism.
- locking handle (C) attached by screw.
Rotate the speaker grill (D) counter clock-
wise direction and extract it from the front door
panel.
Dismount the four attachment screws of the
speaker on the door panel.
Disconnect the front door speaker
connector.
Dismount the attachment screws (1) of the
door panel on the caisson.
D
C
1
1
C
D
1
2
B
A
Detach from clips the door panel in points
(2) .
REMOUNTING
Perform in the reverse order the dismounting
operations taking into account the following
recommendations:
- check the integrity of the deflective
panel and of the continuos layer of Romtix
1502 P sealing material on the front door
caisson;
- for the mounting of the inside opening
mechanism, the opening control rod will be
placed in the position where the assembled plate
with electric control is blocked;
- after mounting, check the operation of
the inside opening mechanism and its alignment
with the front door panel;
- check the operation of the front door
speaker.

72
72 - 2
LATERAL OPENINGS TRIMS
Rear door panel
1
C
B
1
A
2
C
2
DISMOUNTING
Dismount :
- window regulator crank (A) for glass
lifting that is mounted by clips attachment on
the window regulator axle.
- attachment screw of the inside opening
mechanism (B), consequently, the mechanism;
- locking handle (C) attached by screw;
- attachment screws (1) of the rear door
panel on the caisson;
Detach from clips the rear door panel from
points (2).
REMOUNTING
Perform the dismounting operations in the
reverse order, taking into consideration the
followings recommendations:
- check the integrity of the deflective panel
and of the continuos sealant material layer
Romtix 1502 P on the door caisson outliner;
- for the mounting of the inside opening
mechanism, the opening control rod will be
placed in the position where the assembled plate
with electric control is unblocked.
- after mounting, check the operation of
the inside opening mechanism and its alignment
with the rear door panel.
Нет комментариевНе стесняйтесь поделиться с нами вашим ценным мнением.
Текст