Citroen C1 Dag (2010 year). Instruction — part 5
6
61
SAFETY
The driver must ensure that
the passengers use the seat
belts correctly and that they
are all properly restrained
before setting off.
Wherever you are seated in the ve-
hicle, always fasten your seat belt,
even for short journeys.
Do not invert the seat belt buckles as
they will not fulfi l their role fully.
If the seats have armrests * , the lap
part of the seat belt must always
pass under the armrest.
The seat belts are fi tted with an inertia
reel permitting automatic adjustment
of the length of the strap to your size.
The seat belt is stored automatically
when not in use.
Before and after use, ensure that the
seat belt is reeled in correctly.
The lower part of the strap must be
positioned as low as possible on the
pelvis.
The upper part must be positioned in
the hollow of the shoulder.
The inertia reels are fi tted with an au-
tomatic locking device which comes
into operation in the event of a colli-
sion, on emergency braking or if the
vehicle rolls over. You can release
the device by pulling rapidly on the
strap and releasing it.
In order to be effective, a seat belt:
-
must be tightened as close to the
body as possible,
-
must restrain one adult only,
-
must not bear any trace of cuts or
fraying,
-
must be pulled in front of you with
a smooth movement, checking
that it does not twist,
-
must not be transformed or modi-
fi ed to avoid altering its perfor-
mance.
In accordance with current safety
regulations, all repairs and checks
must be carried out by a CITROËN
dealer who can guarantee that the
work is carried out correctly, or quali-
fi ed workshop.
Have your seat belts checked regu-
larly by a CITROËN dealer or a quali-
fi ed workshop and particularly if the
straps show signs of damage.
Clean the seat belt straps with soapy
water or a textile cleaning product,
sold by CITROËN dealers.
After folding or moving a seat or rear
bench seat, ensure that the seat belt
is positioned and rolled up correctly.
Recommendations for children:
-
use a suitable child seat if the pas-
senger is less than 12 years old or
shorter than one metre fi fty,
-
do not use the strap-guide * when
a child seat is installed.
-
never use the same seat belt to
secure more than one person,
-
never allow a child to travel on
your lap.
Depending on the nature and se-
riousness of the impacts , the pre-
tensioning device may be triggered
before and independently of the air
bags. Triggering of the pre-tensioners
is accompanied by a slight emission
of harmless smoke and a noise, due
to the activation of the pyrotechnic
cartridge incorporated in the system.
In all cases, the airbag warning lamp
comes on.
Following an impact, have the seat
belts system checked, and if neces-
sary replaced, by a CITROËN dealer
or a qualifi ed workshop.
* According to model.
6
62
SAFETY
AIRBAGS
FRONT AIRBAGS
Front airbag fault
Flashing indicates an airbag
fault, contact a CITROËN
dealer or a qualifi ed work-
shop to have the system
checked. The airbags may
no longer be deployed in the event of
a serious impact.
Note: the gas escaping from
the airbags can be a minor
irritant.
Immediately after the impact, the air-
bags defl ate rapidly so that they do
not hinder the visibility of the occu-
pants nor their exit if necessary from
the vehicle. The air bags are not de-
ployed in the case of minor impacts,
rear impacts or in certain roll-over
conditions. The seat belt is suffi cient
to ensure maximum protection in
these situations. The seriousness of
a collision depends on the nature of
the obstacle and the speed of the ve-
hicle at the moment of the collision.
Airbags only operate when the ig-
nition is switched on. When they
are deployed, a noise is heard
during infl ation.
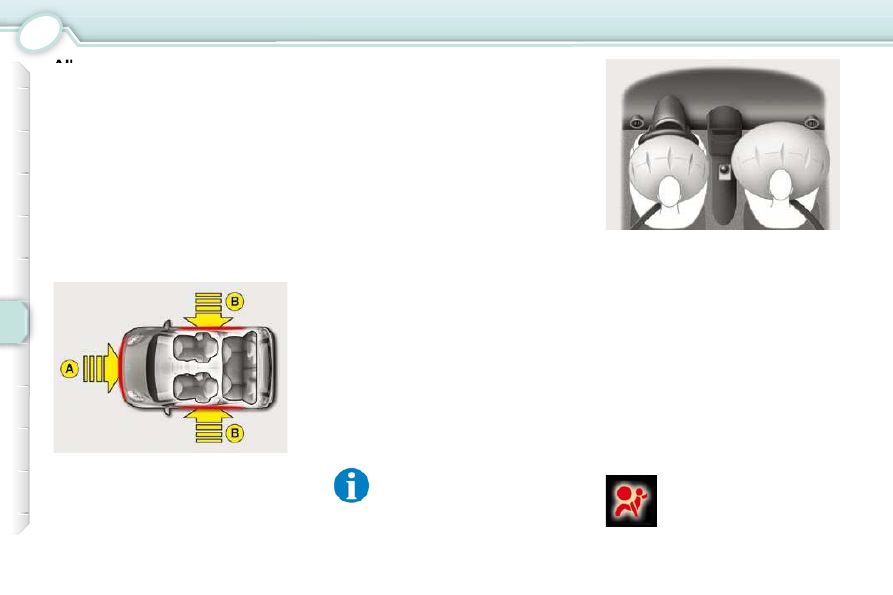
Impact detection zones
A. Front impact zone.
B. Side impact zone.
The airbags have been designed to
maximise the safety of the occupants
in the event of serious collisions. They
work in conjunction with the force-
limiting seat belts. The electronic
detectors register and analyse any
abrupt deceleration of the vehicle in
the impact detection zones (see dia-
gram): if the deployment threshold is
reached, the airbags infl ate instantly
and protect the occupants of the ve-
hicle.
These are fi tted in the centre of the steer-
ing wheel for the driver and in the dash-
board for the front passenger. They are
deployed simultaneously, except in cases
where the passenger's airbag is deacti-
vated, in the event of a serious front im-
pact applied in the impact zone A in the
longitudinal centreline of the vehicle, on
a horizontal plane and from the front of
the vehicle towards the rear. The airbag
infl ates between the front occupant of the
vehicle and the dashboard to cushion his
forward movement. The airbags there-
fore limit the risk of injury to the head and
chest.

6
63
SAFETY
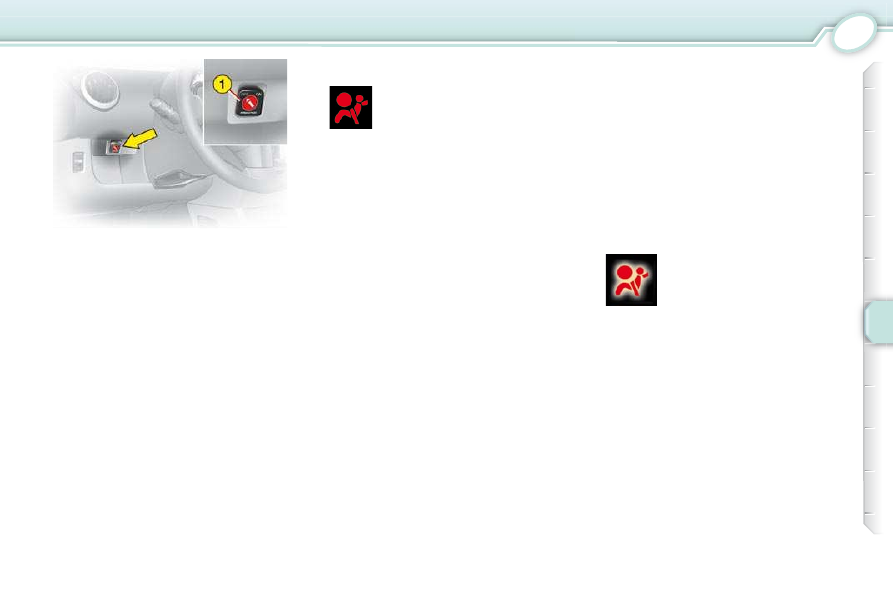
Deactivating the passenger
airbag
To ensure the safety of your child,
it is essential to deactivate the
passenger airbag when you install
a "rear-facing" child seat on the
front passenger seat. Otherwise,
the child would risk being seri-
ously injured or killed if the air bag
were to infl ate.
With the ignition switched off ,
insert the key into the passenger
airbag deactivation switch 1 , turn
it to the "OFF" position, then re-
move the key keeping the switch
in this position.
In the "OFF" position, the passen-
ger airbag will not be deployed in the
event of an impact.
As soon as the child seat is removed,
turn the airbag switch to the "ON"
position to re-activate the airbag and
thus ensure the safety of your pas-
senger in the event of an impact.
If the passenger airbag is de-
activated, the warning lamp
in the instrument panel re-
mains on until the passenger
airbag is reactivated.
Flashing indicates a fault
with at least one of these
airbags.
Contact a CITROËN deal-
er or a qualifi ed workshop
to have the system checked. The
airbags may no longer be deployed
in the event of a serious impact.
Deactivation (check)
Airbag fault
* According to version.
LATERAL AIRBAGS * AND
CURTAIN AIRBAGS *
The lateral airbags are built into the
front seat backs on the door side.
The deployment of these airbags re-
quires a serious side impact applied
in the side impact zone B , perpen-
dicular to the longitudinal centreline
of the vehicle, on a horizontal plane
and from the outside of the vehicle
towards the inside. The lateral airbag
infl ates between the front occupant
of the vehicle and the door trim pan-
el. It therefore limits the risk of injury
to the chest.
The rear lateral airbags afford the
rear passengers the same protection
which the front lateral airbags offer
the front passengers.
The curtain airbags are built into the
headlining.
The curtain airbag infl ates between
the front or rear occupant and the
windows. It therefore limits the risk
of head injuries. In the event of a
minor impact or bump on the side of
the vehicle or if the vehicle rolls over,
the airbag may not be deployed. The
airbag is not deployed in the event of
a front or rear collision.
6
63
SAFETY
Deactivating the passenger
airbag
To ensure the safety of your child,
it is essential to deactivate the
passenger airbag when you install
a "rear-facing" child seat on the
front passenger seat. Otherwise,
the child would risk being seri-
ously injured or killed if the air bag
were to infl ate.
With the ignition switched off ,
insert the key into the passenger
airbag deactivation switch 1 , turn
it to the "OFF" position, then re-
move the key keeping the switch
in this position.
In the "OFF" position, the passen-
ger airbag will not be deployed in the
event of an impact.
As soon as the child seat is removed,
turn the airbag switch to the "ON"
position to re-activate the airbag and
thus ensure the safety of your pas-
senger in the event of an impact.
If the passenger airbag is de-
activated, the warning lamp
in the instrument panel re-
mains on until the passenger
airbag is reactivated.
Flashing indicates a fault
with at least one of these
airbags.
Contact a CITROËN deal-
er or a qualifi ed workshop
to have the system checked. The
airbags may no longer be deployed
in the event of a serious impact.
Deactivation (check)
Airbag fault
* According to version.
LATERAL AIRBAGS * AND
CURTAIN AIRBAGS *
The lateral airbags are built into the
front seat backs on the door side.
The deployment of these airbags re-
quires a serious side impact applied
in the side impact zone B , perpen-
dicular to the longitudinal centreline
of the vehicle, on a horizontal plane
and from the outside of the vehicle
towards the inside. The lateral airbag
infl ates between the front occupant
of the vehicle and the door trim pan-
el. It therefore limits the risk of injury
to the chest.
The rear lateral airbags afford the
rear passengers the same protection
which the front lateral airbags offer
the front passengers.
The curtain airbags are built into the
headlining.
The curtain airbag infl ates between
the front or rear occupant and the
windows. It therefore limits the risk
of head injuries. In the event of a
minor impact or bump on the side of
the vehicle or if the vehicle rolls over,
the airbag may not be deployed. The
airbag is not deployed in the event of
a front or rear collision.
6
64
SAFETY
For the front, lateral and
curtain airbags to be fully
effective, observe the fol-
lowing safety rules:
Wear a correctly adjusted seat belt.
Sit in a normal upright position.
Do not leave anything between the
occupants and the airbags (child,
animal, object...). This could hamper
the operation of the airbags or injure
the occupants.
All work on the airbag systems is
strictly prohibited unless it is car-
ried out by qualifi ed personnel of the
CITROËN dealer network or a quali-
fi ed workshop.
After an accident or if the vehicle has
been stolen or broken into, have the
airbag systems checked.
Front airbags
Do not drive holding the steering
wheel by its spokes or resting your
hands on the centre part of the
wheel.
Passengers must not place their feet
on the dashboard.
Smoke as little as possible; deploy-
ment of the airbags can cause burns
or the risk of injury from a cigarette
or pipe.
Never remove or pierce the steering
wheel or hit it violently.
Curtain airbags
Do not fi x or attach anything to the
pillars or the roof. This could cause
injury to the head when the curtain
airbag infl ates.
The deployment of an airbag or air-
bags is accompanied by a slight
emission of harmless smoke and
a noise due to the activation of the
pyrotechnic cartridge incorporated in
the system. This smoke is not harm-
ful but sensitive individuals may ex-
perience some irritation.
The detonation noise may result in
a slight loss of hearing for a short
time.
Even if all of the precautions men-
tioned are observed, injury or slight
burns to the head, chest or arms
when the air bag is deployed can-
not be ruled out. Indeed, the bag in-
fl ates almost instantly (approximately
30 milliseconds) then defl ates within
the same time discharging hot gas
via the openings provided for this
purpose.
This equipment will only operate
once. If a second impact occurs
(during the same or a subsequent
accident), the airbag will not infl ate.
Lateral airbags
Only put approved covers on the
seats, these will not hamper the infl a-
tion of the lateral airbags. Contact a
CITROËN dealer or a qualifi ed work-
shop.
Do not fi x or attach anything to the
front seat backs. This could cause
injury to the chest or arms when the
lateral airbag infl ates.
Do not sit with the upper part of the
body any nearer to the door than
necessary.
7
65
DRIVING
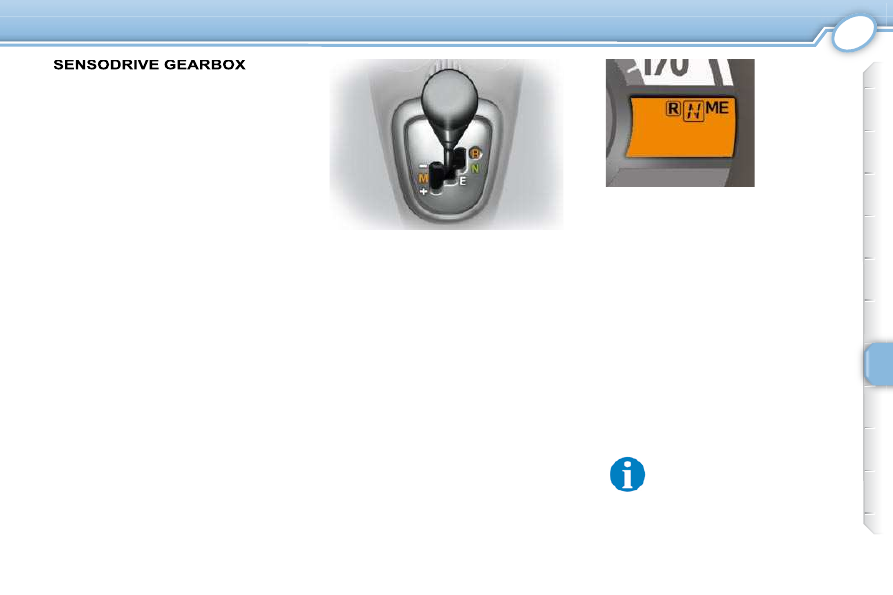
Driver information
The symbol which corresponds to the
selection, R , N , E or M and the number
of the gear engaged 1 to 5 , are displayed
in the instrument panel screen.
Driving mode
Select the driving mode by moving
the gear lever.
R everse "R". This gear will be en-
gaged when stationary or at a speed
below approximately 4 mph (6 km/h).
Engagement of reverse gear is ac-
companied by an audible signal.
N eutral "N".
Position the lever to the right in posi-
tion N , to start the engine .
E asy "E": automatic gear changing.
M anual (+/-) "M": manual gear changing.
Starting the engine
With the parking brake applied, press
the brake pedal then select position N
to start the engine.
With your foot on the brake, select
position R , E or M .
Release the parking brake, take your
foot off the brake pedal, then accel-
erate.
With the engine running, in
these three positions, an au-
dible signal is heard when
the driver’s door is opened.
The fi ve-speed " SensoDrive" gear-
box offers a choice between the ease
of automated operation or the driving
pleasure of manual gear changing .
You can change from position E to
position M and vice versa at any
time.
7
66
DRIVING
EASY mode
(automatic mode)
Select position E using the gear lever.
The gear engaged is displayed in the
instrument panel screen.
The gearbox continuously selects
the most suitable gear.
Manual mode
Place the gear lever in position M ,
then change up or down through the
gears by pressing:
-
rearwards, "+" to change up,
-
forwards, "-" to change down.
The gear engaged is displayed on
the instrument panel screen.
If the engine speed is too low, the
gearbox automatically changes down
to prevent stalling.
In the event of overheating of the
clutch, position N is selected auto-
matically and the symbol N
fl ashes
accompanied by an audible signal.
Operating fault
Stopping the engine
Before switching off the engine, you
can change to position N to be in
neutral.
In all cases, it is essential that you
apply the parking brake to immobilise
the vehicle.
With the ignition on, illumi-
nation of this warning lamp
indicates a gearbox fault.
On a slope, use the brake to
immobilise the vehicle and
place the gear lever in posi-
tion N , E or R .
Do not keep the vehicle immobilised
using the accelerator.
Always press the brake ped-
al while starting the engine.
Never select neutral N while
the vehicle is moving.
In all cases, it is essential to
apply the parking brake to
immobilise the vehicle.
Contact a CITROËN dealer or a
qualifi ed workshop.
If you press the accelerator pedal
beyond the point of resistance, the
SensoDrive gearbox changes down
to permit sharper acceleration.
8
68
CHECKS
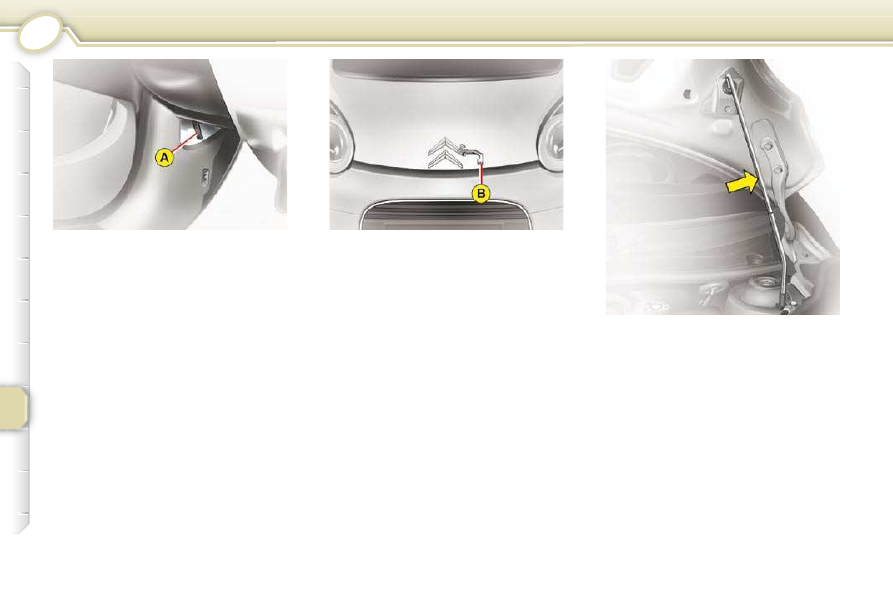
OPENING THE BONNET
On the outside : lift the safety catch B
and raise the bonnet.
Bonnet stay
Secure the stay to hold the bonnet
open.
To close
Before closing the bonnet, return the
stay to its housing.
Lower the bonnet and release it at
the end of its travel. Check that the
bonnet is fully closed.
On the inside : pull the release lever A ,
located under the dashboard.

8
69
CHECKS
1.0 LITRE PETROL ENGINE
1. Coolant reservoir
2. Screenwash reservoir
3.
Brake fl uid reservoir
4. Fusebox
5. Battery
6.
Air fi lter
7. Engine oil dipstick
8.
Engine oil fi ller cap
8
70
CHECKS
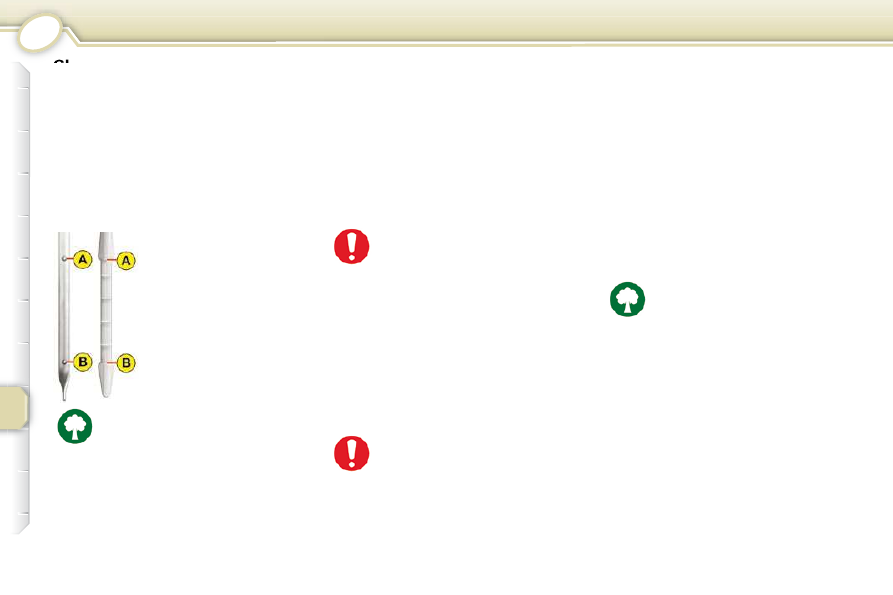
CHECKING THE LEVELS
There are two marks
on the dipstick:
A = maximum
If you fi ll past this
mark,
contact
a
CITROËN dealer or a
qualifi ed workshop.
B = minimum
Never allow the level to
fall below this mark.
Dipstick
Oil change
According to the information given in
the servicing booklet.
Changing the brake fluid
The brake fl uid must be changed at
the intervals stated, according to the
manufacturer's servicing schedule.
Use fl uids recommended by the
manufacturer, which fulfi l DOT4 stan-
dards.
Windscreen wash level
For best quality cleaning and for your
safety, we would advise that you
use products recommended by your
manufacturer.
Contact a CITROËN dealer or a
qualifi ed workshop.
Oil viscosity grade
In all cases, the oil selected must meet
the manufacturer's requirements.
Cooling system
Used oil
Avoid prolonged contact of used oil
with the skin.
Brake fl uid is harmful to health and
very corrosive.
To maintain the reliability of
engines and emission control
systems, the use of additives
in engine oil is prohibited.
Slacken the cap by 1/4 of a
turn to release the pressure
to prevent any risk of scald-
ing. When the pressure has
dropped, remove the cap and top up
the level.
Only use the fl uid recom-
mended by the manufac-
turer.
Otherwise, you risk seriously
damaging your engine.
Do not dispose of used oil,
brake fl uid or coolant into
drains or into the ground.
Empty the used oil into the
containers provided for this
purpose in the CITROËN dealer
network or at a qualifi ed workshop
(France) or at an authorised waste
disposal site.
Oil level
Check the level regularly and top up
between changes. The maximum oil
consumption is 0.5 litre per 600 miles
(1 000 km).
Check the level with the vehicle level,
engine cold, using the dipstick.
When the engine is warm, the tem-
perature of the coolant is controlled
by the engine fan. As this fan can op-
erate with the ignition key removed
and because the cooling system is
pressurised, wait for at least one hour
after the engine has stopped before
carrying out any work.
8
71
CHECKS
Oil filter
Change the fi lter regularly, in accor-
dance with the servicing schedule.
Only use products recom-
mended by CITROËN or
products of equivalent qual-
ity and specifi cation.
In order to optimise the operation
of units as important as the braking
system, CITROËN selects and offers
specifi c products.
In order to avoid damaging the elec-
trical units, high pressure washing
to clean the engine compartment is
strictly prohibited.
To check the main levels and certain
components, in accordance with the
manufacturer's servicing schedule,
refer to the pages of the servicing
booklet which correspond to your
vehicle's engine.
Battery
At the start of winter, have your bat-
tery checked by a CITROËN dealer
or a qualifi ed workshop.
Air filter and passenger
compartment filter
Have the fi lter elements replaced regu-
larly. If you drive in dusty conditions,
change them twice as often.
Brake pads
Brake pad wear depends on the style
of driving, in particular for vehicles
which are used in town, over short
distances.
Disc and drum wear
For information on disc and drum
surface wear, contact a CITROËN
dealer or a qualifi ed workshop.
Manual gearbox
Have the level checked in accord-
ance with the manufacturer's servicing
schedule.
It may be necessary to check
the thickness of the pads,
even between services.
Parking brake
Where the parking brake travel is too
great or there is a reduction in the
performance of the system, the park-
ing brake should be adjusted, even
between services.
Have the system checked by a
CITROËN dealer or a qualifi ed work-
shop.
9
72
PRACTICAL INFORMATION
Parking the vehicle
As far as possible, immobilise the
vehicle on level, stable, non-slip-
pery ground.
Apply the parking brake, switch
off the ignition and engage fi rst
gear or reverse for the manu-
al gearbox, position N for the
"SensoDrive" gearbox.
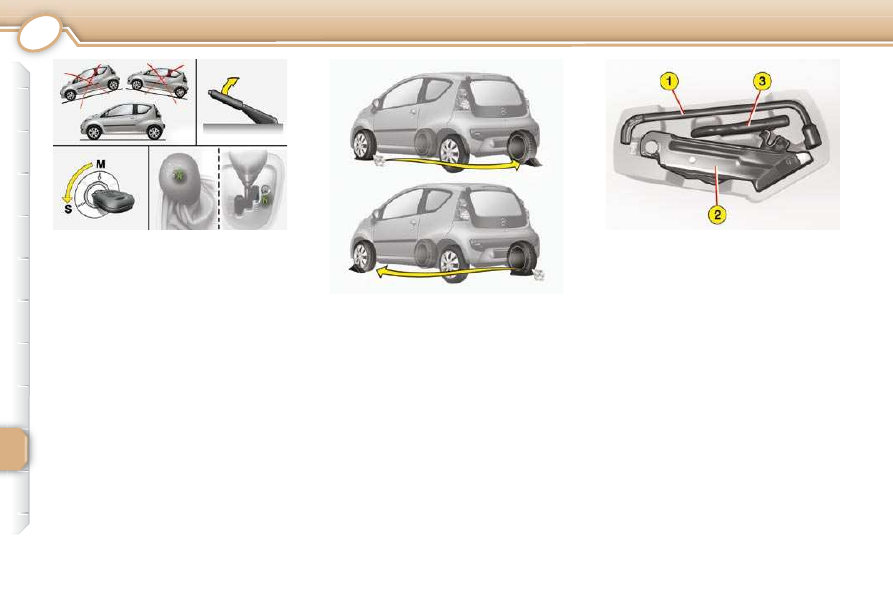
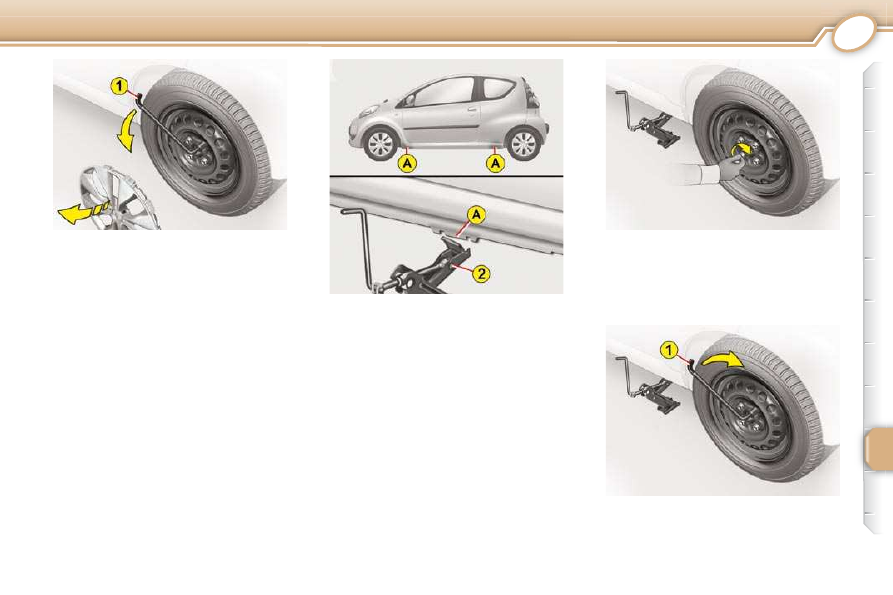
Tools
The following tools are installed in a
carrier, located in the centre of the
spare wheel:
1. Wheelbrace
2. Jack with handle
3. Removable towing eye
Access to the spare wheel and
the jack in the boot
Remove the carpet then the plas-
tic cover using the handle.
Tyre pressures
These are indicated on the label po-
sitioned on the inner pillar of the left
door, see "Identifi cation".
CHANGING A WHEEL
If necessary, chock the wheel di-
agonally opposite the wheel to be
changed.
It is imperative that you ensure
that the occupants get out of the
vehicle and wait in a safe loca-
tion.
9
73
PRACTICAL INFORMATION
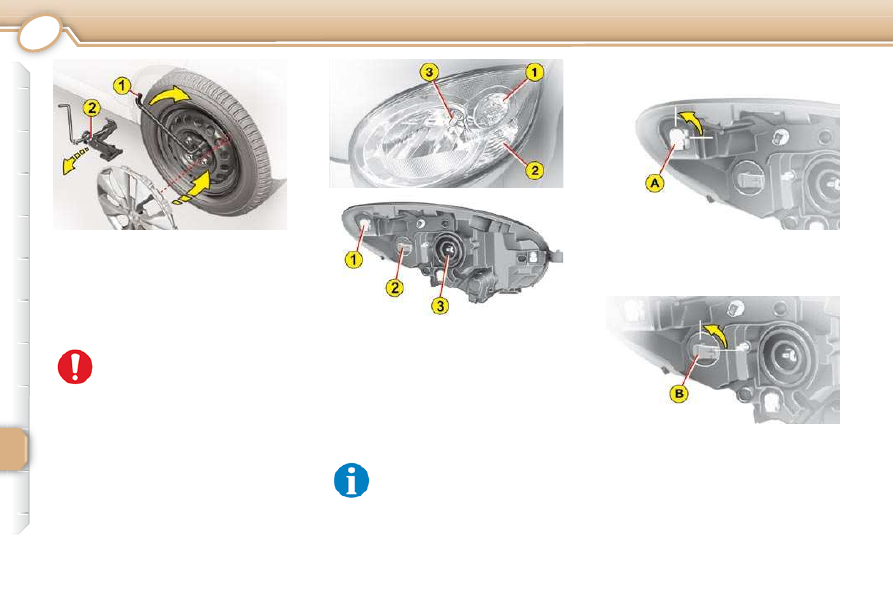
Refi tting the wheel
1. Position the wheel.
2. Screw in the bolts fully by hand.
Removing the wheel
1. Remove the trim.
2. Slacken the wheel bolts using the
wheelbrace 1 .
3. Place the jack 2 in contact with
one of the four locations A pro-
vided on the underbody, the
one closest to the wheel to be
changed.
4. Extend the jack 2 until its base is
in contact with the ground. Ensure
that the centreline of the jack base
is directly below the location A
used.
5. Lift the vehicle.
6. Remove the bolts and detach the
wheel.
3. Pre-tighten the bolts * using the
wheelbrace 1 .
* If your vehicle is fi tted with alloy wheels, when tightening the bolts it is normal
to notice that the washers do not come into contact with the spare wheel. It is
still fi xed securely.
9
74
PRACTICAL INFORMATION
CHANGING A BULB
1. Sidelamps (W5 W)
Turn the bulb holder A one quarter
of a turn and remove it.
Remove the bulb and change it.
2. Direction indicators
(PY 21 W amber)
Turn the bulb holder B one quarter
of a turn and remove it.
Turn the bulb one quarter of a
turn.
Remove the bulb and change it.
If you encounter any diffi culties, con-
tact a CITROËN dealer or a qualifi ed
workshop.
In certain climatic conditions
(low temperatures, humidity),
the presence of condensa-
tion on the internal face of
the headlamps is normal ; it disap-
pears a few minutes after the lights
are switched on.
Never go underneath a vehi-
cle supported only by a jack
(use an axle stand).
4. Fold the jack 2 and detach it.
5. Tighten the wheel bolts using the
wheelbrace 1 .
6.
Refi t the trim.
7. Store the tools and the wheel in
the boot.
The jack and the tool kit are specifi c
to your vehicle. Do not use them for
other purposes.
After changing a wheel:
-
have the tighteness of the bolts
and the pressure of the spare
wheel checked as soon as pos-
sible,
-
have the punctured wheel re-
paired and refi t it on the vehicle
as soon as possible.
Contact a CITROËN dealer or a
qualifi ed workshop.
Front lamps
1. Sidelamps
2. Direction indicators
3. Dipped/Main beam headlamps
9
75
PRACTICAL INFORMATION
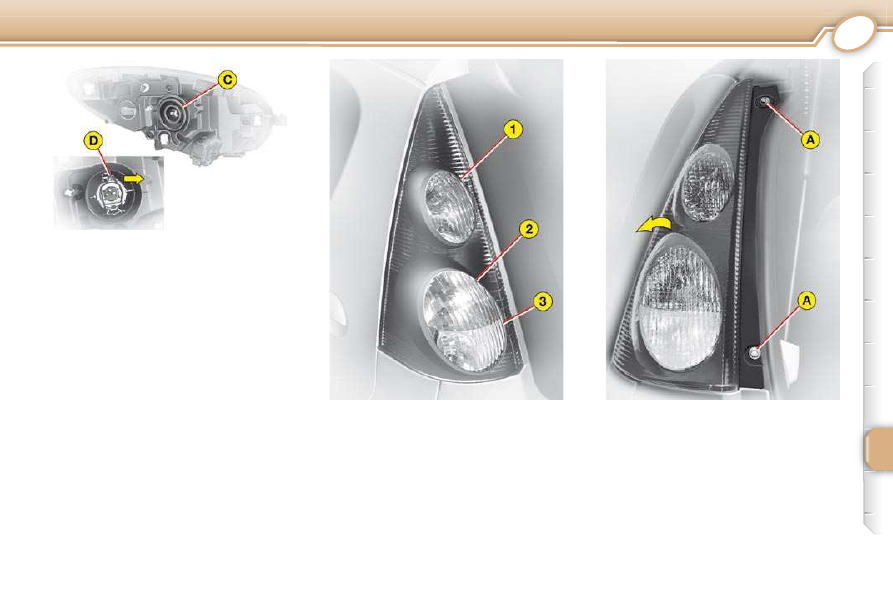
3. Dipped/Main beam headlamps
(H4 - 60/55W)
Disconnect the connector.
Remove the rubber cap C .
Push the side of the tongue D .
Remove the bulb holder and
change the bulb.
Refi t the bulb holder, the tongue
then the rubber cap.
If you encounter any diffi culties, con-
tact a CITROËN dealer or a qualifi ed
workshop.
Rear lamps
1. Brake/sidelamps
(P 21/5 W)
2. Direction indicators
(P 21 W)
3. Reversing lamp (P 21 W),
right side
These 3 bulbs are changed by re-
moving the lamp unit:
open the boot,
unscrew the two lamp fi xing nuts A ,
remove the lamp unit by pulling
outwards,
unclip the harness,
Foglamp (P 21 W), left side
Нет комментариевНе стесняйтесь поделиться с нами вашим ценным мнением.
Текст