Citroën Jumpy-Dispatch (2022 year). Manual in english — page 14
210
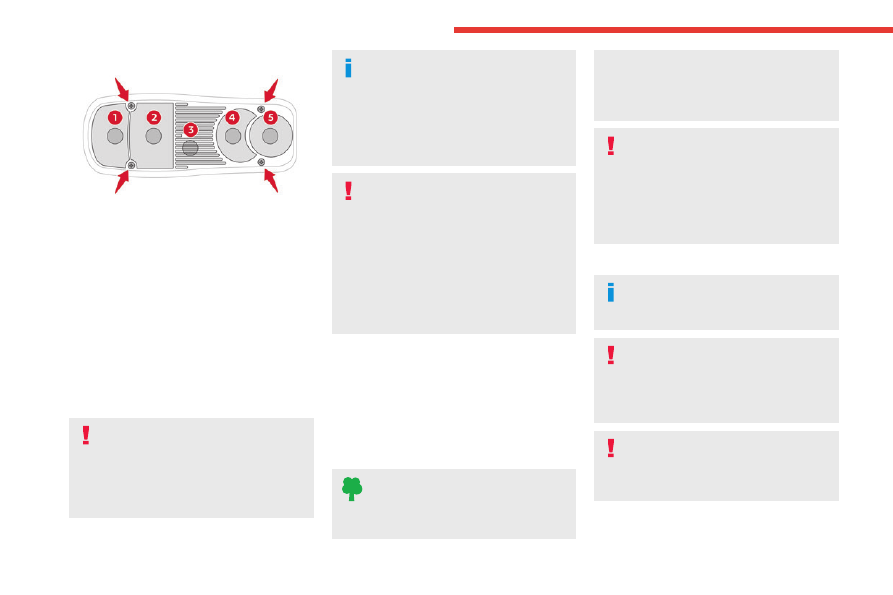
In the event of a breakdown
2.
Jack.
Used to raise the vehicle.
3.
Wheel bolt cover/wheel trim removal tool.
Depending on the vehicle's equipment, this is
used to remove the wheel bolt covers on alloy
wheels or the wheel trim on steel wheels.
4.
Socket for "anti-theft" wheel bolts.
Used to adapt the wheelbrace to the special
"anti-theft" bolts.
5.
Towing eye.
For more information on
Towing
, please
refer to the corresponding section.
These tools are specific to the vehicle
and may vary according to the level of
equipment.
Do not use them for any other purpose.
The jack must only be used to change a
wheel with a damaged or punctured tyre.
Do not use any jack other than the one
supplied with the vehicle.
If the vehicle does not have its original jack,
contact a CITROËN dealer or a qualified
workshop to obtain the one that was intended
by the manufacturer.
The jack meets European standards, as
defined in the Machinery Directive 2006/42/
CE.
The jack does not require any maintenance.
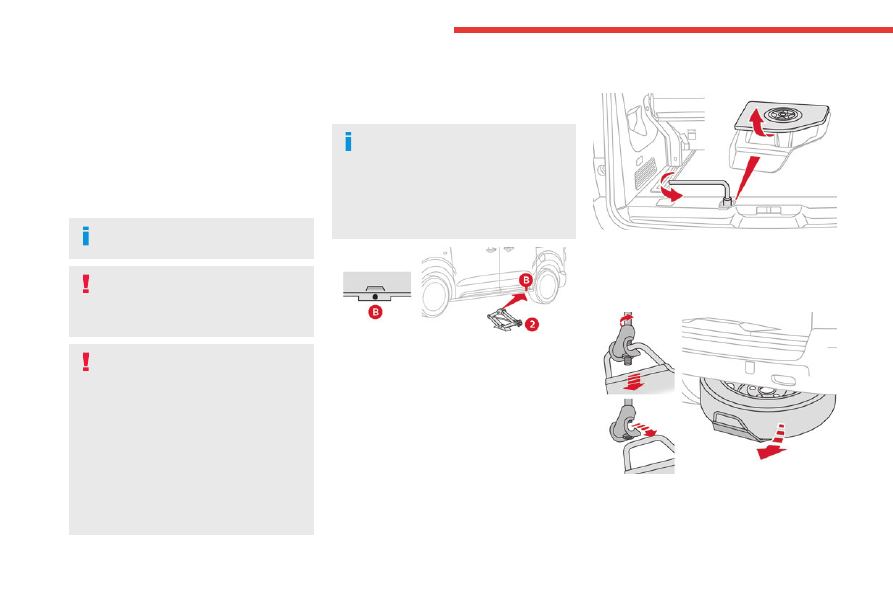
Accessing the spare wheel
► Access to the spare wheel is from the rear.
► Depending on version, open the side-hinged
doors or the tailgate.
To avoid any unwanted opening of the
electric side door(s), deactivate the
Hands-Free Tailgate Access function in the
vehicle configuration menu.
For more information on the
Hands-free
sliding side door
, refer to the corresponding
section.
► If the vehicle is fitted with a towbar, raise
the rear of the vehicle using the jack (must be
at jacking point
B
) to allow sufficient space to
remove the spare wheel.
Remove the spare wheel from the
carrier
► Access the carrier bolt, located on the rear
door sill.
► Slacken the bolt using the wheelbrace (about
14 turns) until the carrier is low enough to allow
the carrier hook to be disengaged.
► Release the carrier from the hook, take the
spare wheel and place it next to the wheel to be
changed.
-------------------------------------------------------------------------------------------------------------------------------------------------------------
211
In the event of a breakdown
8
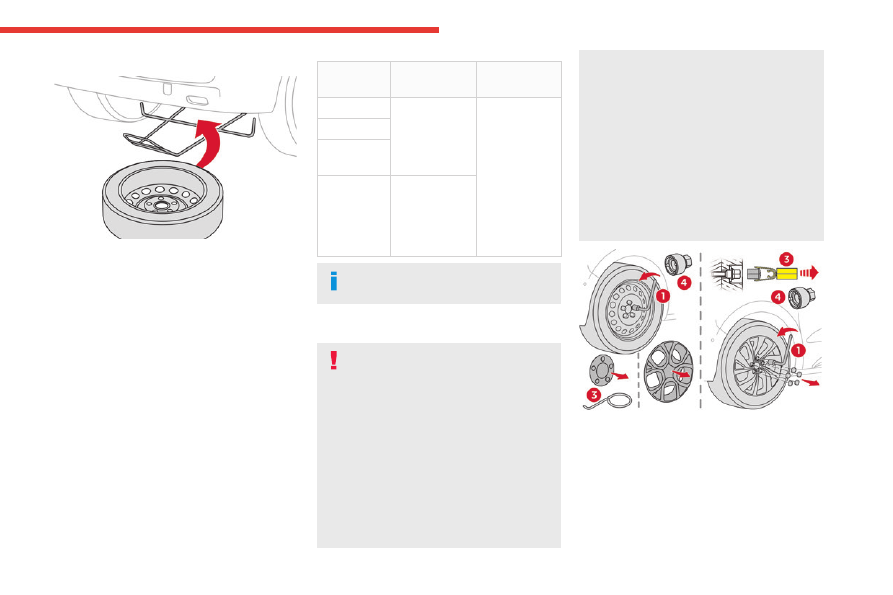
Refit the spare wheel in the carrier
► Position the wheel facing the carrier.
► Progressively return the wheel to the carrier
by pushing alternately at the left and right until it
is clear of the hook fixing area.
► Engage the carrier on the hook, then tighten
the bolt using the wheelbrace until the bolt is fully
tightened.
Tyre in the carrier
You can change the size of the tyre on the spare
wheel by following the instructions below.
Original
tyre
size
XS-M
XL
215/65 R16
Placing a
225 wheel in
the carrier is
prohibited.
There is no
restriction.
215/60 R17
215/60 R17
M&S
225/55 R17
Placing a 215
wheel in the
carrier is not
recommended
(risk of noise).
A punctured tyre of size 215 or 225 can
be placed in the carrier.
Removing a wheel
Parking the vehicle
Immobilise the vehicle where it does
not obstruct traffic: the ground must be level,
stable and non-slippery.
With a manual gearbox, engage first gear
then switch off the ignition to block the
wheels.
With an automatic gearbox, place the gear
selector in position
P
then switch off the
ignition to block the wheels.
With a drive selector, place the gear selector
in position
P
then switch off the ignition to
block the wheels.
Apply the parking brake, unless it is
programmed to automatic mode (for an
electric parking brake), and check that the
indicator lamp lights up on the instrument
panel.
Ensure that the occupants have left the
vehicle and are located in a safe place.
Never go underneath a vehicle raised using a
jack; use an axle stand.
With an electric parking brake, place a chock
against the wheel diagonally opposite to the
one being replaced.
► With a steel wheel, remove the bolt cover
using tool
3
or the wheel trim by hand.
► With an alloy wheel, remove the cover from
each of the bolts using tool
3
.
► If the vehicle is so equipped, fit security bolt
socket
4
to wheelbrace
1
to slacken the security
bolt.
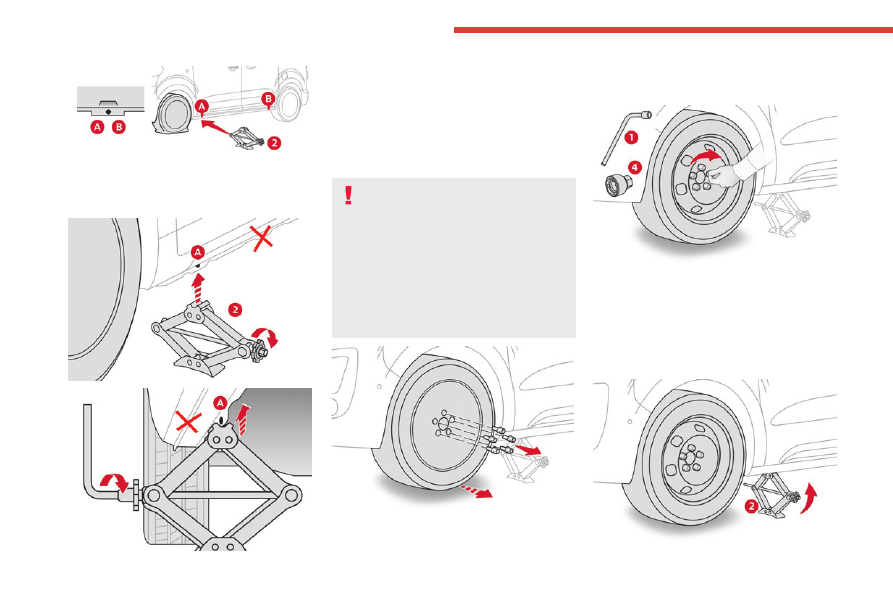
►
Slacken
(without removing) the other wheel
bolts using just wheelbrace
1
.
-------------------------------------------------------------------------------------------------------------------------------------------------------------
212
In the event of a breakdown
► Place the foot of the jack on the ground and
ensure that it is directly below the
A
or
B
jacking
point provided on the underbody, whichever is
closest to the wheel to be changed.
► Use the knob to extend the jack
2
until its
head comes into contact with jacking point
A
or
B
, whichever is used; contact surface
A
or
B
on
the vehicle must be correctly engaged with the
central part of the head of the jack.
► Raise the vehicle until there is sufficient
space between the wheel and the ground, to
then easily fit the spare (not punctured) wheel.
Risk of injury!
Ensure that the jack is stable. If the
ground is slippery or loose, the jack may slip
or collapse.
Ensure that the jack is positioned strictly at
one of the jacking points
A
or
B
under the
vehicle, making sure that the vehicle's contact
surface is correctly centred on the head of the
jack. Otherwise, there is a risk of damage to
the vehicle and/or of the jack collapsing.
► Remove the bolts and store them in a clean
place.
► Remove the wheel.
Fitting the wheel
► Fit the wheel on the hub.
► Screw in the bolts by hand as far as possible.
► If fitted to your vehicle,
pre-tighten
the anti-
theft bolt using the wheelbrace
1
fitted with the
anti-theft socket
4
.
►
Pre-tighten
the other bolts using the
wheelbrace
1
only.
-------------------------------------------------------------------------------------------------------------------------------------------------------------
213
In the event of a breakdown
8
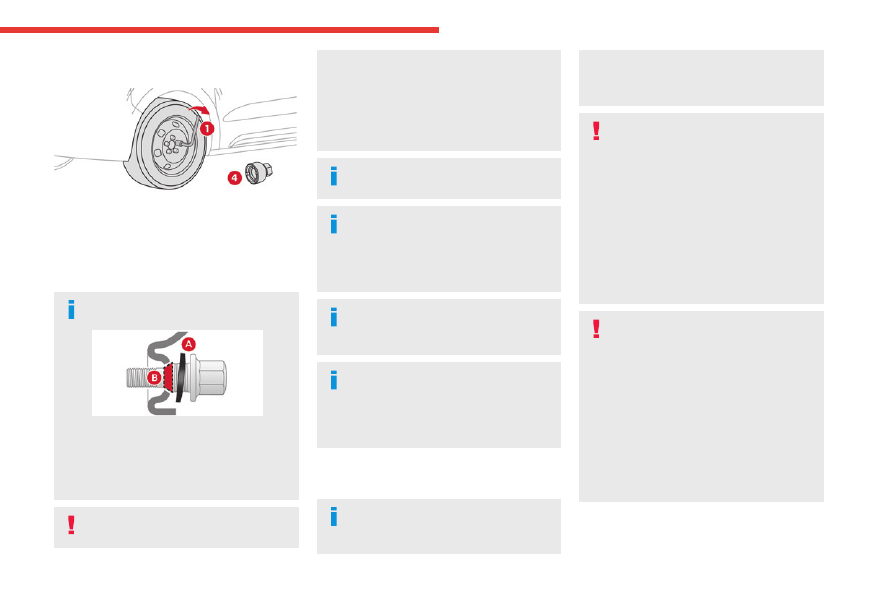
► Lower the vehicle again fully.
► Fold jack
2
and remove it.
► If fitted to your vehicle, tighten the anti-theft
bolt using the wheelbrace
1
fitted with the anti-
theft socket
4
.
►
Tighten
the other bolts using the
wheelbrace
1
only.
► Stow the tools in the tool box.
Fitting a steel or "space-saver" type
spare wheel
If the vehicle is fitted with alloy wheels, the
washers
A
do not make contact with the steel
or "space-saver" type spare wheel. The wheel
is held in place by the conical contact surface
B
of each bolt.
After changing a wheel
Stow the punctured wheel in the carrier.
Go promptly to a CITROËN dealer or a
qualified workshop.
Have the punctured tyre examined. After
inspection, the technician will advise you on
whether the tyre can be repaired or if it must
be replaced.
Some driving aid functions should be
disabled, e.g. the Active Safety Brake.
If your vehicle has tyre under-inflation
detection, check the tyre pressures and
reinitialise the system.
For more information on
Tyre under-inflation
detection
, refer to the corresponding section.
Tyre under
-inflation detection
The steel spare wheel does not have a
sensor.
Wheel with wheel trim
When refitting the wheel
, refit the wheel
trim, starting by aligning the cutout with the
valve and then pushing the trim into place all
round its edge with the palm of your hand.
Changing a bulb
In some weather conditions (e.g. low
temperature or humidity), misting on the
internal surface of the glass of the headlamps
and rear lamps is normal, and will disappear
after the lamps have been on for a few
minutes.
The headlamps have polycarbonate
lenses with a protective coating:
–
Do not clean them with a dry or abrasive
cloth, nor with detergent or solvent
products.
– Use a sponge and soapy water or a pH
neutral product.
– When using a high-pressure washer on
persistent marks, do not keep the lance
directed towards the headlamps, lamps or
their edges for too long, so as not to damage
their protective coating and seals.
Changing a bulb must only be done with
the ignition off and after the headlamp /
lamp has been switched off for several
minutes - risk of serious burns!
Do not touch the bulb directly with your
fingers; use a lint-free cloth.
It is essential only to use anti-ultraviolet
(UV) type bulbs, so as not to damage the
headlamp.
Always replace a failed bulb with a new bulb
of the same type and specification. To avoid
lighting imbalance, replace the bulbs in pairs.
-------------------------------------------------------------------------------------------------------------------------------------------------------------
214
In the event of a breakdown
Halogen bulbs (Hx)
To ensure good quality lighting, check
that the bulb is correctly positioned in its
housing.
Opening the bonnet/Accessing the
bulbs
Proceed with caution when the engine is hot -
risk of burns!
Take care with objects or clothing that could
be caught in the blades of the cooling fan -
risk of strangulation!
After changing a bulb
To refit, carry out the operations in
reverse order to removal.
Close the protective cover very carefully to
guarantee the sealing of the lamps.
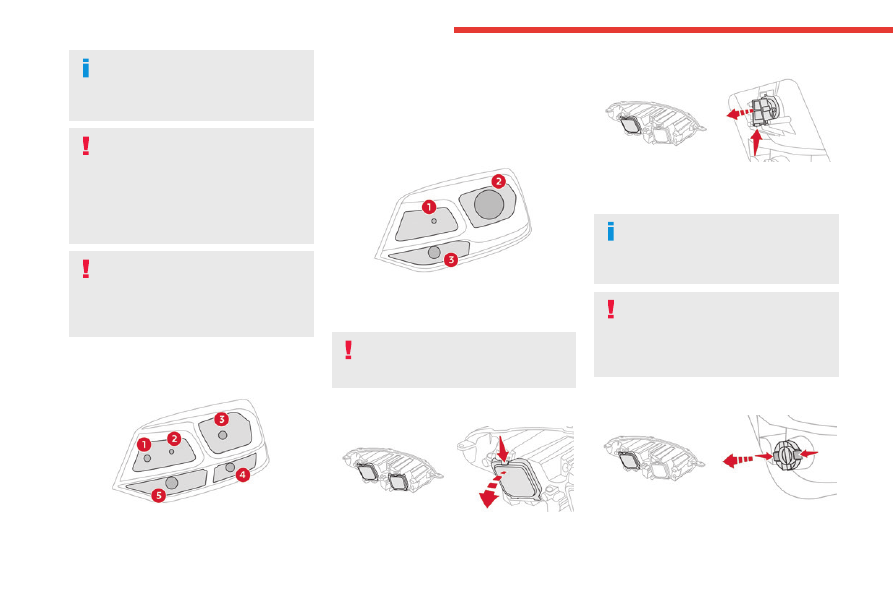
Model with halogen
headlamps
1.
Sidelamps (W5W-5W)
2.
Main beam headlamps (H1-55W)
3.
Dipped beam headlamps (H7-55W)
4.
Daytime running lamps (W21W LL-21W)
5.
Direction indicators (PY21W-21W amber)
Model with Xenon
headlamps
1.
Main beam headlamps (H1-55W)
2.
Dipped beam headlamps (D8S-25W)
3.
Direction indicators (PY21W-21W amber)
Be aware of the zone behind the right
lamp (vehicle direction), which may be
hot with a risk of burning (degassing hoses).
Accessing the bulbs
► Press the upper clip on the cover then tilt it
backwards to remove it.
Dipped beam headlamps
► Press the lower clip on the connector and
remove the assembly of connector and bulb.
► Pull out the bulb and replace it.
When refitting the connector and bulb in
the lamp unit, correctly position the
assembly in its housing until it clicks into
place.
Do not touch the Xenon lamps (D8S)
– risk of electrocution!
If you need to replace this type of bulb, you
must contact a CITROËN dealer or a qualified
workshop.
Daytime running lamps
► Press the two side clips on the connector and
remove the assembly of connector and bulb.
► Pull out the bulb and replace it.
-------------------------------------------------------------------------------------------------------------------------------------------------------------
215
In the event of a breakdown
8
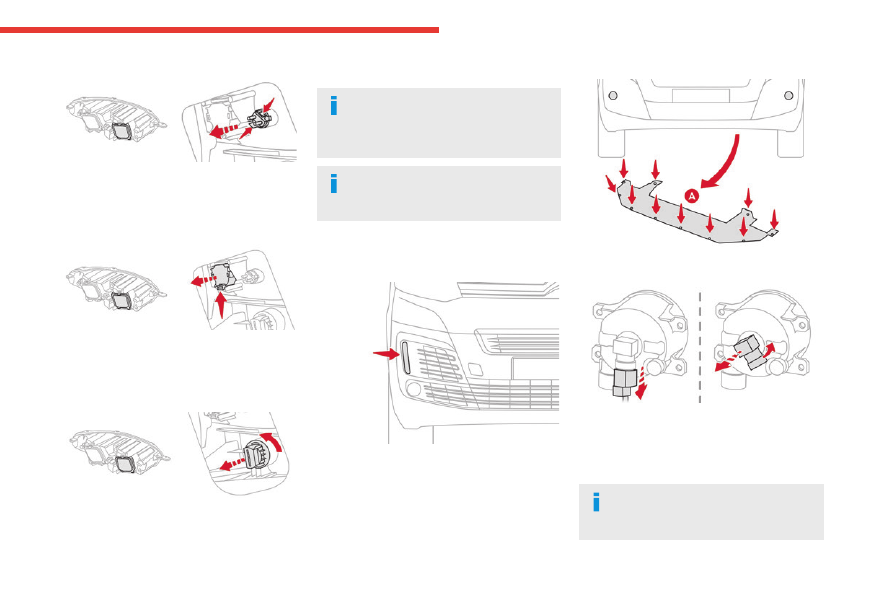
Sidelamps
► Press the two side clips on the connector and
remove the assembly of connector and bulb.
► Pull out the bulb and replace it.
Main beam headlamps
► Press the lower clip on the connector and
remove the assembly of connector and bulb.
► Pull out the bulb and replace it.
Direction indicators
► Turn the bulb holder a quarter turn
anti-clockwise.
► Remove the bulb holder and replace the
faulty bulb.
Rapid flashing of a direction indicator
lamp (left or right) indicates that one of
the bulbs on the corresponding side has
failed.
Amber-coloured bulbs must be replaced
by bulbs with identical specifications and
colour.
Daytime running lamps/
sidelamps
For the replacement of these bulbs, contact a
CITROËN dealer or a qualified workshop.
A replacement kit for the LEDs is available from
CITROËN dealers.
Front foglamps (H11-55W)
► Underneath the front bumper, slacken the
bolts on deflector
A
, then remove it.
► Press the locking clip and disconnect the
connector.
► Unscrew the bulb holder a quarter turn anti-
clockwise and remove it.
► Replace the faulty bulb.
You can also contact a CITROËN dealer
or a qualified workshop to replace these
bulbs.
-------------------------------------------------------------------------------------------------------------------------------------------------------------
216
In the event of a breakdown
Direction indicator side
repeater
– Push the repeater towards the rear and
release it.
– When refitting, engage the repeater towards
the front and then slide it backwards.
Amber coloured bulbs (direction indicators and
side repeaters) must be replaced with bulbs of
identical specification and colour.
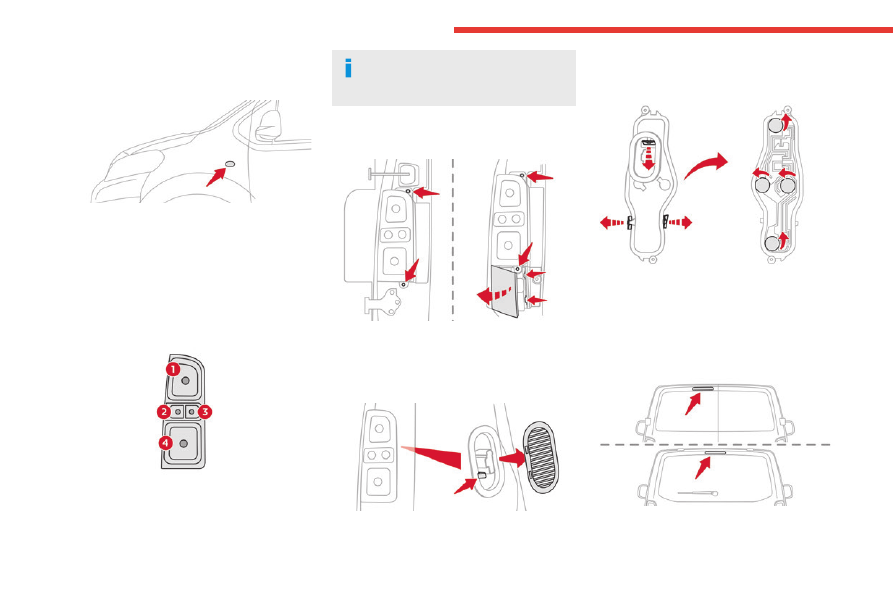
Rear lamps
1.
Brake lamps/Sidelamps (P21/5W-21/5W)
2.
Direction indicators (PY21W-21W amber)
3.
Reversing lamps (P21W-21W)
4.
Foglamps/Sidelamps (P21/4W-21/4W)
For vehicles with interior trim, contact a
CITROËN dealer or a qualified workshop
to have the work done.
► Identify the defective lamp and then,
depending on the version, open the rear doors or
the tailgate.
► With side-hinged doors, unscrew the 2 fixing
screws from the outside.
► With the tailgate, unclip the plastic trim from
the outside and then tilt it outwards to remove it.
Then unscrew the 2 fixing screws.
► From the inside, and depending on the
version, remove the ventilation grille.
► While holding the lamp in place, press the
clip on the inside then carefully remove the lamp.
► Disconnect the electrical connector.
► Spread the 3 lugs slightly, then extract the
bulb holder.
► Remove the faulty bulb by pressing lightly on
it, then turning it a quarter turn clockwise.
► Replace the bulb.
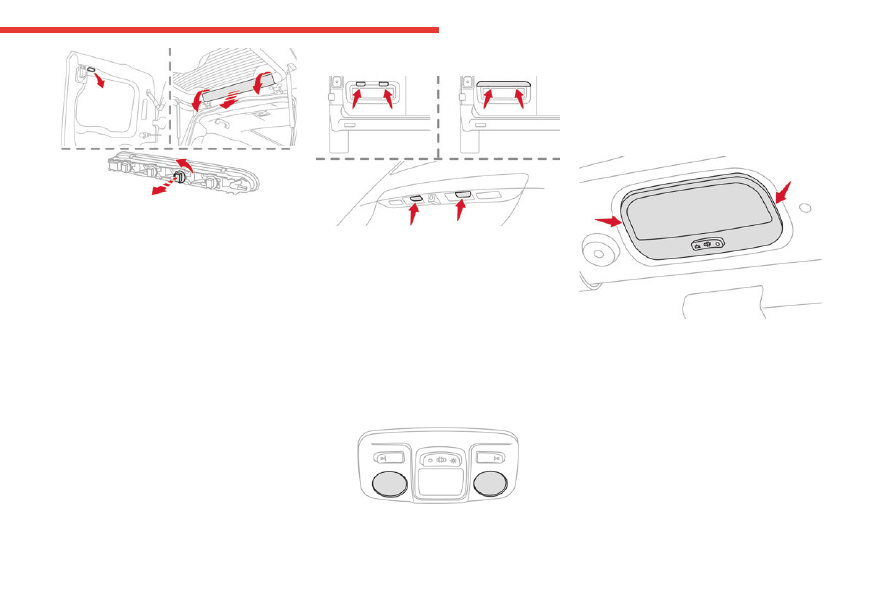
Third brake lamp (W5W - 5W)
► Depending on version, open the rear left-
hand door or tailgate.
-------------------------------------------------------------------------------------------------------------------------------------------------------------
217
In the event of a breakdown
8
► With side-hinged doors, remove the plastic
cover with the aid of a screwdriver.
► With a tailgate, unclip the trim at each end,
rotating it from bottom to top, then unclip the
centre clips to remove it.
► Using a screwdriver through the aperture,
push the lamp towards the outside.
► Disconnect the electrical connector and then
remove the lamp.
► Unscrew the bulb holder a quarter turn anti-
clockwise and replace the faulty bulb.
To refit, press on the lamp to clip it into place.
Number plate lamps (W5W-W)
► Insert a thin screwdriver into one of the cut-
outs on the exterior of the lens.
► Push it outwards to unclip it.
► Remove the lens and replace the faulty bulb.
To refit, press the lens to clip it in.
Courtesy lamps (front and
rear)
LED courtesy lamps
For the replacement of these bulbs, contact a
CITROËN dealer or a qualified workshop.
A replacement kit for the LEDs is available from
CITROËN dealers.
Courtesy lamps with bulb
W5W-5W
► Unclip the lens by inserting a thin screwdriver
into the slots at each side of the courtesy lamp.
► Remove the bulb and change it.
To refit, clip the lens in place and ensure that it
is secure.
-------------------------------------------------------------------------------------------------------------------------------------------------------------
218
In the event of a breakdown
Platform cab (rear lamps)
1.
Direction indicators (P21W-21W).
2.
Brake lamps (P21W-21W).
3.
Sidelamps (R10W-10W).
4.
Reversing lamps (P21W-21W).
5.
Foglamps (P21W-21W).
► Locate the faulty bulb.
► Unscrew the 4 fixing screws from the lens
unit and remove it.
► Remove the faulty bulb by pressing lightly on
it, then turning it a quarter turn clockwise.
► Change the bulb.
Fuses
Changing a fuse
All work must be carried out only by a
CITROËN dealer or a qualified workshop
The replacement of a fuse by a third party
could cause a serious malfunction of the
vehicle.
Installing electrical accessories
The vehicle's electrical system is
designed to operate with standard or optional
equipment.
Before fitting other electrical equipment
or accessories to your vehicle, contact a
CITROËN dealer or a qualified workshop.
CITROËN accepts no responsibility for
the cost incurred in repairing the vehicle
or for rectifying malfunctions resulting from
the installation of accessories not supplied or
not recommended by CITROËN and not
installed in accordance with its
recommendations, in particular when the
combined power consumption of all of the
additional equipment connected exceeds 10
milliamperes.
12 V battery / Accessory
battery
Procedure for starting the engine using another
battery or for charging a discharged battery.
Lead-acid starter batteries
These batteries contain harmful
substances (sulphuric acid and lead).
They must be disposed of in accordance
with regulations and must never under any
circumstances be discarded with household
waste.
Dispose of used batteries at a designated
collection point.
Protect your eyes and face before
handling the battery.
All operations on the battery must be carried
out in a well ventilated area and away from
naked flames and sources of sparks, to avoid
any risk of explosion or fire.
Wash your hands afterwards.
Electric motor
Flat accessory battery
It is no longer possible to start the motor
or recharge the traction battery.
Precautions before working on the
accessory battery
Select mode
P
, switch off the ignition, check
that the instrument panel is off and that the
vehicle is not being charged.
Jump-starting another vehicle
Do not use the accessory battery to
jump-start another vehicle or to charge
another vehicle's battery.
-------------------------------------------------------------------------------------------------------------------------------------------------------------
219
In the event of a breakdown
8
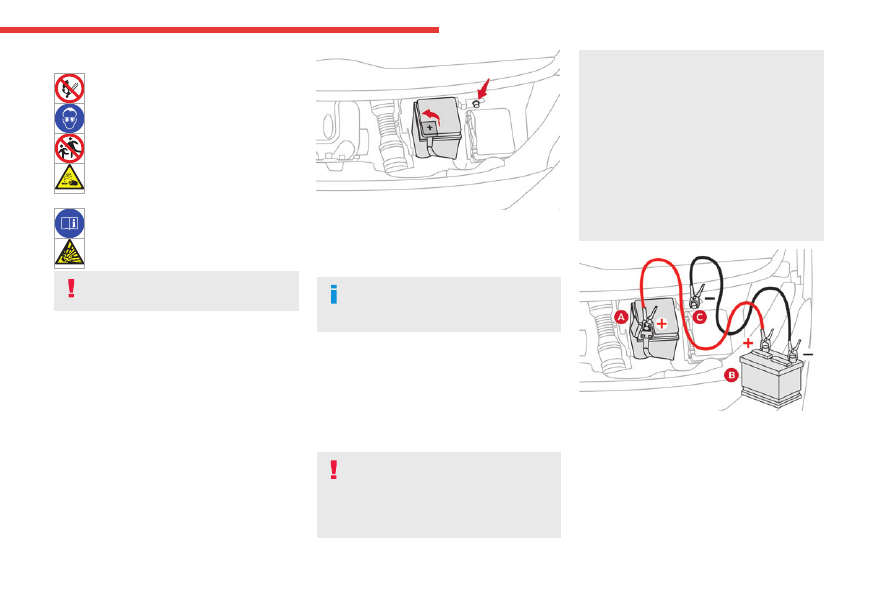
Symbols
No sparks or naked flames, no smoking.
Always protect your eyes. Explosive
gases can cause blindness and injury.
Keep the vehicle's battery out of the reach
of children.
The vehicle's battery contains sulphuric
acid which can make you go blind or
cause severe burns.
For more information, refer to the
handbook.
Explosive gases can be present close to
the battery.
Always replace the battery with one of
equivalent specification.
Access to the battery
The battery is located under the bonnet.
► Open the bonnet using the interior release
lever, then the exterior safety catch.
► Secure the bonnet stay.
► Remove the plastic cover to access the (+)
terminal, if your vehicle has one.
The battery (-) terminal is not accessible.
There is a remote earth point near the battery.
For more information on the
Bonnet
and
the
Engine
, refer to the corresponding
sections.
Starting using another
battery
If the vehicle's battery is flat, the engine can be
started using a backup battery (either external or
from another vehicle) and jump leads or using a
battery booster.
Never start the engine by connecting a
battery charger.
Never use a 24 V or higher battery booster.
Check beforehand that the backup battery
has a nominal voltage of 12 V and a capacity
at least equal to that of the discharged
battery.
The two vehicles must not be in contact with
each other.
Switch off all electricity-consuming equipment
on both vehicles (audio system, wipers,
lighting, etc.).
Make sure that the jump leads are well away
from the engine’s moving parts (fan, belt,
etc.).
Do not disconnect the (+) terminal while the
engine is running.
► Lift the plastic cover on the (+) terminal, if the
vehicle has one.
► Connect the red cable to the (+) terminal of
flat battery
A
(at the metal elbow), then to the
(+) terminal of the backup battery
B
or of the
booster.
► Connect one end of the green or black cable
to the (-) terminal of the backup battery
B
or of
-------------------------------------------------------------------------------------------------------------------------------------------------------------
220
In the event of a breakdown
the booster (or to an earth point on the assisting
vehicle).
► Connect the other end of the green or black
cable to the earth point
C
.
► Start the engine on the assisting vehicle and
leave it running for a few minutes.
► Operate the starter on the broken down
vehicle and let the engine run.
If the engine does not start immediately, switch
off the ignition and wait a few moments before
trying again.
► Wait for it to return to idle.
► Disconnect the jump leads
in reverse order
.
► Refit the plastic cover to the (+) terminal, if
the vehicle has one.
► Allow the engine to run for at least
30 minutes, with the vehicle stationary, so that
the battery reaches an adequate state of charge.
Driving immediately without having
reached a sufficient level of charge may
affect some of the vehicle's functions (e.g.
Stop & Start).
To disconnect, proceed in reverse order.
Automatic gearbox
Never try to start the engine by pushing
the vehicle.
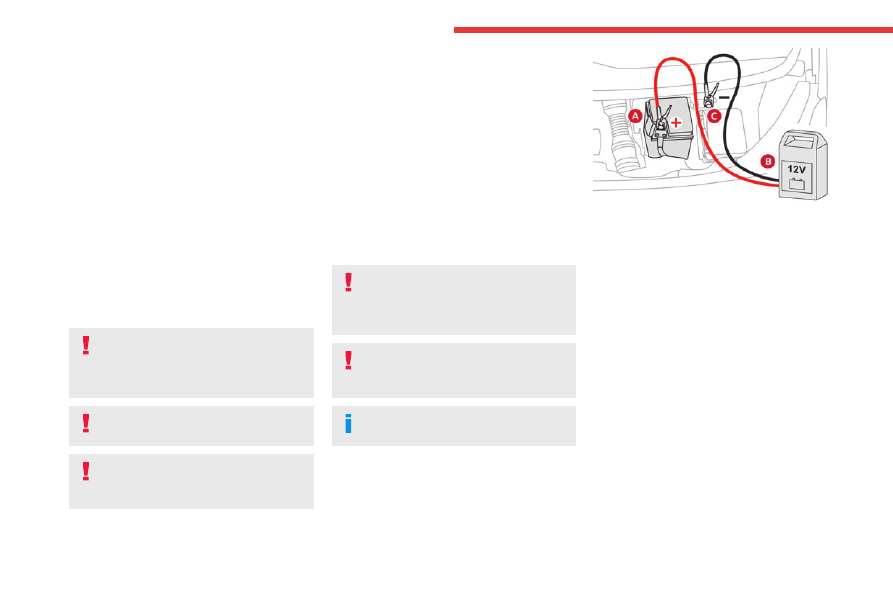
Charging the battery using a
battery charger
For optimum service life of the battery, it is
essential to maintain an adequate state of
charge.
In some circumstances, it may be necessary to
charge the battery:
– When using the vehicle mainly for short
journeys.
– If the vehicle is to be taken off the road for
several weeks.
Contact a CITROËN dealer or a qualified
workshop.
To charge the vehicle's battery yourself,
use only a charger compatible with
lead-acid batteries with a nominal voltage of
12 V.
Follow the instructions provided by the
manufacturer of the charger.
Never reverse polarities.
It is not necessary to disconnect the
battery.
► Switch the ignition off.
► Switch off all electrical consumers (audio
system, lighting, wipers, etc.).
► Switch off charger
B
before connecting
the cables to the battery, so as to avoid any
dangerous sparks.
► Ensure that the charger cables are in good
condition.
► Lift the plastic cover on the (+) terminal, if the
vehicle has one.
► Connect the cables of charger
B
as follows:
• the positive (+) red cable to the (+) terminal
of battery
A
.
• the negative (-) black cable to earth point
C
on the vehicle.
► At the end of the charging operation, switch
off charger
B
before disconnecting the cables
from battery
A
.
-------------------------------------------------------------------------------------------------------------------------------------------------------------
221
In the event of a breakdown
8
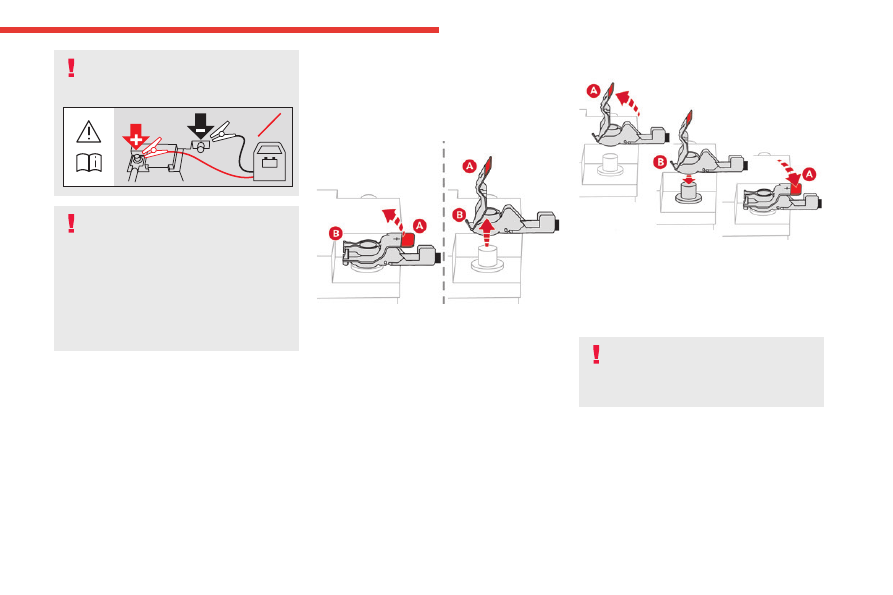
If this label is present, use only a 12 V
charger to avoid causing irreversible
damage to the electrical components.
24V
12V
Frozen battery
Never try to charge a frozen battery - risk
of explosion!
If the battery has frozen, have it checked by a
CITROËN dealer or by a qualified workshop,
who will verify that the internal components
have not been damaged and that the case
has not cracked, which could lead to a risk of
leakage of toxic and corrosive acid.
Disconnecting/reconnecting
the battery
In order to maintain an adequate state of
charge for starting the engine, we recommend
disconnecting the battery if the vehicle is to be
unused for an extended period.
Before disconnecting the battery:
► Close all openings (doors, tailgate, windows).
► Switch off all electricity-consuming devices
(audio system, wipers, lamps, etc.).
► Switch off the ignition and wait for 4 minutes.
After accessing the battery, it is only necessary
to disconnect the (+) terminal.
Quick-release terminal clamp
Disconnecting the (+) terminal
► Depending on equipment, lift the plastic cover
on the
(+)
terminal.
► Raise lever
A
fully to release clamp
B
.
► Remove clamp
B
by lifting it off.
Reconnecting the (+) terminal
► Raise lever
A
fully.
► Refit open clamp
B
on the
(+)
terminal.
► Push clamp
B
fully down.
► Lower lever
A
to lock clamp
B
.
► Depending on equipment, lower the plastic
cover on the
(+)
terminal.
Do not force the lever when pressing on
it, as if the clamp is not positioned
correctly, locking will then not be possible.
Start the procedure again.
Following reconnection
After reconnecting the battery, turn on the
ignition and wait 1 minute before starting the
engine, to enable the electronic systems to
initialise.
If minor problems nevertheless persist following
this operation, contact a CITROËN dealer or a
qualified workshop.
-------------------------------------------------------------------------------------------------------------------------------------------------------------
222
In the event of a breakdown
Referring to the relevant section, reinitialise
certain equipment:
– Remote control key or electronic key
(depending on version).
– Electric windows.
– Date and time.
– Preset radio stations.
The Stop & Start system may not be
operational during the trip following the
first engine start.
In this case, the system will only be available
again after a continuous period with the
vehicle immobilised, the duration of which
depends on the exterior temperature and the
state of charge of the battery (up to about 8
hours).
Towing the vehicle
Procedure for having your vehicle towed or
for towing another vehicle using a removable
mechanical device.
General recommendations
Observe the legislation in force in the
country where you are driving.
Check that the towing vehicle is heavier than
the towed vehicle.
The driver must remain at the wheel of the
towed vehicle and must have a valid driving
licence.
When towing a vehicle with all four wheels on
the ground, always use an approved towbar;
ropes and straps are prohibited.
The towing vehicle must move off gently.
When the vehicle is towed with its engine
off, there is no longer braking and steering
assistance.
A professional recovery service must
be called in the following cases:
– broken down on a motorway or main road;
– not possible to put the gearbox into neutral,
unlock the steering, or release the parking
brake;
– not possible to tow a vehicle with an
automatic gearbox, with the engine running;
– towing with only two wheels on the ground;
– four-wheel drive vehicle;
– no approved towbar available.
Before towing the vehicle, it is essential
to put the vehicle in free-wheeling mode.
For more information on
Free-wheeling
, refer
to the corresponding section.
Electric motor
An electric vehicle cannot under any
circumstances be used to tow another
vehicle.
However, it may be used, for example, to exit
a rut.
With a manual gearbox, place the gear
lever in neutral.
With an automatic gearbox, place the gear
selector in position
N
.
Failure to adhere to this instruction may lead
to damage to some braking components and
the lack of braking assistance on restarting
the engine.
-------------------------------------------------------------------------------------------------------------------------------------------------------------

223
In the event of a breakdown
8
Towing constraints
Type of vehicle
(engine/gearbox)
Front wheels on the
ground
Rear wheels on the
ground
Flatbed
4 wheels on the ground
with towbar
Internal combustion/Manual
Internal combustion/Automatic
Electric
In case of battery or electric parking brake failure, it is essential to call a professional using flatbed recovery vehicles (excluding manual gearbox).
Accessing the towing eye
The towing eye is stowed in the tool box.
For more information on the
Tool box
,
refer to the corresponding section.
Towing your vehicle
To access the front screw thread:
– Slide a finger from the centre of the cover
plate to the upper corner (as shown above) to
unclip it.
To be towed:
► Screw the towing eye in fully.
► Install the towbar.
► Put the gearbox into neutral.
Failure to observe this instruction could
result in damage to certain components
(e.g. braking, transmission) and to the
absence of braking assistance the next time
the engine is started.
Never tow the vehicle with the driving
wheels on the ground and the engine off.
► Unlock the steering and release the parking
brake.
► Switch on the hazard warning lamps on both
vehicles in accordance with the legislation in
force in the country in which you are driving.
► Move off gently, drive slowly and only for a
short distance.
-------------------------------------------------------------------------------------------------------------------------------------------------------------
224
In the event of a breakdown
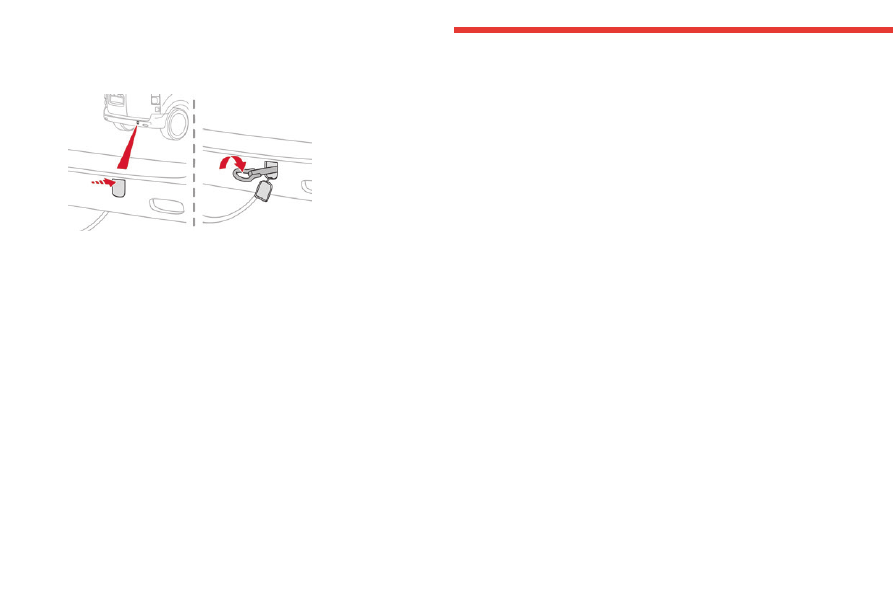
Towing another vehicle
To access the rear screw thread:
– Press the cover (as shown above) to unclip it.
To tow:
► Screw the towing eye in fully.
► Install the towbar.
► Switch on the hazard warning lamps on both
vehicles.
► Move off gently, drive slowly and only for a
short distance.
-------------------------------------------------------------------------------------------------------------------------------------------------------------
225
Technical data
9
Engine technical data and
towed loads
Engines
The engine characteristics are given in the
vehicle's registration document, as well as in
sales brochures.
Only the values available at the time of
publication are presented in the tables.
Contact a CITROËN dealer or a qualified
workshop to obtain missing values.
The maximum power corresponds to the
value type-approved on a test bed, under
conditions defined by European legislation
(Directive 1999/99/EC).
For more information, contact a CITROËN dealer
or a qualified workshop.
Weights and towed loads
The weights and towed loads relating to
the vehicle are indicated on the registration
document, as well as in sales brochures.
These values are also indicated on the
manufacturer's plate or label.
For more information, contact a CITROËN dealer
or a qualified workshop.
The GTW (Gross Train Weight) and towed load
values indicated are valid up to a maximum
altitude of 1,000 metres. The towed load value
must be reduced by 10% for each additional
1,000 metres of altitude.
The maximum authorised nose weight
corresponds to the weight permitted on the
towball.
When exterior temperatures are high, the
vehicle performance may be limited in
order to protect the engine. When the exterior
temperature is higher than 37°C, reduce the
towed weight.
Towing even with a lightly loaded vehicle
can adversely affect its road holding.
Braking distances are increased when towing
a trailer.
When using a vehicle to tow, never exceed
a speed of 62 mph (100 km/h) (observe the
local legislation in force).
-------------------------------------------------------------------------------------------------------------------------------------------------------------
Нет комментариевНе стесняйтесь поделиться с нами вашим ценным мнением.
Текст