Jaguar XJ (X350). Service manual — part 1278

•
Is the resistance greater than 10 Kohms?
-> Yes
An intermittent fault may be present in the wiring harness. Visually check for chaffed wires or other
physical damage to the harness. Refer to the warranty policy and procedures manual if a module is
suspect.
-> No
REPAIR the short circuit. For additional information, refer to the wiring diagrams. Clear the DTC, test
the system for normal operation.
G552802t10 : CHECK THE COMMAND CIRCUIT FOR HIGH RESISTANCE
1. Key off. 2. Disconnect the ECM connector, C101 3. Key on, engine off. 4. Measure the resistance
between:
C073, harness side C101, harness side
Pin 02
Pin H1
•
Is the resistance less than 10 ohms?
-> Yes
An intermittent fault may be present in the wiring harness. Visually check for chaffed wires or other
physical damage to the harness.
-> No
REPAIR the high resistance circuit. For additional information, refer to the wiring diagrams. Clear the
DTC, test the system for normal operation.
PINPOINT TEST G552802p3 : BATTERY
CABLE VOLT DROP
G552802t11 : CHECK FOR GENERATOR OUTPUT
1. Key off. 2. Measure and record the voltage between:
Battery
Battery
Positive terminal Negative terminal
3. Key on, engine running.

Allow to idle 4. Switch off all electrical loads, including heater blowers. 5. Measure and record the
voltage between:
Battery
Battery
Positive terminal Negative terminal
•
Is the voltage greater than in step 2?
-> Yes
GO to Pinpoint Test G552802t12.
-> No
CHECK the connections at either end of the circuit for cleanliness and security. Check for high
resistance in the circuit. Clean or replace as necessary. Check that the generator is charging. Test the
system for normal operation.
G552802t12 : CHECK FOR VOLT DROP BETWEEN THE BATTERY AND THE
GENERATOR
1. Switch on all lights, select maximum heater blower speed, and turn on the rear heated screen. 2.
Measure the voltage between:
Generator
Battery
Connector, ST07 Positive terminal
•
Is the voltage less than 0.5 volts?
-> Yes
An intermittent fault may be present in the wiring harness. Visually check for chaffed wires or other
physical damage to the harness. Check for DTCs indicating another cause of the concern.
-> No
CHECK the connections at either end of the circuit for cleanliness and security. Check for high
resistance in the circuit. Clean or replace as necessary. Test the system for normal operation.
PINPOINT TEST G552802p4 :
GENERATOR VOLTAGE SENSE
CIRCUIT
www.
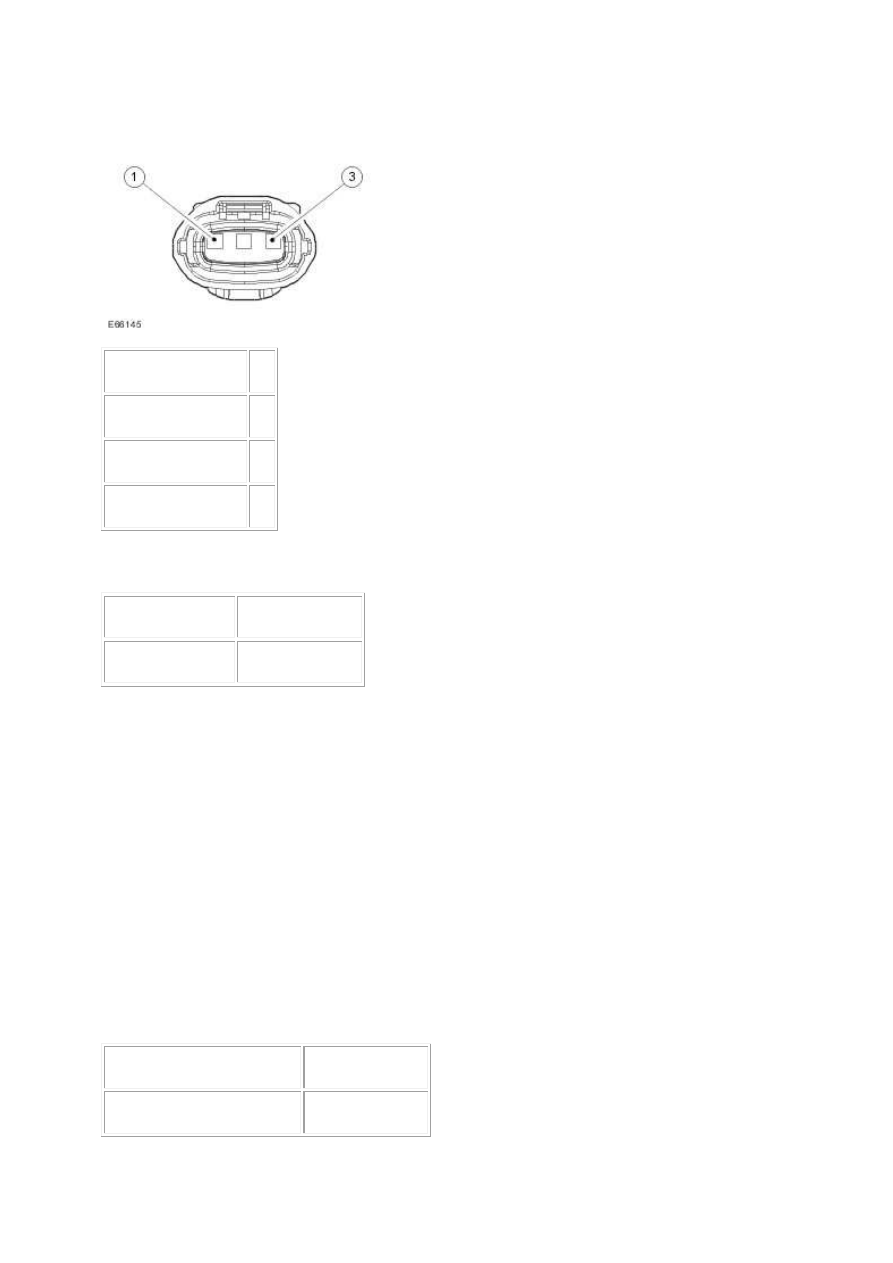
G552802t14 : CHECK THE VOLTAGE AT THE GENERATOR SENSE CIRCUIT
1.
Circuit
Pin
Voltage sense circuit 01
Altcom
02
Altmon
03
2. Key off. 3. Disconnect the generator connector, C073. 4. Measure the voltage between:
C073, harness side
Battery
Pin 01
Negative terminal
•
Is the voltage greater than 10 volts?
-> Yes
Voltage sense circuit is correct. GO to Pinpoint Test G552802p3.
-> No
GO to Pinpoint Test G552802t15.
G552802t15 : CHECK THE VOLTAGE AT THE REAR POWER DISTRIBUTION
BOX
1. Key off. 2. Remove fuse 30 of the rear power distribution box. 3. Measure the voltage between:
Rear power distribution box
Battery
Fuse 30, input pin
Negative terminal

•
Is the voltage greater than 10 volts?
-> Yes
GO to Pinpoint Test G552802t16.
-> No
REPAIR the power supply circuit to the rear power distribution box. For additional information, refer
to the wiring diagrams. Clear the DTC, test the system for normal operation.
G552802t16 : CHECK THE VOLTAGE SENSE CIRCUIT FOR HIGH RESISTANCE
1. Measure the resistance between:
C073, harness side Rear power distribution box
Pin 01
Fuse 30, output pin
•
Is the resistance less than 10 ohms?
-> Yes
RECHECK the fuse. An intermittent fault may be present in the wiring harness. Visually check for
chaffed wires or other physical damage to the harness.
-> No
REPAIR the high resistance circuit. For additional information, refer to the wiring diagrams. Clear the
DTC, test the system for normal operation.
www.
Нет комментариевНе стесняйтесь поделиться с нами вашим ценным мнением.
Текст