Jaguar XK. Service manual — part 58
235
Wheels and tires
R
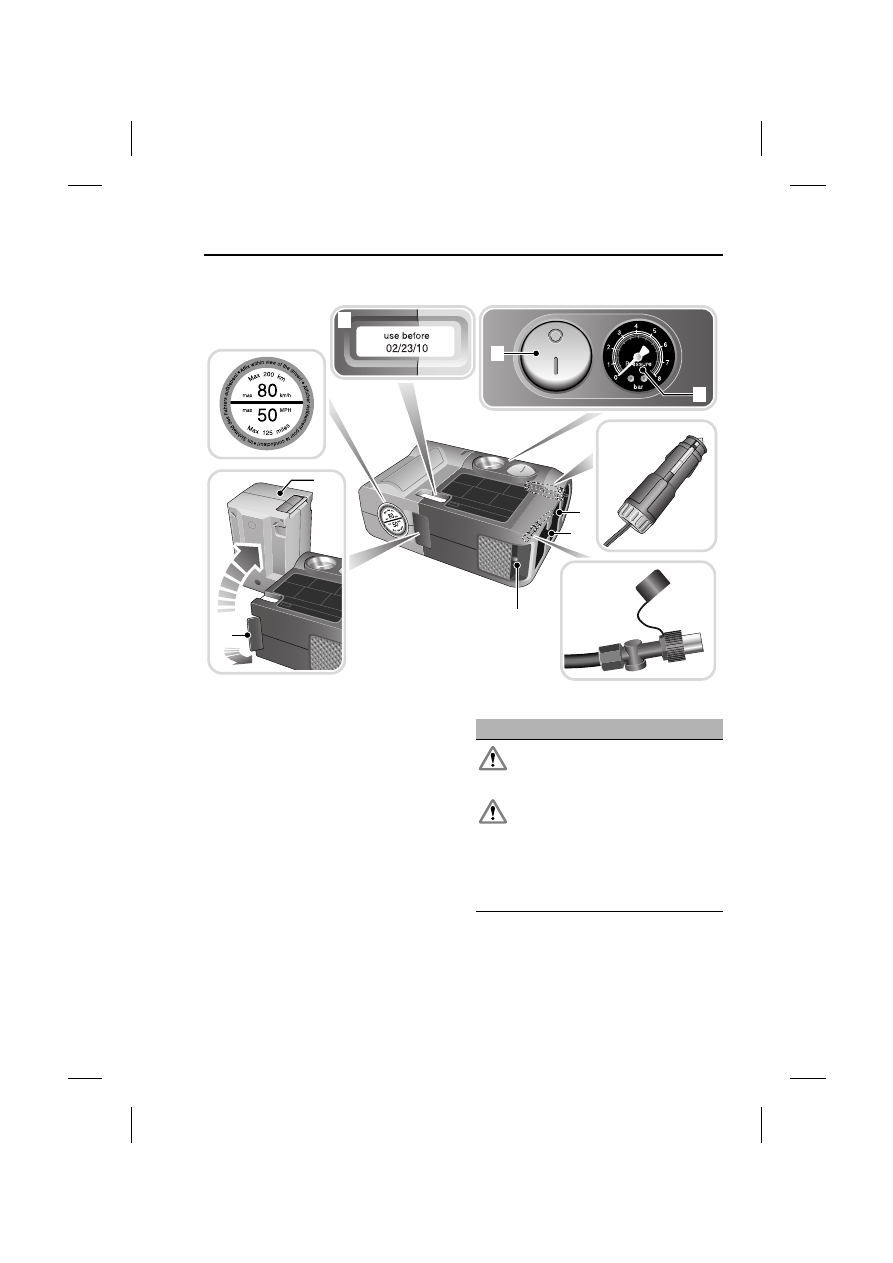
Jaguar tire repair kit
1. Maximum speed label. 80 km/h (50
mph).
2. Shelf-life date label.
3. Compressor On/Off switch. (I = On. 0
= Off.)
4. Tire pressure gauge.
5. Tire inflation hose.
6. Compressor power cable.
7. Inflation hose connector.
8. Power cable connector.
9. Built-in lamp.
10. Safety catch.
11. Sealant container section (orange).
Using the Jaguar tire repair kit
E92368
7
8
1
3
4
2
6
5
11
10
9
WARNINGS
Avoid skin contact with the
sealant which contains natural
rubber latex.
If the tire inflation pressure does
not reach 1.8 bar (26 psi) within
seven minutes, the tire may have
suffered excessive damage. A temporary
repair will not be possible, and the
vehicle should not be driven until the tire
has been replaced.
Wheels and tires
236
L
Note: All vehicle drivers and occupants
should be made aware that a temporary
repair has been made to a tire fitted to the
vehicle. They should also be made aware
of the special driving conditions imposed
when using a repaired tire.
Repair procedure
1. Peel off the maximum speed label 1.
Attach the label to the facia in the
driver's field of view. Take care not to
obstruct any of the instruments or
warning indicators.
2. Uncoil the compressor power cable
and the inflation hose 5 and 6.
3. Remove the valve cap from the
damaged tire.
4. Connect the inflation hose 7 to the tire
valve. Ensure that the hose is
screwed on firmly.
5. Release the safety catch 10 and
swivel the sealant container section
of the repair kit 90 degress to the
main body until it clicks firmly into
place 11.
6. Ensure that the orange compressor
switch 3 is in the OFF O position.
7. Insert the power cable connector 8
into an auxiliary power socket. See
AUXILIARY POWER SOCKETS
(page 153).
8. Unless the vehicle is in an enclosed or
poorly ventilated area, start the
engine.
CAUTIONS
Before attempting a tire repair,
ensure that the vehicle is parked
safely, as far away from passing
traffic as possible.
Ensure that the parking brake is
applied, and P (Park) is selected.
Do not attempt to remove foreign
objects such as nails, screws, etc.
from the tire.
Always run the engine when using
the compressor, unless the vehicle
is in an enclosed, or poorly
ventilated space as this may cause
asphyxiation.
To prevent overheating do not
operate the compressor
continuously for longer than ten
minutes.
WARNING
Check the tire sidewall prior to
inflation. If there are any cracks,
bumps or similar damage, do not
attempt to inflate the tire. Do not stand
directly beside the tire while the
compressor is pumping. Watch the tire
sidewall. If any cracks, bumps or similar
damage appear, turn off the compressor
and let the air out by means of the
pressure relief valve. Do not continue to
use the tire.
237
Wheels and tires
R
9. Set the compressor switch to the ON,
I, position.
10. Inflate the tire for no longer than
seven minutes to a minimum of 1.8
bar (26 psi) and a maximum of 3.5 bar
(51 psi).
11. During the inflation, switch the
compressor off briefly to check the
tire pressure using the gauge
mounted on the compressor.
• When pumping the sealant through
the tire valve, the pressure may rise
up to 6 bar (87 psi). The pressure
will drop again after approximately
30 seconds.
• It should not take longer than seven
minutes to inflate the tire. If after
seven minutes the tire has not
reached the minimum pressure, the
tire should not be used.
12. Once the tire has been inflated to at
least 1.8 bar (26 psi), switch off the
compressor. If desired the engine
may be turned off after the
compressor has been turned off.
13. Remove the power connector from
the auxiliary power socket.
14. Remove the inflation hose from the
tire valve by unscrewing it as quickly
as possible (counterclockwise).
15. Replace the inflation hose protective
cap, and the tire valve cap.
16. Swivel the sealant container section
back to its original position and close
the safety catch.
17. Ensure that the tire repair kit is placed
securely in the vehicle. You will need
to use the kit to check the tire
pressure after 3km (2 miles) so ensure
that it is easily accessible.
18. Immediately drive the vehicle for 3 km
(2 miles) to allow the sealant to coat
the inner surface of the tire and form
a seal at the puncture. Do not drive
any faster than 80 km/h (50 mph),
observe the sticker indicating the
maximum permissible speed.
Checking the tire pressure after a
repair
1. Drive the vehicle for 3 km (2 miles)
then stop in a safe place. Carry out a
visual examination of the tires
condition.
2. Make sure that the sealant container
section is in its original position.
3. Screw the inflation hose connector
firmly onto the tire valve.
4. Read the tire pressure from the
gauge.
5. If the pressure of the sealant filled tire
is above 1.3 bar (19 psi) adjust the
pressure to the correct value. See
TIRE CARE (page 223).
WARNINGS
When driving the vehicle, if you
experience vibrations, abnormal
steering, or noises, reduce speed
immediately. Drive with extreme caution
and reduced speed, to the first safe
place to stop the vehicle. Visually
examine the tire and check its pressure.
If there are any signs of damage or
deformity to the tire, or the tire pressure
is below 1.3 bar (19 psi), do not continue
driving.
Consult a tire repair centre, or
your Jaguar Dealer for advice
concerning the replacement of a
tire after using a tire repair kit.

Wheels and tires
238
L
6. Ensure that the compressor switch is
in the OFF position (O), and insert the
power cable connector into an
auxiliary power socket.
If the vehicle is in a well ventilated
area, start the engine.
7. Switch the compressor to ON (I), and
inflate the tire to the correct pressure.
8. To check the tire pressure, turn OFF
the compressor then read the
pressure from the gauge.
9. When the compressor is OFF, if the
tire pressure is too high, release the
required amount of pressure using
the pressure relief valve.
10. Once the tire is inflated to the correct
pressure, switch OFF the compressor
and remove the power plug from the
auxiliary socket.
• The use of the tire repair kit sealant
may lead to error prompts and
incorrect readings of the Tire
Pressure Monitoring System.
Therefore, use the tire repair kit
pressure gauge to check and adjust
the damaged tire's inflation
pressure.
11. Unscrew the inflation hose connector
from the tire valve, replace the tire
valve cap and the inflation hose
connector protective cap.
12. Ensure that the tire repair kit is placed
securely in the vehicle.
13. Drive to the nearest tire repair centre,
or Jaguar Dealer for a replacement
tire to be fitted. Ensure that you make
the repair centre aware that the tire
repair kit has been used before the
tire is removed.
14. Both the tire inflation hose, and the
sealant container should be replaced
once a new tire has been fitted.
Only sealant containers which
are completely empty should
be disposed of with normal
household waste. Sealant containers
which contain some sealant, and the tire
inflation hose, should be disposed of by a
tire specialist, or your Jaguar Dealer in
compliance with local waste disposal
regulations.
TIRE PRESSURE MONITORING
SYSTEM (TPMS)
Note:
Non-approved accessories may interfere
with the system. If this occurs, TIRE
PRESSURE SYSTEM FAULT is
displayed in the message centre.
Tires may affect the performance of the
TPMS. Always replace tires in
accordance with recommendations. See
TECHNICAL SPECIFICATIONS
(page 249).
WARNING
The TPMS is not a substitute for
manually checking tire pressures.
Tire pressures should be checked
regularly using an accurate pressure
gauge when cold. Failure to properly
maintain your tire pressures could
increase the risk of tire failure, with
consequential loss of vehicle control and
personal injury.
The TPMS cannot register damage to a
tire. Regularly check the condition of
your tires, especially if the vehicle is
driven off road.
Нет комментариевНе стесняйтесь поделиться с нами вашим ценным мнением.
Текст