Skoda Superb (2019 year). Instruction — part 13
Switching the ignition on/off
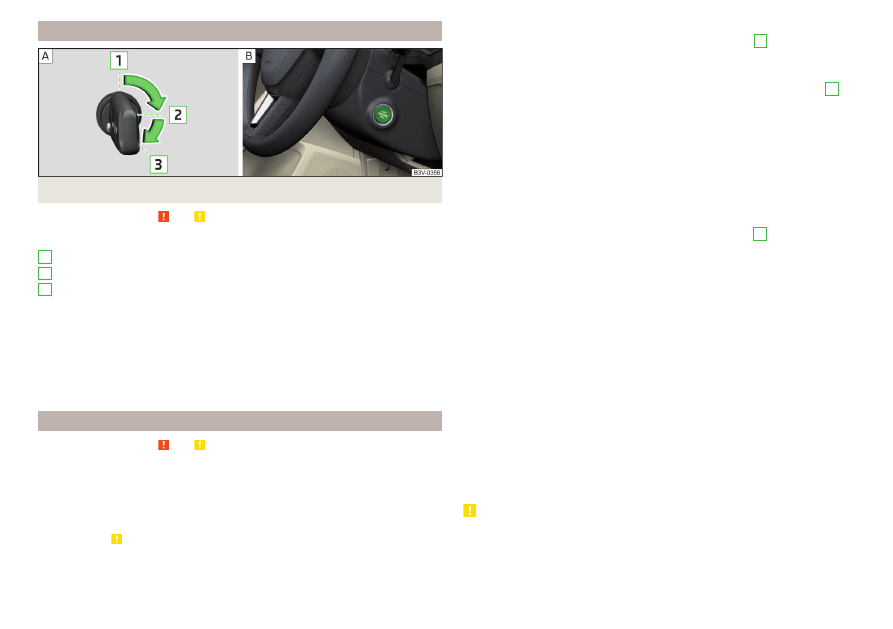
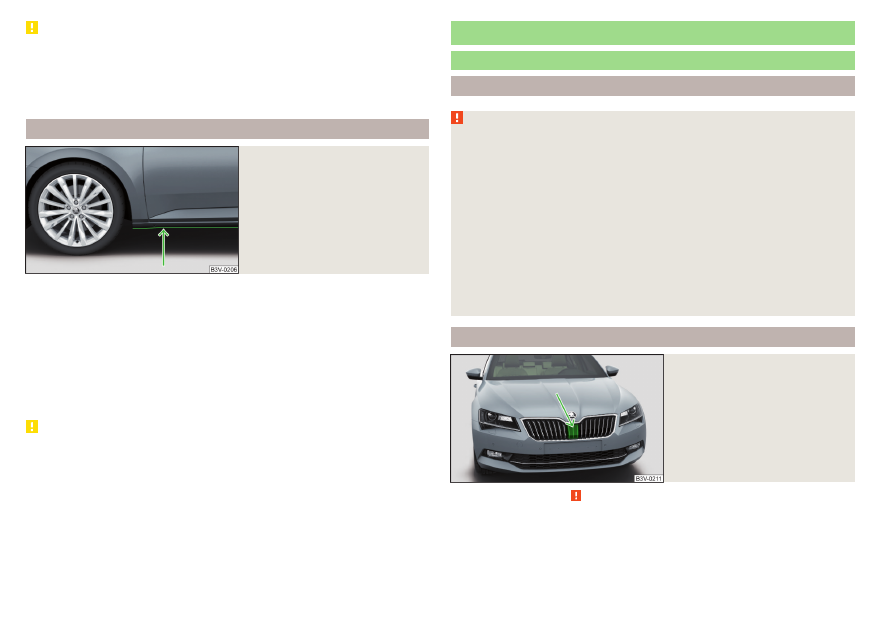
Fig. 255 Positions of the vehicle key in the ignition lock / starter button
Read and observe and on page 204 first.
Positions of the vehicle key in the ignition lock
-
Ignition switched off, engine switched off
Ignition switched on
Starting engine
Switching on /off ignition in vehicles with starter button
›
Press the
- button, the ignition is turned on / off.
On vehicles with instruction transmission the pedal must not be depressed to
switch on / off the ignition, otherwise the engine will start.
On vehicles with automatic transmission, the brake pedal must not be de-
pressed to switch on / off the ignition, otherwise the engine will start.
Starting engine / Stopping
Read and observe and on page 204 first.
Before starting the engine
›
Switch on the parking brake.
›
For vehicles with instruction transmission, shift gear stick to neutral, depress
the clutch pedal and hold it there until the engine starts.
›
For vehicles with automatic transmission, place the selector lever in position
P or N and
depress the brake pedal until the engine starts.
1
2
3
Starting the engine
›
On vehicles with Ignition lock, turn the key to position
3
and the engine
starts
on page 205 . Release the key, the engine will start auto-
matically.
If the engine does not start within 10 seconds, turn the key to position
1
. Re-
peat the starting process after 30 seconds.
›
On vehicles with starter button, press the button briefly
page 205 - , the motor will start automatically.
In vehicles with diesel engines, the glow plug warning lights
up after the
ignition is switched on. The engine can be started after the indicator light goes
out.
Stopping the engine
›
Stopping the vehicle.
›
On vehicles with ignition lock, turn the key to position
1
page 205 .
›
On vehicles with starter button, press the button
on page 205 - ,
The engine and the ignition will be switched off simultaneously.
For vehicles with automatic transmission, the ignition key can only be removed
if the selector lever is in position P (this only applies to a few countries).
Do not switch the engine off immediately at the end of your journey after the
engine has been running for a prolonged period at high loads. Leave it to run at
an idling speed for about 1 minute. This prevents any possible accumulation of
heat when the engine is switched off.
Emergency shutdown of the engine in vehicles with starter button
The system is equipped with a protective device against accidental switching
off, the engine can only be shut off while driving in the event of an emergency.
›
Keep the knob pressed
on page 205 - or press it twice within 1
second.
After the emergency stop of the engine, the steering lock will remain un-
locked.
CAUTION
When the outdoor temperature is below -10 ° C, the selector lever when start-
ing must always be in P mode.
205
Starting-off and Driving
-------------------------------------------------------------------------------------------------------------------------------------------------------------
Note
■
The engine running noises may be louder at first for a short time after start-
ing the cold engine.
■
You should not switch on any major electrical components during the heating
period, otherwise the vehicle battery will be drained unnecessarily.
■
After switching off the ignition, the radiator fan may intermittently continue
to run for approx. 10 minutes (also continuously).
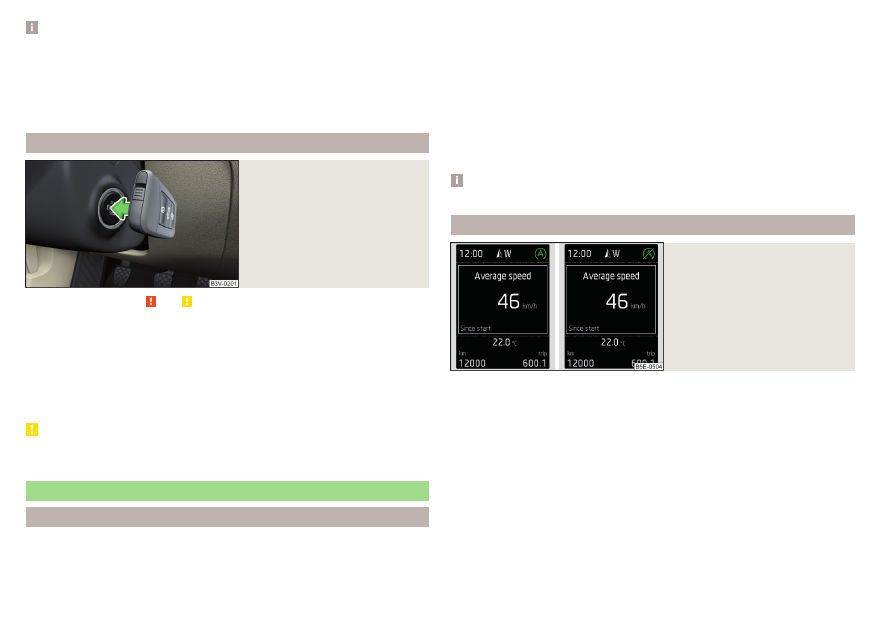
Problems with the engine start - vehicles with starter button
Fig. 256
Engine start - hold key on but-
ton
Read and observe and on page 204 first.
If no engine start is possible and the display of the instrument cluster shows a
message that the key could not be detected by the system or there is a sys-
tem fault, then try to start the engine as follows.
›
Push the starter button and then hold the key with the back of it on the but-
ton
If the engine does not start, the help of a specialist garage is required.
CAUTION
The key may not be detected by the system if the battery in the key is running
out of charge or the signal fails.
START-STOPsystem
Introduction
The START-STOPsystem (hereinafter referred to as the system) reduces
CO
2
emissions and harmful emissions, and saves fuel.
If the system determine that the engine is not needed when the vehicle stops
or is at a standstill (e.g. at the traffic lights), it turns off the engine and starts it
again when moving off.
The system function depends on many factors. Some of them are down to the
driver, while others are systemic and can neither be influenced nor identified.
For this reason, the system may react differently in situations which seem
identical from the driver's perspective.
The system is automatically activated every time the ignition is switched on
(even when it has previously been instructionly deactivated with the button).
Note
If the engine has stopped due to the system, the ignition remains switched on.
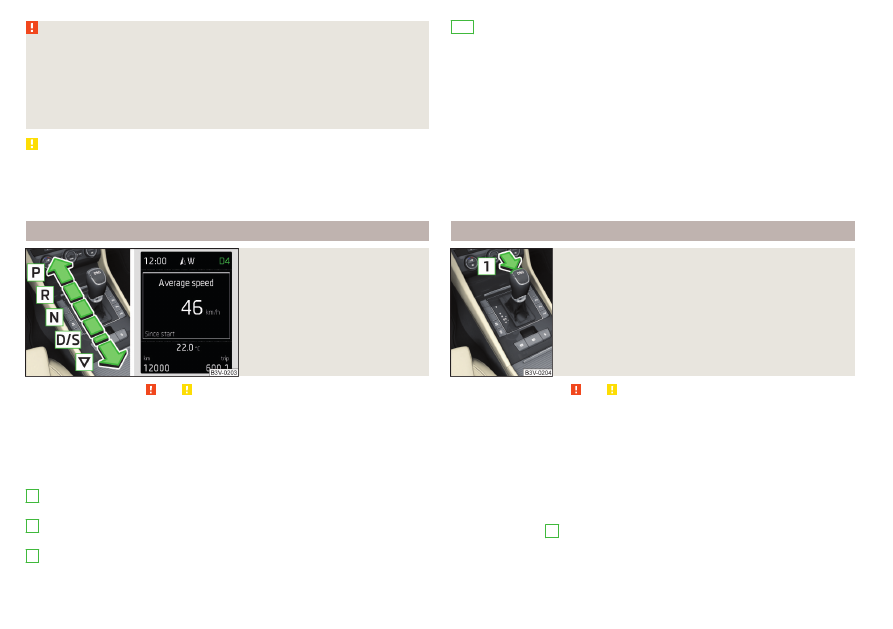
Operation
Fig. 257
Display
Vehicles with instruction transmission
The engine is automatically switched off as soon as the vehicle comes to a
halt, the shift lever is moved into neutral and the clutch pedal is released.
The engine is automatically started as soon as the clutch pedal is depressed.
Vehicles with automatic transmission
The engine is automatically switched off as soon as the vehicle comes to a
halt and the brake pedal is operated.
The engine is automatically started as soon as the accelerator pedal is de-
pressed or the brake pedal is released (with deactivated Auto Hold function).
206
Driving
-------------------------------------------------------------------------------------------------------------------------------------------------------------
Requirements for the system to function correctly
The following conditions must be met for the system to function correctly.
The driver's door is closed.
The driver has fastened the seat belt.
The driving speed was higher than 4 km/h after the last stop.
System status
The system status is shown in the display when the vehicle comes to a halt
The engine is switched off automatically; when moving off, the ignition
process will be initiated automatically.
The engine is not switched off automatically.
When stopping, the engine will not switch off for the following reasons,
among others.
▶
The engine temperature for the proper function of the system has not yet
been reached.
▶
The charge state of the vehicle battery is too low.
▶
The current consumption is too high.
▶
High air conditioning or heating output (high blower speed, big difference
between the desired and actual interior temperature).
If the engine is shut down automatically and the system detects that the en-
gine is required, such as when the brake pedal is pressed repeatedly, then the
system automatically starts the engine.
More information about the current system status can be displayed in the In-
fotainment screen in menu
/ → → display Vehicle status.
If there is a system fault, the following message will appear in the display of
the instrument cluster. Seek help from a specialist garage.
Note
■
If the driver's seat belt is removed for more than approx. 30 seconds or the
driver's door is opened during automatic stop mode, the engine will have to be
started instructionly.
■
No automatic engine shut-down takes place when a vehicle with automatic
transmission is moving at low speed (e.g. during a traffic jam) and remains sta-
tionary after pressing the brake pedal lightly. Automatic engine shut-down
takes place if you press the brake pedal down with more force.
■
For vehicles with automatic transmission there is no automatic engine shut-
down when the system detects a manoeuvring action due to a large steering
angle.
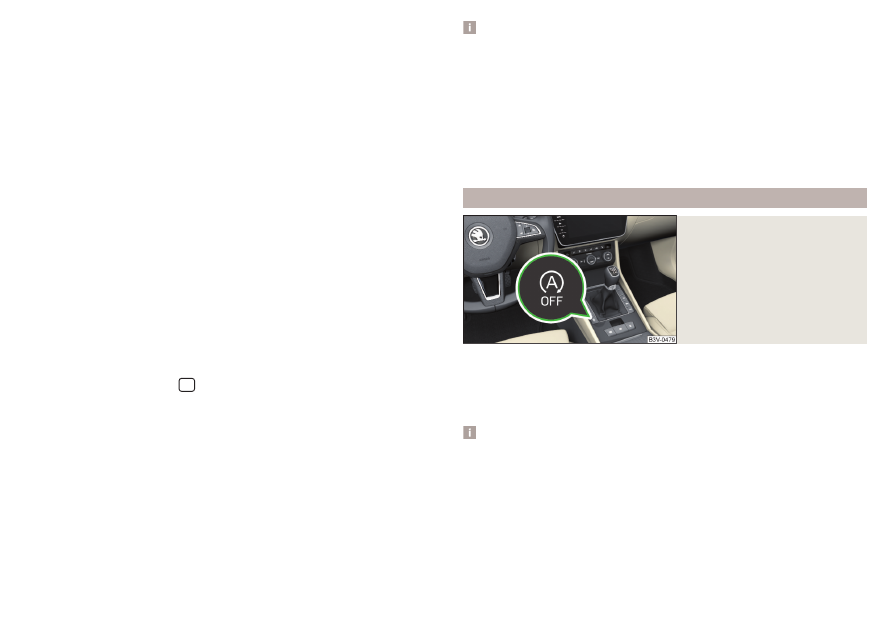
Instructionly disable / enable system
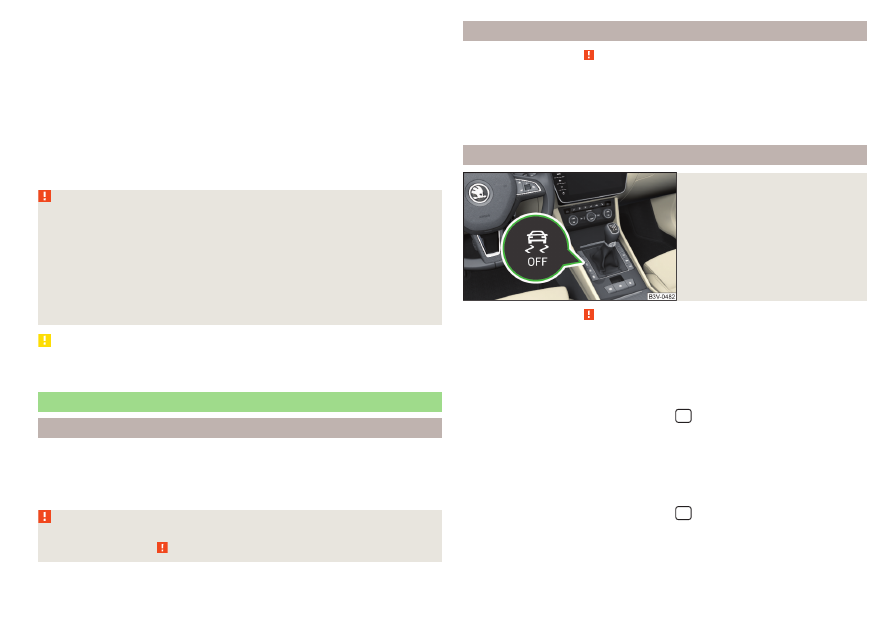
Fig. 258
Button for the START-STOP sys-
tem
›
To deactivate/activate, press the button
.
When the system is deactivated, the symbol
illuminates in the button.
If the system is deactivated, it will be reactivated automatically after the igni-
tion has been switched off and on.
Note
If the system is deactivated when the engine is turned off automatically, then
the automatic start process takes place.
207
Starting-off and Driving
-------------------------------------------------------------------------------------------------------------------------------------------------------------
Brakes and Parking
Introduction
The wear of the brake pads is dependent on the operating conditions and driv-
ing style. Under difficult conditions (e.g. urban, sporty driving style) the condi-
tion of the brakes should also be checked by a specialist garage between the
service intervals.
The performance of the brakes can be delayed if the brakes are damp, iced up
in winter or if covered in a layer of salt. The brakes are cleaned and dried by
applying the brakes several times
»
Corrosion on the brake discs and dirt on the brake pads occur if the vehicle
has been parked for a long period and if you do not make much use of the
braking system. The brakes are cleaned by applying the brakes several times
»
.
Before travelling a long distance with a steep gradient, reduce speed and
shift into the next lowest gear. As a result, the braking effect of the engine will
be used, reducing the load on the brakes. If you do have to brake, this should
be carried out at intervals.
Emergency braking display - when an emergency braking is performed, the
automatic flashing of the brake lights are used to alert the traffic behind.
New brake pads must first be “worn in” because these do not initially have the
best possible braking effect. Drive especially carefully for the first 200 km or
so.
A too low brake fluid level can cause faults in the braking system, the warn-
ing light
illuminates in the instrument cluster
Brake system. If
the warning light does not illuminate and an extended stopping distance is re-
quired, then driving should be adapted according to the unknown cause of
fault and restricted braking effect - seek the assistance of a specialist garage
immediately.
The brake booster increases the pressure generated with the brake pedal. The
brake booster only operates when the engine is running.
WARNING
■
Greater physical effort is required for braking when the engine is switch-
ed off – risk of accident!
■
During the braking procedure on a vehicle with instruction transmission,
when the vehicle is in gear and at low revs, press the clutch pedal. Other-
wise, the functionality of the brake system may be impaired – risk of acci-
dent!
■
Do not press the brake pedal if braking is now required. This causes the
brakes to overheat and can also result in a longer braking distance and ex-
cessive wear - risk of accident!
■
Braking for the purpose of drying and cleaning the brake discs should be
carried out only if the traffic conditions permit. Do not place any other road
users in jeopardy.
■
Recommendations for new brake pads have to be observed.
■
When stopping and parking, the parking brake should always be on, oth-
erwise the vehicle could move off - there is the risk of an accident!
■
If a front spoiler, full wheel trim, etc. is mounted retrospectively, it must
be ensured that the air supply to the front wheel brakes is not reduced.
Otherwise, the functionality of the brake system may be impaired – risk of
accident!
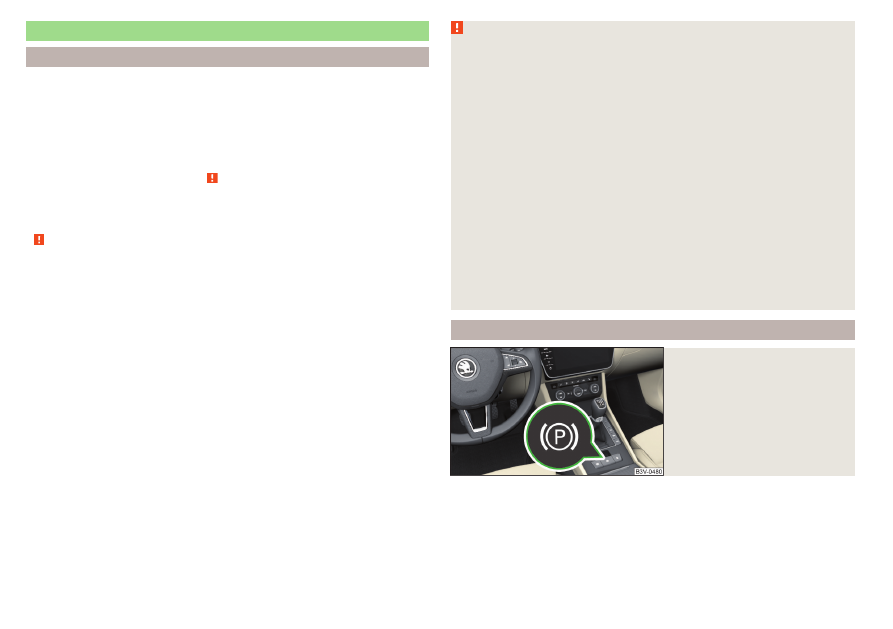
Electric parking brake
Fig. 259
Parking brake button
208
Driving
-------------------------------------------------------------------------------------------------------------------------------------------------------------
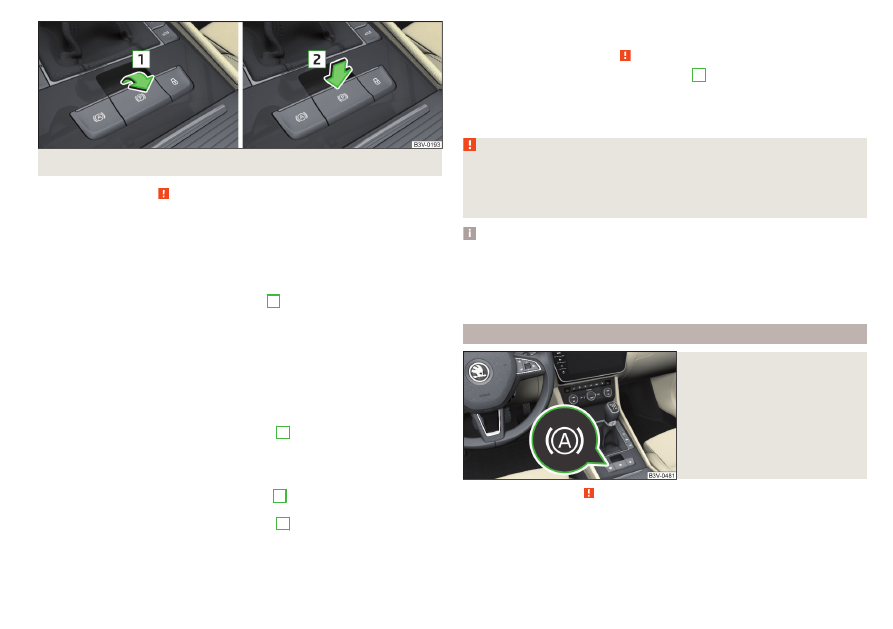
Fig. 260 Parking brake operation
Read and observe on page 208 first.
The electric parking brake (hereinafter referred as a parking brake) replaces
the handbrake. This secures the vehicle when stopping and parking against un-
wanted movement.
The parking brake can be used when the ignition is on or off.
Switching on
›
Pull the button in the direction of arrow
1
and hold until the
symbol in the button and warning light
illuminating the instrument cluster.
Automatic shut-off
The parking brake switches off automatically when starting, as long as the
driver's door is closed and the driver has fastened the seat belt.
Should the vehicle start to roll away backwards when starting on an uphill
slope, step on the accelerator or switch on the parking brake.
Turning off the parking brake can be prevented if, before starting, the but-
ton is pulled and held in the direction of arrow
1
turns off after releasing the button.
Instruction shut-down
›
With the ignition switched on, press the brake pedal and at the same time
push the button in the direction of arrow
2
.
›
With the engine running, press either the brake or accelerator pedal and
press the button in the direction of arrow
2
.
The
symbol in the button and the warning light
in the instrument cluster
go out.
Emergency braking function
If, while driving, a fault occurs in the brake system, the parking brake can be
used as an emergency brake
»
›
Pull the button in the direction of arrow
1
and
hold (you hear
an audible signal), the vehicle starts to brake strongly.
The braking process is interrupted when the key is released or the accelerator
pedal is actuated.
WARNING
■
The emergency brake is to be used only in an emergency when the vehi-
cle cannot be stopped with the brake pedal.
■
Do not place any objects in the recessed grip for the finger in front of the
parking brake key - the parking brake button could be blocked!
Note
■
If the vehicle battery is discharged, it is not possible to release the parking
brake. First connect the vehicle first to a power source, such as the battery of
another vehicle
, Jump-starting and then turn off the parking brake.
■
Noise when switching on and off the parking brake is normal and therefore
harmless.
Auto Hold function
Fig. 261
The Auto-Hold function button
Read and observe on page 208 first.
The Auto Hold function (hereinafter referred to only as system) prevents the
vehicle from rolling unintentionally when stopped. It is, for example, not neces-
sary to secure the vehicle with the brake pedal or parking brake at traffic
lights.
209
Starting-off and Driving
-------------------------------------------------------------------------------------------------------------------------------------------------------------
For the activation, deactivation and correct functioning of the system, the
following basic conditions are required.
The driver's door is closed.
The engine is running (or has been switched off automatically by the
START-STOP system).
On vehicles with automatic transmission the selector lever is not in mode
N (in this mode, the system is not available).
Stopping and starting
When stopping the system prevents the vehicle from rolling away. The warn-
ing light
illuminates in the instrument cluster. The brake pedal can be re-
leased.
The vehicle's brakes are released at the moment of stating off. The warning
light
in the instrument cluster goes out.
Should the vehicle start to roll away backwards when starting on an uphill
slope, step on the accelerator or switch on the parking brake.
If the vehicle is secured by the system and the driver's door is opened or the
ignition is turned off, the vehicle is secured by the parking brake to prevent un-
wanted movement.
In this case, the indicator light turns off
in the instrument cluster and the
warning light
illuminates.
Activation/deactivation
The system is activated/deactivated by means of the
When the system is activated, the symbol illuminates.
After switching off and switching on the ignition, the system remains either
activated or deactivated depending on the last setting.
WARNING
The increased stopping and starting comfort brought by the system must
not tempt you to take any safety risks.
■
The system is not able to stop the vehicle under all circumstances, such
as on icy or otherwise slippery ground, or on gradients.
■
When stopping and parking always make sure that the vehicle is correctly
secured
CAUTION
In some washing systems it is necessary that the vehicle can roll freely. There-
fore, the system must be deactivated before driving through a car wash.
Note
The system is able to secure the vehicle for about 10 minutes, after which the
vehicle will be automatically secured by the parking brake.
Parking
Read and observe on page 208 first.
When stopping and parking, look for a place with a suitable surface
»
Only carry out the activities while parking in the specified order.
›
Bring the vehicle to a stop and depress the brake pedal.
›
The parking brake switch.
›
On vehicles with automatic transmission place the selector lever in the P
position.
›
Switch off the engine.
›
For vehicles with instruction transmission, select 1st gear or reverse gear R.
›
Release the brake pedal.
If the parking brake is turned on while on a steep slope, the following message
may be displayed in the instrument cluster. Search for a car park with less of
an inclination.
WARNING
■
The exhaust system components can become very hot. Therefore, never
stop the vehicle at places where the underside of your vehicle can come in-
to contact with flammable materials such as dry grass, undergrowth,
leaves, spilled fuel or such like. - Risk of fire and serious injury can occur!
■
When leaving the vehicle, never leave people who could, for example, lock
the vehicle or release the brake, unattended in the vehicle - risk of accident
and injury!
210
Driving
-------------------------------------------------------------------------------------------------------------------------------------------------------------

Instruction gear changing and pedals
Introduction
CAUTION
When stopping on a slope, never try to hold the vehicle using the accelerator
pedal – this may lead to gear damage.
Instruction gear changing
Fig. 262
The shift pattern
Read and observe on page 211 first.
The gearshift pattern for the individual gear positions is shown on the gear lev-
er
The gear shift indicator should be observed when changing gear
Always depress the clutch pedal all the way down. This prevents uneven wear
on the clutch.
Engage reverse gear
›
Stop the vehicle.
›
The clutch pedal is fully depressed.
›
Switch the gear lever to N.
›
Push the shift lever downwards fully to the left and then forward into
R
The reversing lights will come on once reverse gear is engaged, provided the
ignition is on.
WARNING
Never engage reverse gear when driving – risk of accident!
CAUTION
If not in the process of changing gear, do not leave your hand on the gear shift
lever while driving. The pressure from the hand can cause the gear shift mech-
anism to wear excessively.
Pedals
Read and observe on page 211 first.
The operation of the pedals must not be hindered under any circumstances!
In the driver's footwell, only a footmat (supplied by the factory or from the
ŠKODA Original Accessories) which is secured on the respective attachment
points should be used.
WARNING
No objects should be located in the driver's footwell, otherwise the pedal
operation could be disabled - risk of accident!
Automatic transmission
Introduction
The automatic transmission performs an automatic gear change irrespective
of the engine load, the operation of the accelerator, the vehicle speed and the
selected driving mode.
The modes of the automatic transmission can be adjusted by the driver by
means of the selector lever.
WARNING
■
Do not use the throttle if the forwards mode has been set using the se-
lector lever prior to starting up - risk of accident!
■
Never move the selector lever to mode R or P when driving – risk of acci-
dent!
211
Starting-off and Driving
-------------------------------------------------------------------------------------------------------------------------------------------------------------
WARNING (Continued)
■
If the vehicle stalls, with engine running, in the D, S, R or Tiptronic mode,
then the vehicle must be prevented from rolling away using the brake ped-
al, or using the Auto Hold function. Even when the engine is idling, the pow-
er transmission is never interrupted - the vehicle creeps.
■
When leaving the vehicle, the selector lever must always be set to P .
Otherwise, the vehicle could start to move - risk of accident.
CAUTION
■
If you want to move the selector lever from position N to position D / S
whilst driving, the engine must be running at idling speed.
■
When stopping on a slope, never try to hold the vehicle using the accelerator
pedal – this may lead to gear damage.
Select selector lever position
Fig. 263
Selector lever settings / display
Read and observe and on page 211 first.
Move the selector lever to change to the following positions
. In
some positions you have to push the locking button
lock.
When the ignition is switched on, the gearbox mode and the currently selected
gear are indicated in the display
.
Park - the position can be set only when the vehicle is at a standstill.
The drive wheels are mechanically locked.
Reverse gear - the position can be set only when the vehicle is at a stand-
still and the engine is at idling speed.
Neutral (idle position) - the power transmission to the drive wheels is in-
terrupted.
P
R
N
Forward mode / sports programme - the gear change takes place in the
position S at higher engine speeds than in mode D
(Sprung position) - choice between positions D and S
If the Sport driving mode is selected with the engine running
lect the driving mode (Driving Mode Selection) , the transmission is automati-
cally set in the S mode.
E – Economical driving mode
If the driving mode Eco or Individual (engine - Eco)
is selected and
the selection lever is in the setting D/S, the transmission is automatically set to
mode E. This mode cannot be selected with the selector lever.
The forwards mode is switched up or down automatically in mode E at lower
engine speeds than in mode D.
Selector lever lock
Fig. 264
Shift lock button
Read and observe and on page 211 first.
The selector lever is locked in mode P and N to prevent that the forward driv-
ing is selected accidentally, thereby setting the vehicle in motion.
The selector lever is locked only when the vehicle is stationary and at speeds
up to 5 km/h.
The selector lever lock is indicated by the illumination of the warning
light.
Release the gear selector lever from P mode or N
›
Press the brake pedal and, at the same time, push the lock button in the di-
rection of arrow
1
To move the selector lever from mode N to D / S only the brake pedal is press-
ed.
D/S
212
Driving
-------------------------------------------------------------------------------------------------------------------------------------------------------------
The selector lever is not locked when quickly moving across the position N
(e.g. from R to D/S). This, for example, helps to rock out a vehicle that is stuck,
e.g. in a bank of snow. The selector lever lock will engage if the lever is in posi-
tion N for more than approx. 2 seconds without the brake pedal being de-
pressed.
If it is not possible to release the gear selector from mode P in the usual man-
ner, then this can be emergency unlocked
.
Note
If you want to switch the selector lever from mode P to mode D/S or vice ver-
sa, move the selector lever quickly. This prevents that you accidentally select
mode R or N.
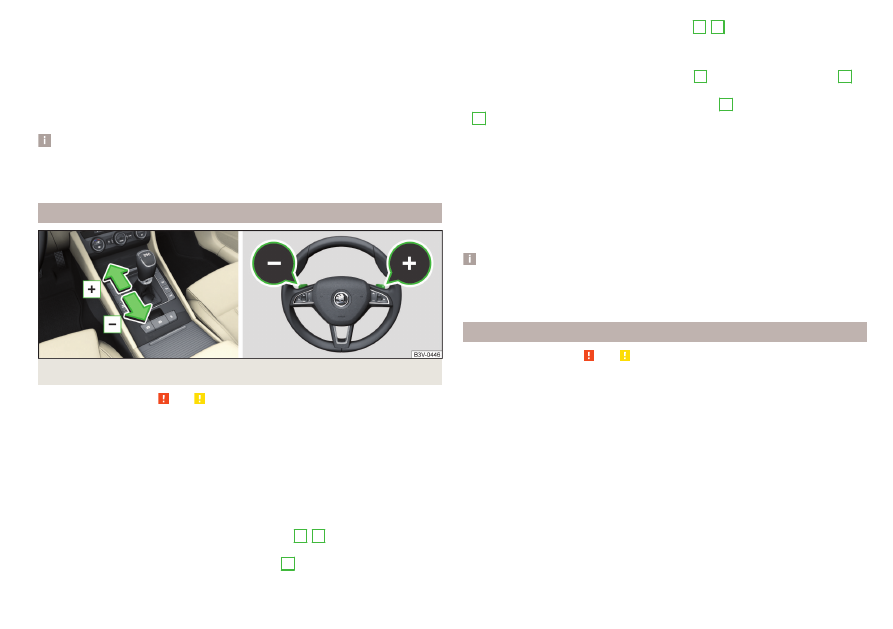
Manual shifting of gears (Tiptronic)
Fig. 265 Selector lever/multi function steering wheel
Read and observe and on page 211 first.
Tiptronic mode makes it possible to manually shift gears with the selector lev-
er or multifunction steering wheel.
Switching to manual shifting using the selector lever
›
Push the gear selector from position D/S towards the right, or left in a right-
hand drive vehicle. The current gear is maintained.
Switching to manual shifting by using the rocker switches under the
multifunction steering wheel
›
To change gear, pull one of the rocker switches
-
/
+
briefly towards the
steering wheel
›
To cancel manual shift, pull the rocker switch
+
towards the steering wheel
for more than 1 s.
If you do not pull one of the rocker switches
-
/
+
for a certain time, manual
shifting of the gears is deactivated automatically.
Changing gear
›
To shift up, tap the selector lever forwards
+
or pull the rocker switch
+
briefly towards the steering wheel
.
›
To shift down, tap the selector lever backwards
-
or pull the rocker switch
-
briefly towards the steering wheel
The currently selected gear is marked with the letter M in the instrument clus-
ter display.
The gear shift indicator should be observed when changing gear
When accelerating, the gearbox automatically shifts up into the higher gear
just before the maximum permissible engine speed is reached. If a lower gear
is selected, the gearbox does not shift down until there is no risk of the engine
over revving.
Note
It may be beneficial, for example, when travelling downhill, to use manual shift-
ing of gears. Shifting to a lower gear reduces the load on the brakes and hence
the wear of the brakes.
Start and run
Read and observe and on page 211 first.
Starting and temporarily pausing
›
Firmly depress and hold the brake pedal.
›
Start the engine.
›
Press the locking button and move the selector lever to the desired position
.
›
Release the brake pedal and accelerate.
The selector lever position N does not have to be selected if stopping for a
short time, such as at cross roads. However, you must apply the brake pedal in
order to prevent the vehicle from rolling away.
Accelerate to maximum speed during the journey (kickdown function)
The kickdown function is applied when the accelerator pedal is pressed down
in the forward mode.
The gear change is adjusted accordingly to reach the maximum acceleration.
213
Starting-off and Driving
-------------------------------------------------------------------------------------------------------------------------------------------------------------
When approaching maximum speed (launch control function)
The launch control function is available in mode S or Tiptronic.
›
Disable the TCS
, Braking and stabilisation systems.
›
START STOP deactivate
, Manually disable / enable system.
›
Fully depress and hold the brake pedal with your left foot.
›
Fully depress the accelerator pedal with your right foot.
›
Release the brake pedal - the vehicle is running at maximum acceleration.
Driving in neutral (“coasting”)
When releasing the accelerator pedal, the vehicle moves without the braking
effect of the engine.
Operating conditions
▶
The selector lever is in the D/S position.
▶
Driving mode Eco or Individual (Drive: - Eco) is selected
the driving mode (Driving Mode Selection).
▶
The vehicle speed is 20-130 km/h.
▶
No trailer or other accessory is connected to the trailer socket.
The gear is selected again automatically, when you depress the accelerator or
brake pedal or pull one of the rocker switches
-
/
+
towards the steering
wheel
, Manual shifting of gears (Tiptronic).
WARNING
Rapid acceleration, particularly on slippery roads, can lead to loss of control
of the vehicle – risk of accident!
Running in the engine and economical driving
Running in the engine
During the first 1,500 km, the driving manner determines the quality of the
running in process on a new engine.
During the first 1,000 km, the engine should not be charged with more than
3/4 of the maximum permitted engine revs and without the trailer.
In the area of 1,000 to 1,500 kilometres, the engine load can be increased up
to the maximum permitted engine speed.
Tips for economical driving
The fuel consumption depends on the driving style, road condition, weather
conditions and the like.
For an economical driving style, the following instructions must be observed.
▶
Avoid unnecessary acceleration and braking.
▶
Observe the recommended gear
▶
Avoid full throttle and high speeds.
▶
Reduce idling.
▶
Avoid short distances.
▶
Ensure the correct tyre inflation pressure is maintained
.
▶
Avoid unnecessary ballast.
▶
Remove the roof rack when it is not needed.
▶
Only switch on electrical consumers (e.g. seat heating) for as long as they are
needed. In the infotainment system, in menu
/ → → Fuel consumption:,
it is possible to display up to three consumers that are currently making up
the largest share of fuel consumption.
▶
Before switching on, ventilate the cooling system briefly and do not use the
cooling system with open windows.
▶
Do not leave windows open at high speed.
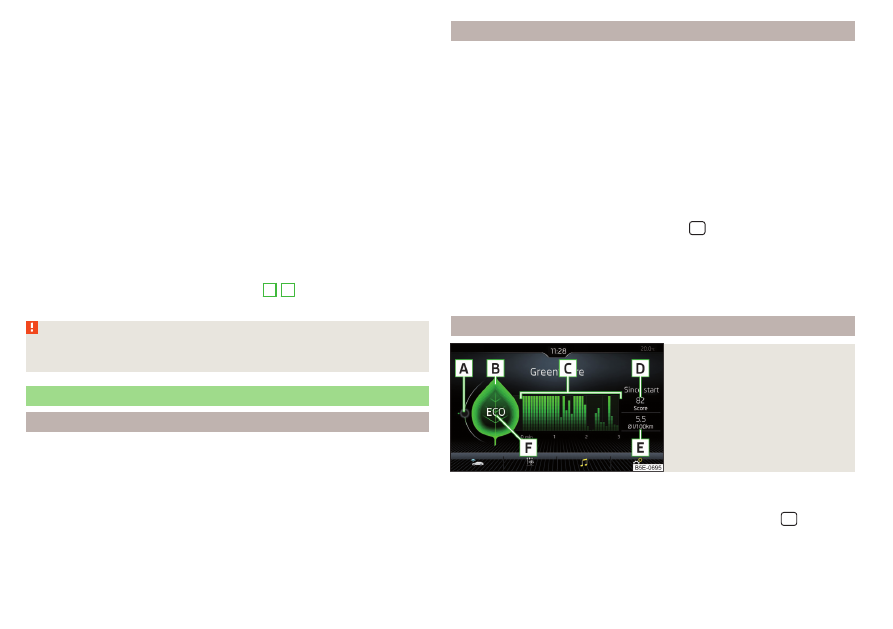
DriveGreen function
Fig. 266
Display in Infotainment screen
The DriveGreen function (hereinafter referred to as DriveGreen) evaluates the
driving efficiency based on the information respecting the driving style.
DriveGreen can be displayed in the infotainment screen in menu
/ →
→ DriveGreen.
214
Driving
-------------------------------------------------------------------------------------------------------------------------------------------------------------

A
driving liquid display
With the driving is fluid, the display is located in the middle (near the green
dot). When accelerating, the display moves down, and upwards when braking.
B
“Green leaf”
The greener the leaf, the more economic the driving style. With less economi-
cal driving, the leaf is presented without any green colouring or it can be com-
pletely hidden.
C
bar graph
The higher the green bars, the more economical the driving style. Each bar
shows the driving efficiency in 5-second steps, the current bar is on the left.
D
scoring (0 - 100)
The higher the indicated value, the more economical the driving style. When
you tap the function surface
D
, a detailed assessment showing the driving ef-
ficiency during the last 30 minutes is displayed.
If the trip lasts less than 30 minutes from the start, then the overview will add
the assessment from the previous journey (the bars are shown in dark green).
E
the average fuel consumption from the start
When you tap the
E
function surface, a detailed overview of the average fuel
consumption during the last 30 minutes is shown.
If the trip lasts less than 30 minutes from the start, then the overview will add
the overview of the average fuel consumption from the previous journey (the
bars are shown in dark green).
F
symbols
The display may show the following four symbols, which give information on
the current driving style.
Economical driving style
The current speed has a negative effect on fuel consumption.
Travelling is not fluid, this is to avoid unnecessary acceleration and braking
Recommended gear
Tips for economical driving
Tap on the
B
leave to display tips for economical driving.
Note
Resetting the single-trip memory “Since start” also resets the average con-
sumption
E
and the driving assessment
D
as well as diagram
C
.
Radiator shutters
The radiator shutters located in front of the radiator (hereinafter: shutter) help
to reduce CO
2
emissions as well as harmful emissions and to save fuel.
If the system detects that it is possible to reduce the amount of air flowing to
the radiator, it closes the blinds. As a result, the air resistance of the vehicle is
reduced.
If a driving speed of 150 km/h is reached due to a function impairment of the
shutters, a message regarding the function impairment of the shutters is
shown in the instrument cluster display.
After this message has been displayed, the maximum speed of the vehicle is
automatically limited to 170 km/h. The manner of driving should therefore be
adapted to this limitation.
If this message appears in the winter, the cause may be ice or snow caught up
in the blinds. After the ice or snow has thawed, the blinds are functional again.
If the impairment not due to ice or snow, then assistance from a specialist
should be sought.
Avoiding damage to your vehicle
Driving Tips
Only drive on such roads and in such terrain that match the vehicle parameters
, Technical data as well as your driving skills.
The driver is always responsible for deciding whether the vehicle can handle
travelling in the given terrain.
WARNING
■
Adjust the speed and driving style to the current visibility, weather, road
and traffic conditions. Too high a speed or an erroneous manoeuvre may
cause serious injury and damage to the vehicle.
■
Combustible objects such as dry leaves or twigs caught under the base of
the vehicle could ignite on hot vehicle parts - risk of fire!
215
Starting-off and Driving
-------------------------------------------------------------------------------------------------------------------------------------------------------------
CAUTION
■
Pay attention to the ground clearance of the vehicle! When driving over ob-
jects which are larger than the ground clearance, the vehicle can get damaged.
■
Any objects that get trapped under the vehicle floor must be removed as
soon as possible. These items can cause damage to the vehicle (e.g. on parts of
the fuel system or the brake system).
Driving through water
Fig. 267
Maximum permissible water lev-
el when driving through water
The following must be observed to avoid damage to the vehicle when driving
through bodies of water (e.g. flooded roads).
›
Therefore determine the depth of the water before driving through bodies of
water. The water level must not reach above the lower edge of the lower
brace
.
›
Drive at a maximum speed of walking pace, otherwise a shaft may form in
front of the vehicle which could enable water to enter the vehicle system
(e.g. in the air induction system of the engine).
›
Never stop in the water, do not reverse and do not switch the engine off.
CAUTION
■
Water entering the vehicle systems (e.g. the air induction system of the en-
gine) can cause serious damage to the vehicle!
■
Oncoming vehicles can generate water waves which can exceed the permis-
sible water level for your vehicle.
■
Do not drive through salt water, as the salt can cause corrosion. An vehicle
coming into contact with salt water is to be thoroughly rinsed with fresh wa-
ter.
Assist systems
General information
Introduction
WARNING
■
The assistance systems only serve to support the driver and do not re-
lieve the driver of the responsibility for driving the vehicle.
■
The increased safety provision, as well as the increased occupant protec-
tion provided by the assistance systems must not tempt you to take risks -
risk of accident!
■
Adjust the speed and driving style to the current visibility, weather, road
and traffic conditions.
■
The assistance systems have physical and system-related limitations. For
this reason, the driver may experience some undesired or delayed system
responses in certain situations. You should therefore always be alert and
ready to intervene!
■
Only enable, disable or set the assistance systems when you have the car
fully under control, in every traffic situation - risk of accident!
Radar sensor
Fig. 268
Installation location of the radar
sensor
Read and observe on page 216 first.
The radar sensor (hereinafter referred to only sensor) uses electromagnetic
waves to capture the traffic situation ahead of the vehicle. The radar is located
under a cover
.
The sensor is part of the ACC
and Front Assist
216
Driving
-------------------------------------------------------------------------------------------------------------------------------------------------------------
The sensor function may be impaired in the event of one of the following sit-
uations arising.
▶
The sensor cover is soiled (e.g. with mud, snow and the like).
▶
The area in front of and around the sensor cover is obscured (e.g. by labels,
auxiliary headlights and the like(.
▶
When visibility is poor (e.g. fog, heavy rain, thick snowfall).
▶
In exceptional cases, the sensor may be covered in the area beneath the cov-
er, e.g. due to snow.
If the sensor cover or the sensor is dirty or covered, a message to that effect
from the ACC system
, Malfunctions or Front Assist
functions system appears in the instrument cluster display.
WARNING
■
If you suspect that the sensor is damaged, deactivate the ACC system
and Front Assist system
,
. Have the sensor checked by
a specialist garage.
■
A collision or damage in the front or lower area of the vehicle could affect
the sensor function - there is risk of accident! Have the sensor checked by
a specialist garage.
■
Do not cover the area in front of and around the sensor cover. This can
lead to impaired function of the sensor - risk of accident!
CAUTION
Remove snow with a brush and ice with a solvent-free de-icer from the sensor
cover.
Braking and stabilisation systems
Introduction
The brake and stabilization systems are automatically activated each time the
ignition is switched on, unless otherwise indicated.
The error display is in Chapter
WARNING
The general information relating to the use of assistance systems must be
observed
Stability Control (ESC)
Read and observe on page 217 first.
ESC improves vehicle stability in critical driving situations (e.g. if the vehicle
starts to skid) by the braking the individual wheels to maintain the direction.
During an ECS intervention, the warning light
flashes in the instrument clus-
ter.
ESC Sport
Fig. 269
ESC Sport / ASR system button
Read and observe on page 217 first.
ESC Sport allows for a sportier driving style. With ESC Sport switched on, in
the event of light oversteer or understeer of the vehicle, no ESC interventions
take place and the ASR is so limited that the drive wheels can spin.
Activation
›
Press and hold down the
›
or: In the infotainment system, in menu
/ tap on function surface →
ESC system: → ESC Sport.
With activation the warning light
lights up in the instrument cluster and an
appropriate message is displayed in the instrument cluster.
Deactivation
›
Press the
›
or: In the infotainment system, in menu
/ tap on function surface →
ESC system: → Activated.
With deactivation the warning light
extinguishes in the instrument cluster
and an appropriate message is displayed in the instrument cluster.
217
Assist systems
-------------------------------------------------------------------------------------------------------------------------------------------------------------

Anti-lock brake system (ABS)
Read and observe on page 217 first.
ABS prevents the wheels locking when braking. Thus helping the driver to
maintain control of the vehicle.
An ABS intervention can be noticed through pulsating movements of the
brake pedal and distinct noises.
When the ABS system is active, do not brake periodically or reduce the pres-
sure on the brake pedal.
Engine drag torque control (MSR)
Read and observe on page 217 first.
The MSR prevents the blocking tendency of the drive wheels when shifting
down or with an abrupt deceleration (e.g. on icy or otherwise slippery road
surfaces).
If the drive wheels lock, the engine speed is automatically increased. This re-
duces the braking effect of the engine, and the wheels can rotate freely again.
Traction control (ASR)
Read and observe on page 217 first.
The ASR prevents spinning of the drive wheels. TCS reduces the drive power
transmitted to the wheels in the case of slipping wheels. Thus, for example,
driving on road surfaces with low grip is made easier.
During a TCS intervention, the indicator light
flashes in the instrument clus-
ter.
Deactivation
›
Press the
›
or: In the infotainment system, in menu
/ tap on function surface →
ESC system: → ASR off.
With deactivation the warning light lights up in the instrument cluster
and
an appropriate message is displayed in the instrument cluster.
Activation
›
Press the
›
or: In the infotainment system, in menu
/ tap on function surface →
ESC system: → Activated.
With activation the warning light
is extinguished and an appropriate mes-
sage is displayed in the instrument cluster.
The TCS should normally always be enabled. The system should be deactivated
only in the following situations, for example.
▶
When driving with snow chains.
▶
When driving in deep snow or on a very loose surface.
▶
When it is necessary to “rock” a car free when it has become stuck.
Electronic Differential Lock (EDL and XDS)
Read and observe on page 217 first.
EDL prevents the turning of the respective wheel of the driven axle. EDL
brakes the spinning wheel, if necessary, and transmits the driving force to the
other driving wheel. Driving becomes easier on road surfaces with different
traction under each wheel of the driven axle.
EDL switches off automatically to avoid excessive heat generation on the
brake of the wheel being braked. Once the brakes have cooled down, there is
an automatic re-activation of EDL.
XDS+ is an extension to the electronic differential lock (EDL). The XDS+ re-
sponds to the release of pressure on the wheels during fast cornering by
means of a braking intervention on the wheel on the inside of the corner on
the driven axle. By decelerating the individual wheels, this prevents the vehicle
from over-steering or understeering. This has a positive effect on the driving
stability and steerability of the vehicle.
Active steering assist (DSR)
Read and observe on page 217 first.
In critical situations, the DSR provides the driver with a steering recommenda-
tion in order to stabilise the vehicle. DSR is activated, for example, on the right
and left vehicle side when braking sharply on different road surfaces.
218
Driving
-------------------------------------------------------------------------------------------------------------------------------------------------------------

Brake Assist (HBA)
Read and observe on page 217 first.
The HBA increases the braking effect and helps to reduce the braking dis-
tance.
The HBA is activated by very quick operation of the brake pedal. In order to
achieve the shortest possible braking distance, the brake pedal must be ap-
plied firmly until the vehicle has come to a standstill.
The HBA function is automatically deactivated when the brake pedal is re-
leased.
Hill Start Assist
Read and observe on page 217 first.
When driving on slopes, Hill Start Assist (hereinafter referred to simply as the
system) allows you to move your foot from the brake pedal to the accelerator
pedal without the vehicle rolling downhill on its own.
The vehicle is braked by the system for about 2 seconds after releasing the
brake pedal.
The system is active as of a 5% slope, if the driver door is closed. The system is
only ever active on slopes when starting off in forward or reverse.
Multicollision brake (MCB)
Read and observe on page 217 first.
MCB helps to decrease speed after a collision by means of automatic braking
interventions and to stabilise the vehicle. This reduces the risk of a subsequent
crash due to uncontrolled vehicle movement.
The automatic brake interventions can take place only if the following condi-
tions are met.
There was a front, side and rear-end collision of a certain severity.
The impact speed was greater than approx. 10 km/h.
The brakes, the ESL and other required electrical systems remain function-
al after impact.
The accelerator pedal is not actuated.
Trailer stabilisation system (TSA)
Read and observe on page 217 first.
The TSA helps the combination stable in situations where the trailer sways and
then the whole trailer combination.
TSA brakes the individual wheels of the towing vehicle in order to damp the
rocking motion of the entire vehicle combination.
The following conditions are required for the correct TSA function.
The trailer was shipped from the factory or purchased from the ŠKODA
genuine accessories.
The trailer is electrically connected to the towing vehicle via the trailer
socket.
The parking aid is activated.
The speed is greater than 60 km/h.
Further information
Parking aid (ParkPilot)
Introduction
The parking aid (hereinafter referred to as system) uses acoustic signals or the
Infotainment screen when manoeuvring around obstacles in the vicinity of the
vehicle.
WARNING
■
The general information relating to the use of assistance systems must be
observed
■
Moving persons or objects may not be recognized by the system sensors.
■
Under certain circumstances, surfaces of certain objects and types of
clothing cannot reflect the system signals. There is a danger that such ob-
jects or people may not be recognised by the system sensors.
■
External noise sources may affect the signals of the system sensors.
There is a danger that obstacles may not be detected by the system sen-
sors.
■
Before reversing, make sure that there are is not any small obstacle, such
as a rock, thin post etc., in front of or behind your vehicle. Such obstacles
may not be recognised by the system sensors.
219
Assist systems
-------------------------------------------------------------------------------------------------------------------------------------------------------------
CAUTION
■
Keep the system sensors
on page 220 clean, snow-and ice-free
and do not cover with any objects of any kind, otherwise the system function-
ing may be impaired.
■
Under adverse weather conditions (heavy rain, water vapour, very low or high
temperatures, etc.), the system function may be limited - “incorrect recogni-
tion of obstacle”.
■
Accessories fitted to the vehicle rear, such as bicycle carriers, can impair the
system function.
Settings in Infotainment
Read and observe and on page 219 first.
›
In the infotainment system, in menu
/ tap on function surface → Park-
ing and manoeuvring.
■
ParkPilot - Settings for the parking aid
■
Activate automatically - Activate/deactivate the compact parking aid display
(when driving forward)
■
Front volume - Adjust the volume of the beeps for obstacle detection in front
■
Front tone setting - Setting the pitch of the beeps for obstacle detection in
front
■
Rear volume - Set the volume level of the beeps for the rear obstacle detec-
tion
■
Rear tone setting - Setting the pitch of the beeps for the rear obstacle detec-
tion
■
Entertainment fading while parking – Lowers the audio volume (e.g. radio vol-
ume) with activated parking aid
■
Manoeuvre braking - Activation / deactivation of the automatic emergency
braking
Operation
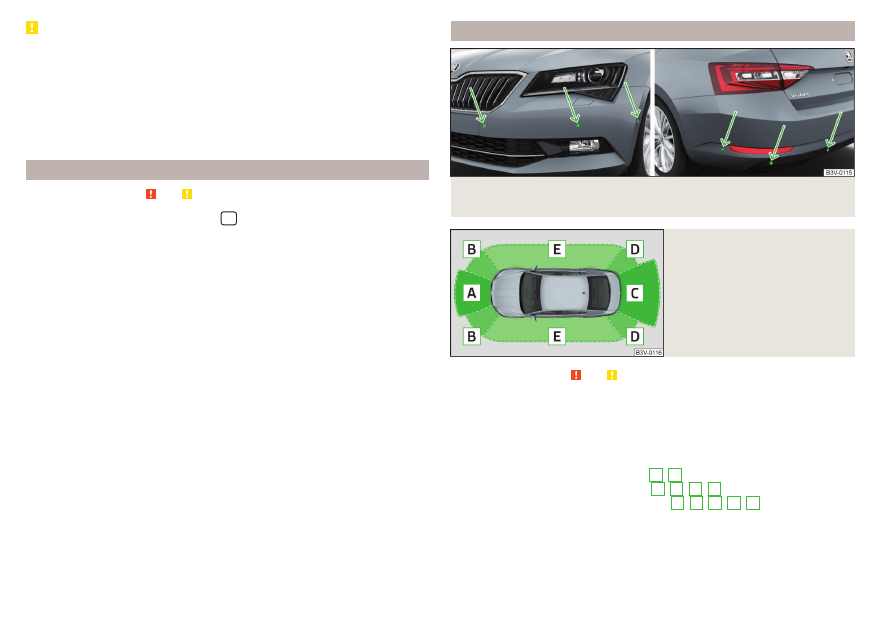
Fig. 270 Installation location of the sensors on the left side of the vehi-
cle: front/rear
Fig. 271
Sampled areas and range of the
sensors
Read and observe and on page 219 first.
The system uses ultrasound waves to calculate the distance between the
bumper and an obstacle. The ultrasonic sensors are, depending on vehicle
equipment,, located in the back or in the front bumper
.
Depending on the equipment, the following system versions are possible
.
▶
Variant 1: warns of obstacles in areas
C
,
D
.
▶
Variant 2: warns of obstacles in areas
A
,
B
,
C
,
D
.
▶
Variant 3: warns of obstacles in the areas
A
,
B
,
C
,
D
,
E
.
220
Driving
-------------------------------------------------------------------------------------------------------------------------------------------------------------
Нет комментариевНе стесняйтесь поделиться с нами вашим ценным мнением.
Текст