Hyundai Ioniq Electric (2019 year). Manual — part 27

LIGHT BULBS
Consult an authorized HYUNDAI
i
Information
WARNING
dealer to replace most vehicle light
bulbs. It is difficult to replace vehicle
•
A normally functioning lamp may
•
Prior to replacing a lamp,
flicker momentarily to stabilize the
light bulbs because other parts of the
vehicle must be removed before you
depress the foot brake, shift
vehicle’s electrical control system.
to P (Park), apply the parking
However, if the lamp goes out after
can get to the bulb. This is especially
true for removing the headlamp
brake, place the POWER but-
flickering momentarily, or contin-
ton in the OFF position and
ues to flicker, we recommend the
assembly to get to the bulb(s).
take the key with you when
system be checked by an authorized
Removing/installing the headlamp
leaving the vehicle to avoid
HYUNDAI dealer.
assembly can result in damage to
sudden movement of the vehi-
the vehicle.
•
The position lamp may not turn on
cle and to prevent possible
when the position lamp switch is
electric shock.
turned on, but the position lamp and
i
Information
•
Be aware the bulbs may be
headlamp switch may turn on when
After heavy driving, rain or washing,
hot and may burn your fin-
the headlamp switch is turned on.
lamps could appear frosty. This condi-
gers.
This may be caused by network fail-
tion is caused by the temperature dif-
ure or vehicle electrical control sys-
ference between the lamp inside and
tem malfunction. If this occurs, we
the outside temperature. This is simi-
recommend the system be checked
lar to the condensation on your win-
by an authorized HYUNDAI dealer.
dows inside your vehicle during the
7
rain and doesn’t indicate a problem
with your vehicle. If the water leaks
into the lamp bulb circuitry, have your
vehicle checked by an authorized
HYUNDAI dealer.
7-55
Maintenance
Headlamp, Parking Lamp, Turn
• Always handle them carefully, and
Signal Lamp and Side Marker
avoid scratches and abrasions. If
the bulbs are lit, avoid contact with
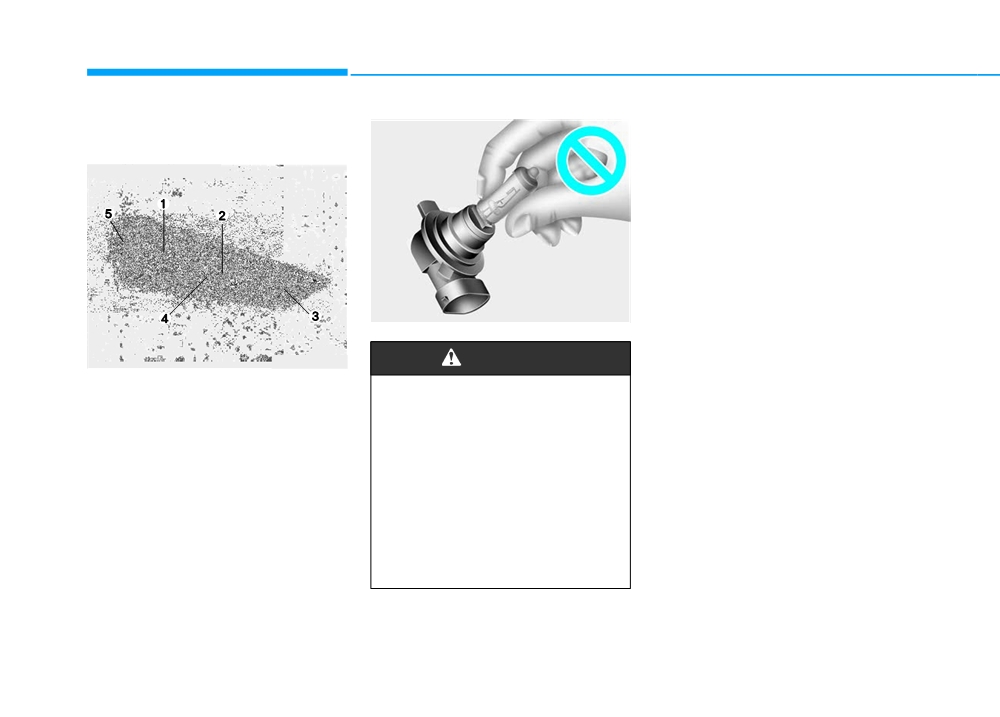
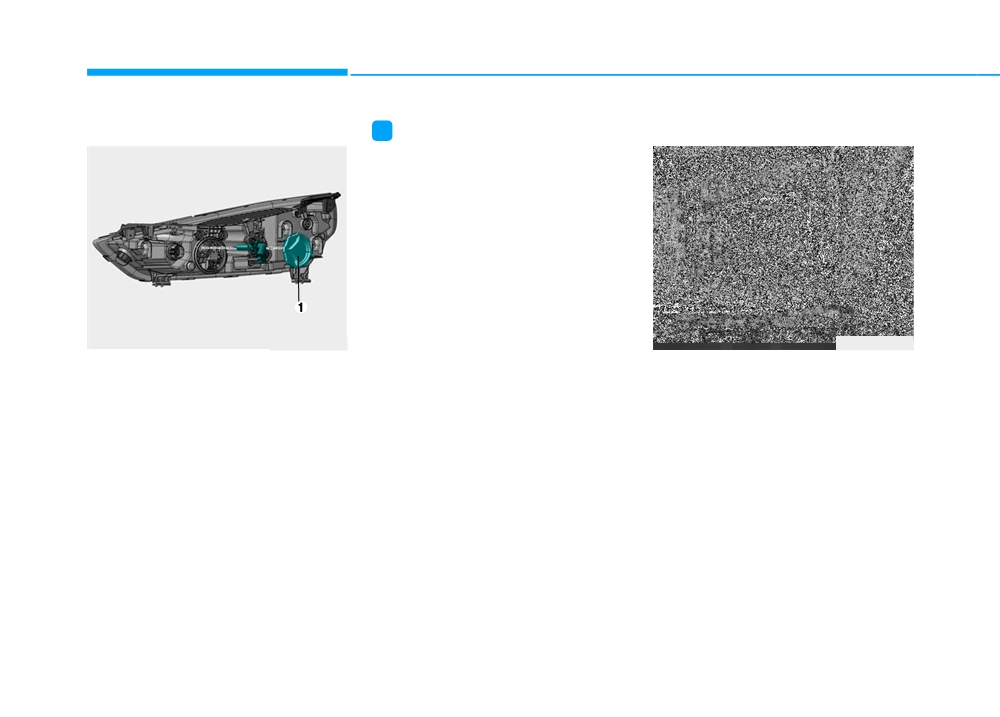
■ Type A- Standard type
liquids.
• Never touch the glass with bare
hands. Residual oil may cause the
bulb to overheat and burst when lit.
• A bulb should be operated only
when installed in a headlamp.
• If a bulb becomes damaged or
cracked, replace it immediately
OLMB073042L
and carefully dispose of it.
OAE076028
WARNING
(1) Headlamp (Low)
Halogen bulb
(2) Headlamp (High)
• Handle halogen bulbs with
(3) Turn signal lamp
care. Halogen bulbs contain
(4) Parking lamp
pressurized gas that will pro-
duce flying pieces of glass
(5) Side marker
that could cause injuries if
broken.
• Wear eye protection when
changing a bulb. Allow the
bulb to cool down before han-
dling it.
7-56
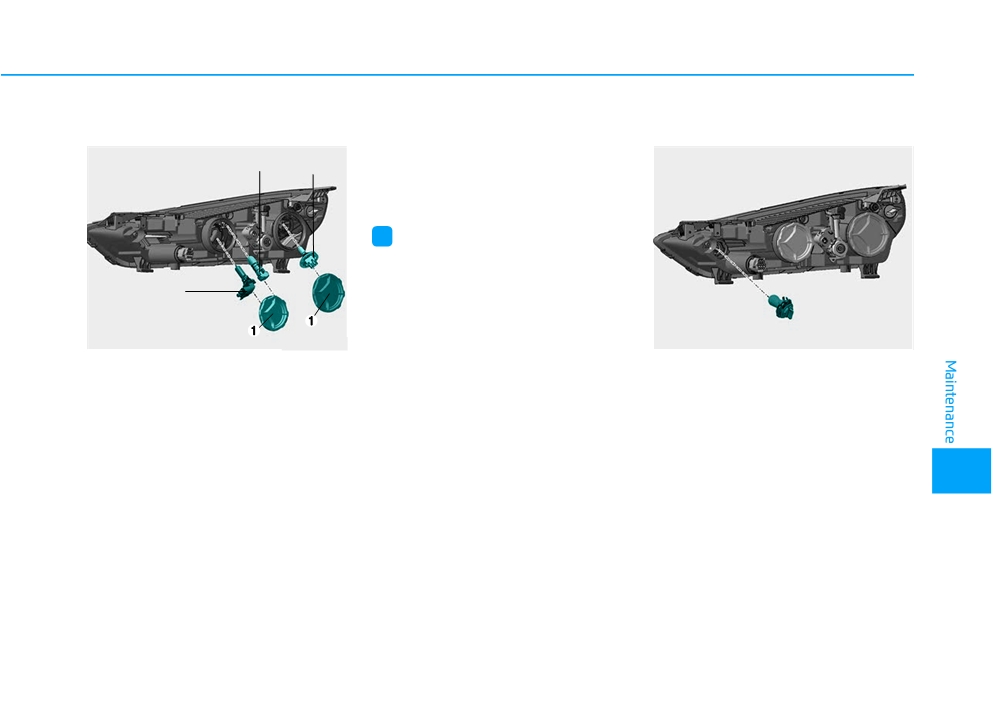
Headlamp and parking lamp
7. Connect the headlamp bulb sock-
Turn signal
et-connector. (for low beam and
Parking lamp
high beam)
Low beam
8. Install the headlamp bulb cover (1)
by turning it clockwise.
i
Information
The headlamp aiming should be
adjusted after an accident or after the
High beam
headlamp assembly is reinstalled at an
authorized HYUNDAI dealer.
OAE076030
OAE076031
1. Open the hood.
1. Open the hood.
2. Disconnect the negative battery
2. Disconnect the negative battery
cable.
cable.
3. Remove the headlamp bulb cover
3. Remove the socket from the
(1) by turning it counterclockwise.
assembly by turning the socket
counterclockwise until the tabs on
4. Disconnect the headlamp bulb
the socket align with the slots on
7
socket-connector. (for low beam
the assembly.
and high beam)
4. Remove the bulb from the socket
5. Remove the bulb from the head-
lamp assembly.
by pressing it in and rotating it
counterclockwise until the tabs on
6. Install a new bulb.
the bulb align with the slots in the
socket. Pull the bulb out of the
socket.
7-57
Maintenance
5. Install a new bulb by inserting it
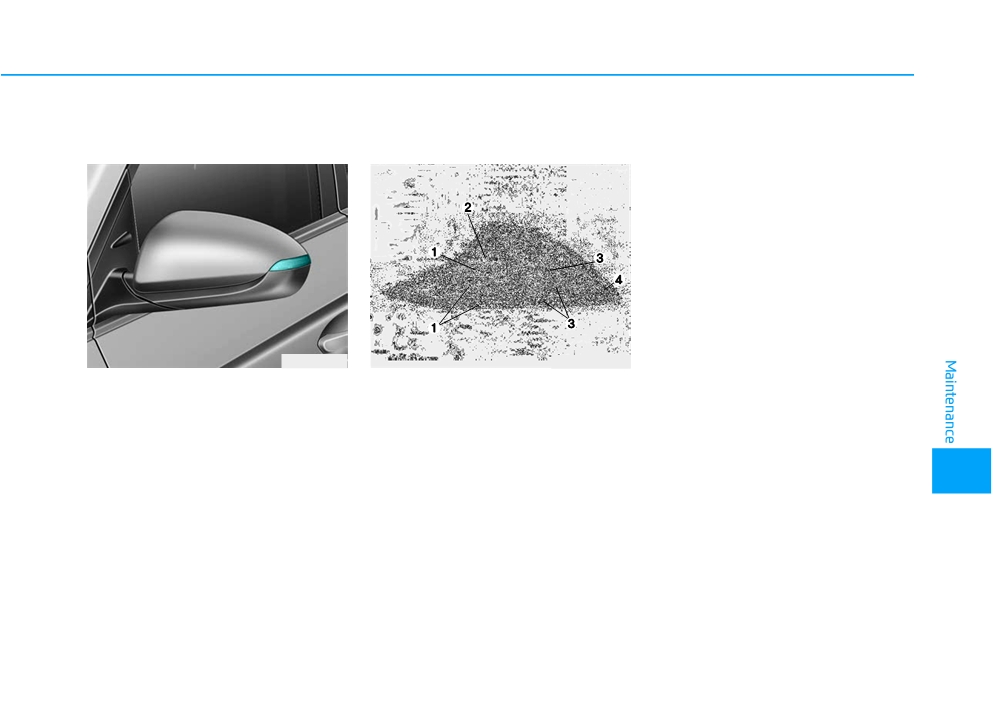
Side marker
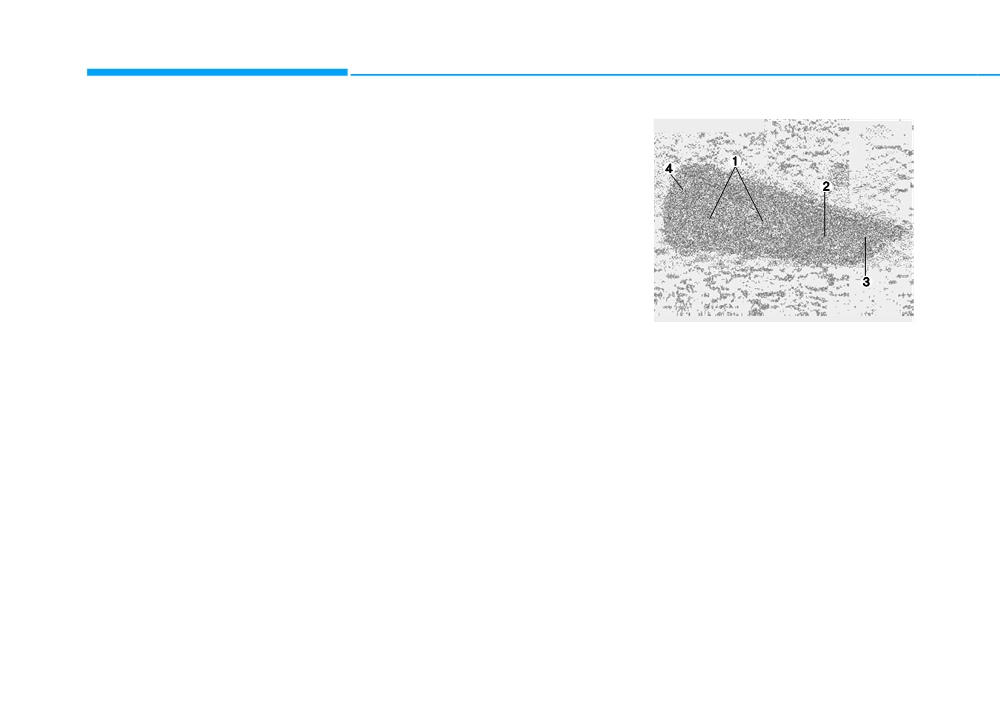
■ Type B - LED type
into the socket and rotating it until
1. Open the hood.
it locks into place.
2. Disconnect the negative battery
6. Install the socket in the assembly
cable.
by aligning the tabs on the socket
3. Remove the socket from the
with the slots in the assembly.
assembly by turning the socket
7. Push the socket into the assembly
counterclockwise until the tabs on
and turn the socket clockwise.
the socket align with the slots on
the assembly.
4. Remove the bulb from the socket
by pulling out the bulb.
5. Insert a new bulb.
(1) Headlamp (Low)
(2) Headlamp (High)
(3) Parking/Turn signal lamp
(4) Side marker
7-58
Headlamp (Low), parking/turn
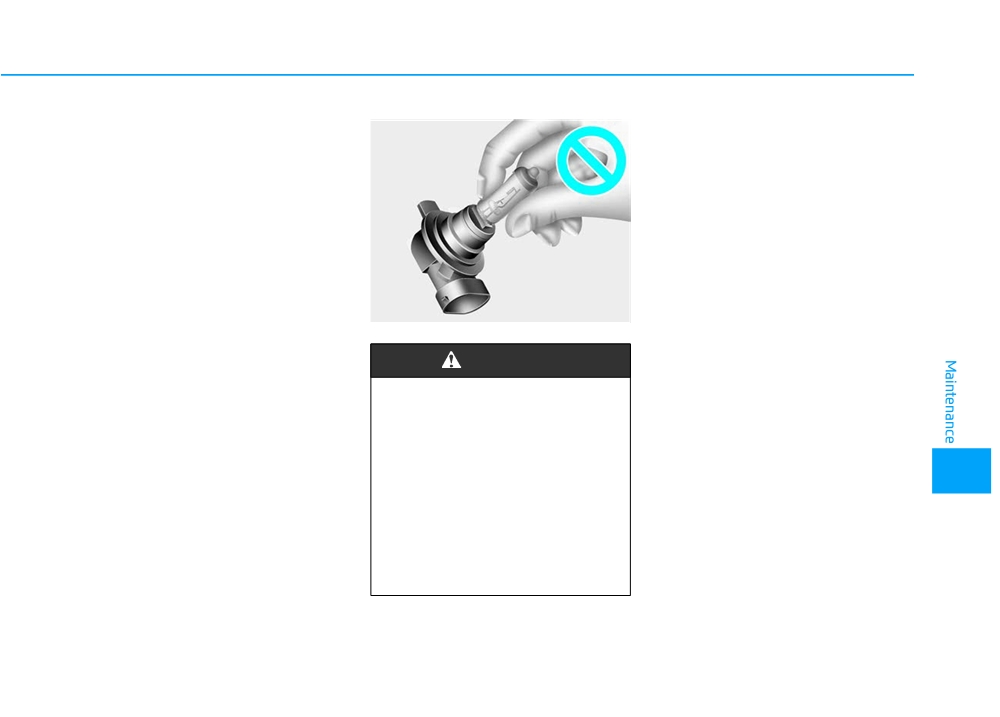
• Always handle them carefully, and
signal lamp and side marker
avoid scratches and abrasions. If
the bulbs are lit, avoid contact with
Your vehicle is equipped with LED
liquids.
lamps. LED lamps do not have
replaceable bulbs. If the LED lamp
• Never touch the glass with bare
does not operate, have the vehicle
hands. Residual oil may cause the
checked by an authorized HYUNDAI
bulb to overheat and burst when lit.
dealer.
• A bulb should be operated only
when installed in a headlamp.
• If a bulb becomes damaged or
cracked, replace it immediately
OLMB073042L
and carefully dispose of it.
WARNING
Halogen bulb
• Handle halogen bulbs with
care. Halogen bulbs contain
pressurized gas that will pro-
duce flying pieces of glass
7
that could cause injuries if
broken.
• Wear eye protection when
changing a bulb. Allow the
bulb to cool down before han-
dling it.
7-59
Maintenance
Headlamp (High)
Daytime Running Light (DRL)
i
Information
The headlamp aiming should be
adjusted after an accident or after the
headlamp assembly is reinstalled at an
authorized HYUNDAI dealer.
OAEE076039
OAEE076030N
1. Open the hood.
Your vehicle is equipped with LED
2. Disconnect the negative battery
lamps. LED lamps do not have
cable.
replaceable bulbs. If the LED lamp
does not operate, have the vehicle
3. Remove the headlamp bulb cover
checked by an authorized HYUNDAI
(1) by turning it counterclockwise.
dealer.
4. Disconnect the headlamp bulb
socket-connector.
5. Remove the bulb from the head-
lamp assembly.
6. Install a new bulb.
7. Connect the headlamp bulb sock-
et-connector.
8. Install the headlamp bulb cover (1)
by turning it clockwise.
7-60
Side Repeater Lamp
Rear Combination Light Bulb
Stop lamp, tail lamp, turn signal
Replacement
Replacement
lamp and side marker
Your vehicle is equipped with LED
lamps. LED lamps do not have
replaceable bulbs. If the LED lamp
does not operate, have the vehicle
checked by an authorized HYUNDAI
dealer.
OAE076034
OAEE076022
Your vehicle is equipped with LED
(1) Tail lamp
lamps. LED lamps do not have
(2) Back-up lamp
replaceable bulbs. If the LED lamp
(3) Stop lamp, tail lamp and turn sig-
does not operate, have the vehicle
nal lamp
checked by an authorized HYUNDAI
dealer.
(4) Side marker
7
7-61
Maintenance
Backup lamp
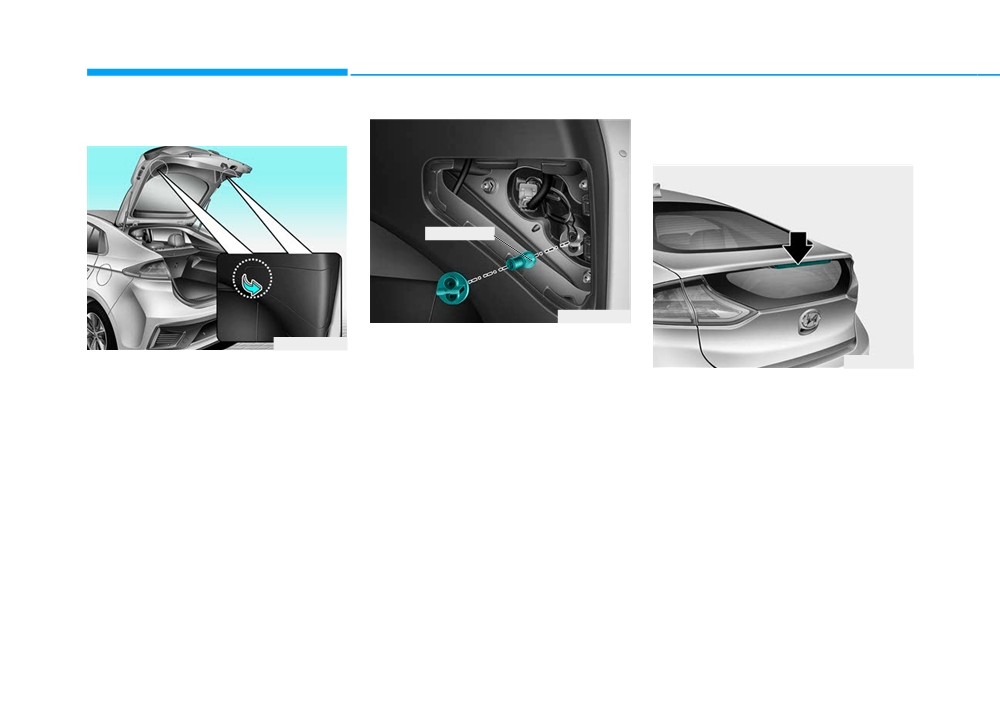
High Mounted Stop Light
Replacement
Backup lamp
OAEE076038
4. Remove the socket from the
OAEE076025
assembly by turning the socket
OAEE076023
1. Turn off the vehicle.
counterclockwise until the tabs on
2. Open the liftgate.
the socket align with the slots on
1. Open the liftgate.
3. Remove the service cover using a
the assembly.
2. Gently remove the cover of the lift-
flat-blade screwdriver.
5. Remove the bulb by pulling it
gate trim.
straight out.
3. Remove the spoiler plug hole.
6. Insert a new bulb by inserting it
4. Disconnect the electrical connec-
into the socket and rotating it until
tor.
it locks into place.
5. Loosen the mounting bolts and
7. Install the socket into the assem-
remove the spoiler.
bly by aligning the tabs on the
6. Remove the high mounted stop
socket with the slots in the assem-
light assembly after disconnecting
bly. Push the socket into the
the connector.
assembly and turn the socket
7. Reinstall a new light assembly in
clockwise.
the reverse order of removal.
8. Reinstall the service cover.
7-62
License Plate Light Bulb
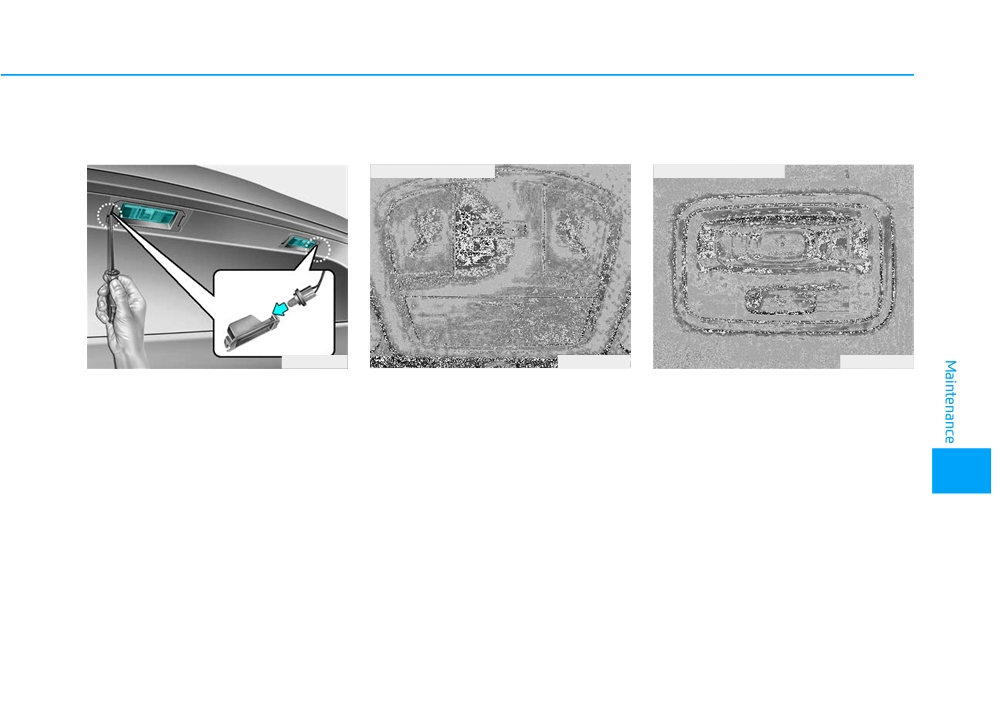
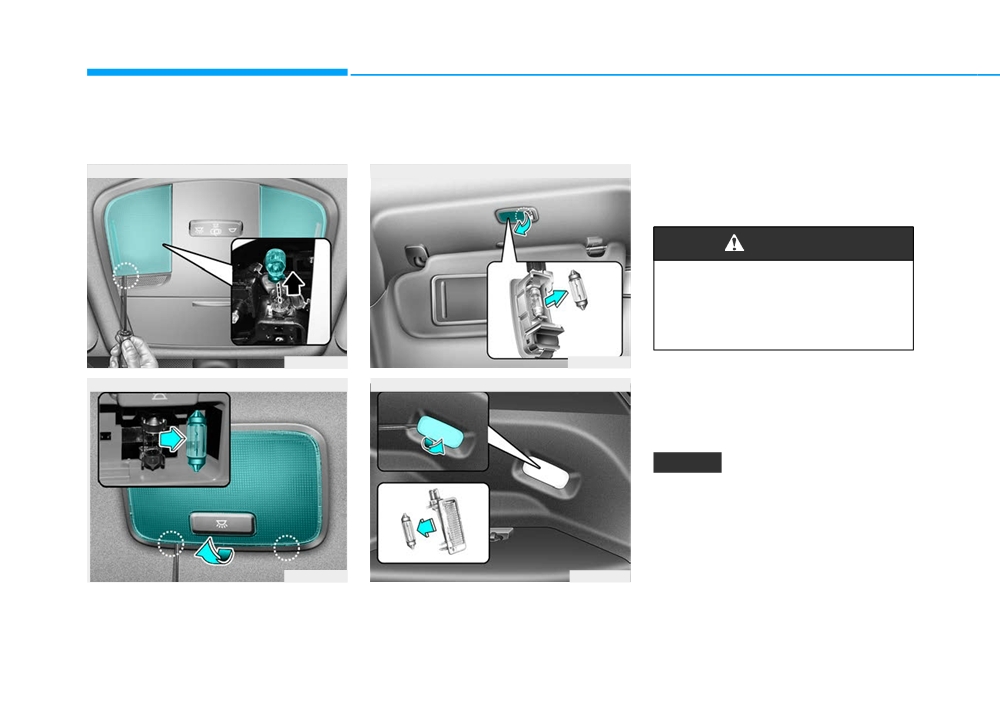
Interior Light Bulb Replacement
Replacement
Map lamp and room lamp
■ Map lamp (LED type)
■ Room lamp (LED type)
OAE076044
OAEE076026
OAEE076027
1. Using a flat-blade screwdriver,
Your vehicle is equipped with LED lamps. LED lamps do not have replace-
gently pry the lens cover from the
able bulbs. If the LED lamp does not operate, have the vehicle checked by an
lamp housing.
authorized HYUNDAI dealer.
2. Remove the bulb by pulling it
straight out.
7
3. Install a new bulb.
4. Reinstall in the reverse order.
7-63
Maintenance
Map lamp, room lamp, vanity mirror lamp and
1. Using a flat-blade screwdriver,
luggage compartment lamp
gently pry the lens from the interi-
or lamp housing.
■ Map lamp (Bulb type)
■ Vanity mirror lamp
2. Remove the bulb by pulling it
straight out.
WARNING
Prior to working on the Interior
Lights, ensure that the lamp is
off to avoid burning your fingers
or receiving an electric shock.
OAE076045
OAE076048
3. Install a new bulb in the socket.
■ Room lamp (Bulb type)
■ Luggage compartment lamp
4. Align the lens tabs with the interi-
or lamp housing notches and snap
the lens into place.
NOTICE
Use care not to dirty or damage
lens, lens tab, and plastic hous-
ings.
OAE076046
OAE076047
7-64
APPEARANCE CARE
Exterior Care
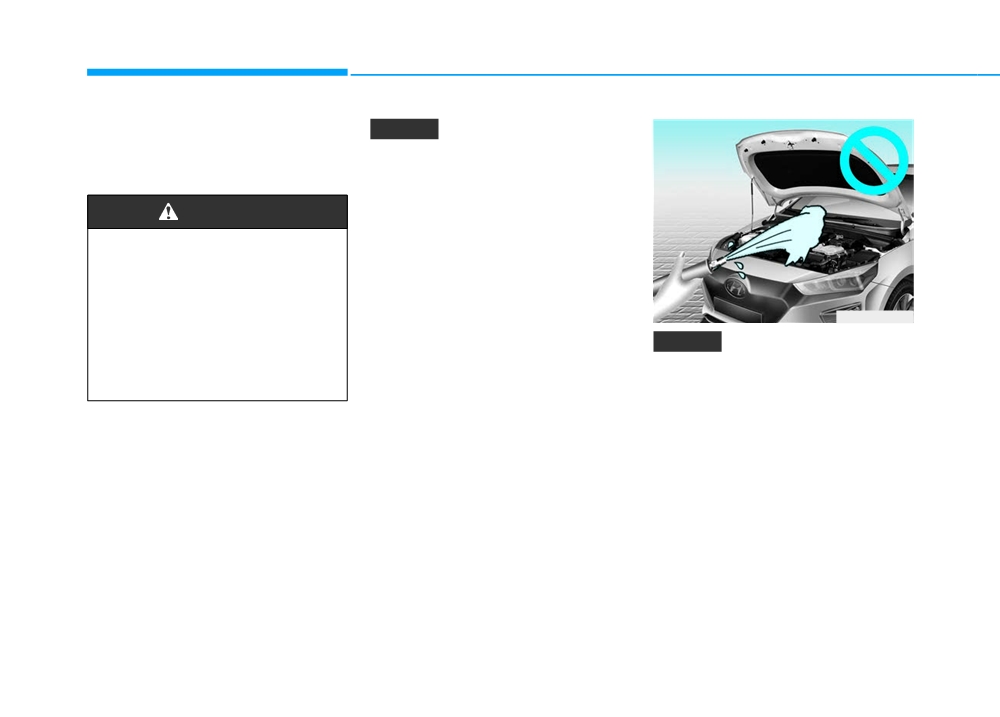
High-pressure washing
Protecting your vehicle’s finish
Exterior general caution
•
When using high-pressure wash-
Washing
ers, make sure to maintain suffi-
To help protect your vehicle’s finish
It is very important to follow the label
cient distance from the vehicle.
directions when using any chemical
from rust and deterioration, wash it
Insufficient clearance or excessive
thoroughly and frequently at least
cleaner or polish. Read all warning
pressure can lead to component
and caution statements that appear
once a month with lukewarm or cold
damage or water penetration.
water.
on the label.
•
Do not spray the camera, sensors
If you use your vehicle for off-road
or its surrounding area directly with
driving, you should wash it after each
a high pressure washer. Shock
off-road trip. Pay special attention to
applied from high pressure water
the removal of any accumulation of
may cause the device to not oper-
salt, dirt, mud, and other foreign
ate normally.
materials. Make sure the drain holes
•
Do not bring the nozzle tip close to
in the lower edges of the doors and
boots (rubber or plastic covers)or
rocker panels are kept clear and
connectors as they may be dam-
clean.
aged if they come into contact with
Insects, tar, tree sap, bird droppings,
high pressure water.
industrial pollution and similar
•
Do not use any high-pressure noz-
deposits can damage your vehicle’s
zles, which induce either one-
finish if not removed immediately.
7
direct water stream or water
Even prompt washing with plain
swirling.
water may not completely remove all
these deposits. A mild soap, safe for
use on painted surfaces, should be
used.
7-65
Maintenance
After washing, rinse the vehicle thor-
NOTICE
oughly with lukewarm or cold water.
Do not allow soap to dry on the fin-
•
Do not use strong soap, chemi-
ish.
cal detergents or hot water, and
do not wash the vehicle in direct
sunlight or when the body of the
WARNING
vehicle is warm.
After washing the vehicle, test
•
Be careful when washing the
the brakes while driving slowly
side windows of your vehicle.
to see if they have been affected
Especially, with high-pressure
by water before getting on the
water, water may leak through
road. If braking performance is
the windows and wet the interi-
OAEE076046L
impaired, dry the brakes by
or.
NOTICE
applying them lightly while
•
To prevent damage to the plastic
maintaining a slow forward
• Water washing in the motor
parts, do not clean with chemi-
speed.
compartment including high
cal solvents or strong deter-
gents.
pressure water washing may
cause the failure of electrical cir-
cuits located in the motor com-
partment.
• Never allow water or other liquids
to come in contact with electri-
cal/electronic components inside
the vehicle as this may damage
them.
7-66

Waxing
NOTICE
Repairing your vehicle’s finish
A good coat of wax provides a barri-
Deep scratches or stone chips in the
•
Wiping dust or dirt off the body
er between your paint and environ-
painted surface must be repaired
with a dry cloth will scratch the
mental contamination.
promptly. Exposed metal will quickly
finish.
Keeping a good coat of wax on your
rust and may develop into a major
•
Do not use steel wool, abrasive
repair expense.
vehicle will help protect it.
cleaners, or strong detergents
Wax the vehicle when water will no
containing highly alkaline or
NOTICE
longer bead on the paint.
caustic agents on chrome-plat-
Always wash and dry the vehicle
ed or anodized aluminum parts.
If your vehicle is damaged and
before waxing. Use a good quality
This may result in damage to the
requires any metal repair or
liquid or paste wax, and follow the
protective coating and cause
replacement, be sure the body
manufacturer’s instructions. Wax all
discoloration or paint deteriora-
shop applies anti-corrosion mate-
metal trim to protect it and to main-
tion.
rials to the parts repaired or
tain its luster.
replaced.
Removing oil, tar, and similar materi-
als with a spot remover will usually
strip the wax from the finish. Be sure
to re-wax these areas even if the rest
of the vehicle does not yet need wax-
ing.
7
7-67
Maintenance
Bright-metal maintenance
Thoroughly flush the vehicle under-
Aluminum wheel maintenance
body and wheel openings with luke-
• To remove road tar and insects,
The aluminum wheels are coated
warm or cold water once a month,
use a tar remover, not a scraper or
with a clear protective finish.
after off-road driving and at the end
other sharp object.
of each winter. Pay special attention
• To protect the surfaces of bright-
NOTICE
to these areas because it is difficult
metal parts from corrosion, apply a
to see all the mud and dirt. It will do
•
Do not use abrasive cleaner, pol-
coating of wax or chrome preser-
more harm than good to wet down
ishing compound, solvent, or
vative and rub to a high luster.
the road grime without removing it.
wire brushes on aluminum
• During winter weather or in coastal
The lower edges of doors, rocker
wheels.
areas, cover the bright metal parts
panels, and frame members have
•
Clean the wheel when it has
with a heavier coating of wax or
drain holes that should not be
cooled.
preservative. If necessary, coat the
allowed to clog with dirt; trapped
parts with non-corrosive petroleum
water in these areas can cause rust-
•
Use only a mild soap or neutral
jelly or other protective compound.
ing.
detergent, and rinse thoroughly
with water. Also, clean the
wheels after driving on salted
Underbody maintenance
WARNING
roads.
Corrosive materials used for ice and
•
Do not wash the wheels with
snow removal and dust control may
After washing the vehicle, test
high-speed car wash brushes.
collect on the underbody. If these
the brakes while driving slowly
to see if they have been affected
•
Do not use any cleaners con-
materials are not removed, acceler-
taining acid or alkaline deter-
ated rusting can occur on underbody
by water. If braking performance
is impaired, dry the brakes by
gents.
parts such as the fuel lines, frame,
floor pan and exhaust system, even
applying them lightly while
though they have been treated with
maintaining a slow forward
rust protection.
speed.
7-68
Corrosion protection
High-corrosion areas
High temperatures can also acceler-
ate corrosion of parts that are not
Protecting your vehicle from corro-
If you live in an area where your vehi-
properly ventilated so the moisture
sion
cle is regularly exposed to corrosive
can be dispersed. For all these rea-
materials, corrosion protection is
By using the most advanced design
sons, it is particularly important to
particularly important. Some of the
and construction practices to combat
keep your vehicle clean and free of
common causes of accelerated cor-
corrosion, HYUNDAI produces cars
mud or accumulations of other mate-
rosion are road salts, dust control
of the highest quality. However, this is
rials. This applies not only to the vis-
chemicals, ocean air and industrial
only part of the job. To achieve the
ible surfaces but particularly to the
pollution.
long-term corrosion resistance your
underside of the vehicle.
vehicle can deliver, the owner’s
cooperation and assistance is also
Moisture breeds corrosion
required.
To help prevent corrosion
Moisture creates the conditions in
Keep your car clean
which corrosion is most likely to
Common causes of corrosion
occur. For example, corrosion is
The best way to prevent corrosion is
accelerated by high humidity, partic-
to keep your vehicle clean and free
The most common causes of corro-
ularly when temperatures are just
of corrosive materials. Attention to
sion on your vehicle are:
above freezing. In such conditions,
the underside of the vehicle is partic-
• Road salt, dirt and moisture that is
the corrosive material is kept in con-
ularly important.
allowed to accumulate underneath
tact with the car surfaces by moisture
the vehicle.
that is slow to evaporate.+
• If you live in a high-corrosion area
7
• Removal of paint or protective
Mud is particularly corrosive
— where road salts are used, near
coatings by stones, gravel, abra-
because it is slow to dry and holds
the ocean, areas with industrial
sion or minor scrapes and dents
moisture in contact with the vehicle.
pollution, acid rain, etc.—, you
which leave unprotected metal
Although the mud appears to be dry,
should take extra care to prevent
exposed to corrosion.
it can still retain the moisture and
corrosion. In winter, hose off the
promote corrosion.
underside of your vehicle at least
once a month and be sure to clean
the underside thoroughly when
winter is over.
7-69

Maintenance
• When cleaning underneath the
Keep your garage dry
Interior Care
vehicle, pay particular attention to
Don’t park your car in a damp, poor-
Interior general precautions
the components under the fenders
ly ventilated garage. This creates a
and other areas that are hidden
Prevent caustic solutions such as
favorable environment for corrosion.
from view. Do a thorough job; just
perfume and cosmetic oil, from con-
This is particularly true if you wash
dampening the accumulated mud
tacting the interior parts because
your vehicle in the garage or drive it
rather than washing it away will
they may cause damage or discol-
into the garage when it is still wet or
accelerate corrosion rather than
oration. If they do contact the interior
covered with snow, ice or mud. Even
prevent it. Water under high pres-
parts, wipe them off immediately.
a heated garage can contribute to
sure and steam are particularly
See the instructions for the proper
corrosion unless it is well ventilated
effective in removing accumulated
way to clean vinyl.
so moisture is dispersed.
mud and corrosive materials.
• When cleaning lower door panels,
NOTICE
Keep paint and trim in good condition
rocker panels and frame members,
• Never allow water or other liq-
be sure that drain holes are kept
Scratches or chips in the finish
uids to come in contact with
open so that moisture can escape
should be covered with "touch-up"
electrical/electronic
compo-
and not be trapped inside to accel-
paint as soon as possible to reduce
nents inside the vehicle as this
erate corrosion.
the possibility of corrosion. If bare
may damage them.
metal is showing through, the atten-
tion of a qualified body and paint
• When cleaning leather products
shop is recommended.
(steering wheel, seats etc.), use
neutral detergents or low alco-
Bird droppings are highly corrosive
hol content solutions. If you use
and may damage painted surfaces in
high alcohol content solutions
just a few hours. Always remove bird
or acid/alkaline detergents, the
droppings as soon as possible.
color of the leather may fade or
the surface may get stripped off.
7-70

Cleaning the upholstery and
Leather (if equipped)
CAUTION
interior trim
•
Feature of Seat Leather
Vinyl (if equipped)
- Leather is made from the outer
•
Wrinkles or abrasions which
Remove dust and loose dirt from
skin of an animal, which goes
appear naturally from usage
vinyl with a whisk broom or vacuum
through a special process to be
are not covered by warranty.
cleaner. Clean vinyl surfaces with a
available for use. Since it is a nat-
•
Belts with metallic acces-
vinyl cleaner.
ural object, each part differs in
sories, zippers or keys inside
thickness or density.
the back pocket may damage
Fabric (if equipped)
Wrinkles may appear as a natural
the seat fabric.
result of stretching and shrinking
Remove dust and loose dirt from fab-
•
Make sure not to wet the seat.
depending on the temperature
ric with a whisk broom or vacuum
It may change the nature of
and humidity.
cleaner. Clean with a mild soap solu-
natural leather.
tion recommended for upholstery or
- The seat is made of stretchable
•
Jeans or clothes which could
carpets. Remove fresh spots imme-
fabric to improve comfort.
bleach may contaminate the
diately with a fabric spot cleaner. If
- The parts contacting the body are
surface of the seat covering
fresh spots do not receive immediate
curved and the side supporting
fabric.
attention, the fabric can be stained
area is high which provides driv-
and its color can be affected. Also, its
ing comfort and stability.
fire-resistant properties can be
- Wrinkles may appear naturally
reduced if the material is not proper-
from usage. It is not a fault of the
7
ly maintained.
products.
NOTICE
Using anything but recommended
cleaners and procedures may
affect the fabric's appearance and
fire-resistant properties.
7-71
Большое спасибо!
Ваше мнение очень важно для нас.
Нет комментариевНе стесняйтесь поделиться с нами вашим ценным мнением.
Текст