Hyundai Ioniq Electric (2019 year). Manual — part 24
Maintenance
MAINTENANCE SERVICES
You should exercise the utmost care
Detailed warranty information is pro-
Certain modifications may also be in
to prevent damage to your vehicle
vided in your Owner's Handbook &
violation of regulations established by
and injury to yourself whenever per-
Warranty Information booklet.
the U.S. Department of Transportation
forming any maintenance or inspec-
and other federal or state agencies.
Repairs and adjustments required as
tion procedures.
a result of improper maintenance or
We recommend you have your vehi-
a lack of required maintenance are
NOTICE
cle maintained and repaired by an
not covered.
Improper owner maintenance dur-
authorized HYUNDAI dealer. An
authorized HYUNDAI dealer meets
ing the warranty period may affect
Owner Maintenance
warranty coverage. For details,
HYUNDAI's high service quality
Precautions
read the separate Owner's
standards and receives technical
Handbook & Warranty Information
support from HYUNDAI in order to
Inadequate, incomplete or insuffi-
provide you with a high level of serv-
cient servicing may result in opera-
booklet provided with the vehicle.
If you're unsure about any service
ice satisfaction.
tional problems with your vehicle that
or maintenance procedure, have it
could lead to vehicle damage, an
done by an authorized HYUNDAI
accident, or personal injury. This
Owner's Responsibility
dealer.
chapter provides instructions only for
Maintenance service and record
the maintenance items that are easy
retention are the owner's responsibil-
to perform. Several procedures can
ity.
be done only by an authorized
You should retain documents that
HYUNDAI dealer with special tools.
show proper maintenance has been
Your vehicle should not be modified
performed on your vehicle in accor-
in any way. Such modifications may
dance with the scheduled mainte-
adversely affect the performance,
nance service charts shown on the
safety or durability of your vehicle
following pages. You need this infor-
and may, in addition, violate condi-
mation to establish your compliance
tions of the limited warranties cover-
with the servicing and maintenance
ing the vehicle.
requirements of your vehicle war-
ranties.
7-4
OWNER MAINTENANCE
The following lists are vehicle checks
WARNING
(Continued)
and inspections that should be per-
•
Block the tires
(front and
formed by the owner or an author-
Performing maintenance work
back) to prevent the vehicle
ized HYUNDAI dealer at the frequen-
on a vehicle can be dangerous.
from moving.
cies indicated to help ensure safe,
If you lack sufficient knowledge
Remove loose clothing or jew-
dependable operation of your vehi-
and experience or the proper
elry that can become entan-
cle.
tools and equipment to do the
gled in moving parts.
Any adverse conditions should be
work, have it done by an author-
•
Keep flames, sparks, or smok-
brought to the attention of your deal-
ized HYUNDAI dealer.
ing materials away from the
er as soon as possible.
ALWAYS follow these precau-
battery related parts.
These Owner Maintenance vehicle
tions for performing mainte-
checks are generally not covered by
nance work:
warranties and you may be charged
• Park your vehicle on level
for labor, parts and lubricants used.
ground, shift to the P (Park)
position, apply the parking
brake, and place the POWER
button in the OFF position.
(Continued)
7
7-5
Maintenance
Owner Maintenance Schedule
While operating your vehicle:
At least monthly:
When you stop for fuel:
•
Check for vibrations in the steering
•
Check coolant level in the coolant
wheel. Notice if there is any
reservoir.
• Check coolant level in the coolant
increased steering effort or loose-
reservoir.
•
Check the operation of all exterior
ness in the steering wheel, or
lights, including the brake lights,
• Check the windshield washer fluid
change in its straight-ahead posi-
turn signals and hazard warning
level.
tion.
flashers.
• Check for low or under-inflated
•
Notice if your vehicle constantly
•
Check the inflation pressures of all
tires.
turns slightly or "pulls" to one side
tires including the spare for tires
when traveling on smooth, level
that are worn, show uneven wear,
WARNING
road.
or are damaged.
•
When stopping, listen and check
•
Check for loose wheel lug nuts.
Be careful when checking your
for unusual sounds, pulling to one
coolant level when the parts in
side, increased brake pedal travel
the motor compartment are hot.
or "hard-to-push" brake pedal.
This may result in coolant being
•
If any slipping or changes in the
blown out of the opening and
operation of your reduction gear
cause serious burns and other
occurs, check the reduction gear
injuries.
fluid level.
•
Check the reduction gear P (Park)
function.
•
Check the parking brake.
•
Check for fluid leaks under your
vehicle (water dripping from the air
conditioning system during or after
use is normal).
7-6
SCHEDULED MAINTENANCE
At least twice a year:
At least once a year:
SERVICES
(i.e., every Spring and Fall)
•
Clean body and door drain holes.
Follow
Normal
Maintenance
•
Check radiator, heater and air con-
•
Lubricate door hinges and hood
Schedule if the vehicle is usually
ditioning hoses for leaks or dam-
hinges.
operated where none of the following
age.
•
Lubricate door and hood locks and
conditions apply. If any of the follow-
•
Check windshield washer spray
ing conditions apply, you must follow
latches.
and wiper operation. Clean wiper
the Maintenance Under Severe
•
Lubricate door rubber weather
blades with clean cloth dampened
Usage Conditions.
strips.
with washer fluid.
•
Repeated short distance driving.
•
Lubricate door checker.
•
Check headlamp alignment.
•
Driving in dusty conditions or
•
Check the air conditioning system.
•
Check the seat belts for wear and
sandy areas.
function.
•
Inspect and lubricate reduction
•
Extensive use of brakes.
gear linkage and controls.
•
Driving in areas where salt or other
•
Clean the battery and terminals.
corrosive materials are used.
•
Check the brake fluid level.
•
Driving on rough or muddy roads.
•
Driving in mountainous areas.
•
Extended periods of low speed
operation.
7
•
Driving for a prolonged period in
cold temperatures and/or extreme-
ly humid climates.
•
More than 50% driving in heavy
city traffic during hot weather
above 90°F (32°C).
For additional information or assis-
tance see your authorized HYUNDAI
dealer.
7-7
Maintenance
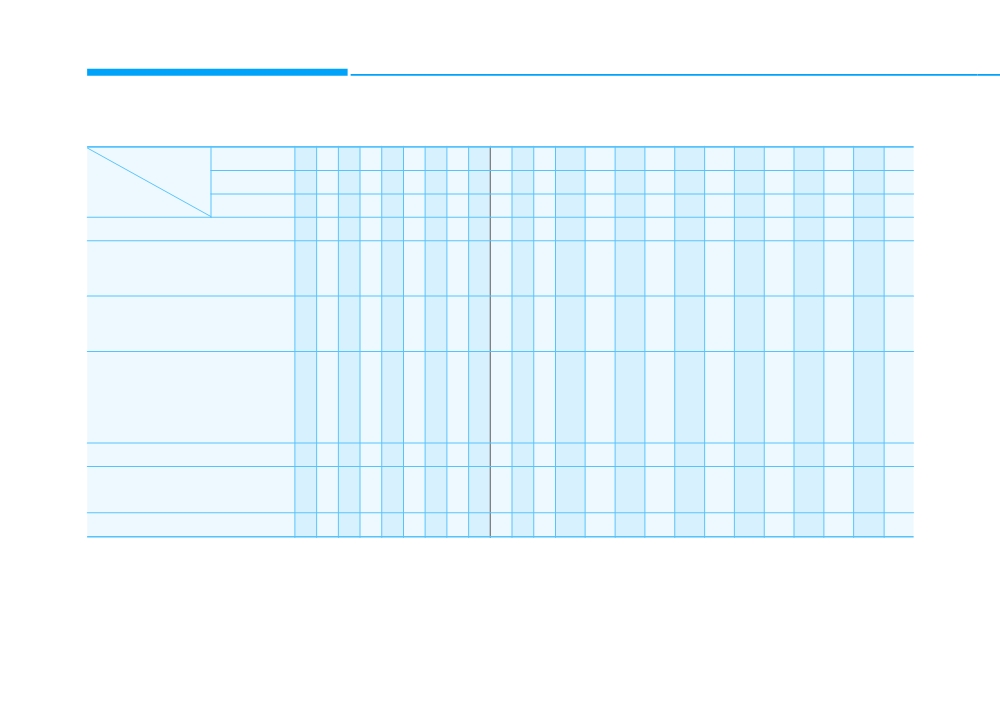
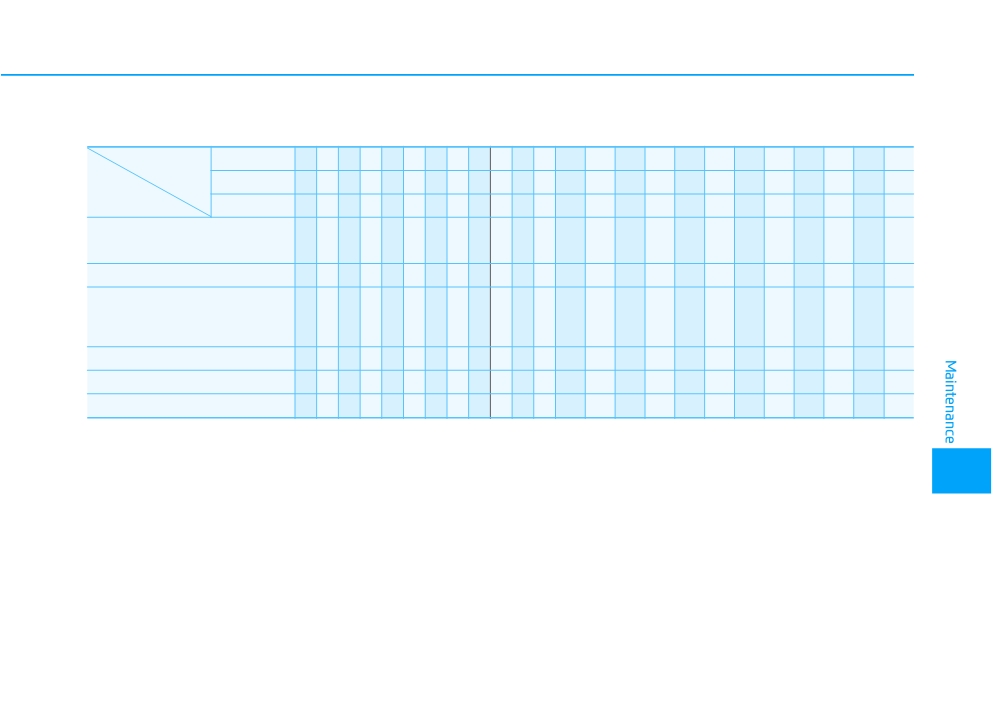
Normal Maintenance Schedule
Maintenance
Months
4
8
12
16
20
24
28
32
36
40
44
48
52
56
60
64
68
72
76
80
84
88
92
96
Intervals
Miles×1,000
5
10
15
20
25
30
35
40
45
50
55
60
65
70
75
80
85
90
95
100
105
110
115
120
Maintenance
Km×1,000
8
16
24
32
40
48
56
64
72
80
88
96
104
112
120
128
136
144
152
160
168
176
184
192
Item
Inspect cooling system
I
I
I
I
I
I
I
I
Rotate Tires
(Includes Tire Pressure and
I
I
I
I
I
I
I
I
I
I
I
I
I
I
I
I
I
I
I
I
I
I
I
I
Tread Wear Inspection)
Replace Climate Control Air
Filter (For Evaporator and
R
R
R
R
R
R
R
R
Blower Unit)
Replace coolant *1 *2
(1st Replace 120,000 miles or
96 months)
R
(Thereafter, Replace 30,000
miles / 24 months)
Inspect 12V battery condition
I
I
I
I
I
I
I
I
Inspect brake lines, hoses, and
I
I
I
I
I
I
I
I
connections
Inspect disc brakes and pads
I
I
I
I
I
I
I
I
I
: Inspect (Inspect and if necessary, adjust, correct, clean, or replace)
R : Replace or change.
*1 : When adding coolant, use only deionized water or soft water for your vehicle and never mix hard water in the coolant filled at
the factory. An improper coolant mixture can result in serious malfunction or vehicle damage.
*2 : For your convenience, it can be replaced prior to it's interval when you do maintenance of other items.
7-8
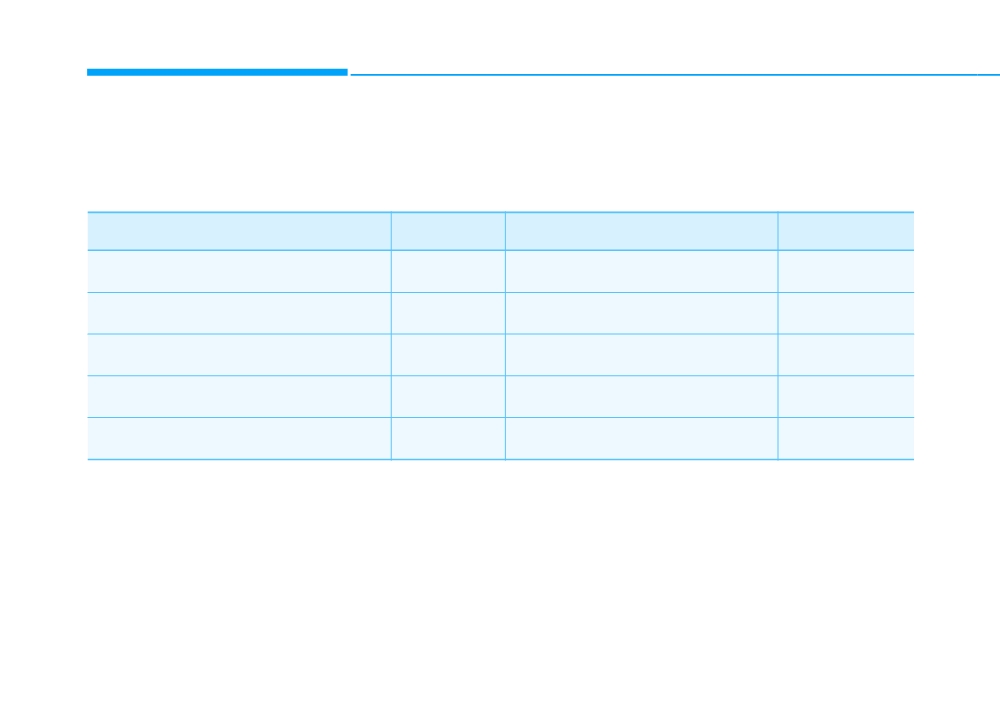
Normal Maintenance Schedule (Cont.)
Maintenance
Months
4
8
12
16
20
24
28
32
36
40
44
48
52
56
60
64
68
72
76
80
84
88
92
96
Intervals
Miles×1,000
5
10
15
20
25
30
35
40
45
50
55
60
65
70
75
80
85
90
95
100
105
110
115
120
Maintenance
Km×1,000
8
16
24
32
40
48
56
64
72
80
88
96
104
112
120
128
136
144
152
160
168
176
184
192
Item
Inspect steering gear rack,
I
I
I
I
I
I
I
I
linkage, and boots
Inspect drive shafts and boots
I
I
I
I
I
I
I
I
Inspect air conditioning
compressor, air conditioner
I
I
I
I
I
I
I
I
refrigerant and performance
Inspect reduction gear fluid
I
I
I
Inspect brake pedal
I
I
I
I
I
I
I
I
Inspect brake fluid
I
I
I
I
I
I
I
I
I
: Inspect (Inspect and if necessary, adjust, correct, clean, or replace)
R : Replace or change.
7
7-9
Maintenance
Maintenance Under Severe Usage Conditions
The following items must be serviced more frequently on cars normally used under severe driving conditions. Refer
to the chart below for the appropriate maintenance intervals.
R : Replace I : Inspect and, after inspection, clean, adjust, repair or replace if necessary
MAINTENANCE
DRIVING
MAINTENANCE ITEM
MAINTENANCE INTERVALS
OPERATION
CONDITION
Reduction gear fluid
R
Every 75,000 miles (120,000 km)
C, E, F, G, I
Brake / pads, calipers
I
More frequently
C, D, G, H
Steering gear box, linkage & boots /
I
More frequently
C, D, E, F, G, H, I
lower arm ball joint, upper arm ball joint
Drive shafts and boots
I
More frequently
C, D, E, F, G, H, I
Climate control air filter
R
More frequently
C, E
(for evaporator and blower unit)
Severe Driving Conditions
A-Repeatedly driving short distances of less than 5 miles
E-Driving in sandy areas
(8 km) in normal temperature or less than 10 miles (16 km)
F-Driving in heavy traffic area over 90°F (32°C)
in freezing temperature
G-Driving on uphill, downhill, or mountain road
B-Extensive low speed driving for long distances
H-Towing a Trailer, or using a camper, or roof rack
C-Driving on rough, dusty, muddy, unpaved, graveled or salt-
I
- Driving as a patrol car, taxi, other commercial use or vehicle
spread roads
towing
D-Driving in areas using salt or other corrosive materials or in
J-Driving over 106 mph (170 km/h)
very cold weather
K-Frequently driving in stop-and-go conditions
7-10
EXPLANATION OF SCHEDULED MAINTENANCE ITEMS
Cooling System
Brake Fluid
Steering Gear Box, Linkage &
Boots/Lower Arm Ball Joint
Check cooling system components,
Check brake fluid level in the brake
such as radiator, coolant reservoir,
fluid reservoir. The level should be
With the vehicle stopped and the
hoses and connections for leakage
between the MIN and the MAX
vehicle off, check for excessive free-
and damage. Replace any damaged
marks on the side of the reservoir.
play in the steering wheel. Check the
parts.
Use only hydraulic brake fluid con-
linkage for bends or damage. Check
forming to DOT 3 or DOT 4 specifi-
the dust boots and ball joints for
cation.
deterioration, cracks, or damage.
Coolant
Replace any damaged parts.
The coolant should be changed at
Brake Discs, Pads, Calipers
the intervals specified in the mainte-
and Rotors
Drive Shafts and Boots
nance schedule.
Check the pads for excessive wear,
Check the drive shafts, boots and
discs for run out and wear, and
clamps for cracks, deterioration, or
Reduction Gear Fluid
calipers for fluid leakage.
damage. Replace any damaged
Inspect the reduction gear fluid
parts and, if necessary, repack the
according to the maintenance sched-
grease.
Suspension Mounting Bolts
ule.
Check the suspension connections
Air Conditioning Refrigerant
for looseness or damage. Retighten
Brake Hoses and Lines
to the specified torque.
Check the air conditioning lines and
7
Visually check for proper installation,
connections for leakage and dam-
chafing, cracks, deterioration and
age.
any leakage. Replace any deteriorat-
ed or damaged parts immediately.
7-11
Maintenance
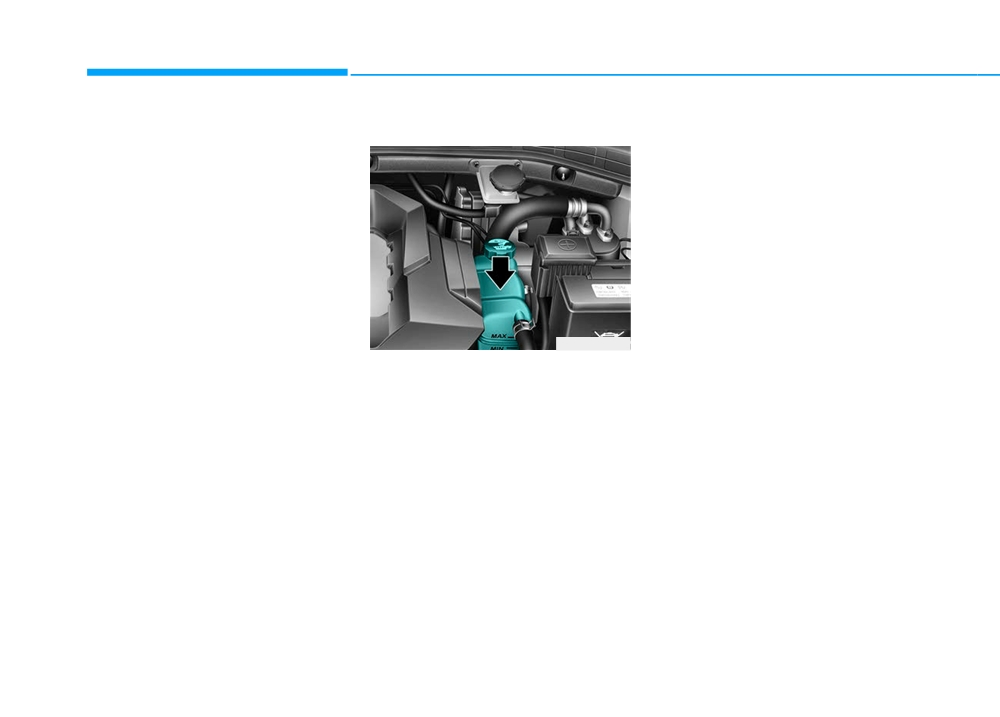
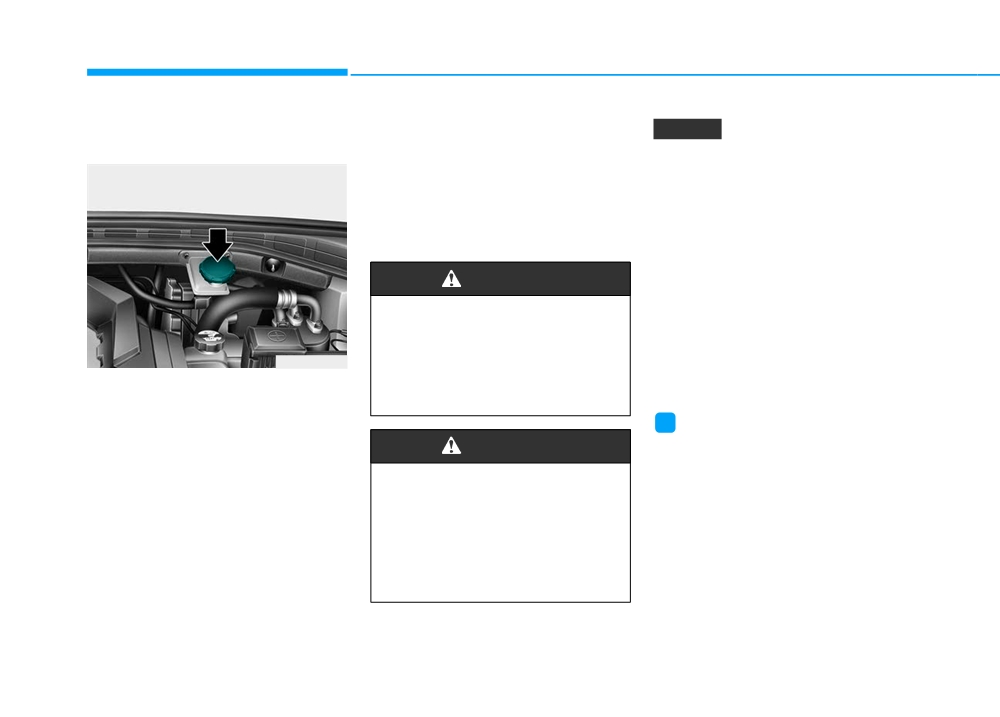
COOLANT
The high-pressure cooling system
Checking the Coolant Level
Recommended coolant
has a reservoir filled with year-round
•
When adding coolant, use only
antifreeze coolant. The reservoir is
distilled (deionized) water for your
filled at the factory.
vehicle and never mix hard water in
Check the antifreeze protection and
the coolant filled at the factory.
coolant level at least once a year, at
•
An improper coolant mixture can
the beginning of the winter season
result in severe malfunction or
and before traveling to a colder cli-
electric vehicle damage.
mate.
•
Do not use alcohol or methanol
coolant or mix them with the spec-
ified coolant.
•
Do not use a solution that contains
OAEE076002L
more than 60% antifreeze or less
than 35% antifreeze, which would
Check the condition and connections
reduce the effectiveness of the
of all cooling system hoses and
solution.
heater hoses. Replace any swollen
or deteriorated hoses.
The coolant level should be filled
between the MAX and the MIN
marks on the side of the coolant
reservoir when the parts in the motor
compartment is cool.
If the coolant level is low, add enough
distilled
(deionized) water to bring
the level to the MAX mark, but do not
overfill. If frequent additions are
required, you see an authorized
HYUNDAI dealer for a cooling sys-
tem inspection.
7-12
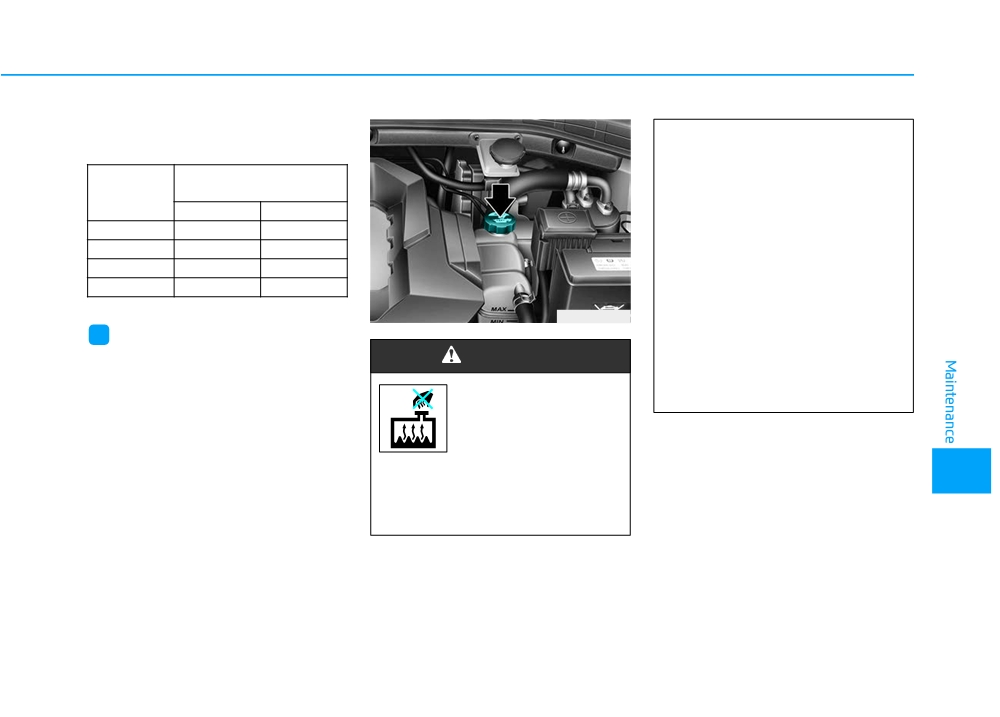
For mixing percentage, refer to the
(Continued)
following table:
Turn the vehicle off and wait
Mixture Percentage
until the parts in the motor com-
Ambient
(volume)
partment cools down. Use
Temperature
Antifreeze
Water
extreme care when removing
the coolant cap. Wrap a thick
5°F (-15°C)
35
65
towel around it, and turn it
-13°F (-25°C)
40
60
counterclockwise slowly to the
-31°F (-35°C)
50
50
first stop. Step back while the
-49°F (-45°C)
60
40
pressure is released from the
cooling system. When you are
OAEE076002
sure all the pressure has been
i
Information
released, press down on the
If in doubt about the mix ratio, a 50%
WARNING
cap, using a thick towel, and
water and 50% antifreeze mix is the
continue turning counterclock-
easiest to mix together as it will be the
Never remove the
wise to remove it.
same quantity of each. It is suitable to
coolant cap or the
use for most temperature ranges of
drain plug while the
- 31°F and higher.
radiator is hot. Hot
coolant and steam
may blow out under pressure,
7
causing serious injury.
(Continued)
7-13

Maintenance
WARNING
WARNING
(Continued)
■ Motor compartment rear view
The electric motor for
Make sure the coolant cap is
the cooling fan may
properly closed after refilling
continue to operate
coolant.
or start up when the
■ Motor compartment front view
vehicle is not running
and can cause serious injury.
Keep hands, clothing and tools
away from the rotating fan
blades of the cooling fan.
OAEE076044L
The electric motor for the cooling fan
2. Make sure that the tiny pro-
is controlled by coolant temperature,
trusions inside the coolant
refrigerant pressure and vehicle
cap is securely interlocked.
OTL075062
speed. As the coolant temperature
decreases, the electric motor will
1. Check if the coolant cap label
automatically shut off. This is a nor-
is straight In front.
mal condition.
(Continued)
7-14
Changing Coolant
NOTICE
Have coolant changed by an author-
To prevent damage to parts in the
ized HYUNDAI dealer according to
motor compartment, put a thick
the Maintenance Schedule at the
towel around the coolant cap
beginning of this chapter.
before refilling the coolant to pre-
vent the coolant from overflowing
WARNING
into parts in the motor compart-
ment.
Do not use coolant or antifreeze
in the washer fluid reservoir.
Coolant can severely obscure
visibility when sprayed on the
windshield and may cause loss
of vehicle control resulting in an
accident.
Coolant may also cause dam-
age to paint and body trim.
7
7-15
Maintenance
BRAKE FLUID
Checking the Brake Fluid
If the level is low, add the specified
NOTICE
Level
brake fluid to the MAX level. The level
will fall with accumulated mileage.
• Do not allow brake fluid to con-
This is a normal condition associated
tact the vehicle’s body paint, as
with the wear of the brake linings. If
paint damage will result.
the fluid level is excessively low, have
• Brake fluid, which has been
the brake system checked by an
exposed to open air for an
authorized HYUNDAI dealer.
extended time should NEVER be
used as its quality cannot be
WARNING
guaranteed. It should be dis-
posed of properly.
If the brake system requires fre-
• Do not use the wrong kind of
quent additions of fluid this
brake fluid. A few drops of min-
could indicate a leak in the
eral based oil, such as engine
OAEE076003
brake system. Have the vehicle
oil, in your brake system can
Check the fluid level in the reservoir
inspected by an authorized
damage brake system parts.
HYUNDAI dealer.
periodically. The fluid level should be
between MAX and MIN marks on the
i
Information
side of the reservoir.
WARNING
Use only the specified brake fluid
Before removing the reservoir cap
(refer to "Recommended Lubricants
and adding brake fluid, clean the
Do not allow brake fluid to come
and Capacities" in chapter 8).
area around the reservoir cap thor-
in contact with your eyes. If
oughly to prevent brake fluid contam-
brake fluid comes in contact
ination.
with your eyes, flush your eyes
with clean water for at least 15
minutes and get immediate
medical attention.
7-16

WASHER FLUID
Checking the Washer Fluid
WARNING
Level
To prevent serious injury or
death, take the following safety
precautions when using washer
fluid:
•
Do not use coolant or
antifreeze in the washer fluid
reservoir.
Coolant can severely obscure
visibility when sprayed on the
windshield and may cause loss
of vehicle control resulting in
OAEE076004
an accident or damage to paint
and body trim.
Check the fluid level in the washer
fluid reservoir and add fluid if neces-
•
Do not allow sparks or flame to
sary. Plain water may be used if
contact the washer fluid or the
washer fluid is not available.
washer fluid reservoir. Washer
However, use washer solvent with
fluid may contain alcohol and
antifreeze characteristics in cold cli-
can be flammable.
7
mates to prevent freezing.
•
Do not drink washer fluid and
avoid contact with skin. Washer
fluid is harmful to humans and
animals.
•
Keep washer fluid away from
children and animals.
7-17
Maintenance
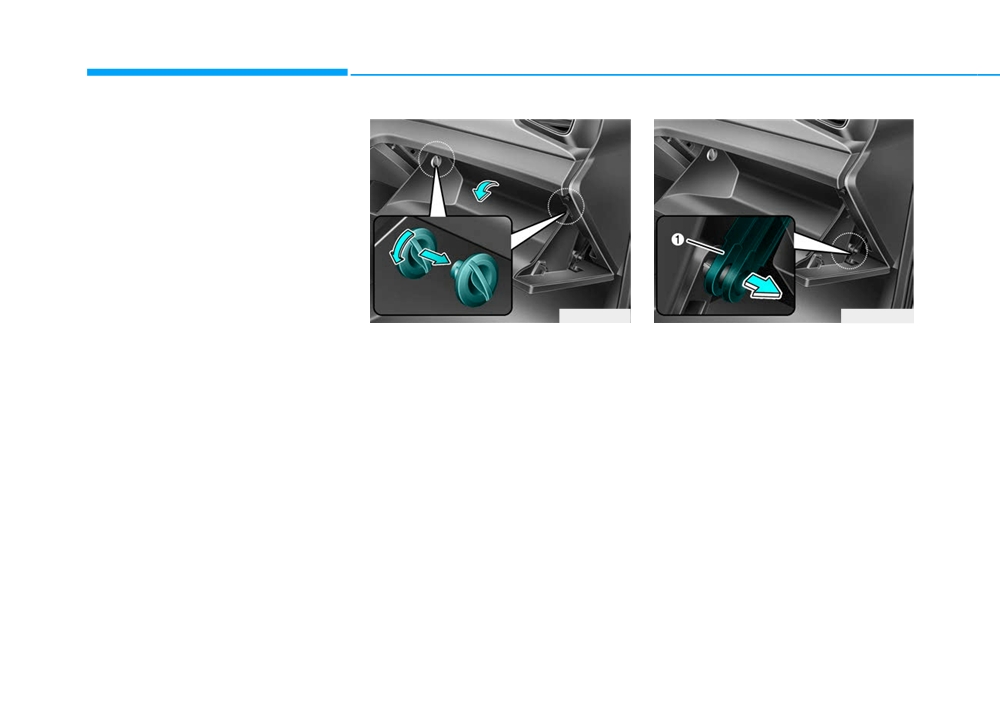
CLIMATE CONTROL AIR FILTER
Filter Inspection
The climate control air filter should
be replaced according to the
Maintenance Schedule. If the vehi-
cle is operated in severely air-pollut-
ed cities or on dusty rough roads for
a long period, it should be inspected
more frequently and replaced earlier.
When you replace the climate control
air filter, replace it performing the fol-
lowing procedure, and be careful to
avoid damaging other components.
OAEE076006
OAEE076005
1. With the glove box open, remove
2. Remove the support rod (1).
the stoppers on both sides to allow
the glove box to hang freely on the
hinges.
7-18

NOTICE
Install a new climate control air fil-
ter in the correct direction with the
arrow symbol (↓) facing down-
wards. Otherwise, the climate con-
trol effects may decrease, possi-
bly with a noise.
OAEE076029
OHG075041
3. Press and hold the lock (1) on
5. Replace the climate control air fil-
both sides of the cover.
ter.
4. Pull out (2) the cover.
6. Reassemble in the reverse order
of disassembly.
7
7-19
Maintenance
WIPER BLADES
Blade Inspection
NOTICE
Blade Replacement
Contamination of either the wind-
When the wipers no longer clean
To prevent damage to the wiper
shield or the wiper blades with for-
adequately, the blades may be worn
blades, arms or other compo-
eign matter can reduce the effective-
or cracked, and require replacement.
nents, do not:
ness of the windshield wiper func-
• Use gasoline, kerosene, paint
tionality. Common sources of con-
NOTICE
thinner, or other solvents on or
tamination are insects, tree sap, and
near them.
hot wax treatments used by some
To prevent damage to the wiper
commercial car washes. If the blades
• Attempt to move the wipers
arms or other components, do not
are not wiping properly, clean both
manually.
attempt to move the wipers manu-
the window and the blades with a
• Use non-specified wiper blades.
ally.
clean cloth dampened with washer
fluid.
NOTICE
i
Information
Commercial hot waxes applied by
The use of a non-specified wiper
automatic car washes have been
blade could result in wiper mal-
known to make the windshield diffi-
function and failure.
cult to clean.
7-20
Большое спасибо!
Ваше мнение очень важно для нас.
Нет комментариевНе стесняйтесь поделиться с нами вашим ценным мнением.
Текст