Dodge Challenger SRT8 (2009 year). Instruction — part 19

WARNING!
• Do not use a tire, wheel size or rating other than
that specified for your vehicle. Some combinations
of unapproved tires and wheels may change sus-
pension dimensions and performance characteris-
tics, resulting in changes to steering, handling, and
braking of your vehicle. This can cause unpredict-
able handling and stress to steering and suspen-
sion components. You could lose control and have
an accident resulting in serious injury or death.
Use only the tire and wheel sizes with load ratings
approved for your vehicle.
• Never use a tire with a smaller load index or
capacity, other than what was originally equipped
on your vehicle. Using a tire with a smaller load
index could result in tire overloading and failure.
You could lose control and have an accident.
(Continued)
WARNING! (Continued)
• Failure to equip your vehicle with tires having
adequate speed capability can result in sudden tire
failure and loss of vehicle control.
CAUTION!
Replacing original tires with tires of a different size
may result in false speedometer and odometer read-
ings.
TIRE CHAINS
Due to limited clearance, tire chains are not recom-
mended.
300
STARTING AND OPERATING
CAUTION!
Damage to the vehicle may result if tire chains are
used.
SNOW TIRES
Some areas of the country require the use of snow tires
during the winter. Standard tires are of the all season type
and satisfy this requirement as indicated by the M+S
designation on the tire sidewall.
If you need snow tires, select tires equivalent in size and
type to the original equipment tires. Use snow tires only
in sets of four. Failure to do so may adversely affect the
safety and handling of your vehicle.
Snow tires generally have lower speed ratings than what
was originally equipped with your vehicle and should
not be operated at sustained speeds over 75 mph
(120 km/h).
TIRE ROTATION RECOMMENDATIONS
Tires on the front and rear axles of vehicles operate at
different loads and perform different steering, driving,
and braking functions. For these reasons, they wear at
unequal rates and tend to develop irregular wear pat-
terns. These effects can be reduced by timely rotation of
tires. The benefits of rotation are especially worthwhile
with aggressive tread designs such as those on all season
type tires. Rotation will increase tread life, help to main-
tain mud, snow, and wet traction levels, and contribute to
a smooth, quiet ride.
Refer to the “Maintenance Schedule” in Section 8 for the
proper maintenance intervals. Remember, more frequent
rotation is permissible if desired. Also, correct for any-
thing causing rapid or unusual wear prior to performing
the tire rotation.
STARTING AND OPERATING
301
5

Tire Rotation — Four Season/RSA Tires
The suggested rotation method for vehicles equipped
with all season tires is the “forward-cross” as shown in
the following diagram.
Tire Rotation — F1 Three Season Tires
The suggested rotation method is the “side-to-side” as
shown in the following diagram. This method is required
due to different size tires on the front and rear of the
vehicle.
Tire Rotation
Tire Rotation
302
STARTING AND OPERATING
TIRE PRESSURE MONITOR SYSTEM (TPMS)
The Tire Pressure Monitor System (TPMS) will warn the
driver of a low tire pressure based on the vehicle recom-
mended cold placard pressure.
The tire pressure will vary with temperature by about
1 psi (6.9 kPa) for every 12°F (6.5°C). This means that
when the outside temperature decreases, the tire pressure
will decrease. Tire pressure should always be set based
on cold inflation tire pressure. This is defined as the tire
pressure after the vehicle has not been driven for at least
three hours, or driven less than 1 mile (1 km) after a three
hour period. The cold tire inflation pressure must not
exceed the maximum inflation pressure molded into the
tire sidewall. Refer to “Tires – General Information” in
this section for information on how to properly inflate the
vehicle’s tires. The tire pressure will also increase as the
vehicle is driven - this is normal and there should be no
adjustment for this increased pressure.
The TPMS will warn the driver of a low tire pressure if
the tire pressure falls below the low-pressure warning
limit for any reason, including low temperature effects
and natural pressure loss through the tire.
The TPMS will continue to warn the driver of low tire
pressure as long as the condition exists, and will not turn
off until the tire pressure is at or above the recommended
cold placard pressure. Once the low tire pressure warn-
ing (Tire Pressure Monitoring [TPM] Telltale Light) illu-
minates, you must increase the tire pressure to the
recommended cold placard pressure in order for the TPM
Telltale Light to turn off. The system will automatically
update and the TPM Telltale Light will turn off once the
system receives the updated tire pressures. The vehicle
may need to be driven for up to 20 minutes above 15 mph
(25 km/h) in order for the TPMS to receive this informa-
tion.
STARTING AND OPERATING
303
5
For example, your vehicle may have a recommended
cold (parked for more than three hours) placard pressure
of 30 psi (207 kPa). If the ambient temperature is 68°F
(20°C) and the measured tire pressure is 27 psi (186 kPa),
a temperature drop to 20°F (-7°C) will decrease the tire
pressure to approximately 23 psi (158 kPa). This tire
pressure is sufficiently low enough to turn ON the TPM
Telltale Light. Driving the vehicle may cause the tire
pressure to rise to approximately 27 psi (186 kPa), but the
TPM Telltale Light will still be ON. In this situation, the
TPM Telltale Light will turn OFF only after the tires are
inflated to the vehicle’s recommended cold placard pres-
sure value.
CAUTION!
• The TPMS has been optimized for the original
equipment tires and wheels. TPMS pressures and
warning have been established for the tire size
equipped on your vehicle. Undesirable system
operation or sensor damage may result when us-
ing replacement equipment that is not of the same
size, type, and/or style. Aftermarket wheels can
cause sensor damage. Do not use aftermarket tire
sealants or balance beads if your vehicle is
equipped with a TPMS, as damage to the sensors
may result.
• After inspecting or adjusting the tire pressure,
always reinstall the valve stem cap. This will
prevent moisture and dirt from entering the valve
stem, which could damage the TPM sensor.
304
STARTING AND OPERATING
NOTE:
• The TPMS is not intended to replace normal tire care
and maintenance or to provide warning of a tire failure
or condition.
• The TPMS should not be used as a tire pressure gauge
while adjusting your tire pressure.
• Driving on a significantly under-inflated tire causes
the tire to overheat and can lead to tire failure.
Under-inflation also reduces fuel efficiency and tire
tread life, and may affect the vehicle’s handling and
stopping ability.
• The TPMS is not a substitute for proper tire mainte-
nance, and it is the driver’s responsibility to maintain
correct tire pressure using an accurate tire pressure
gauge, even if under-inflation has not reached the
level to trigger illumination of the TPM Telltale Light.
• Seasonal temperature changes will affect tire pressure,
and the TPMS will monitor the actual tire pressure in
the tire.
Premium System
The Tire Pressure Monitor System (TPMS) uses wireless
technology with wheel rim mounted electronic sensors to
monitor tire pressure levels. Sensors mounted to each
wheel as part of the valve stem transmit tire pressure
readings to the receiver module.
NOTE:
It is particularly important for you to check the
tire pressure in all of the tires on your vehicle monthly
and to maintain the proper pressure.
STARTING AND OPERATING
305
5
The TPMS consists of the following components:
• Receiver module,
• Four TPM sensors,
• CORAX Receiver module,
• Various TPMS messages, which display in the Elec-
tronic Vehicle Information Center (EVIC), and
• TPM Telltale Light
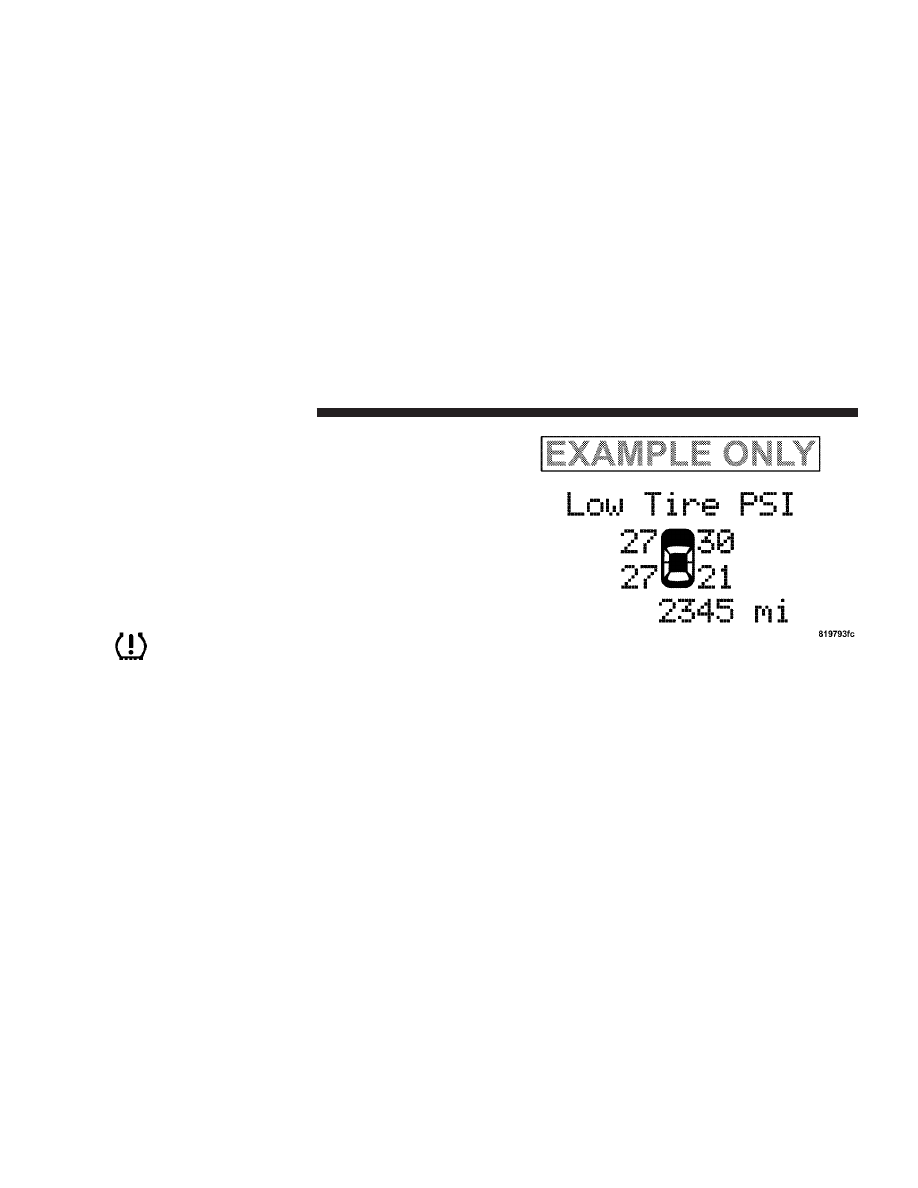
Tire Pressure Monitoring Low Pressure Warnings
The TPM Telltale Light will illuminate in the
instrument cluster and a chime will sound when
tire pressure is low in one or more of the four
active road tires. In addition, the EVIC will display one or
more low pressure messages (Left Front, Left Rear, Right
Front, Right Rear) for three seconds and a graphic
showing the pressure values of each tire with the low tire
pressure values flashing.
Should this occur, you should stop as soon as possible
and inflate all of the tires with low pressure (including
those flashing in the EVIC graphic) to the vehicle’s
recommended cold placard pressure value. Once the
system receives the updated tire pressures, the system
will automatically update, the graphic display in the
EVIC will stop flashing, and the TPM Telltale Light will
306
STARTING AND OPERATING
turn off. The vehicle may need to be driven for up to
20 minutes above 15 mph (25 km/h) in order for the
TPMS to receive this information.
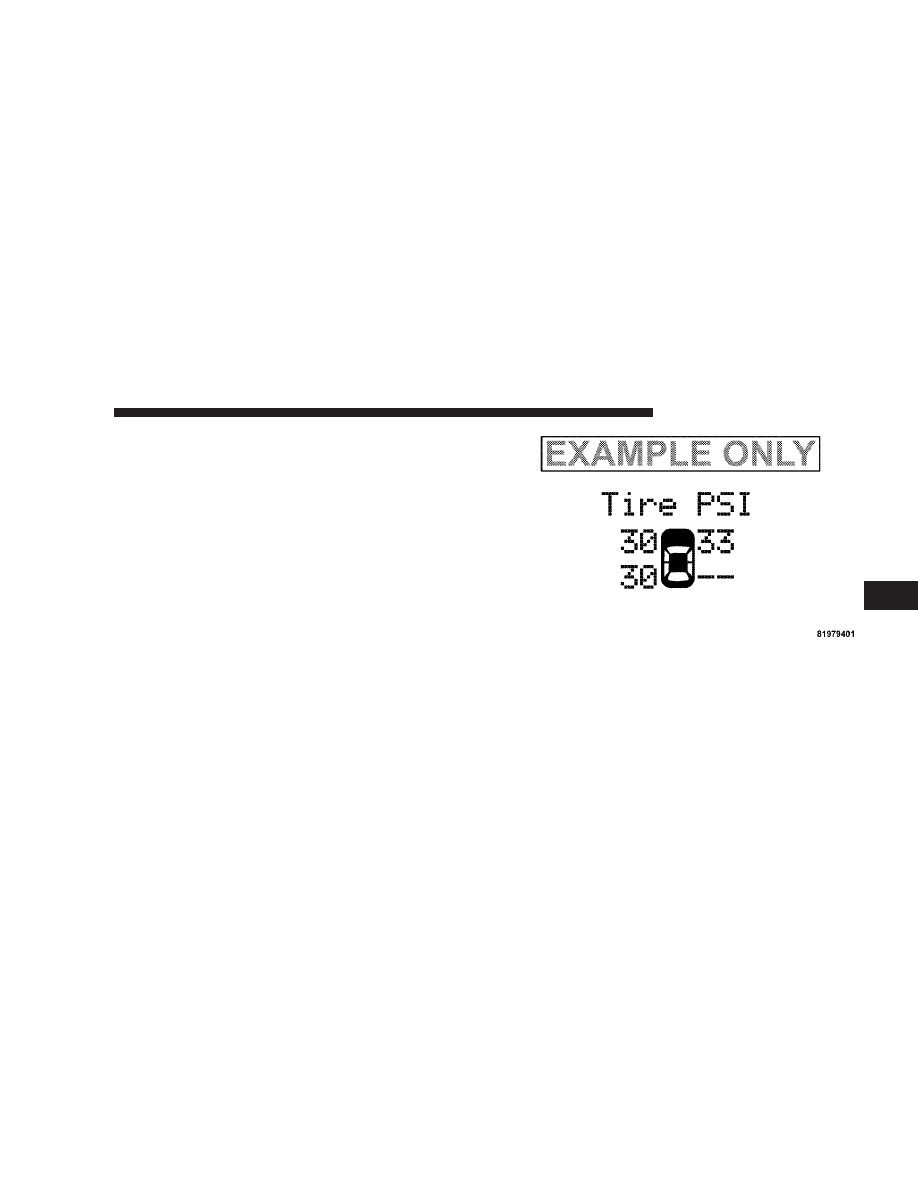
Check TPMS Warning
If a system fault is detected, the TPM Telltale Light will
flash on and off for 75 seconds and then remain on solid.
The system fault will also sound a chime. In addition, the
EVIC will display a
⬙CHECK TPM SYSTEM⬙ message for
three seconds and then display dashes (- -) in place of the
pressure value to indicate which sensor is not being
received.
If the ignition key is cycled, this sequence will repeat,
providing the system fault still exists. If the system fault
no longer exists, the TPM Telltale Light will no longer
flash, and the
⬙CHECK TPM SYSTEM⬙ message will no
longer display, and a pressure value will display in place
STARTING AND OPERATING
307
5
of the dashes. A system fault can occur due to any of the
following:
1. Signal interference due to electronic devices or driving
next to facilities emitting the same radio frequencies as
the TPM sensors.
2. Installing aftermarket window tinting that contains
materials that may block radio wave signals.
3. Accumulation of snow or ice around the wheels or
wheel housings.
4. Using wheels/tires not equipped with TPM sensors,
or equipped with the incorrect type of TPM sensors.
General Information
This device complies with Part 15 of the FCC rules and
RSS 210 of Industry Canada. Operation is subject to the
following conditions:
• This device may not cause harmful interference.
• This device must accept any interference received,
including interference that may cause undesired
operation.
The TPM sensors are regulated under one of the follow-
ing licenses:
United States . . . . . . . . . . . . . . . . . . . . . KR5S120123
Canada . . . . . . . . . . . . . . . . . . . . . . . . 2671-S120123
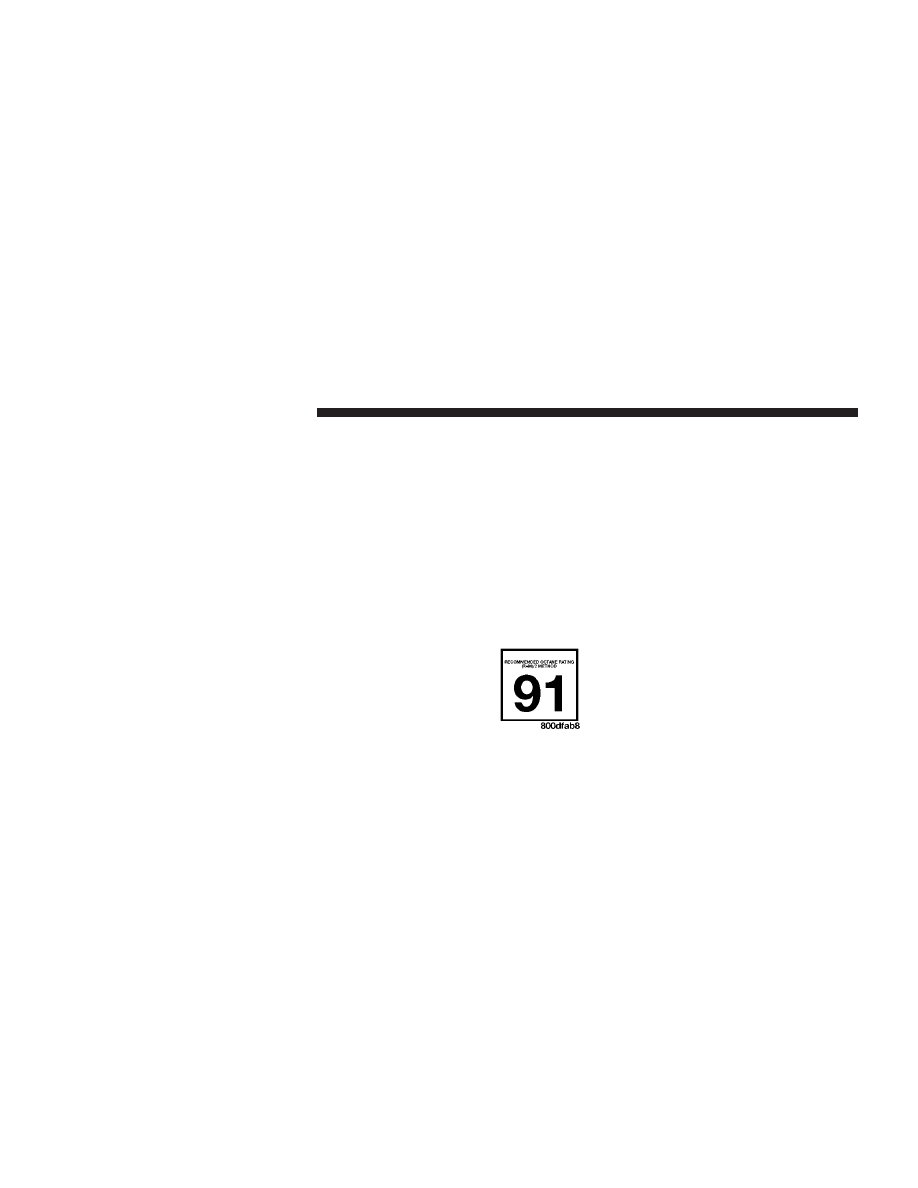
FUEL REQUIREMENTS
6.1L Engine
The 6.1L engine is designed to meet all
emissions regulations and provide excel-
lent fuel economy and performance when
using high-quality premium unleaded
gasoline with an octane rating of 91 or
higher.
308
STARTING AND OPERATING
Light spark knock at low engine speeds is not harmful to
your engine. However, continued heavy spark knock at
high speeds can cause damage and immediate service is
required. Poor quality gasoline can cause problems such
as hard starting, stalling, and hesitations. If you experi-
ence these symptoms, try another brand of gasoline
before considering service for the vehicle.
Over 40 auto manufacturers worldwide have issued and
endorsed consistent gasoline specifications (the World-
wide Fuel Charter, WWFC) which define fuel properties
necessary to deliver enhanced emissions, performance,
and durability for your vehicle. The manufacturer recom-
mends the use of gasolines that meet the WWFC speci-
fications if they are available.
Reformulated Gasoline
Many areas of the country require the use of cleaner
burning gasoline referred to as “reformulated gasoline.”
Reformulated gasolines contain oxygenates and are spe-
cifically blended to reduce vehicle emissions and im-
prove air quality.
The manufacturer supports the use of reformulated gaso-
lines. Properly blended reformulated gasolines will pro-
vide excellent performance and durability of engine and
fuel system components.
Gasoline/Oxygenate Blends
Some fuel suppliers blend unleaded gasoline with oxy-
genates such as 10% ethanol, MTBE, and ETBE. Oxygen-
ates are required in some areas of the country during the
winter months to reduce carbon monoxide emissions.
Fuels blended with these oxygenates may be used in
your vehicle.
STARTING AND OPERATING
309
5
CAUTION!
DO NOT use gasolines containing Methanol or E85
Ethanol. Use of these blends may result in starting
and driveability problems and may damage critical
fuel system components.
Problems that result from using methanol/gasoline or
E85 ethanol blends are not the responsibility of the
manufacturer. While MTBE is an oxygenate made from
methanol, it does not have the negative effects of
methanol.
E-85 Usage In Non-Flex Fuel Vehicles
Non-FFV vehicles are compatible with gasoline contain-
ing 10% ethanol (E10). Gasoline with higher ethanol
content may void the vehicle’s warranty.
If a Non-FFV vehicle is inadvertently fueled with E-85
fuel, the engine will have some or all of these symptoms:
• operate in a lean mode
• OBD II “Malfunction Indicator Light” on
• poor engine performance
• poor cold start and cold drivability
• increased risk for fuel system component corrosion
To fix a Non-FFV vehicle inadvertently fueled once with
E-85 perform the following:
• drain the fuel tank (see your authorized dealer)
• change the engine oil and oil filter
• disconnect and reconnect the battery to reset the
engine controller memory
More extensive repairs will be required for prolonged
exposure to E-85 fuel.
310
STARTING AND OPERATING
MMT In Gasoline
MMT is a manganese-containing metallic additive that is
blended into some gasoline to increase octane. Gasoline
blended with MMT provides no performance advantage
beyond gasoline of the same octane number without
MMT. Gasoline blended with MMT reduces spark plug
life and reduces emissions system performance in some
vehicles. The manufacturer recommends that gasoline
without MMT be used in your vehicle. The MMT content
of gasoline may not be indicated on the gasoline pump,
therefore, you should ask your gasoline retailer whether
the gasoline contains MMT. It is even more important to
look for gasoline without MMT in Canada, because MMT
can be used at levels higher than those allowed in the
United States. MMT is prohibited in Federal and Califor-
nia reformulated gasoline.
Materials Added to Fuel
All gasoline sold in the United States is required to
contain effective detergent additives. Use of additional
detergents or other additives is not needed under normal
conditions and they would result in additional cost.
Therefore, you should not have to add anything to the
fuel.
Fuel System Cautions
CAUTION!
Follow these guidelines to maintain your vehicle’s
performance:
• The use of leaded gas is prohibited by Federal law.
Using leaded gasoline can impair engine performance
and damage the emissions control system.
STARTING AND OPERATING
311
5
• An out-of-tune engine or certain fuel or ignition mal-
functions can cause the catalytic converter to overheat.
If you notice a pungent burning odor or some light
smoke, your engine may be out of tune or malfunc-
tioning and may require immediate service. Contact
your authorized dealer for service assistance.
• The use of fuel additives, which are now being sold as
octane enhancers, is not recommended. Most of these
products contain high concentrations of methanol.
Fuel system damage or vehicle performance problems
resulting from the use of such fuels or additives is not
the responsibility of the manufacturer.
NOTE:
Intentional tampering with the emissions con-
trol system can result in civil penalties being assessed
against you.
Carbon Monoxide Warnings
WARNING!
Carbon monoxide (CO) in exhaust gases is deadly.
Follow the precautions below to prevent carbon
monoxide poisoning:
• Do not inhale exhaust gases. They contain carbon
monoxide, a colorless and odorless gas, which can kill.
Never run the engine in a closed area, such as a
garage, and never sit in a parked vehicle with the
engine running for an extended period. If the vehicle is
stopped in an open area with the engine running for
more than a short period, adjust the ventilation system
to force fresh, outside air into the vehicle.
312
STARTING AND OPERATING

• Guard against carbon monoxide with proper mainte-
nance. Have the exhaust system inspected every time
the vehicle is raised. Have any abnormal conditions
repaired promptly. Until repaired, drive with all side
windows fully open.
• Keep the trunk/liftgate closed when driving your
vehicle to prevent carbon monoxide and other poison-
ous exhaust gases from entering the vehicle.
ADDING FUEL
Fuel Filler Cap (Gas Cap)
The gas cap is located behind the fuel filler door on the
left side of the vehicle. Use a finger to pull open the door.
If the gas cap is lost or damaged, be sure the replacement
cap is for use with this vehicle.
NOTE:
When removing the fuel filler cap, lay the cap
tether in the hook, located on the fuel filler door.
Fuel Fill Cap
STARTING AND OPERATING
313
5
CAUTION!
• Damage to the fuel system or emissions control
system could result from using an improper fuel
tank filler tube cap (gas cap).
• A poorly fitting gas cap could let impurities into
the fuel system.
• A poorly fitting gas cap may cause the Malfunc-
tion Indicator Light (MIL) to turn on.
• To avoid fuel spillage and overfilling, do not “top
off” the fuel tank after filling. When the fuel
nozzle “clicks” or shuts off, the fuel tank is full.
WARNING!
• Never have any smoking materials lit in or near
the vehicle when the gas cap is removed or the
tank filled.
(Continued)
WARNING! (Continued)
• Never add fuel to the vehicle when the engine is
running.
• A fire may result if gasoline is pumped into a
portable container that is inside of a vehicle. You
could be burned. Always place gas containers on
the ground while filling.
NOTE:
• Tighten the gas cap until you hear a “clicking” sound.
This is an indication that the gas cap is tightened
properly. The MIL in the instrument cluster may turn
on if the gas cap is not secured properly. Make sure
that the gas cap is tightened each time the vehicle is
refueled.
• When the fuel nozzle “clicks” or shuts off, the fuel
tank is full.
314
STARTING AND OPERATING
Loose Fuel Filler Cap Message
If the vehicle diagnostic system determines that the fuel
filler cap is loose, improperly installed, or damaged, a
“Check Gascap” message will display in the Electronic
Vehicle Information Center (EVIC). If this occurs, tighten
the fuel filler cap properly and press the TRIP ODOM-
ETER button to turn off the message. If the problem
continues, the message will appear the next time the
vehicle is started.
A loose, improperly installed, or damaged fuel filler cap
may also turn on the MIL. Refer to “Onboard Diagnostic
System” in Section 7.
VEHICLE LOADING
The load carrying capacity of your vehicle is shown on the
“Vehicle Certification Label.” This information should be
used for passenger and luggage loading as indicated.
Do not exceed the specified Gross Vehicle Weight Rating
(GVWR) or the Gross Axle Weight Rating (GAWR).
Vehicle Certification Label
Your vehicle has a Vehicle Certification Label affixed to
the rear of the driver’s door.
The label contains the following information:
• Name of manufacturer
• Month and year of manufacture
• Gross Vehicle Weight Rating (GVWR)
• Gross Axle Weight Rating (GAWR) front
• Gross Axle Weight Rating (GAWR) rear
• Vehicle Identification Number (VIN)
• Type of Vehicle
• Month Day and Hour of Manufacture (MDH)
The bar code allows a computer scanner to read the VIN.
STARTING AND OPERATING
315
5
Нет комментариевНе стесняйтесь поделиться с нами вашим ценным мнением.
Текст