Lexus ES300 (1997 year). Service manual — part 301
S04607
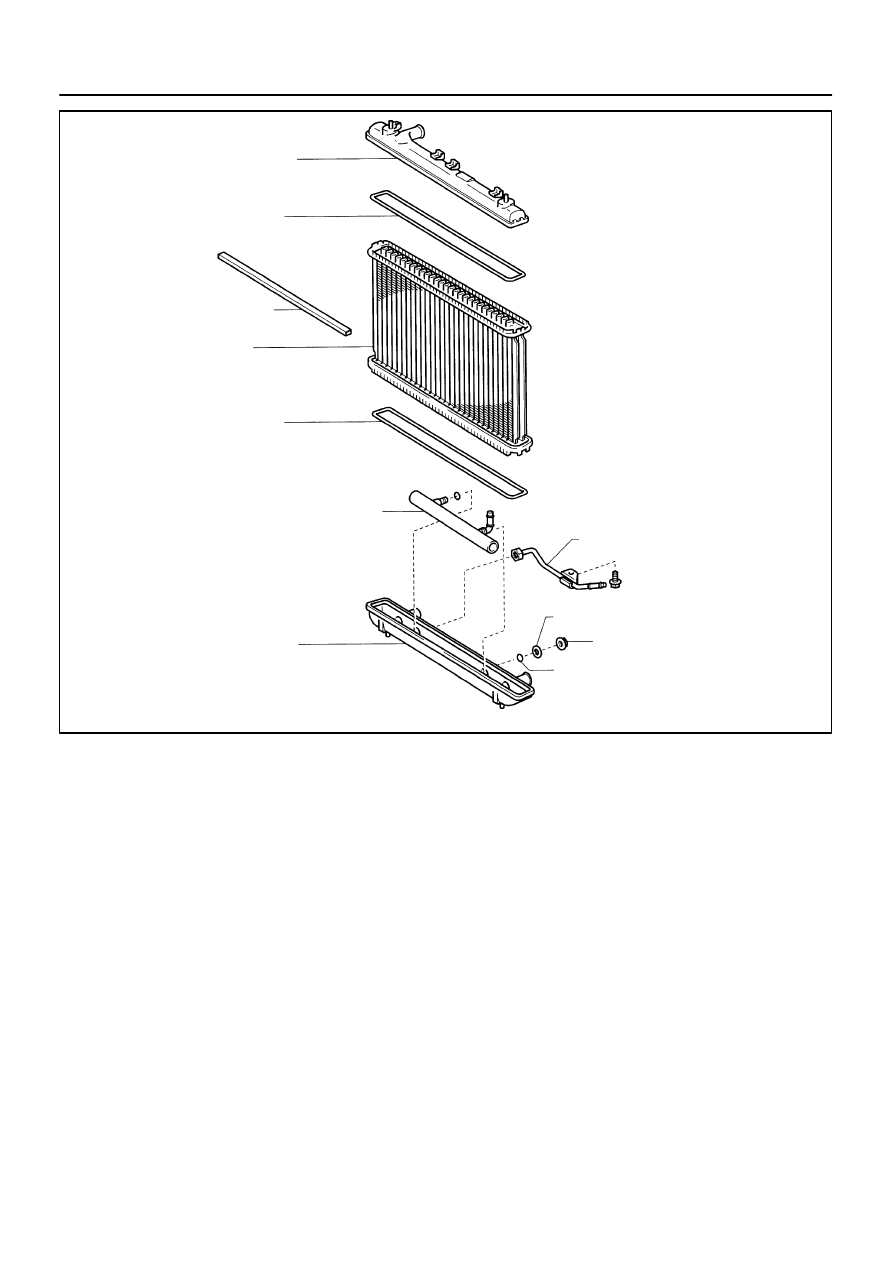
O–Ring
Non–reusable part
Upper Tank
Cushion
Core
Oil Cooler
Lower Tank
Inlet Pipe
Plate Washer
Nut
O–Ring
O–Ring
CO–16
–
COOLING
RADIATOR
933
1997 LEXUS ES300 (RM511U)

CO02X–03
S04725
S04733
Lower
Hose
Oil
Cooler
Hose
–
COOLING
RADIATOR
CO–17
934
1997 LEXUS ES300 (RM511U)
REMOVAL
HINT:
At the time of installation, please refer to the following
items.
Start the engine, and check for coolant and A/T fluid
leaks.
Check the A/T fluid level.
(See page
1.
DRAIN ENGINE COOLANT
2.
CANADA:
DISCONNECT RELAY BLOCK (FOR DAYTIME
RUNNING LIGHT SYSTEM) FROM BATTERY
HOLD–DOWN CLAMP
3.
DISCONNECT UPPER RADIATOR HOSE FROM
RADIATOR
4.
DISCONNECT LOWER RADIATOR HOSE FROM
WATER INLET PIPE
5.
DISCONNECT A/T OIL COOLER HOSES FROM OIL
COOLER PIPES
6.
DISCONNECT NO.1 AND NO.2 COOLING FAN
CONNECTORS
7.
DISCONNECT NO.1 ECT SWITCH WIRE CONNECTOR
8.
REMOVE RADIATOR AND COOLING FANS
ASSEMBLY
(a)
Remove the 2 bolts and 2 upper supports.
Torque: 12.8 N·m (130 kgf·cm, 9 ft·lbf)
(b)
Lift out the radiator, and remove the radiator and cooling
fans assembly.
(c)
Remove the 2 lower supports.
9.
REMOVE A/T OIL COOLER HOSES FROM
RADIATOR
10.
REMOVE LOWER RADIATOR HOSE FROM
RADIATOR

S04588
S04732
No.1
No.2
CO–18
–
COOLING
RADIATOR
935
1997 LEXUS ES300 (RM511U)
11.
REMOVE NO.1 ECT SWITCH
12.
REMOVE NO.1 COOLING FAN FROM RADIATOR
Remove the 2 bolts and cooling fan.
Torque: 5.0 N·m (50 kgf·cm, 44 in.·lbf)
13.
REMOVE NO.2 COOLING FAN FROM RADIATOR
Remove the 3 bolts and cooling fan.
Torque: 5.0 N·m (50 kgf·cm, 44 in.·lbf)
CO02Y–01
CO1205
Dimension ”B”
Part ”A”
Stopper Bolt
SST
Claw
Overhaul Handle
S04737
Tank
SST
Lock Plate
Stopper Bolt
S04738
Tap
S04434
–
COOLING
RADIATOR
CO–19
936
1997 LEXUS ES300 (RM511U)
DISASSEMBLY
1.
REMOVE CUSHION FROM RADIATOR
2.
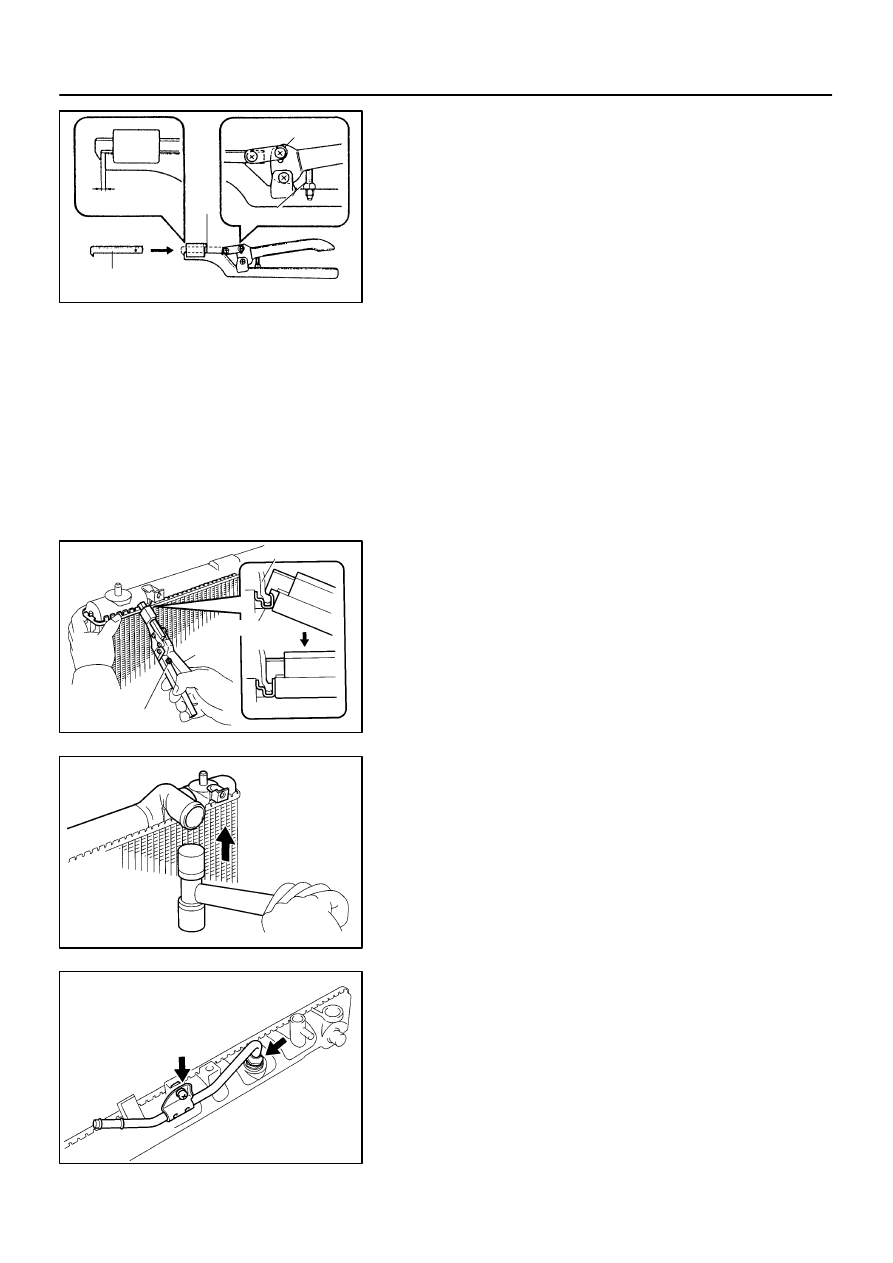
ASSEMBLE SST
SST
09230–01010
(a)
Install the claw to the overhaul handle, inserting it in the
hole in part ”A” as shown in the diagram.
(b)
While gripping the handle, adjust the stopper bolt so that
dimension ”B” shown in the diagram is 0.2 – 0.5 mm
(0.008 – 0.020 in.).
NOTICE:
If this adjustment is not done, the claw may be damaged.
3.
UNCAULK LOCK PLATES
Using SST to release the caulking, squeeze the handle until
stopped by the stopper bolt.
SST
09230–01010
4.
REMOVE TANKS AND O–RINGS
(a)
Lightly tap the bracket of the radiator (or radiator hose in-
let or outlet) with a soft–faced hammer and remove the
tank.
(b)
Remove the O–ring.
5.
REMOVE OIL COOLER FROM LOWER TANK
(a)
Remove the pipe.
(b)
Remove the nuts and plate washers.
(c)
Remove the oil cooler and O–rings.
Нет комментариевНе стесняйтесь поделиться с нами вашим ценным мнением.
Текст