Lexus ES300 (1997 year). Service manual — part 262
N21199
7
N21200
7
N21374
Wire Harness Side
1 2 3
4 5 6
7 8 9 1011121314
s–14–1–B
N21201
1
2
3
4
5
6
BE–112
–
BODY ELECTRICAL
POWER WINDOW CONTROL SYSTEM
1496
1997 LEXUS ES300 (RM511U)
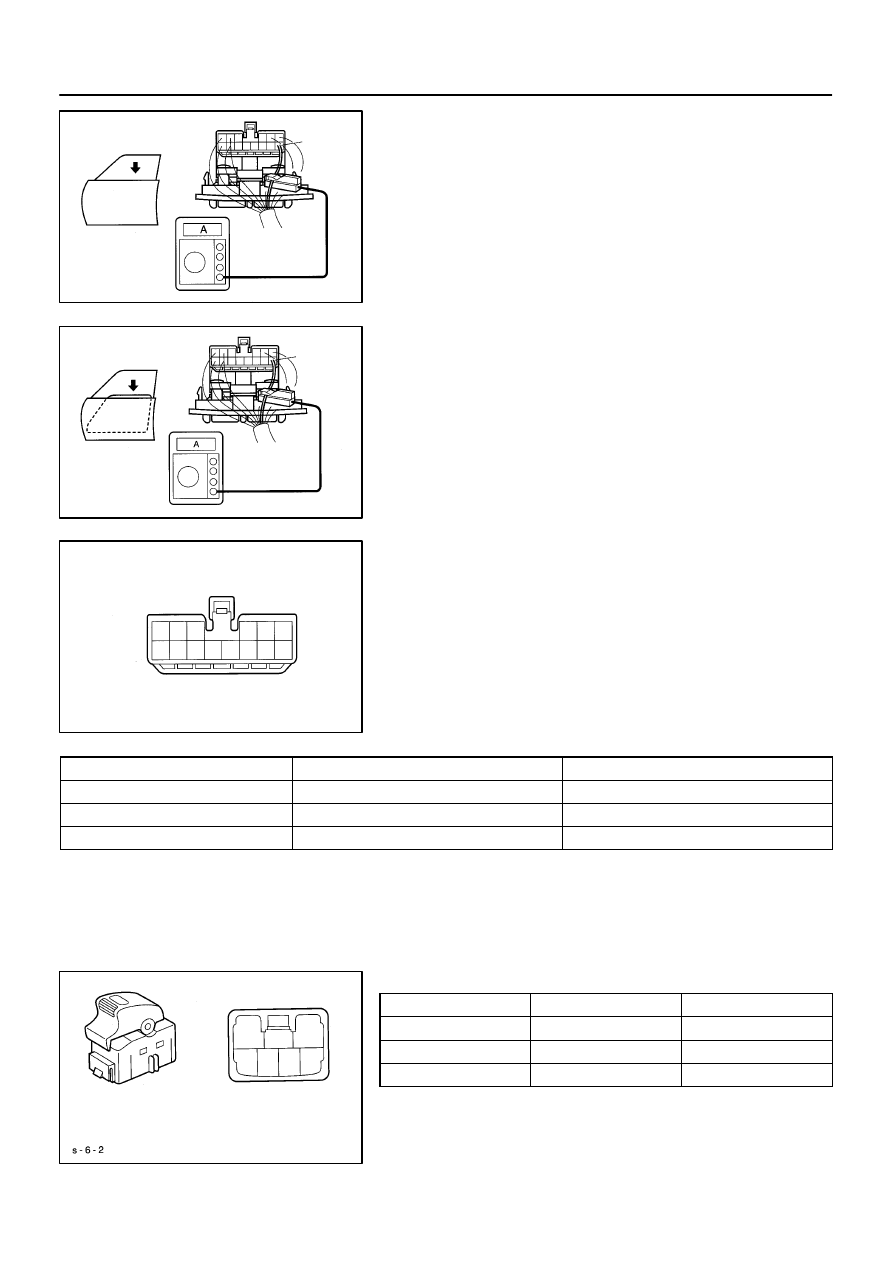
4.
INSPECT ONE TOUCH POWER WINDOW SYSTEM/
CURRENT OF CIRCUIT (Using an ammeter with a cur-
rent–measuring probe)
(a)
Remove the master switch with connector connected.
(b)
Attach a current–measuring probe to terminal 7 of the
wire harness.
(c)
Turn the ignition switch ON and set the power window
switch in the down position.
(d)
As the window goes down, check that the current flow is
approximately 7 A.
(e)
Check that the current increases up to approximately
14.5 A or more when the window stops going down.
HINT:
The circuit breaker opens some 4 – 40 seconds after the win-
dow stops going down, so that check must be made before the
circuit breaker operates.
If operation is as specified, replace the master switch.
5.
INSPECT POWER WINDOW MASTER SWITCH CIR-
CUIT
Disconnect the connector from the master switch and inspect
the connector on the wire harness side.
Tester connection
Condition
Specified condition
1 – Ground
Constant
Continuity
7 – Ground
Ignition switch position LOCK or ACC
*No voltage
7 – Ground
Ignition switch position ON
Battery positive voltage
* Exceptions: During 60 seconds after the ignition switch is
turned ON
→
OFF (ACC) or until driver or a passenger’s door
is opened after the ignition switch is turned ON
→
OFF (ACC).
If the circuit is not as specified, inspect the circuits connected
to other parts.
6.
INSPECT POWER WINDOW SWITCH CONTINUITY
Switch position
Tester connection
Specified condition
UP
1 – 3 2 – 5
Continuity
OFF
1 – 3 2 – 4
Continuity
DOWN
2 – 4 3 – 5
Continuity
If continuity is not as specified, replace the switch.

Z07440
Wire Harness Side
1
2
3 4 5 6
N14863
1
2
5
3
3
5
2
1
N21202
(a)
(b)
1
2
2
1
–
BODY ELECTRICAL
POWER WINDOW CONTROL SYSTEM
BE–113
1497
1997 LEXUS ES300 (RM511U)
7.
INSPECT POWER WINDOW SWITCH CIRCUIT
Disconnect the connector from the switch and inspect the con-
nector on the wire harness side.
Tester connection
Condition
Specified condition
1 – Ground
Ignition switch position ON and
master switch position OFF
No voltage
1 – Ground
Ignition switch positrion ON and
master switch position DOWN
Battery positive voltage
4 – Ground
Ignition switch position ON and
master switch position OFF
No voltage
4 – Ground
Ignition switch position ON and
master switch position UP
Battery positive voltage
5 – Ground
Ignition switch position LOCK or ACC
*No voltage
5 – Ground
Ignition switch position ON
Battery positive voltage
*Exceptions: During 60 seconds period after the ignition switch
is turned ON
→
OFF (ACC) or until driver or a passenger’s door
is opened after the ignition switch is turned ON
→
OFF (ACC).
If the circuit is not as specified, inspect the circuits connected
to other parts.
8.
INSPECT POWER MAIN RELAY CONTINUITY
Condition
Tester connection
Specified condition
Constant
1 – 2
Continuity
Apply B+ between
terminals 1 and 2.
3 – 5
Continuity
If continuity is not as specified, replace the relay.
9.
INSPECT POWER MAIN RELAY CIRCUIT
(See page
)
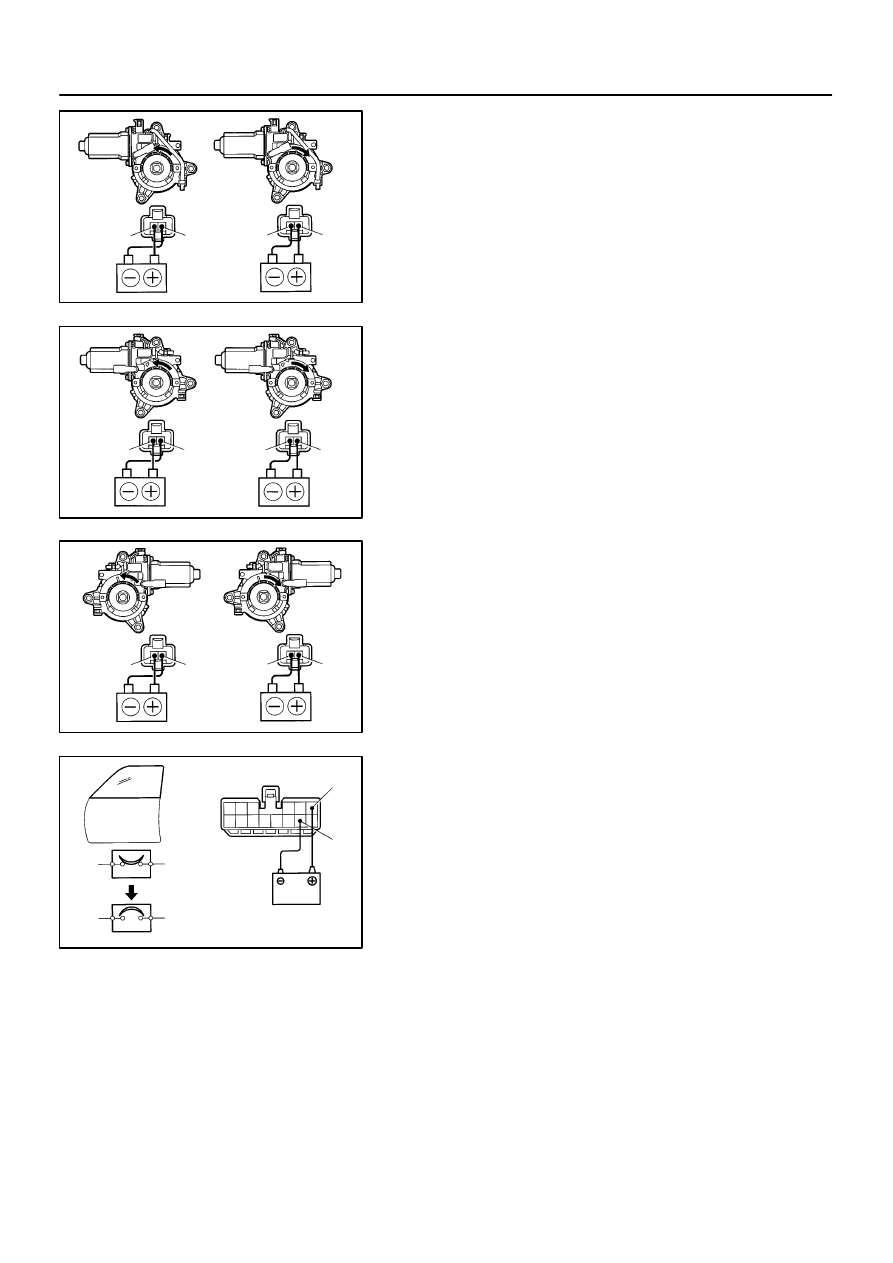
10.
Driver’s Door:
INSPECT POWER WINDOW MOTOR OPERATION
(a)
Connect the positive (+) lead from the battery to terminal
2 and the negative (–) lead to terminal 1, and check that
the motor turns counterclockwise.
(b)
Reverse the polarity, check that the motor turns clock-
wise.
If operation is not as specified, replace the motor.
N21203
(a)
(b)
1
2
2
1
N21204
(a)
(b)
1
2
2
1
N21205
(a)
(b)
1
2
2
1
N21206
within
4 to 40
seconds
13
6
BE–114
–
BODY ELECTRICAL
POWER WINDOW CONTROL SYSTEM
1498
1997 LEXUS ES300 (RM511U)
11.
Front Passenger’s Door:
INSPECT POWER WINDOW MOTOR OPERATION
(a)
Connect the positive (+) lead from the battery to terminal
2 and the negative (–) lead to terminal 1, and check that
the motor turns counterclockwise.
(b)
Reverse the polarity, check that the motor turns clock-
wise.
If operation is not as specified, replace the motor.
12.
Rear Left Side Door:
INSPECT POWER WINDOW MOTOR OPERATION
(a)
Connect the positive (+) lead from the battery to terminal
2 and the negative (–) lead to terminal 1, and check that
the motor turns counterclockwise.
(b)
Reverse the polarity, check that the motor turns clock-
wise.
If operation is not as specified, replace the motor.
13.
Rear Right Side Door:
INSPECT POWER WINDOW MOTOR OPERATION
(a)
Connect the positive (+) lead from the battery to terminal
2 and the negative (–) lead to terminal 1, and check that
the motor turns counterclockwise.
(b)
Reverse the polarity, check that the motor turns clock-
wise.
If operation is not as specified, replace the motor.
14.
Driver’s Door:
INSPECT POWER WINDOW MOTOR CIRCUIT
BREAKER OPERATION
(a)
Disconnect the connector from the master switch.
(b)
Connect the positive (+) lead from the battery to terminal
6 and the negative (–) lead to terminal 13 on the wire har-
ness side connector and raise the window to full closed
position.
(c)
Continue to apply voltage, check that there is a circuit
breaker operation noise within approximately 4 to 40 se-
conds.

N21207
6
within
60 seconds
13
N21208
within
4 to 40
seconds
3
2
N21209
3
within
60
seconds
2
–
BODY ELECTRICAL
POWER WINDOW CONTROL SYSTEM
BE–115
1499
1997 LEXUS ES300 (RM511U)
(d)
Reverse the polarity, check that the window begins to de-
scend within approximately 60 seconds.
If operation is not as specified, replace the motor.
15.
Front Passenger’s Door Motor:
INSPECT POWER WINDOW MOTOR CIRCUIT
BREAKER OPERATION
(a)
Disconnect the connector from the power window switch.
(b)
Connect the positive (+) lead from the battery to terminal
2 and the negative (–) lead to terminal 3 on the wire har-
ness side connector, and raise the window to full closed
position.
(c)
Continue to apply voltage, check that there is a circuit
breaker operation noise within approximately 4 to 40 se-
conds.
(d)
Reverse the polarity, check that the window begins to de-
scend within approximately 60 seconds.
If operation is not as specified, replace the motor.
16.
Rear Left Side Door:
INSPECT POWER WINDOW MOTOR CIRCUIT
BREAKER OPERATION
See step of Front Passenger Door Motor.
17.
Rear Right Side Door:
INSPECT POWER WINDOW MOTOR CIRCUIT
BREAKER OPERATION
See step of Front Passenger Door Motor.
Нет комментариевНе стесняйтесь поделиться с нами вашим ценным мнением.
Текст