Lexus ES300 (1997 year). Service manual — part 280
BR068–01
–
BRAKE
PARKING BRAKE PEDAL
BR–11
1126
1997 LEXUS ES300 (RM511U)
INSTALLATION
Installation is in the reverse order of removal (See page
BR069–04
Z19275
Z19275
Master Cylinder
Brake Booster
N·m (kgf·cm, ft·lbf)
: Specified torque
Non–reusable part
Gasket
2–way
15 (155, 11)
13 (130, 9)
Z19274
Cap
Strainer
Reservoir
Grommet
Snap Ring
No.2 Piston and Spring
No.1 Piston
Cylinder Body
Stopper Bolt
w/ ABS
w/ TRAC
Reservoir Set Screw
Straight Pin
Grommet
N·m (kgf·cm, ft·lbf)
: Specified torque
Non–reusable part
Gasket
Lithium soap base glycol grease
Cap
Strainer
Reservoir
Grommet
Grommet
Cylinder Body
No.2 Piston
No.1 Piston and Spring
Spring
Spring
1.7 (18, 16 in.·lbf)
10 (100, 7)
1.7 (18, 16 in.·lbf)
Reservoir Set Screw
BR–12
–
BRAKE
BRAKE MASTER CYLINDER
1127
1997 LEXUS ES300 (RM511U)
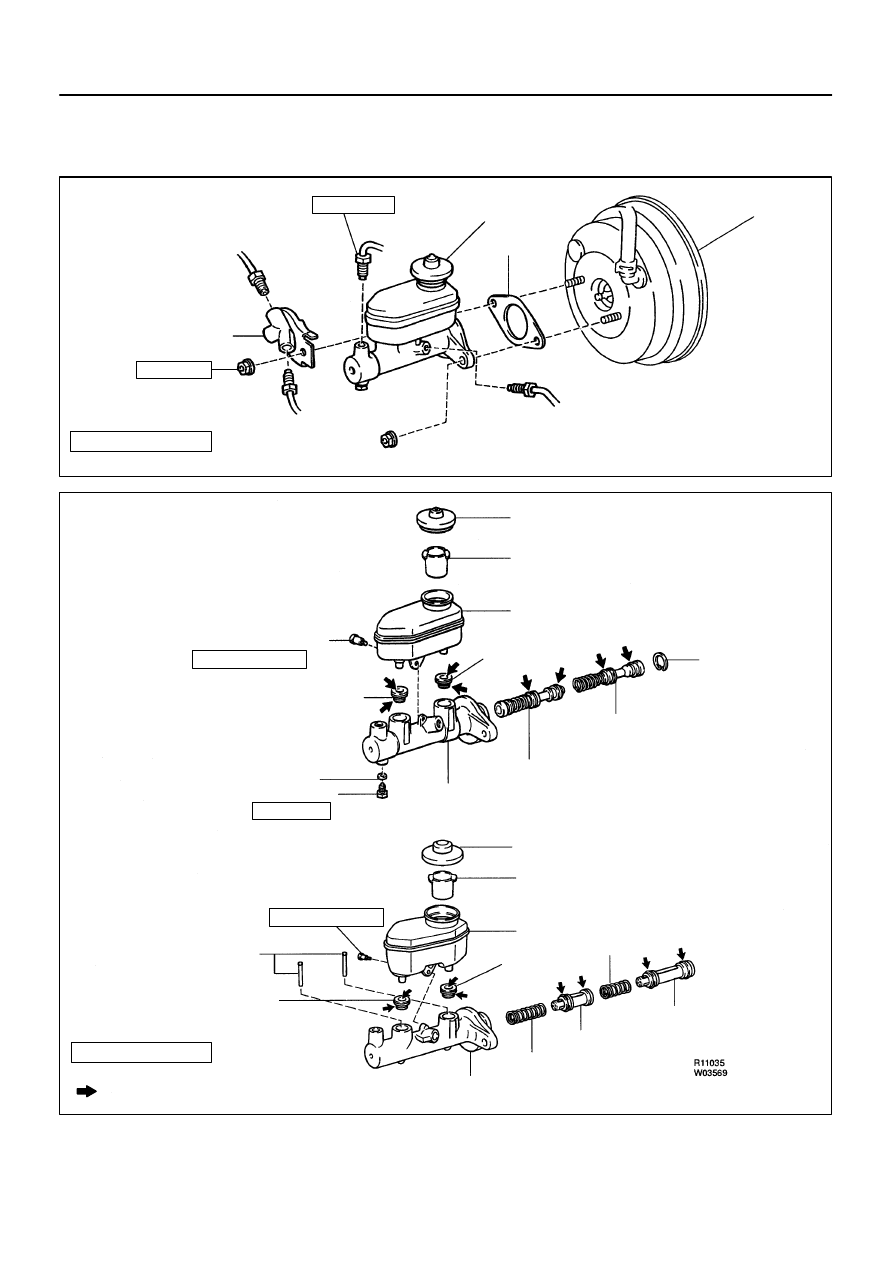
BRAKE MASTER CYLINDER
COMPONENTS

BR06A–01
W04697
SST
R11405
–
BRAKE
BRAKE MASTER CYLINDER
BR–13
1128
1997 LEXUS ES300 (RM511U)
REMOVAL
1.
DISCONNECT LEVEL WARNING SWITCH CONNEC-
TOR
2.
TAKE OUT FLUID WITH SYRINGE
NOTICE:
Do not let brake fluid remain on a painted surface. Wash it
off immediately.
3.
DISCONNECT BRAKE LINES
Using SST, disconnect the 5 brake lines.
SST
09023–00100
Torque: 15 N·m (155 kgf·cm, 11 ft·lbf)
4.
REMOVE MASTER CYLINDER
Remove the 2 nuts, and pull out the 2–way, master cylinder and
gasket.
Torque: 13 N·m (130 kgf·cm, 9 ft·lbf)

BR06B–01
R11406
Soft Jaws
R11407
Soft Jaws
R12236
A
BR–14
–
BRAKE
BRAKE MASTER CYLINDER
1129
1997 LEXUS ES300 (RM511U)
DISASSEMBLY
1.
REMOVE RESERVOIR
(a)
Remove the set screw and pull out the reservoir.
Torque: 1.7 N·m (18 kgf·cm, 16 in.·lbf)
(b)
Remove the cap and strainer from the reservoir.
2.
REMOVE 2 GROMMETS
3.
w/ ABS:
PLACE CYLINDER IN VISE
4.
REMOVE PISTON STOPPER BOLT
Using a screwdriver, push the pistons in all the way and remove
the piston stopper bolt and gasket.
HINT:
Tape the screwdriver tip before use.
Torque: 10 N·m (100 kgf·cm, 7 ft·lbf)
5.
REMOVE 2 PISTONS AND SPRINGS
(a)
Push in the piston with a screwdriver and remove the
snap ring with snap ring pliers.
HINT:
Tape the screwdriver tip before use.
(b)
Remove the No.1 piston and spring by hand, pulling
straight out, not at an angle.
NOTICE:
If pulled out and installed at an angle, there is a possi-
bility that the cylinder bore could be damaged.
At the time reassembly, be careful not to damage the
rubber lips on the pistons.
(c)
Place a rag and 2 wooden blocks on the work table, and
lightly tap the cylinder flange against the block edges until
the No.2 piston drops out of the cylinder.
HINT:
Make sure that the distance (A) from the rag to the top of the
blocks is at least 100 mm (3.94 in.).
Нет комментариевНе стесняйтесь поделиться с нами вашим ценным мнением.
Текст