Volvo S60 Cross Country (2018 year). Manual — part 6
INSTRUMENTS AND CONTROLS
* Option/accessory.
107
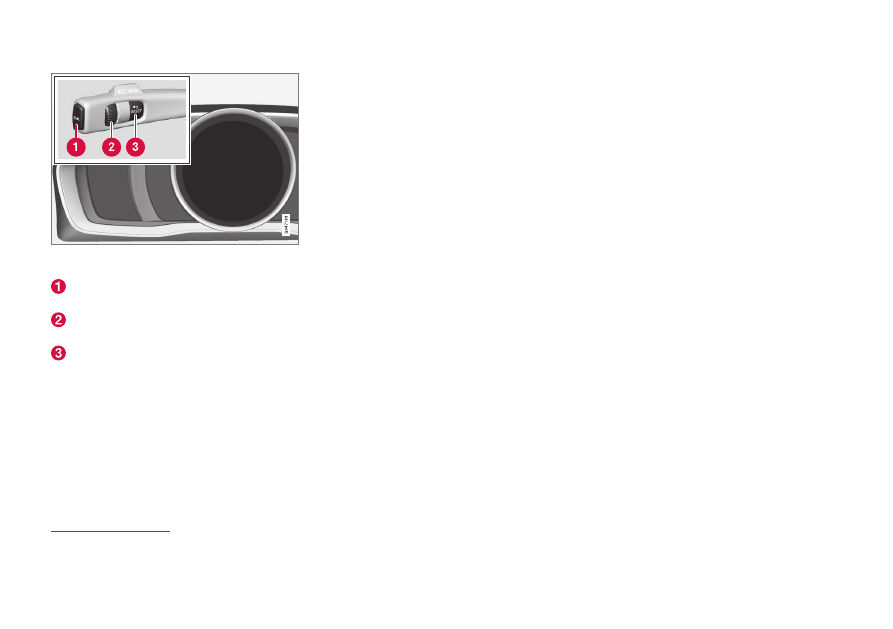
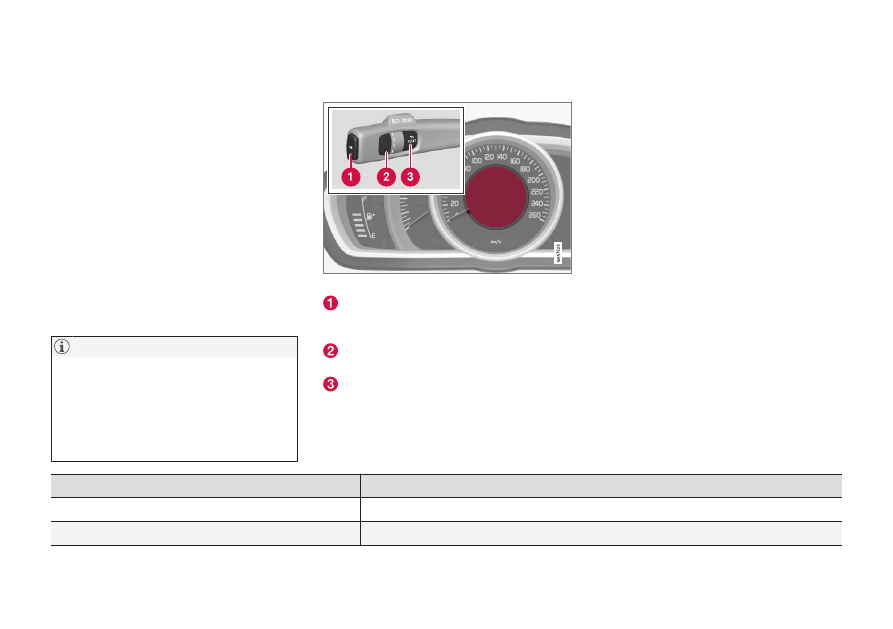
Display (digital combined instrument panel) and controls
for menu navigation.
OK – access to message list and message
confirmation.
Thumbwheel – browse between menu
options.
RESET – reset the active function. Used in
certain cases to select/activate a function,
see the explanation under each respective
function.
If there is a message (p. 108) then it must be
acknowledged with OK in order that the menus
shall be shown.
Related information
•
Menu overview - combined
instrument panel
Which menus are shown in the combined instru-
ment panel's information display depends on the
key position (p. 77).
Some of the following menu options require the
function and hardware to be installed in the car.
Analogue combined instrument panel
Digital speed
Parking heater*
Additional heater*
TC options
Service status
Oil level
26
Messages (##)
27
Digital combined instrument panel
Settings*
Themes
Contrast mode/Colour mode
Service status
Messages
27
Oil level
26
Parking heater*
Trip computer reset
Related information
•
Analogue combined instrument panel - over-
view (p. 62)
•
Digital combined instrument panel - overview
(p. 63)
•
Menu navigation - combined instrument
panel (p. 106)
26
Certain engines.
27
The number of messages is indicated in brackets.

INSTRUMENTS AND CONTROLS
* Option/accessory.
108
Messages
When a warning, information or indicator symbol
illuminates, a corresponding message appears
on the information display.
Message
Specification
Stop safely
A
Stop and switch off the
engine. Serious risk of dam-
age - consult a workshop
B
.
Stop engine
A
Stop and switch off the
engine. Serious risk of dam-
age - consult a workshop
B
.
Service
urgent
A
Contact a workshop
B
to
check the car immediately.
Service
required
A
Contact a workshop
B
to
check the car as soon as
possible.
See manual
A
Read the owner's manual.
Book time for
maintenance
Time to book regular service
- contact a workshop
B
.
Time for reg-
ular mainte-
nance
Time for regular service -
contact a workshop
B
. The
timing is determined by the
number of kilometres driven,
number of months since the
last service, engine running
time and oil grade.
Message
Specification
Maintenance
overdue
If the service intervals are
not followed then the war-
ranty does not cover any
damaged parts - contact a
workshop
B
.
Transmission
Oil change
needed
Contact a workshop
B
to
check the car as soon as
possible.
Transmission
Reduced per-
formance
The gearbox cannot handle
full capacity. Drive carefully
until the message clears
C
.
If shown repeatedly - con-
tact a workshop
B
.
Transmission
hot Reduce
speed
Drive more smoothly or stop
the car in a safe manner.
Disengage the gear and run
the engine at idling speed
until the message clears
C
.
Transmission
hot Stop
safely Wait for
cooling
Critical fault. Stop the car
immediately in a safe man-
ner and contact a work-
shop
B
.
Message
Specification
Temporarily
off
A
A function has been tempo-
rarily switched off and is
reset automatically while
driving or after starting
again.
Low battery
charge Power
save mode
The audio system is
switched off to save energy.
Charge the battery.
A
Part of message, shown together with information on where the
problem has arisen.
B
An authorised Volvo workshop is recommended.
C
For more information regarding the automatic gearbox, see
Automatic gearbox - Geartronic
For the Volvo warranty to apply, check and
follow the instructions in the Service and
Warranty Booklet.
Related information
•
•
INSTRUMENTS AND CONTROLS
}}
* Option/accessory.
109
Messages - handling
Use the left-hand stalk switch to acknowledge
and browse among messages (p. 108) that are
shown in the information display of the com-
bined instrument panel.
When a warning, information or indicator symbol
illuminates, a corresponding message appears in
the display at the same time. An error message is
stored in a memory list until the fault has been
rectified.
Press OK on the left-hand stalk switch to
acknowledge a message. Scroll through mes-
sages with the thumbwheel (p. 106).
If a warning message appears while you are
using the trip computer, the message must be
read (press OK) before the previous activity
can be resumed.
Related information
•
Menu overview - combined instrument panel
(p. 107)
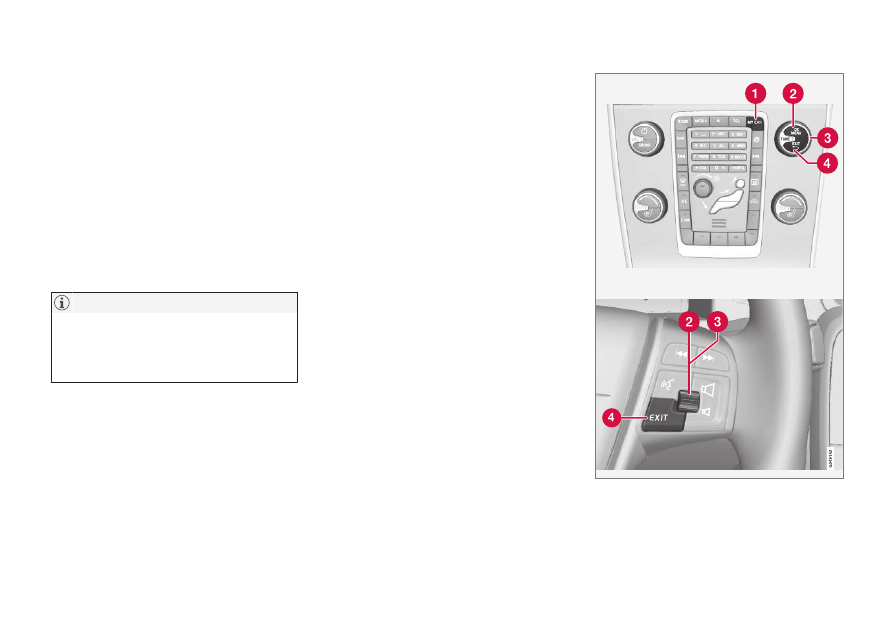
MY CAR
MY CAR is a menu source that handles many of
the car's functions, e.g. City Safety
™, locks and
alarm, automatic fan speed, setting the clock,
etc.
Certain functions are standard, others are
optional - the range also varies depending on the
market.
Operation
Navigation in the menus is carried out using but-
tons in the centre console or with the steering
wheel's right-hand keypad
*.
Control panel in centre console and steering wheel key-
pad. The figure is schematic - the number of functions
||
INSTRUMENTS AND CONTROLS
* Option/accessory.
110
and layout of the buttons both vary, depending on the
equipment selected and the market.
MY CAR - opens the menu system MY CAR.
OK/MENU - press the button in the centre
console or the thumbwheel on the steering
wheel to select/tick in the highlighted menu
option or store the selected function in the
memory.
TUNE - turn the knob in the centre console
or the thumbwheel on the steering wheel to
scroll up/down through the menu options.
EXIT
EXIT functions
Depending on the function the cursor is on when
EXIT is depressed briefly, and on which menu
level, one of the following may occur:
•
phone call is rejected
•
current function is interrupted
•
input characters are deleted
•
most recent selections are undone
•
leads up in the menu system.
A long press on EXIT leads to the normal view
for MY CAR or if you are in the normal view, to
the highest menu level (main source menu).
Menu options and search paths
For a description of the menu options and search
paths in MY CAR, see the Sensus Infotainment
supplement.
Trip computer
The car's trip computer records and calculates
vales such as e.g. distance, fuel consumption
and average speed whilst driving.
Trip computer content and appearance varies
depending on whether the combined instrument
panel is analogue or digital:
•
Trip computer - analogue combined instru-
ment panel (p. 112)
•
Trip computer - digital combined instrument
panel (p. 115)
The information from the trip computer can be shown in
the combined instrument panel's information display
28
.
Trip meter
The trip computer has two trip meters and one
odometer for the total mileage.
Average
Average fuel consumption is calculated from the
last resetting.
There may be a slight deviation if a fuel-driven
heater
* has been used.
Average speed
The average speed is calculated for the driving
distance driven since the last reset to zero.
INSTRUMENTS AND CONTROLS
* Option/accessory.
111
Instantaneous
The information for current fuel consumption is
updated continuously - approximately once per
second. When the car is driven at low speed the
consumption is shown per time unit - at a higher
speed it is shown related to mileage.
Different units (km/miles) can be selected for the
display - see section "Change unit" (p. 110).
Range - distance to empty tank
The trip computer shows the approximate dis-
tance that can be driven with the fuel quantity
remaining in the tank.
No guaranteed range remains when the heading
Distance to empty
shows "
----
".
•
In which case, refuel as soon as possible.
The calculation is based on the average fuel con-
sumption over the last 30 km and the remaining
driveable fuel quantity.
There may be a slight deviation if the driving
style has been changed.
An economic driving style generally results in a
longer driving distance. For more information on
how fuel consumption can be influenced, see
Volvo Car Corporation 's Environmental Philoso-
phy (p. 22).
Digital speed display in another unit
29
If the main instrument is graduated in mph, the
equivalent digital speed is shown as km/h.
Change unit
Distance and fuel unit can be changed in the
menu system MY CAR, see MY CAR (p. 109).
In addition to in the trip computer, these units
are also changed in Volvo's navigation sys-
tem
*.
Related information
•
Trip computer - analogue combined instru-
ment panel (p. 112)
•
Trip computer - digital combined instrument
panel (p. 115)
•
Trip computer - trip statistics
28
The appearance and showing of the display may vary depending on the instrument variant.
29
Only digital combined instrument panel and certain markets.
INSTRUMENTS AND CONTROLS
112
Trip computer - analogue combined
instrument panel
The information from the trip computer can be
shown in the combined instrument panel and
operated with the controls on the left-hand stalk
switch and with the combined instrument panel's
menu.
Checking and settings can be made immediately
after the combined instrument panel is automati-
cally illuminated in connection with unlocking. If
none of the trip computer's controls are actuated
within approx. 30 seconds after the driver's door
has been opened then the instrument extin-
guishes, after which either key position II or
engine starting is required in order to operate the
trip computer.
If a warning message appears when the trip
computer is used then the message must first
be acknowledged before the trip computer
can be reactivated.
•
Acknowledge the message by briefly
pressing the indicator stalk OK button.
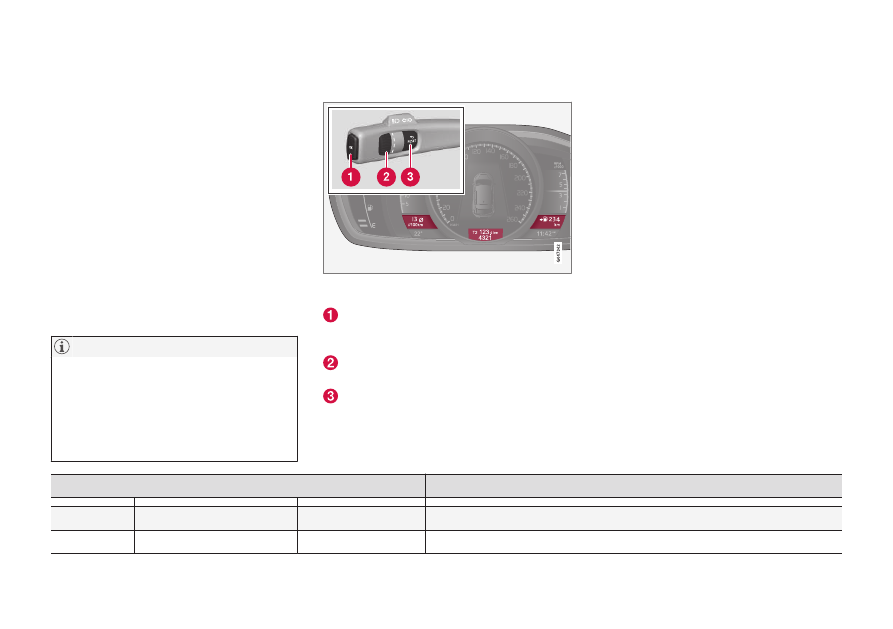
Controls
Information display and controls.
OK - opens the combined instrument panel's
menu, confirms messages or menu selec-
tions.
Thumbwheel - browses between menu
options or trip computer options.
RESET - resets the current trip meter or
goes back out of the menu structure.
Trip comp. opt.
Choose which trip computer should be shown:
1. To ensure that no control is in the middle of
a sequence - reset them first with
two presses on RESET.
2. Turn the thumbwheel to browse between the
options and stop at the required heading.
The trip computer display in the combined instru-
ment panel can be shifted to another option at
any time during the journey. One of the options
means that no trip computer is shown.
Trip computer heading in combined instrument panel
Information
Trip meter
T1 and total dist.
•
Long press on RESET resets trip meter T1.
Trip meter
T2 and total dist.
•
Long press on RESET resets trip meter T2.
INSTRUMENTS AND CONTROLS
}}
* Option/accessory.
113
Trip computer heading in combined instrument panel
Information
Distance to empty
For more information - see the section "Range - distance to empty tank" (p. 110).
Fuel consumption
Current consumption.
Average speed
•
Long press on RESET resets
Average speed
.
No trip computer information.
This option shows a blank display and it also indicates the beginning/end of the loop.
Resetting the trip computer
1. Turn the thumbwheel and stop at the trip
computer heading to be reset:
T1 and total
dist.
,
T2 and total dist.
or
Average speed
.
2. One long press on RESET resets the value
for the selected heading.
Each heading must be zeroed individually.
Functions in the combined instrument
panel's menu
The combined instrument panel's menu includes
setting options for trip computer. Open the menu
to check/adjust the functions in the table below.
1. To ensure that no control is in the middle of
a sequence - reset them first with
two presses on RESET.
2. Press OK.
3. Browse through the functions with the
thumbwheel and select/confirm with OK.
4. Finish by pressing twice on RESET after
completed checking/adjustment.
Functions
Information
Digital speed
•
km/h
•
mph
•
No display
Shows the car's speed digitally in the centre of the combined instrument panel.
Parking heater*
•
DIRECT START
•
- Timer 1 - leads to the menu for selecting time.
•
- Timer 2 - leads to the menu for selecting time.
||
INSTRUMENTS AND CONTROLS
* Option/accessory.
114
Functions
Information
Additional heater*
•
Auto On
•
Off
For more information, see Additional heater
TC options
•
Distance to empty tank
•
Fuel consumption
•
Average speed
•
Trip meter
T1 and total dist.
•
Trip meter
T2 and total dist.
Here you can activate the options that you want to be available as selectable headings in
the trip computer. The symbols for the options already selected are white with a "tick" -
others are grey and have no "tick".
Service status
Shows the number of months and mileage to next service.
Oil level
A
For more information, see Engine oil - checking and filling (p. 354).
Messages (##)
For more information, see Messages - handling (p. 109).
A
Certain engines.
Related information
•
•
INSTRUMENTS AND CONTROLS
}}
115
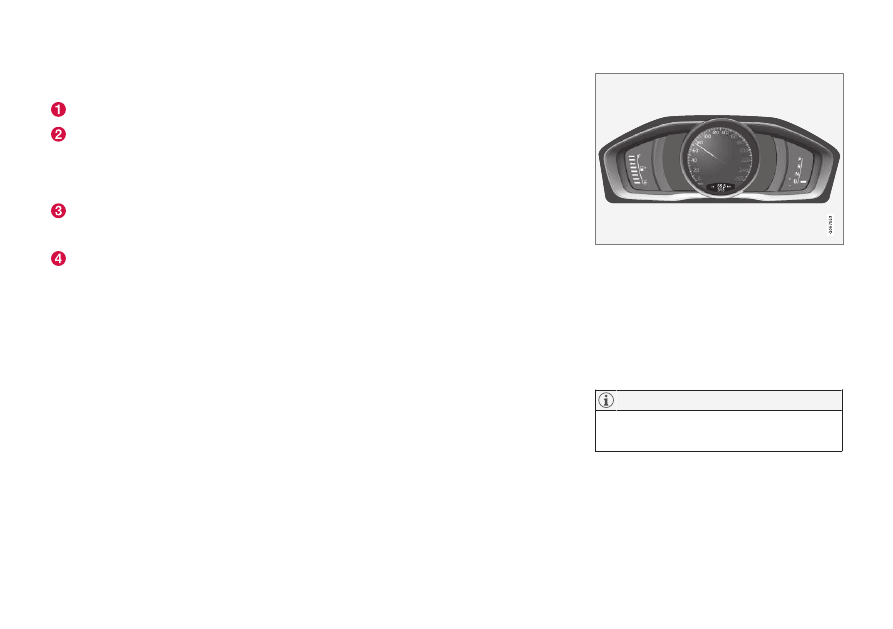
Trip computer - digital combined
instrument panel
The information from the trip computer can be
shown in the combined instrument panel and
operated with the controls on the left-hand stalk
switch and with the combined instrument panel's
menu.
Checking and settings can be made immediately
after the combined instrument panel is automati-
cally illuminated in connection with unlocking. If
none of the trip computer's controls are actuated
within approx. 30 seconds after the driver's door
has been opened then the instrument extin-
guishes, after which either key position II or
engine starting is required in order to operate the
trip computer.
If a warning message appears when the trip
computer is used then the message must first
be acknowledged before the trip computer
can be reactivated.
•
Acknowledge the message by briefly
pressing the indicator stalk OK button.
Controls
Three trip computer options can be displayed simultane-
ously - one in each "window".
OK - opens the combined instrument panel's
menu, confirms messages or menu selec-
tions.
Thumbwheel - browses between menu
options or trip computer options.
RESET - resets the current trip meter or
goes back out of the menu structure.
Trip comp. opt.
Choose which trip computer should be shown:
1. To ensure that no control is in the middle of
a sequence - reset them first with
two presses on RESET.
2. Turn the thumbwheel to browse between the
heading combinations.
3. Stop at the required combination for the con-
stant display of this trip data in the combined
instrument panel.
The trip computer display in the combined instru-
ment panel can be shifted to another option at
any time during the journey. One of the options
means that no trip computer is shown.
Heading combinations
Information
Average
Trip meter T1 + Meter reading
Average speed
•
Long press on RESET resets trip meter T1.
Instantaneous Trip meter T2 + Meter reading Distance to empty tank
•
Long press on RESET resets trip meter T2.
||
INSTRUMENTS AND CONTROLS
116
Heading combinations
Information
Instantaneous
Meter reading
kmh<>mph
kmh<>mph - see section Reverse digital speed display (p. 110).
No trip computer information.
This option extinguishes all three trip computer displays and it also indicates the
beginning/end of the loop.
Resetting the trip computer
Trip meter
1. Turn the thumbwheel and stop at the head-
ing combination with the trip meter to be
reset.
2. One long press on RESET resets the value
for the selected heading.
Average speed and average consumption
1. Press OK to open the combined instrument
panel's menu.
2. Browse to the
Trip computer reset
menu
option with the thumbwheel and confirm with
OK.
3. Choose to reset average consumption, aver-
age speed or to reset both. Confirm the
selection with OK.
4. Finish by pressing RESET.
Functions in the combined instrument
panel's menu
The combined instrument panel's menu includes
setting options for trip computer. Open the menu
to check/adjust the functions in the table below.
1. To ensure that no control is in the middle of
a sequence - reset them first with
two presses on RESET.
2. Press OK.
3. Browse through the functions with the
thumbwheel and select/confirm with OK.
4. Finish by pressing twice on RESET after
completed checking/adjustment.
Functions
Information
Trip computer reset
•
Average
•
Average speed
Reset the value of average fuel consumption and average speed.
Note that this function does not reset both trip meters T1 and T2.
Messages
For more information, see Messages - handling (p. 109).
Themes
Select the theme for the appearance of the combined instrument panel (p. 62).
INSTRUMENTS AND CONTROLS
* Option/accessory.
117
Functions
Information
Settings*
Select
Auto On
or
Off
.
For more information, see Additional heater
Contrast mode/Colour mode
Adjusting the combined instrument panel's brightness and colour intensity.
Parking heater*
•
Direct start
•
- Symbol Timer 1 - leads to the menu for
selecting time.
•
- Symbol Timer 2 - leads to the menu for
selecting time.
For a description of programming the timer, see Engine block heater and passenger compartment
heater
Service status
Shows the number of months and mileage to next service.
Oil level
A
For more information, see Engine oil - checking and filling (p. 354).
A
Certain engines.
Related information
•
•
INSTRUMENTS AND CONTROLS
* Option/accessory.
118
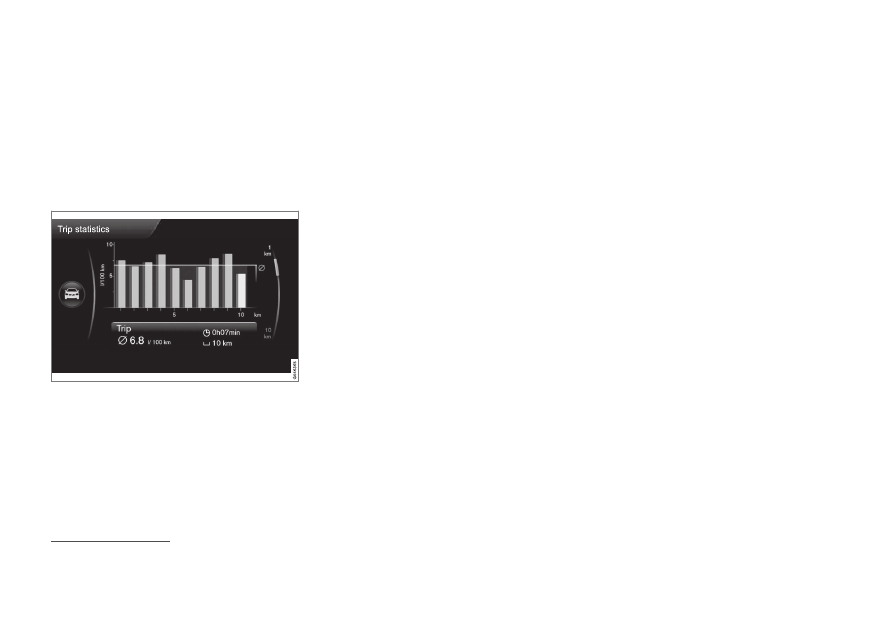
Trip computer - trip statistics*
Trip statistics from the trip computer can be
shown in the centre console's screen and pro-
vide a graphic overview of fuel consumption.
Function
–
Open the menu system MY CAR (p. 109)
and select
Trip statistics
in order to see the
bar chart.
Trip statistics
30
Each bar symbolises 1 km or 10 km driven dis-
tance, depending on the scale selected - the bar
at the far right shows the value for the current kil-
ometre or 10 km.
Using the TUNE control, the scale for the bars
can be changed between 1 km and 10 km - the
cursor on the far right changes position between
up and down in relation to the scale selected.
Settings
Different settings can be made for trip statistics
in the menu system MY CAR -
Trip statistics
.
•
Reset when vehicle has been off for
minimum 4h
- highlight the box by select-
ing ENTER and go back out of the menu by
selecting EXIT. With this option selected, all
statistics are deleted automatically after fin-
ishing driving and the car has been stationary
for more than 4 hours. Trip statistics start
again from zero the next time the engine is
started.
•
Start new trip
- ENTER is used to delete all
previous statistics, go back out of the menu
by selecting EXIT. If a new driving cycle shall
be started before 4 hours have elapsed then
the current period must first be deleted man-
ually with this option.
See also information on Eco guide (p. 66).
Related information
•
30
The figure is schematic - layout may vary depending on car model or updated software.
CLIMATE CONTROL
* Option/accessory.
120
General information on climate
control
The car is equipped with electronic climate con-
trol (p. 126). The climate control system cools
or heats as well as dehumidifies the air in the
passenger compartment.
Air conditioning (AC) (p. 130) can be
switched off, but to ensure the best possible
climate comfort in the passenger compart-
ment, and to prevent the windows from mist-
ing, it should always be switched on.
To bear in mind
•
To ensure that the air conditioning works
optimally, the side windows, and sunroof
*
should be closed.
•
Global opening (p. 172) opens/closes all
side windows simultaneously and can be
used for example to quickly air the car during
hot weather.
•
Remove ice and snow from the climate con-
trol system air intake (the grille between the
bonnet and the windscreen).
•
In warm weather, condensation from the air
conditioning may drip under the car. This is
normal.
•
When the engine requires full power, e.g. for
full acceleration, the air conditioning can be
temporarily switched off. There may then be
a temporary increase in temperature in the
passenger compartment.
•
Remove misting on the insides of the win-
dows primarily by using the defroster func-
tion (p. 130). To reduce the risk of misting,
keep the windows clean and use window
cleaner.
To avoid misting on the rear window, do not
block the ventilation holes at the back of the
parcel shelf with articles of clothing or other
objects.
Cars with Start/Stop
*
With an auto-stopped (p. 284) engine certain
equipment may have its function temporarily
reduced, e.g. climate control fan speed (p. 128).
Cars with ECO
*
Certain equipment may have its function tempo-
rarily reduced or deactivated when the ECO
(p. 292) function is activated, e.g. the air condi-
tioning (p. 130).
When the ECO function is activated, several
parameters in the climate control system's
settings are changed, and several electricity
consumer functions are reduced. Certain set-
tings can be reset manually, but full function-
ality is only restored by deactivating the ECO
function.
Related information
•
•
Menu settings - climate control (p. 123)
•
Electronic climate control - ECC (p. 126)
•
Air distribution in the passenger compart-
ment (p. 123)
•
CLIMATE CONTROL
* Option/accessory.
121
Actual temperature
The temperature you select in the passenger
compartment corresponds to the physical expe-
rience with reference to factors such as ambient
temperature, air speed, humidity and solar radia-
tion etc. in and around the car at the time.
The system includes a sun sensor (p. 121) which
detects on which side the sun is shining into the
passenger compartment. This means that the
temperature can differ between the right and left-
hand air vents despite the controls being set for
the same temperature on both sides.
Related information
•
General information on climate control
(p. 120)
•
Temperature control in the passenger com-
partment (p. 129)
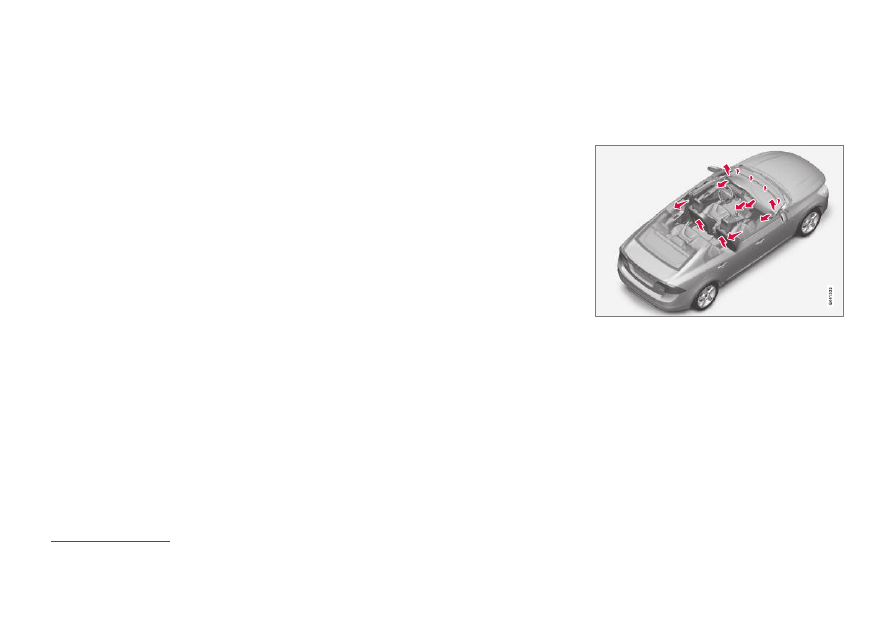
Sensors - climate control
The climate control system has a number of sen-
sors to help control the temperature (p. 121) in
the car.
•
The sun sensor is located on the top side of
the dashboard.
•
The temperature sensor for the passenger
compartment is located below the climate
control panel.
•
The outside temperature sensor is located in
the door mirror.
•
The humidity sensor
* is located by the inte-
rior rearview mirror.
Do not cover or block the sensors with cloth-
ing or other objects.
Related information
•
General information on climate control
(p. 120)
Air quality
The interior in a passenger compartment is
designed to be pleasant and comfortable, even
for people with contact allergies and for asthma
sufferers.
•
Passenger compartment filter (p. 122)
•
Material in the passenger compartment
(p. 123)
•
Clean Zone Interior Package (CZIP)
(p. 122)
•
Interior Air Quality System (IAQS) (p. 122)
*
Related information
•
CLIMATE CONTROL
* Option/accessory.
122
Air quality - passenger
compartment filter
All air entering the car's passenger compartment
is cleaned with a filter.
The filter must be replaced at regular intervals.
Follow the Volvo Service Programme for the rec-
ommended replacement intervals. If the car is
used in a severely contaminated environment, it
may be necessary to replace the filter more often.
There are different types of passenger com-
partment filter. Make sure that the correct fil-
ter is fitted.
Related information
•
Air quality - Clean Zone Interior
Package (CZIP)*
CZIP comprises a series of modifications that
keep the passenger compartment even clearer
from allergy and asthma-inducing substances.
The following is included:
•
An enhanced fan function that means that
the fan starts when the car is opened with
the remote control key. The fan fills the pas-
senger compartment with fresh air. The func-
tion starts when required and is disengaged
automatically after a time or when one of the
passenger compartment doors is opened.
The amount of time the fan runs is reduced
gradually due to reduced need up until the
car is 4 years old.
•
The air quality system IAQS (p. 122) is a fully
automatic system that cleans the air in the
passenger compartment from contaminants
such as particles, hydrocarbons, nitrous
oxides and ground-level ozone.
Related information
•
General information on climate control
(p. 120)
•
Air quality - IAQS*
The air quality system IAQS separates gases
and particles to reduce the levels of odours and
pollution in the passenger compartment.
If the outside air is contaminated then the air
intake is closed and the air is recirculated.
It is possible to activate/deactivate the function
in the menu system MY CAR. For a description of
the menu system, see MY CAR (p. 109).
The air quality sensor must always be enabled
to ensure the best air in the passenger com-
partment.
In a cold climate recirculation is limited so as
to prevent misting.
In the event of misting, the air quality sensor
should be disengaged, and the defroster
functions for the windscreen and side win-
dows, as well as the rear window, should be
used.
Related information
•
General information on climate control
(p. 120)
•
•
CLIMATE CONTROL
}}
* Option/accessory.
123
Air quality - material
Tested materials have been developed in order
to minimise the quantity of dust in the passenger
compartment and to contribute to making the
passenger compartment easier to keep clean.
The carpets in both the passenger compartment
and the cargo area are removable and easy to
remove and clean. Use cleaning agents and car
care products recommended by Volvo to clean
the interior (p. 394).
Related information
•
Menu settings - climate control
It is possible to activate/deactivate or change
the default settings for six of the climate control
system's functions via the centre console.
•
Fan level during automatic climate control
(p. 129).
•
•
Automatic start of rear window defroster
(p. 102)
1
.
•
•
Automatic start of seat heating driver
(p. 127).
•
Automatic start of steering wheel heating
(p. 84).
More information is available in the description of
the menu system (p. 109).
The climate control system's functions can be
reset in the menu system MY CAR to the default
settings. For a description of the menu system,
see MY CAR (p. 109).
Related information
•
General information on climate control
(p. 120)
Air distribution in the passenger
compartment
The incoming air is divided between a number of
different vents in the passenger compartment.
Air distribution is fully automatic in AUTO mode.
If necessary it can be controlled manually; see
the air distribution table (p. 132).
1
Using the Engine Remote Start (ERS)
* function, the heated windscreen is also demisted/defrosted automatically if the setting for rear window defroster is activated.
Нет комментариевНе стесняйтесь поделиться с нами вашим ценным мнением.
Текст