Volvo V70X, C70 (2010 year). Manual — part 8
04 Comfort and driving pleasure
Climate system
04
130
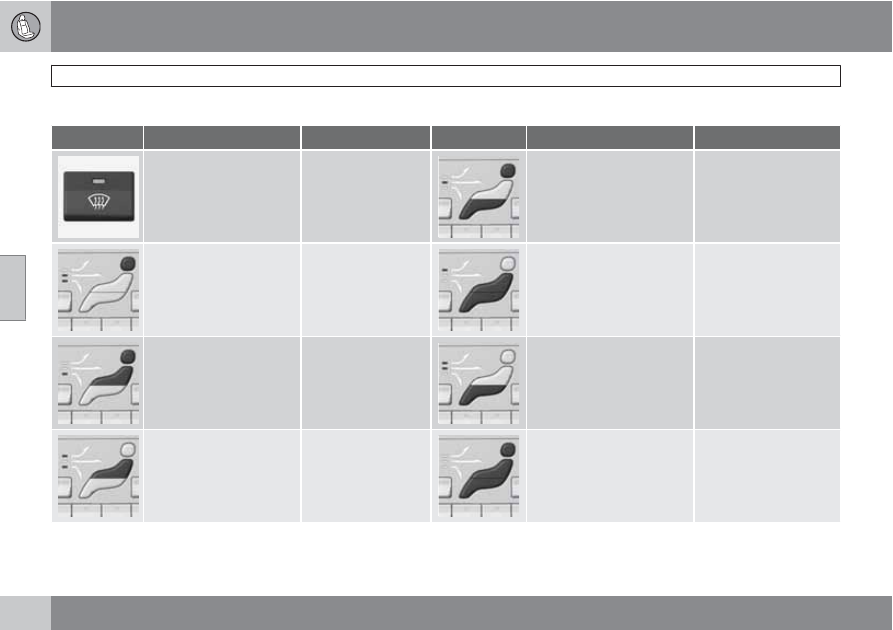
Air distribution table
Air distribution
Use
Air distribution
Use
Air to windows. Some air
flows from the dashboard
air vents. The air is not
recirculated. Air condition-
ing is always engaged.
To remove de-fog/de-
ice the front side win-
dows and windshield
quickly.
Air to the floor and windows.
Some air flows from the
dashboard air vents.
To ensure comfortable
conditions and good de-
fogging in cold or humid
weather.
Air to windshield and side
windows. Some air flows
from the air dashboard
vents.
In cold or humid
weather (blower
speed should be
moderate to high).
Air to floor and from dash-
board air vents.
In sunny weather with
cool outside tempera-
tures.
Airflow to windows and
from dashboard air vents.
To ensure good com-
fort in warm, dry
weather.
Air to floor. Some air flows to
the dashboard air vents and
windows.
To warm or cool the feet.
Airflow to the head and
chest from the dashboard
air vents.
To ensure efficient
cooling in warm
weather.
Airflow to windows, from
dashboard air vents and to
the floor.
To cool the feet or pro-
vide warmer air to the
upper body in cold
weather or hot, dry
weather.
04 Comfort and driving pleasure
Audio system
04
``
*
Option/accessory, for more information, see Introduction.
131
Introduction
The audio system is available in two versions:
High Performance and Premium Sound. The
system version is shown in the display when
the audio system is switched on.
If the audio system is on when the ignition is
switched off, it will come on automatically the
next time the ignition is put in mode I or higher.
The audio system can be operated without a
key in the ignition slot for 15 minutes at a time
by pressing the POWER button (the driver's
door must be closed on vehicles with the
optional keyless drive).
Some functions are controlled from the menu
system in the center console. For more infor-
mation on menus, see page 120.
Dolby Surround Pro Logic II and the sym-
bol are trademarks of Dolby Laboratories
Licensing Corporation. The Dolby Surround
Pro Logic II System is manufactured under
license from Dolby Laboratories Licensing Cor-
poration.
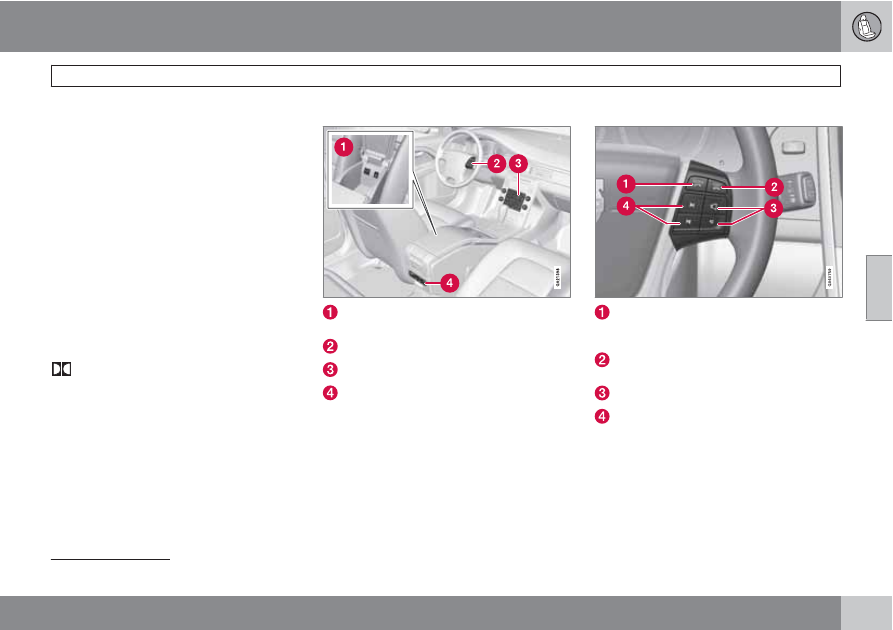
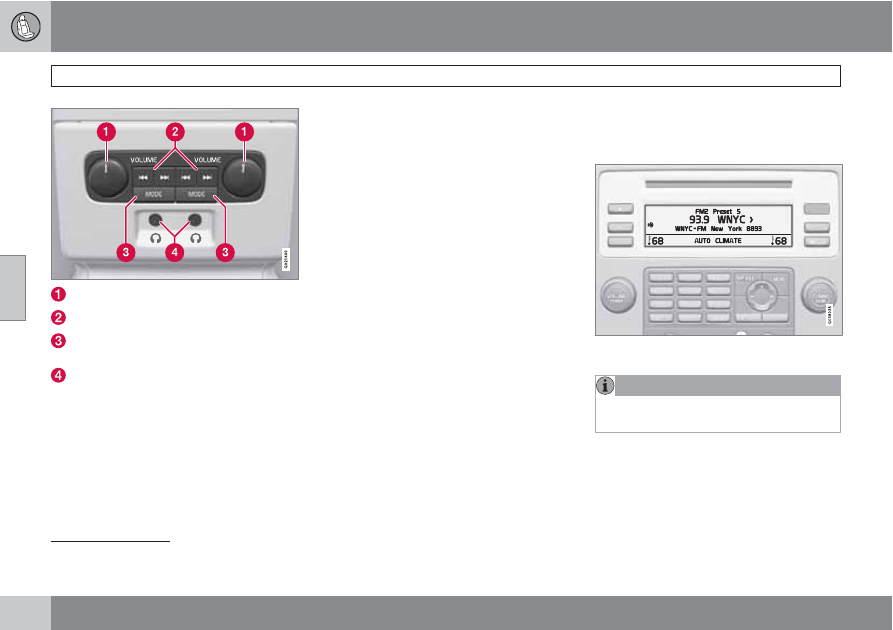
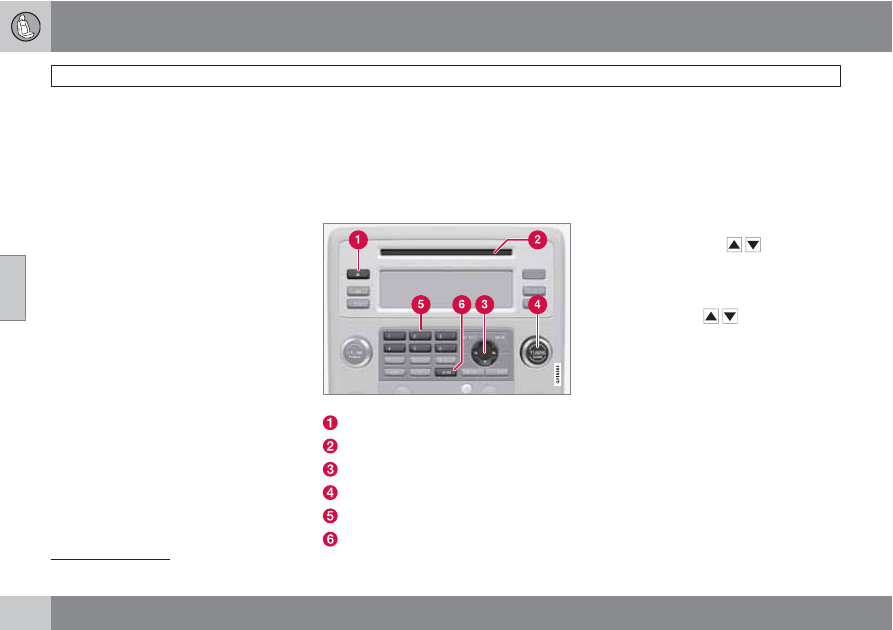
Overview
Socket for external audio source (AUX,
USB, iPod
1
)*
Steering wheel keypad
Center console control panel
Control panel with headphones socket*
Steering wheel keypad
Confirm selection in menu system and
controls for a bluetooth-connected cell
phone (see page 145).
Go higher in the menu system. Interrupt
current function.
Volume
A short press scrolls between CD tracks or
preset radio stations. A long press
searches within CD tracks or searches for
radio stations automatically.
Please note that these functions are also avail-
able through the audio system controls on cen-
ter console.
1
iPod is a registered trademark of Apple Inc.
04 Comfort and driving pleasure
Audio system
04
132
*
Option/accessory, for more information, see Introduction.
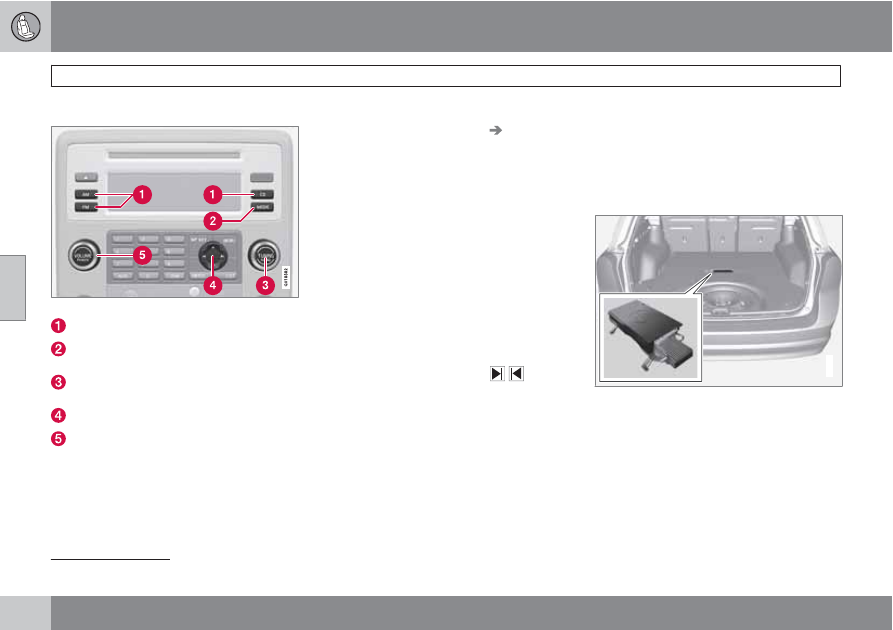
Audio functions
Center console, controls for audio functions
Internal audio sources: AM, FM and CD
External audio source. For connection, see
page 131
Push button and knob controls for making
sound settings
Navigation button
Volume and on/off
Audio volume and automatic volume
control
The audio system compensates for disrupting
noises in the passenger compartment by
increasing the volume according to the speed
of the vehicle. The level of sound compensa-
tion can be set at low, medium or high. Select
the level under
Audio settings
Auto
volume control
.
External audio source audio volume
External devices such as an MP3 player can be
connected to the AUX input, see page 131. The
volume of the external sound source AUX may
be different from the volume of the internal
sound sources such as the CD player or the
radio. If the external sound source's volume is
too high, the quality of the sound may be
impaired. To help prevent this, adjust the input
volume of the external audio source:
1.
Set the audio system in AUX mode using
MODE and use (4) to navigate to
Volume,
AUX input
.
2.
Turn the control (3) or press
/
the nav-
igation button.
Sound settings
Press the control (3) repeatedly to toggle
among the sound settings. Adjustments are
made by turning the control (3).
•
Bass
– Bass level.
•
Treble
– Treble level.
•
Fader
– Balance between the front and
rear speakers.
•
Balance
– Balance between the right and
left speakers.
•
Subwoofer
* – Level for the bass speaker.
The subwoofer can be switched off by
turning control (3) counterclockwise to
MIN
. The location of the subwoofer is
shown in the illustration.
G019419
•
Surround
* – Surround settings.
Under
Surround,
3 channel stereo or Dolby
Surround Pro logic II can be activated by
selecting
3-ch
or
Dpl2
respectively. This ena-
bles the following options:
•
Center level
2
– Level for the center
speaker.
•
Surround level
2
– Level for surround
sound.
2
Premium Sound

04 Comfort and driving pleasure
Audio system
04
``
133
Equalizer
Sound levels for different frequencies can be
adjusted separately using the equalizer
3
.
1.
Go to
Audio settings
and select
Equalizer Front
or
Equalizer Rear
.
The sound level for the frequency is
adjusted with
/
on the navigation but-
ton. Press
/
to select another fre-
quency.
2.
Use ENTER to save or EXIT to close.
Sound stage
4
The sound experience can be optimized for the
driver's seat, both front seats or the rear seat.
Select one of the options under
Audio settings
Soundstage
.
Optimal sound reproduction
The audio system is calibrated for optimal
sound reproduction using digital signal pro-
cessing.
This calibration takes into account factors such
as the speakers, amplifier, cabin acoustics, the
listeners' seating positions, etc., for each com-
bination of vehicle/audio system.
There is also a dynamic calibration that takes
into consideration the volume level, radio
reception, and the speed of the vehicle.
The settings that are described in this manual,
such as
Bass
,
Treble
, and
Equalizer
are only
intended to enable the user to adapt sound
reproduction to his/her personal tastes.
Radio functions
Center console, controls for radio functions
Navigation button for automatic tuning
Press to cancel a menu selection or a
selected function
Manual tuning
Scan the current wave band
Auto store the strongest radio stations in
the area in which you are driving
Station preset buttons
Select wave band AM and FM (FM1 and
FM2)
Automatic tuning
1.
Select a wave band using FM or AM.
2.
Press
/
on the navigation button.
Manual tuning
1.
Select a wave band using FM or AM.
2.
Turn TUNING to select a station.
Preset stations
Ten station presets can be stored for each
wave band. FM has two memories for presets:
FM1
and
FM2
. The stored presets are selected
using the preset buttons.
Preset storage can be carried out manually or
automatically.
Manually storing preset stations
1.
Tune into a station.
3
Certain audio systems
4
Certain markets only.
04 Comfort and driving pleasure
Audio system
04
134
*
Option/accessory, for more information, see Introduction.
2.
Hold in one of the preset buttons until the
message
Channel stored
appears on the
display.
Automatically storing preset stations
The function is especially useful in areas where
the radio stations and their frequencies are
unfamiliar. The ten strongest radio stations are
stored automatically in a separate memory.
1.
Select a wave band using FM or AM.
2.
Hold in AUTO until
Autostoring…
appears on the display.
Once
Autostoring…
disappears from the dis-
play, the stations are stored. The radio contin-
ues in Auto mode and
Auto
appears on the
display. The automatically stored presets can
now be selected using the preset buttons.
Automatic preset storage can be cancelled
using EXIT.
Auto mode is cancelled by pressing for exam-
ple AUTO or FM.
Returning to Auto mode provides access to the
autostored presets:
1.
Press AUTO.
>
Auto
appears on the display.
2.
Press a preset button.
Scan
The function automatically searches the cur-
rent wave band for strong stations. When a
station is found, it is played for approx. eight
seconds before scanning is resumed. While
the station is playing it can be stored as a pre-
set as usual.
NOTE
Storing a station interrupts the SCAN func-
tion.
1.
Select a wave band using AM or FM.
2.
Press SCAN.
>
SCAN
appears on the display. Close
using SCAN or EXIT.
Radio text
Some stations transmit information on pro-
gram content, artists, etc. This information can
be shown on the display.
Activate/deactivate in FM mode under
Radio
text
.
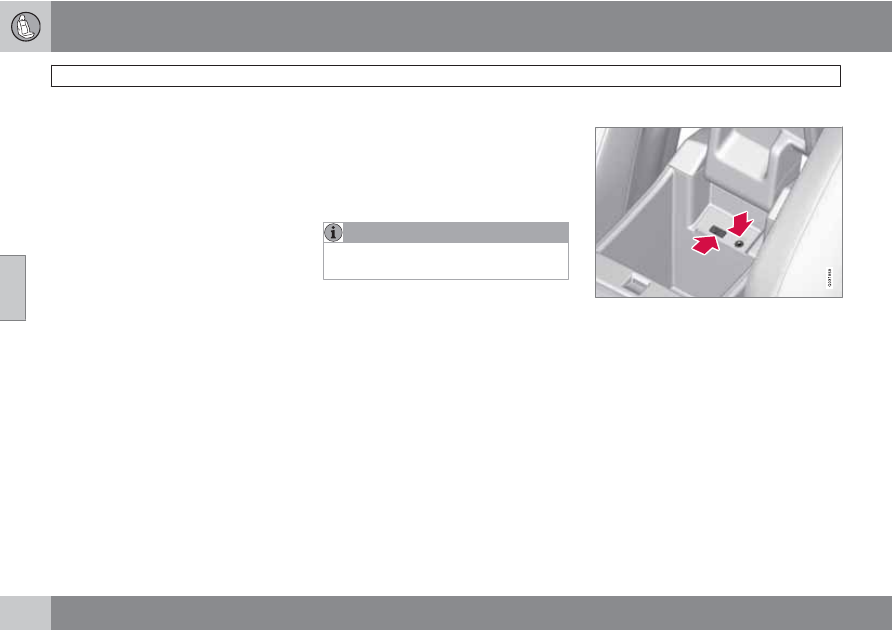
USB/iPod
connector*
AUX and USB sockets in the storage compartment
between the front seats
An auxiliary device, such as an iPod
, MP3
player or a USB flash drive can be connected
to the audio system via the connectors in the
center console storage compartment. A stand-
ard cable from an iPod
or MP3 player can be
routed under the cover to the AUX connector
in the storage compartment.
A sound source must be chosen, depending on
the device that has been connected:
1.
Use MODE to select
iPod
or
USB
. The text
CONNECT DEVICE
will be displayed.
2.
Connect the device to the connector in the
center console storage compartment (see
the illustration).
04 Comfort and driving pleasure
Audio system
04
``
*
Option/accessory, for more information, see Introduction.
135
The text
LOADING
will be displayed while the
system loads the files (folder structure) on the
device. This may take a short time.
When information about the files (the folder
structure) on the device has been loaded, the
resulting list includes information on the artist,
genre and song title.
To navigate in the folder structure, press
ENTER and scroll up and down the folders
using the arrow buttons (on the audio system
control panel or on the steering wheel keypad).
Press the right arrow button to select a folder.
Press the left arrow button to go up a level in
the folder structure. Press ENTER to go down
a level in the folder structure.
Tracks can be selected in two ways:
•
Turn the manual tuning knob clockwise or
counterclockwise
•
Use the right or left arrow keys on the nav-
igation control to select the desired track.
The arrow keys on the steering wheel key-
pad can also be used in the same way.
NOTE
The system supports playback of files in the
most common versions of formats such as
mp3, wma, and wav. However, there may be
versions of these formats that the system
does not support.
The system also supports a number of
iPod
models produced in 2005 or later.
iPod
Shuffle is not supported.
USB flash drive
To simplify the use of a USB flash drive, it is
advisable to only store music files on the drive.
It will take considerably longer for the system
to index the files on the drive if it contains any-
thing other than compatible music files.
NOTE
The system supports removable media that
uses the USB 2.0 standard and the FAT32
file system and can index up to 500 folders
and a maximum of 64,000 files. The device
must have at least 256 Mb of memory.
MP3 player
Many MP3 players have a file indexing system
that is not supported by the vehicle's audio
system. In order to use an MP3 player, the sys-
tem must be set to USB Removable device/
Mass Storage Device.
iPod
An iPod
receives current and its battery is
charged through the connecting cord. How-
ever, if the iPod's battery is completely
drained, it should be recharged before the
iPod
is connected to the audio system.
NOTE
When an iPod
is used as a sound source,
the vehicle's audio system has a menu
structure similar to the one in the iPod
. See
the iPod's manual for detailed information.
For further information, refer to the accessory
manual USB/iPod
Music Interface.
Rear control panel with headphones
socket*
Headphones with an impedance of
16 – 32 ohm and sensitivity of 102 dB or higher
are recommended for best sound reproduc-
tion.
04 Comfort and driving pleasure
Audio system
04
136
*
Option/accessory, for more information, see Introduction.
Volume control (right/left sides)
Scroll/search forward and back
MODE – select AM, FM, HD Radio
5
, CD,
AUX, USB/iPod
* and ON/OFF.
Headphones sockets (3.5 mm)
Activating/deactivating
The control panel is activated by pressing
MODE when the audio system is switched on.
It is switched off automatically when the audio
system is switched off or by a long press on
MODE.
Scroll/search forward and backward
Short presses on (2) are used to scroll between
CD tracks or preset radio stations. Long
presses are used to fast-wind CD tracks or to
search for radio stations automatically.
Limitations
The audio source (FM, AM, CD, etc.) being
played in the speakers cannot be controlled
from the rear control panel.
HD Radio
reception (U.S. models
only)
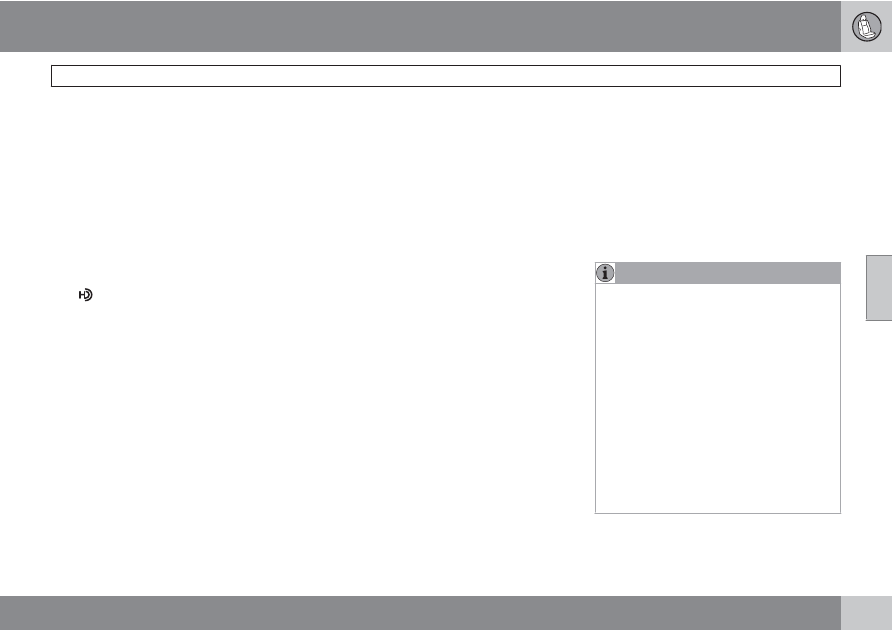
Introduction
Display when the radio is receiving an HD Radio
broadcast
NOTE
HD radio volume may fade in and out at
times due to coverage limitations.
HD radio is a brand name registered by the
Ibiquity digital corporation
6
. They are the
developer of a broadcasting technology called
IBOC or In Band On Channel, which refers to
the method of transmitting a digital radio
5
Available on U.S. models only
6
HD Radio (TM) technology is manufactured under license from iBiquity Digital Corp. U.S. and Foreign Patents. HD Radio(TM) and the HD and HD Radio logos are proprietary trademarks of iBiquity
Digital Corp.
04 Comfort and driving pleasure
Audio system
04
``
137
broadcast signal centered on the same fre-
quency as the AM or FM station's present fre-
quency.
The IBOC system is referred to as a "hybrid"
since it is both analogue and digital. During
hybrid operation, receivers still continue to
receive the analogue (non-digital) signal. HD
radio receivers incorporate both modes of
reception, where the receiver will automatically
switch to the analogue signal if the digital signal
cannot be decoded or is lost by the receiver.
When you have tuned to an HD Radio station,
the
symbol will appear in the audio sys-
tem display.
More information about HD radio and IBOC
can be found on Ibiquity's website,
www.hdradio.com and www.ibiquity.com.
Benefits of digital broadcasting
•
Better sound (FM sounds near CD quality
and AM as analogue FM).
•
Some FM frequencies offer a greater num-
ber of listening choices through “multicast-
ing” (consisting of a frequency's main
channel and any sub-channels that may
also be available on that particular fre-
quency. See also the section "Sub-chan-
nels" below).
•
When receiving a digital signal there is no
multipath disturbance or hisses/pops/
crackling due to outside influences.
How HD broadcasting works
HD Radio works similarly to conventional radio
and broadcasts of this type are available in
many areas of the United States. However,
there are a few key differences:
•
Instead of transmitting one analogue sig-
nal, stations send out a bundled signal –
both analogue and digital.
•
An HD radio receiver can receive both dig-
ital and analogue broadcasts. Depending
on the terrain and location of the vehicle
(which will influence the signal strength),
the receiver will determine which signal to
receive.
Limitations
•
Main channel vs. sub-channels (FM
only): The main channel is the only channel
that can receive in hybrid mode (both dig-
ital and analogue). If a frequency has sub-
channels, they are broadcast in digital
mode only. The main FM channel will be
displayed as, for example, 93.9 WNYC
(Volvo uses the symbol > to indicate there
are sub-channels available) The sub-FM
channels will be displayed as 93.9 – 2
WNYC, 93.9 - 3 WNYC, etc.
•
Reception coverage area: Due to current
IBOC transmitter power limitations, the
reception coverage area in digital mode is
somewhat more limited than the station's
analogue coverage area. Please be aware
that as with any radio broadcast technol-
ogy, terrain, time of day, foliage level and
building location can have positive or neg-
ative effects on radio reception.
•
Analogue to digital/digital to analogue
blending: Analogue to digital blending will
occur as the signal strength reaches a pre-
set threshold in the receiver. This will be
noticeable in fringe areas (areas with weak
reception) and is normal.
NOTE
There may be a noticeable difference in
sound quality when a change from analogue
to digital or digital to analogue occurs, such
as:
•
Volume increase or decrease
•
Equalizer settings, i.e. Bass/ Midrange/
Treble cut or boost
•
Time alignment (Digital program mate-
rial in extreme cases can be as much as
8 seconds behind the analogue). This
will noticeable as a "stuttering" effect.
The above items are dependant on the
broadcaster's equipment settings and do
not indicate a fault in the vehicle's radio
receiver or antenna systems.
04 Comfort and driving pleasure
Audio system
04
138
Switching HD on or off
The factory setting for HD radio is on. However,
when driving through areas with weak HD sig-
nals (fringe areas), you may experience that the
radio repeatedly switches between analogue/
digital and digital/analogue reception. If this
happens, it may be desirable to switch HD off.
To do so:
1.
Be sure the audio system is switched on
and in AM or FM mode.
2.
Press MENU in the center console control
panel.
3.
Press ENTER to turn HD off (the X will dis-
appear from the box on the display screen).
This will disable the radio's capability to receive
digital broadcasts but it will continue to func-
tion as a conventional (analogue) AM/FM
receiver. Please note that when HD is switched
off, it will not be possible to tune to sub-chan-
nels (see the following section for a more
detailed explanation of sub-channels).
Repeat steps 2 and 3 above to reactivate HD
(an X will appear in the box on the display
screen).
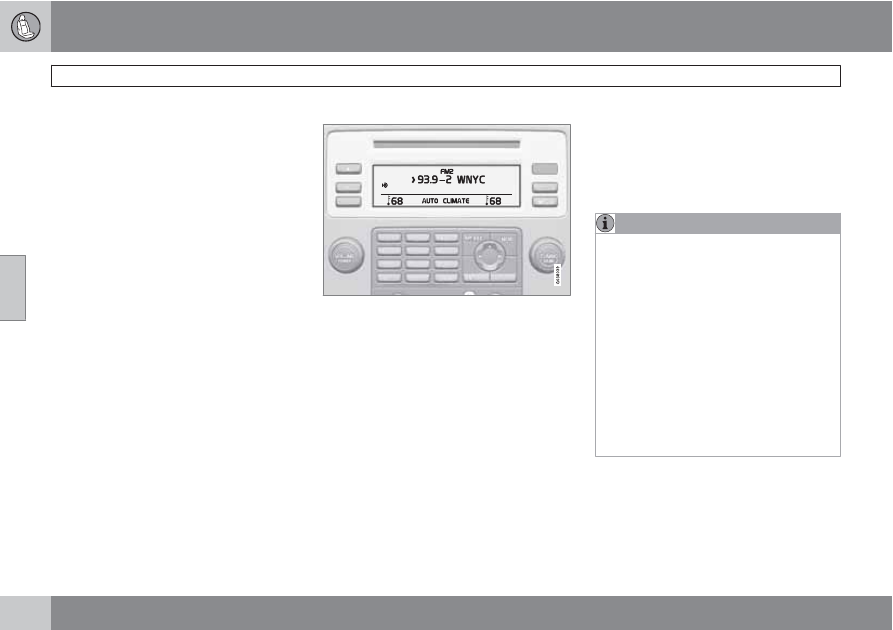
Sub-channels
Example of an HD Radio station with sub-channels
In many cases, a main HD Radio station (FM
wavebands only) will also have sub-channels
offering additional types of programming or
music.
In such cases, the “>” symbol will be displayed
to the left of the frequency number and a num-
ber will be displayed to the right of the fre-
quency number indicating that the currently
tuned frequency has at least one sub-channel.
The "2" in the illustration indicates that you are
currently listening to the first sub-channel on
frequency 93.9.
Selecting sub-channels
To listen to a station's sub-channel(s), press
the right arrow key on the center console or on
the steering wheel keypad. To go back to the
main channel, press the left arrow key. To go
to subchannel 2 (if available), press the right
arrow key.
If you are currently tuned to a frequency's main
channel, pressing the left arrow key will tune to
the next lower radio frequency.
NOTE
•
When the radio has gone into HD mode,
it may take several seconds before the
">" symbol (if the current frequency has
any sub-channels) is displayed to the
right of the frequency. Pressing the
arrow keys before the number is dis-
played will cause the radio to tune to the
next available radio station, not to the
current station's sub-channels.
•
When you are no longer in broadcasting
range of the currently tuned sub-chan-
nel,
No HD reception
will be dis-
played. The radio will then be muted
and it will be necessary to tune to or
search for a new radio station.
Sub-channels can also be stored as presets,
see page 133 for information on storing sta-
tions.
If you press a sub-channel's preset button, it
may take up to 6 seconds before the channel
becomes audible. If you press this button while
04 Comfort and driving pleasure
Audio system
04
``
*
Option/accessory, for more information, see Introduction.
139
you are out of digital range of the transmitter,
No HD reception
will be displayed.
Sirius satellite radio*
Listening to satellite radio
The Sirius satellite system consists of a number
of high elevation satellites in geosynchronous
orbit.
NOTE
•
The digital signals from the Sirius satel-
lites are line-of-sight, which means that
physical obstructions such as bridges,
tunnels, etc, may temporarily interfere
with signal reception.
•
Avoid any obstructions, such as metal-
lic objects transported on roof racks or
in a ski box, or other antennas that may
impede signals from the SIRIUS satel-
lites.
Selecting Sirius radio mode
1.
Press Power to switch on the audio sys-
tem (see page 132 and see page 133 for
information on the standard audio and
radio functions).
2.
Press the MODE button repeatedly until
Sirius 1 or 2 is displayed.
Activating Sirius radio
1.
Tune to a satellite channel that has no
audio, which means that the channel is
unsubscribed and the text "Call 888-539-
SIRIUS TO SUBSCRIBE" is displayed (see
also "Selecting a channel".
2.
Call Sirius at 1-888-539-SIRIUS (7474).
3.
When asked for the Sirius ID number press
AUTO to display this number. It is also
possible to retrieve the Sirius ID from the
menu.
4.
UPDATING SUBSCRIPTION
will be dis-
played while the subscription is being
updated, after which the display will return
to the normal view.
SIRIUS ID
The SIRIUS ID is required when contacting the
Sirius Call Center. It is used to activate your
account and when making any account trans-
actions. The SIRIUS ID is sometimes referred
to as the Electronic Serial Number (ESN).
Selecting a channel category
1.
Select Sirius radio mode as described
above.
2.
Press ENTER.
3.
Use the up/down arrow keys to scroll
through the list of categories.
4.
Press ENTER or the right arrow key to
select a category.
> The first channel in the selected cate-
gory will then be played.
NOTE
•
The category
ALL
is default, which ena-
bles you to scroll through the entire list
of available satellite channels.
•
The channel categories are automati-
cally updated several times a year. This
takes approximately two minutes and
will interrupt normal broadcasting. A
message will be displayed while updat-
ing is in progress. Information on chan-
nel or feature updates is available at
www.sirius.com.
Selecting a channel
There are three ways of tuning in a channel:
•
Using the left and right arrow keys
•
By turning the tuning control
•
Through direct channel entry.
04 Comfort and driving pleasure
Audio system
04
140
NOTE
•
The numbers of skipped or locked
channels will not be displayed.
•
If a channel is locked, the access code
must be entered before the channel can
be selected. See "Unlocking a channel"
on page 141.
Direct channel entry
The Sirius satellite channels are in numerical
order throughout all of the categories. To
access a channel directly:
1.
Press MENU and scroll to
Direct channel
entry
.
2.
Use the numerical keypad to enter the
channel's number.
3.
Press ENTER. The radio will tune to this
channel, even if it belongs to a category
other than the currently selected one.
Scanning
SCAN automatically searches through the list
of satellite channels. The search will only be
carried out in the selected category, see
page 133 for more detailed information.
Storing a channel
A total of 20 satellite channels can be stored;
10 channels each for Sirius 1 and 2, see
page 133 for detailed information on storing
channels.
•
A long press on one of the number keys
stores the currently tuned channel on that
key.
•
A short press on a number key while the
radio is in Sirius 1or 2 mode will tune to the
preset satellite channel stored on that but-
ton, regardless of the currently selected
channel category.
Song Seek and Song Memory
The
Song Seek
and
Song Memory
functions
provide both audio and visual notification when
Sirius is broadcasting your favorite songs.
Song Seek
enables you to store the name of
the song for future advance notification when
that song is being played. The
Song Memory
feature makes it possible to view all of the cur-
rent songs that are stored in memory.
Song memory
Up to ten songs can be saved in the system's
memory.
1.
Press MENU.
2.
Scroll to
Add song to song mem.
and
follow the instructions shown in the dis-
play.
If a new song is selected when the memory is
full, you will be prompted to press ENTER to
delete the last song on the list.
NOTE
The remaining songs in the list will move
down one position, and the newly added
song will be placed at the top of the list.
Song seek
When a satellite radio channel plays one of the
songs stored in the song memory, the listener
will be alerted by a text message and an audi-
ble signal.
Press ENTER to listen to the song or EXIT to
cancel.
To activate/deactivate the song seek function:
1.
Press MENU
2.
Scroll to
Song seek
3.
Press ENTER to activate or deactivate the
function.
NOTE
When the song has ended, the radio will
remain tuned to the channel on which the
song was played.
04 Comfort and driving pleasure
Audio system
04
``
141
Radio text
The text that is displayed about the song that
is currently playing can be changed. Use the
AUTO button or the menu to display the Artist,
Title, Composer, or switch radio text off.
Advanced settings
This menu function enables you to make set-
tings on certain Sirius satellite radio functions.
To access this menu:
1.
Press MENU.
2.
Scroll to the Sirius menu.
3.
Select
Advanced Sirius settings
.
WARNING
Settings should be made when the vehicle
is at a standstill.
The following settings can be made in the Sir-
ius menu:
•
The list of saved songs can be displayed
•
Channel skip settings can be made
•
Channel lock settings can be made
•
The channel access code can be displayed
or changed
•
Your Sirius ID can be displayed
Skip options
This function is used to remove a channel from
the list of available channels.
Skipping a channel
1.
Select
CHANNEL SKIP LIST
and press
ENTER.
2.
Select a category in the list and press
ENTER.
3.
Skip channels in the list presented by
pressing ENTER or right arrow key.
Unskip all channels
This permanently removes all channels from
the skip list and makes them available for
selection.
Temp. unskip all ch.
This function will temporarily unskip all chan-
nels and make them available for selection. The
channels remain on the skip list and will again
be skipped the next time the ignition is
switched on.
Channel lock
Access to specific channels can be restricted
(locked). A locked channel will not provide
audio, song titles, or artist information.
NOTE
All channels are initially unlocked.
Locking a channel:
1.
Select
Sirius ID
in the menu and select
LOCK OPTIONS
and press ENTER.
2.
Select
CHANNEL LOCK LIST
and press
ENTER
3.
Enter the channel access code
7
and press
ENTER.
4.
Select a category in the list and press
ENTER.
5.
Lock channels in the list presented by
pressing ENTER or right arrow.
The channel is now locked and a checked box
will be displayed to indicate this. It will be nec-
essary to enter the channel access code
7
in
order to listen to a locked channel.
Unlocking a channel
A channel's access code
7
is required to unlock
a channel.
Unlock all channels
This permanently removes all channels from
the locked list and makes them available for
selection.
7
The default code is 0000. If you have changed the code and forgotten it, see the section "If you have forgotten the access code."
04 Comfort and driving pleasure
Audio system
04
142
*
Option/accessory, for more information, see Introduction.
Temp. unlock all ch.
This function will temporarily unlock all chan-
nels and make them available for selection. The
channels remain on the locked list and will
again be locked the next time the ignition is
switched on.
CHANGE CODE
This function makes it possible to change the
channel access code. The default code is
0000.
To change the code:
1.
Select
CHANGE CODE
and press
ENTER.
2.
Enter the current code and press ENTER.
3.
Enter the new code and press ENTER.
4.
Confirm the new code and press ENTER.
If an incorrect code is entered, the text
WRONG CODE!
is displayed.
If you have forgotten the access code:
1.
Select
SIRIUS ID
in the Sirius settings
menu and press ENTER.
2.
Press and hold the ENTER button for
2 seconds.
3.
The current code will be displayed.
Your Volvo retailer can also provide you with
assistance.
SIRIUS ID
This function displays the 12-digit Sirius acti-
vation ID.
CD functions
Center console, controls for CD functions
CD insert and eject
CD slot
Navigation button for changing CD tracks
Fast-back and change CD track
CD changer* position selection
Scan CD
Playing a CD (CD player
8
)
If a music CD is in the player when CD is
pressed, it will be played automatically. Other-
wise, insert a disc and press CD.
Playing a CD (CD changer)
If a CD position with a music CD is already
selected when CD is pressed, it will be played
automatically. Otherwise select a disc with the
number buttons 1 – 6 or
/
on the naviga-
tion button.
Insert a CD (CD changer)
1.
Select an empty position with the number
buttons 1 – 6 or
/
on the navigation
button.
> An empty position is marked on the dis-
play. The text
Insert disc
shows that a
new disc can be inserted. The CD
changer can hold up to six CDs.
2.
Insert a CD in the CD changer slot.
Disc eject
For reasons of traffic safety, an ejected CD
must be removed within 12 seconds or it will
be automatically drawn back into the slot and
the CD player will enter pause mode. Press the
CD button to restart the disc.
8
Certain markets only.

04 Comfort and driving pleasure
Audio system
04
``
143
Eject individual discs by pressing the eject but-
ton.
Eject all discs with a long press on the eject
button. The entire magazine is emptied disc by
disc.
NOTE
The Eject all function can only be used while
the vehicle is at a standstill and will be can-
celled if the vehicle begins to move.
Pause
When the audio system volume is turned off
completely, the CD player will pause and will
resume playing when the volume is turned up
again.
Sound files
In addition to playing normal music CDs, the
CD player/changer can also play discs con-
taining files in mp3 or wma format.
NOTE
Some copy protected sound files may not
be read by the player.
When a CD containing sound files is inserted
into the player the disc's directory structure is
scanned before the CD begins playing. The
length of time that this takes depends on the
quality of the disc.
Navigating the disc and playing tracks
If a disc containing sound files is inside the CD
player, press ENTER to display the disc's
directory structure. The directory structure is
navigated in the same way as the audio sys-
tem's menu structure. Sound files have the
symbol and directories have the
symbol. Press ENTER to play a selected folder
or a file.
When the music file has been played, the
player will continue to play the rest of the files
in the current folder. When all of the files in the
folder have been played, the player will auto-
matically go to the next folder and play the files
in it.
Fast-forward/change CD tracks and
sound files
Short presses
/
on the navigation button
are used to scroll between CD tracks/sound
files. Long presses are used to search within
CD tracks/sound files. TUNING (or the steering
wheel keypad) can also be used for this pur-
pose.
Scan CD
This function plays the first ten seconds of
each CD track/sound file. Press SCAN to acti-
vate. Interrupt with EXIT or SCAN to continue
playing the current CD track/sound file.
Random
This function plays the tracks in random order
(shuffle). The random CD tracks/sound files
can be scrolled through in the normal way.
NOTE
It is only possible to scroll between random
CD tracks on the current disc.
Different messages are displayed depending
on which random function has been selected:
•
RANDOM
means that the tracks from only
one music CD are played
•
RND ALL
means that all tracks on all
music CDs in the optional CD changer are
played.
•
RANDOM FOLDER
means that the sound
files in a directory on the current CD are
played.
CD player
If a normal music CD is being played, activate/
deactivate under
Random
.
If a disc with sound files is being played, acti-
vate/deactivate under
Random
Folder
.
04 Comfort and driving pleasure
Audio system
04
144
CD changer
If a normal music CD is being played under
Random
Single disc
or
Random
All
discs
. The
All discs
feature only applies to the
music CDs in the changer.
If a CD with sound files is being played, acti-
vate/deactivate instead under
Random
Folder
. If you select another CD the function is
deactivated.
Disc text
If title information is stored on a music CD it can
be shown on the display
9
. Activate/deactivate
in CD mode under
CD settings
Disc text
.
9
Only applies to the CD changer.
04 Comfort and driving pleasure
Bluetooth
®
hands-free connection
04
``
145
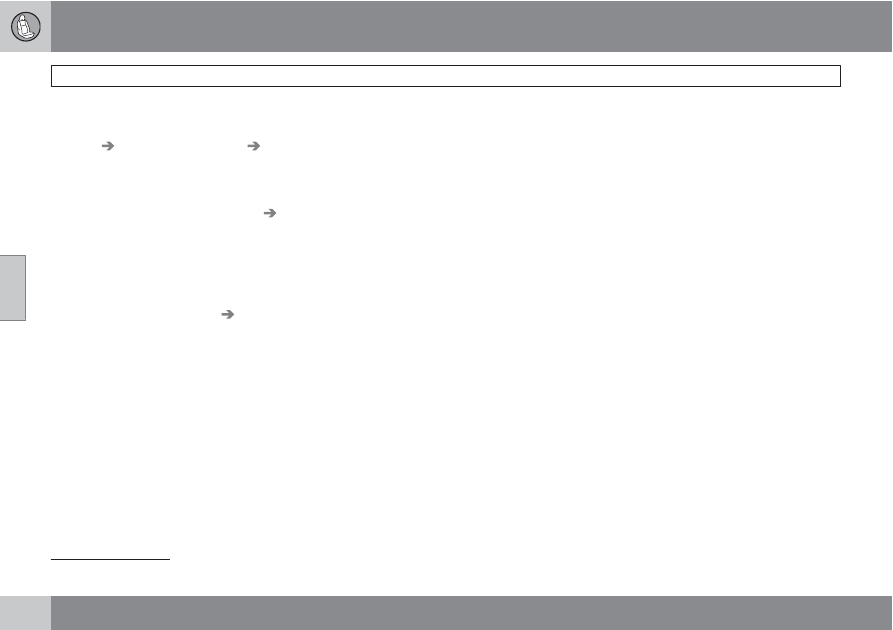
Introduction
System overview
Cell phone
Location of the microphone
Steering wheel keypad
Center console control panel and display
Bluetooth
®
hands-free
This feature makes it possible to set up a wire-
less connection between a Bluetooth
-ena-
bled cell phone and the vehicle’s audio system.
This enables the audio system to function as a
hands-free connection and allows you to
remote-control a number of the phone’s func-
tions. The microphone used by this system is
located in the ceiling console (2). The buttons
and other controls on the cell phone can
always be used regardless of whether or not
the phone is connected to the hands-free sys-
tem.
NOTE
Not all cell phones are fully compatible with
the hands-free system. A list of compatible
phones is available at your Volvo retailer or
at www.volvocars.us
WARNING
Never use the hands-free feature or any
other device in your vehicle in a way that
distracts you from the task of driving safely.
Distraction can lead to a serious accident.
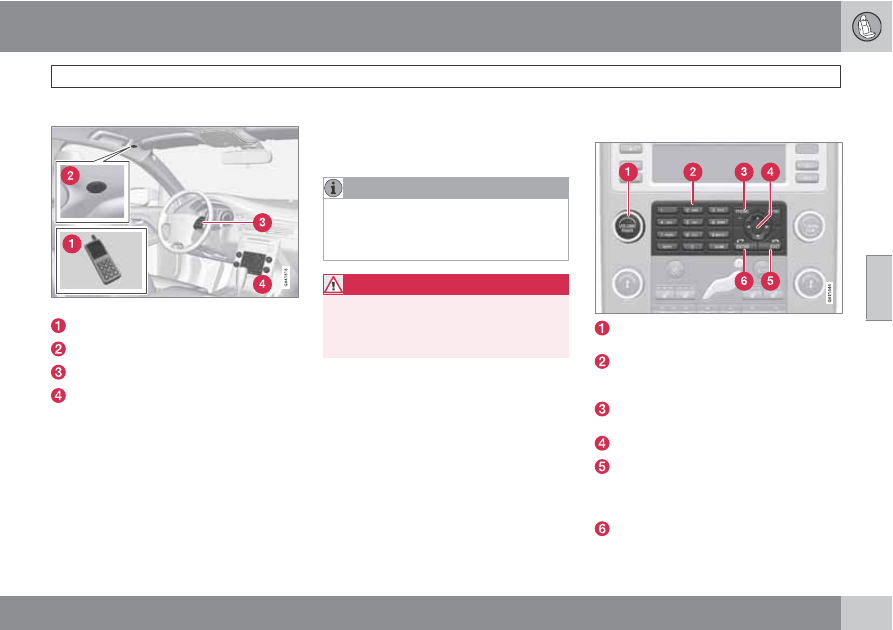
Bluetooth
®
functions in the center
console control panel
VOLUME – This function is also available
on the steering wheel keypad.
Keys containing letters and numbers for
dialing numbers, adding phone book
entries, etc.
PHONE – Press to activate/deactivate the
Bluetooth
®
function
Navigation buttons
EXIT – Press to end or defer calls, erase
characters that have been entered, end an
ongoing function. This function is also
available on the steering wheel keypad.
ENTER – Answer a call. Press once to dis-
play the most recently dialed number. This
Нет комментариевНе стесняйтесь поделиться с нами вашим ценным мнением.
Текст