Nissan NV200 Taxi (2017 year). Manual — part 9
MEMO
Pre-driving checks and adjustments
3-19

4 Monitor, climate, audio, phone and voice
recognition systems
How to use the touch-screen . . . . . . . . . . . . . . . . . . . . 4-3
How to use the BACK button . . . . . . . . . . . . . . . . . . . . 4-5
button . . . . . . . . . . . . . . . . . . . 4-5
button. . . . . . . . . . . . . . . . . . . . . . . . . . . . . . . . . . . 4-7
How to use the CAMERA button . . . . . . . . . . . . . . . . . 4-7
RearView Monitor . . . . . . . . . . . . . . . . . . . . . . . . . . . . . . . . . 4-8
RearView Monitor system operation . . . . . . . . . . . . . . 4-9
How to read the displayed lines . . . . . . . . . . . . . . . . . . 4-9
Difference between predicted and actual
distances . . . . . . . . . . . . . . . . . . . . . . . . . . . . . . . . . . . . . 4-10
How to park with predicted course lines. . . . . . . . . . 4-11
Adjusting the screen . . . . . . . . . . . . . . . . . . . . . . . . . . . 4-13
How to turn on and off predicted course
lines . . . . . . . . . . . . . . . . . . . . . . . . . . . . . . . . . . . . . . . . . 4-13
RearView Monitor system limitations . . . . . . . . . . . . . 4-13
System maintenance . . . . . . . . . . . . . . . . . . . . . . . . . . . 4-14
Controls . . . . . . . . . . . . . . . . . . . . . . . . . . . . . . . . . . . . . . 4-16
Heater operation . . . . . . . . . . . . . . . . . . . . . . . . . . . . . . 4-17
Air conditioner operation . . . . . . . . . . . . . . . . . . . . . . . 4-18
Air flow charts. . . . . . . . . . . . . . . . . . . . . . . . . . . . . . . . . 4-19
Rear seat air conditioner . . . . . . . . . . . . . . . . . . . . . . . 4-23
Radio . . . . . . . . . . . . . . . . . . . . . . . . . . . . . . . . . . . . . . . . 4-24
FM radio reception . . . . . . . . . . . . . . . . . . . . . . . . . . . . 4-24
AM radio reception . . . . . . . . . . . . . . . . . . . . . . . . . . . . 4-25
Satellite radio reception . . . . . . . . . . . . . . . . . . . . . . . . 4-25
Audio operation precautions . . . . . . . . . . . . . . . . . . . . 4-25
FM/AM/SAT radio with compact disc (CD)
player . . . . . . . . . . . . . . . . . . . . . . . . . . . . . . . . . . . . . . . . 4-32
USB (Universal Serial Bus) Connection Port . . . . . . 4-39
iPod®* player operation . . . . . . . . . . . . . . . . . . . . . . . . 4-41
Bluetooth® streaming audio . . . . . . . . . . . . . . . . . . . . 4-45
CD care and cleaning . . . . . . . . . . . . . . . . . . . . . . . . . . 4-46
Steering wheel switch for audio control . . . . . . . . . . 4-47
Antenna . . . . . . . . . . . . . . . . . . . . . . . . . . . . . . . . . . . . . . 4-47
Mobile Apps . . . . . . . . . . . . . . . . . . . . 4-48
Registering with NissanConnect
Car phone or CB radio . . . . . . . . . . . . . . . . . . . . . . . . . . . . 4-49
Intercom System . . . . . . . . . . . . . . . . . . . . . . . . . . . . . . . . . 4-49
Regulatory Information . . . . . . . . . . . . . . . . . . . . . . . . . 4-51
Voice commands . . . . . . . . . . . . . . . . . . . . . . . . . . . . . . 4-52
Connecting Procedure . . . . . . . . . . . . . . . . . . . . . . . . . 4-52
Vehicle phonebook . . . . . . . . . . . . . . . . . . . . . . . . . . . . 4-53
Making a call . . . . . . . . . . . . . . . . . . . . . . . . . . . . . . . . . . 4-53
Receiving a call . . . . . . . . . . . . . . . . . . . . . . . . . . . . . . . 4-53
During a call . . . . . . . . . . . . . . . . . . . . . . . . . . . . . . . . . . 4-53
Ending a call . . . . . . . . . . . . . . . . . . . . . . . . . . . . . . . . . . 4-53
Text messaging. . . . . . . . . . . . . . . . . . . . . . . . . . . . . . . . 4-54
Bluetooth® settings . . . . . . . . . . . . . . . . . . . . . . . . . . . 4-56
Phone settings . . . . . . . . . . . . . . . . . . . . . . . . . . . . . . . . 4-57
Troubleshooting guide . . . . . . . . . . . . . . . . . . . . . . . . . 4-58
NISSAN Voice Recognition System. . . . . . . . . . . . . . . . . 4-59
Using the system . . . . . . . . . . . . . . . . . . . . . . . . . . . . . . 4-59
System features . . . . . . . . . . . . . . . . . . . . . . . . . . . . . . . 4-60
Bluetooth® Hands-Free Phone System
voice commands . . . . . . . . . . . . . . . . . . . . . . . . . . . . . . 4-61
Navigation System voice commands . . . . . . . . . . . . . 4-62
Audio system voice commands. . . . . . . . . . . . . . . . . . 4-62
Information voice commands. . . . . . . . . . . . . . . . . . . . 4-62
My Apps Voice Commands . . . . . . . . . . . . . . . . . . . . . 4-62
Help voice commands . . . . . . . . . . . . . . . . . . . . . . . . . 4-63
Troubleshooting guide . . . . . . . . . . . . . . . . . . . . . . . . . 4-63
WARNING
● Positioning of the heating or air condi-
tioning controls and display controls
should not be done while driving in or-
der that full attention may be given to
the driving operation.
● Do not disassemble or modify this sys-
tem. If you do, it may result in accidents,
fire, or electrical shock.
● Do not use this system if you notice any
abnormality, such as a frozen screen or
lack of sound. Continued use of the
system may result in accident, fire or
electric shock.
● In case you notice any foreign object in
the system hardware, spill liquid on it,
or notice smoke or smell coming from it,
stop using the system immediately. Ig-
noring such conditions may lead to ac-
cidents, fire or electrical shock. It is rec-
ommended that you visit a NISSAN
dealer for servicing.
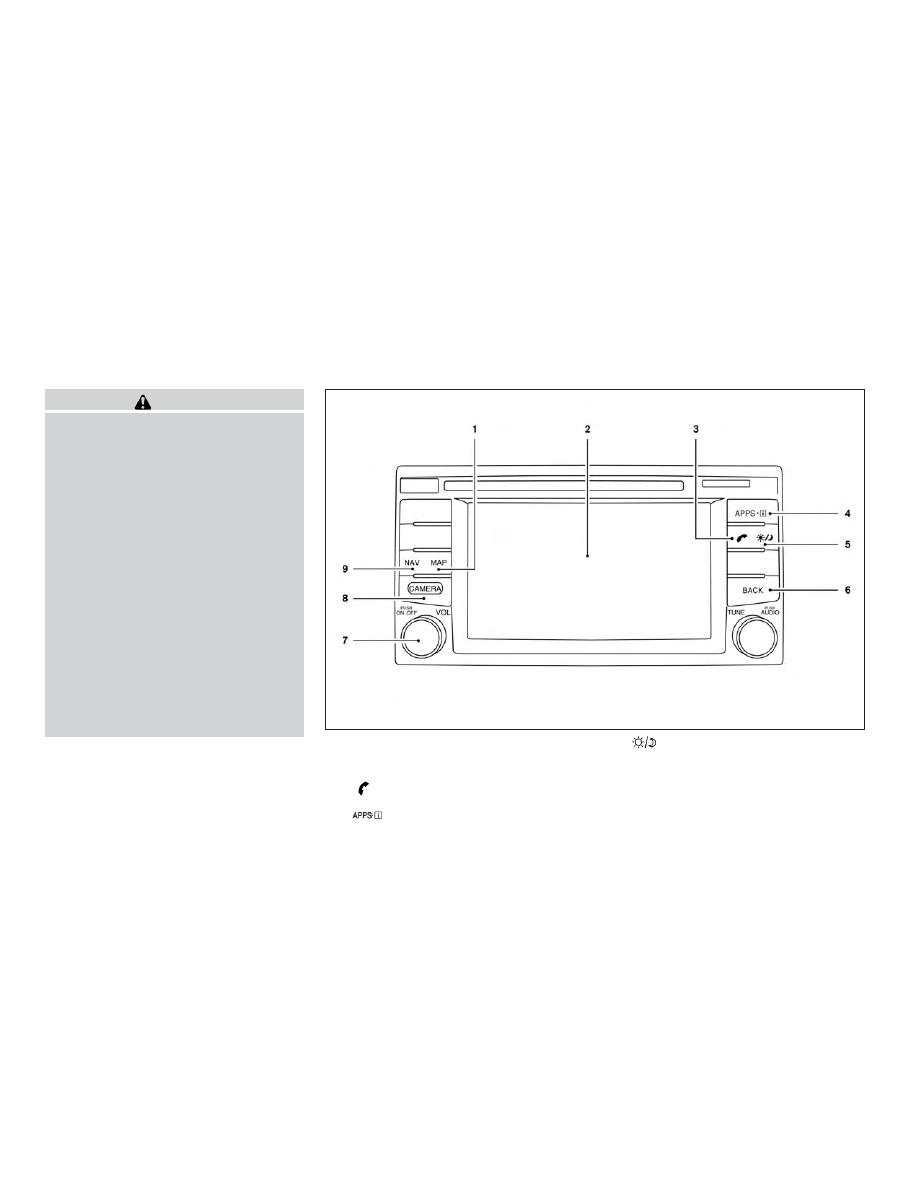
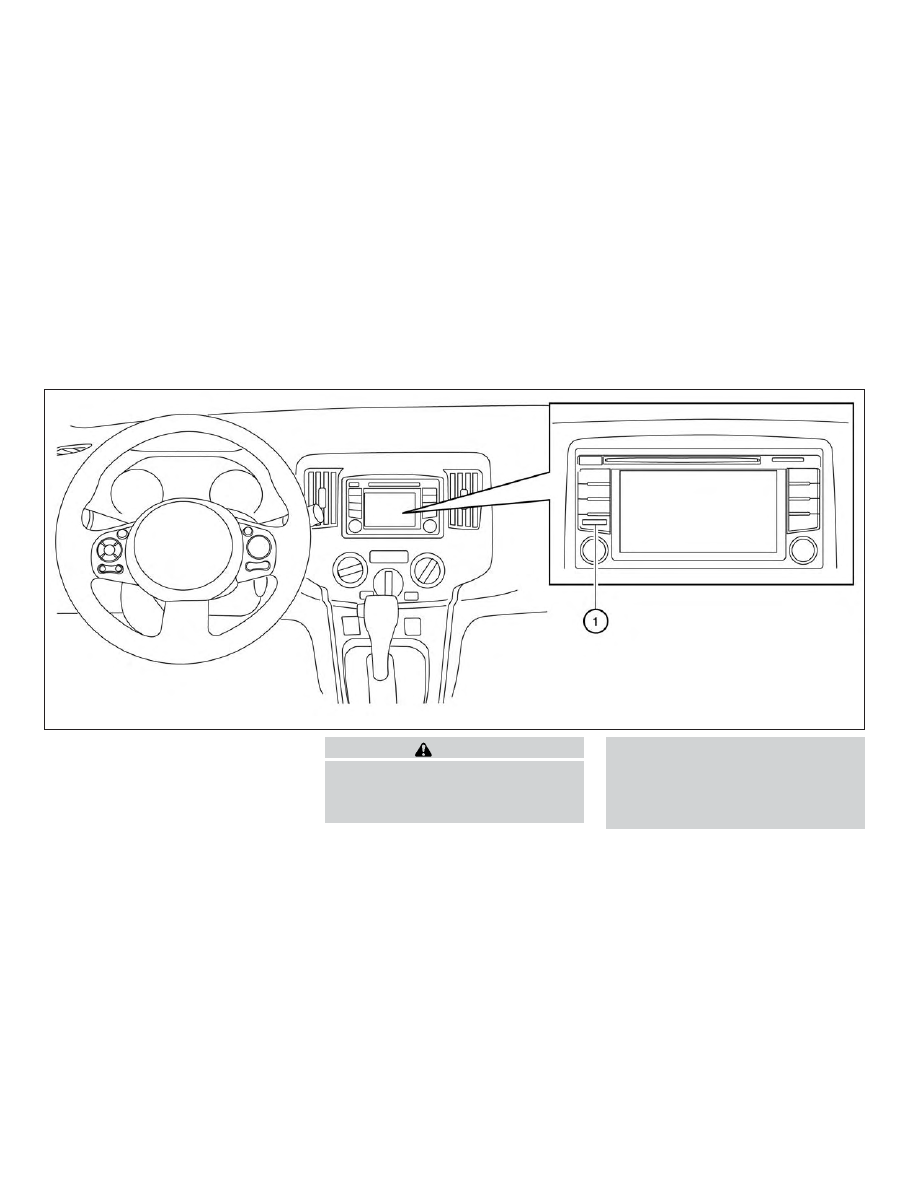
1. MAP button*
2. Display screen
3.
button**
4.
button
5.
(brightness control) button
6. BACK button
7. ON•OFF button / VOL (volume) control
knob
8. CAMERA button
LHA2898
CONTROL PANEL BUTTONS – COLOR
SCREEN WITH NAVIGATION SYSTEM
4-2
Monitor, climate, audio, phone and voice recognition systems

9. NAV button*
* For additional information regarding the Naviga-
tion system control buttons, refer to the separate
Navigation System Owner’s Manual.
** For additional information regarding the
Bluetooth® Hands-Free Phone System control
button, refer to “Bluetooth® Hands-Free Phone
System with Navigation System” in this section.
When you use this system, make sure the engine
is running.
If you use the system with the engine not
running (ignition ON or ACC) for a long
time, it will discharge the battery, and the
engine will not start.
Reference symbols:
“Example” — Words marked in quotes refer to a
key shown only on the display. These keys can be
selected by touching the screen.
HOW TO USE THE TOUCH-
SCREEN
CAUTION
● The glass display screen may break if it
is hit with a hard or sharp object. If the
glass screen breaks, do not touch it.
Doing so could result in an injury.
● To clean the display, never use a rough
cloth, alcohol, benzine, thinner or any
kind of solvent or paper towel with a
chemical cleaning agent. They will
scratch or deteriorate the panel.
● Do not splash any liquid such as water
or car fragrance on the display. Contact
with liquid will cause the system to
malfunction.
To help ensure safe driving, some functions can-
not be operated while driving.
The on-screen functions that are not available
while driving will be “grayed out” or muted.
Park the vehicle in a safe location and then oper-
ate the navigation system.
WARNING
● ALWAYS give your full attention to
driving.
● Avoid using vehicle features that could
distract you. If distracted, you could
lose control of your vehicle and cause
an accident.
Monitor, climate, audio, phone and voice recognition systems
4-3
Touch-screen operation
Menu Item
Result
Selecting the item
Touch an item to select . To select the “Audio” key, touch the “Audio” key on the screen. Touch the “BACK” key to return to the
previous screen.
Adjusting the item
Touch the “+” key or the “
⫺” key to adjust the settings of an item. Touch the up arrow to scroll up the page one item at a time.
Touch the down arrow to scroll down the page one item at a time.
Inputting characters
Touch the letter or number key. There are some options available when inputting characters.
123/ABC
Changes the available character set to numbers.
Space
Inserts a space.
Delete
Deletes the last inputted character with one touch. Touch and hold the “Delete” key to delete all of the characters.
OK
Completes the character input.
LHA2916
4-4
Monitor, climate, audio, phone and voice recognition systems
Touch-screen maintenance
If you clean the display screen, use a dry, soft
cloth. If additional cleaning is necessary, use a
small amount of neutral detergent with a soft
cloth. Never spray the screen with water or de-
tergent. Dampen the cloth first and then wipe the
screen.
HOW TO USE THE BACK BUTTON
Press the BACK button to return to the previous
screen.
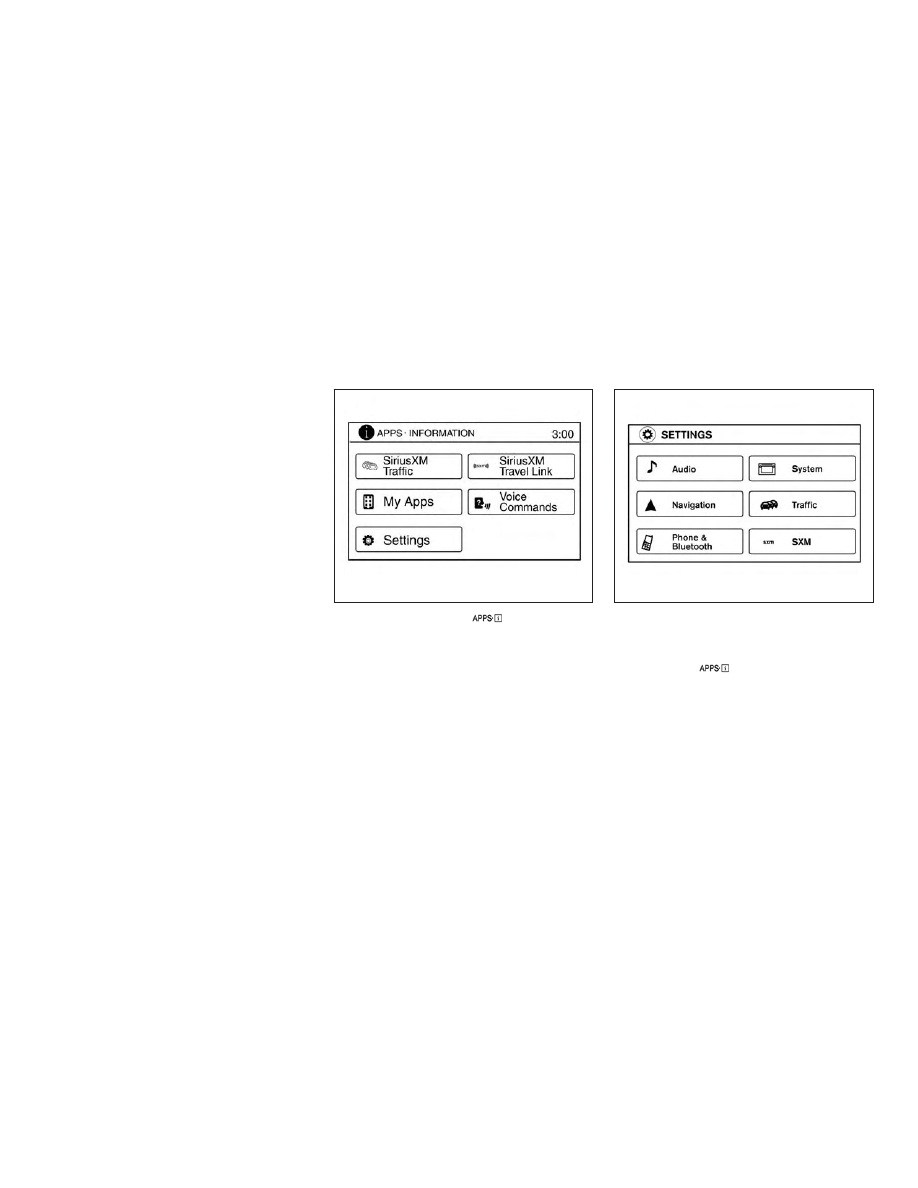
HOW TO USE THE
BUTTON
For additional information about the “SiriusXM
Travel Link”, and “Traffic” features, refer to the
separate Navigation System Owner’s Manual.
For additional information about the “My Apps”
key, refer to “NissanConnect
SM
Mobile Apps” in
this section.
For additional information about the “Voice Com-
mands” key, refer to “NISSAN Voice Recognition
System” in this section.
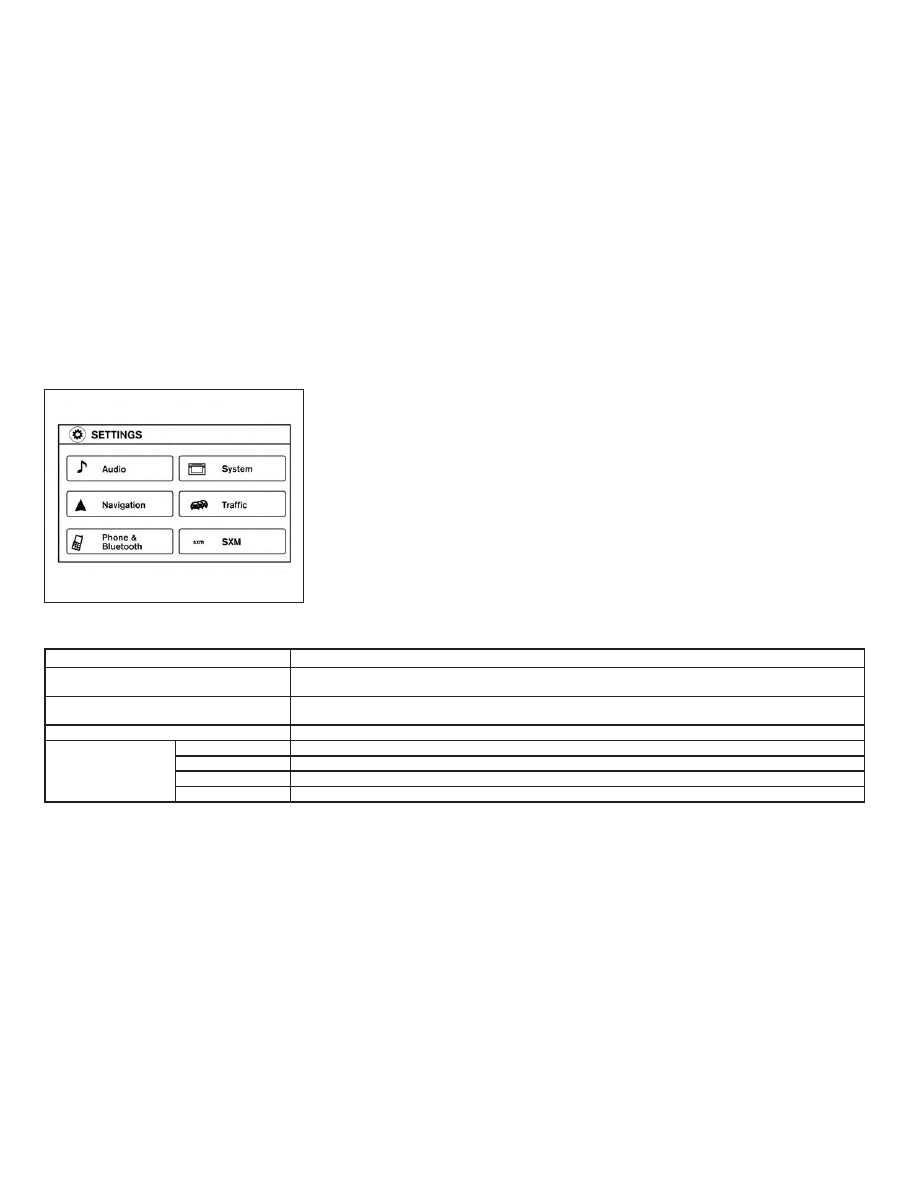
To select and/or adjust several functions, fea-
tures and modes that are available for your ve-
hicle:
1. Press the [
] button.
2. Touch the “Settings” key.
3. Touch the desired item.
LHA2773
LHA2916
Monitor, climate, audio, phone and voice recognition systems
4-5

Menu item
Result
Audio
For additional information, refer to “Audio system” in this section.
Navigation
For additional information, refer to the separate Navigation System Owner’s Manual.
Phone & Bluetooth
For additional information, refer to “Bluetooth® Hands-Free Phone System with Navigation System” in this section.
System
Touch this key to select and/or adjust various functions of this system. A screen with additional options will appear.
Display
Touch this key to adjust the appearance of the display.
Brightness
Adjusts the brightness of the display.
Display Mode
Adjusts to fit the level of lighting in the vehicle. Touch key to cycle through options. “Day” and “Night” modes are suited for the respec-
tive times of day while “Auto” controls the display automatically.
Scroll Direction
Adjusts the direction of the menu scroll. Choose to either move up or down.
Clock
Touch this key to adjust the time.
Time Format
The clock can be set to 12 hours or 24 hours.
Date Format
Select from five possible formats of displaying the day, month, and year.
Clock Mode
Adjust the mode for the clock. “Auto” uses the system’s GPS to automatically maintain the time. “Manual” allows you to set the clock
using the “Set Clock Manually” key.
Set Clock
Manually
Adjust the clock manually, Touch the “+” or “-” keys to adjust the hours, minutes, day, month and year up or down. “Clock Mode” must
be set to manual for this option to be available.
Daylight Sav-
ings Time
Adjusts the daylight savings time on or off.
Time Zone
Choose the applicable time zone from the list.
Language
Touch this key to change the language on the display.
Camera Settings
Touch this key to change the camera settings.
Display Mode
Touch this key to select the touch-screen display mode (day, night, or automatic).
Brightness
Adjust touch-screen brightness.
Contrast
Adjust touch-screen contrast.
Color
Adjust touch-screen color.
4-6
Monitor, climate, audio, phone and voice recognition systems
Menu item
Result
Temperature Unit
Touch this key to change the temperature unit being displayed (Fahrenheit or Celsius).
Touchscreen click
Toggles the touch-screen click feature on or off. When activated a click sound will be heard every time a key on the screen is touched.
System Beeps
Toggle the system beep tones feature on or off. When activated, a beep sound will be heard when a pop-up message appears on the
screen or a button on the unit (such as the
button) is pressed and held for two seconds.
Return to Factory Settings/
Clear Memory
Touch this key to return all settings to default and to clear the memory.
Software Licenses
Touch this key to display software licensing information.
Traffic
Touch this key to display traffic settings. For additional information, refer to the separate Navigation System Owner’s Manual.
SXM
Touch this key to start SiriusXM® radio. For SXM setup, refer to “Audio system” in this section.
BUTTON
To
change
the
display
brightness,
press
the
button. Pressing the button again will
change the display to day or night display mode.
If no operation is performed within 5 seconds, the
display will return to the previous display.
Press and hold the
button for more than
2 seconds to turn the display off. Press the button
again to turn the display on.
HOW TO USE THE CAMERA
BUTTON
For additional information, refer to “RearView
Monitor” in this section.
Monitor, climate, audio, phone and voice recognition systems
4-7
1. CAMERA button
WARNING
Failure to follow the warnings and instruc-
tions for proper use of the RearView
Monitor system could result in serious in-
jury or death.
● RearView Monitor is a convenience fea-
ture and is not a substitute for proper
backing. Always turn and look out the
windows and check mirrors to be sure
that it is safe to move before operating
the vehicle. Always back up slowly.
LHA4050
REARVIEW MONITOR
4-8
Monitor, climate, audio, phone and voice recognition systems
● The system is designed as an aid to the
driver in showing large stationary ob-
jects directly behind the vehicle, to help
avoid damaging the vehicle.
● The distance guide line and the vehicle
width line should be used as a reference
only when the vehicle is on a level
paved surface. The distance viewed on
the monitor is for reference only and
may be different than the actual dis-
tance between the vehicle and dis-
played objects.
CAUTION
Do not scratch the camera lens when
cleaning dirt or snow from the front of the
camera.
The RearView Monitor system automatically
shows a rear view of the vehicle when the shift
lever is shifted into the R (Reverse) position.
While in the R (Reverse), pressing the CAMERA
button will cycle through guideline options. The
radio can still be heard while the RearView Moni-
tor is active.
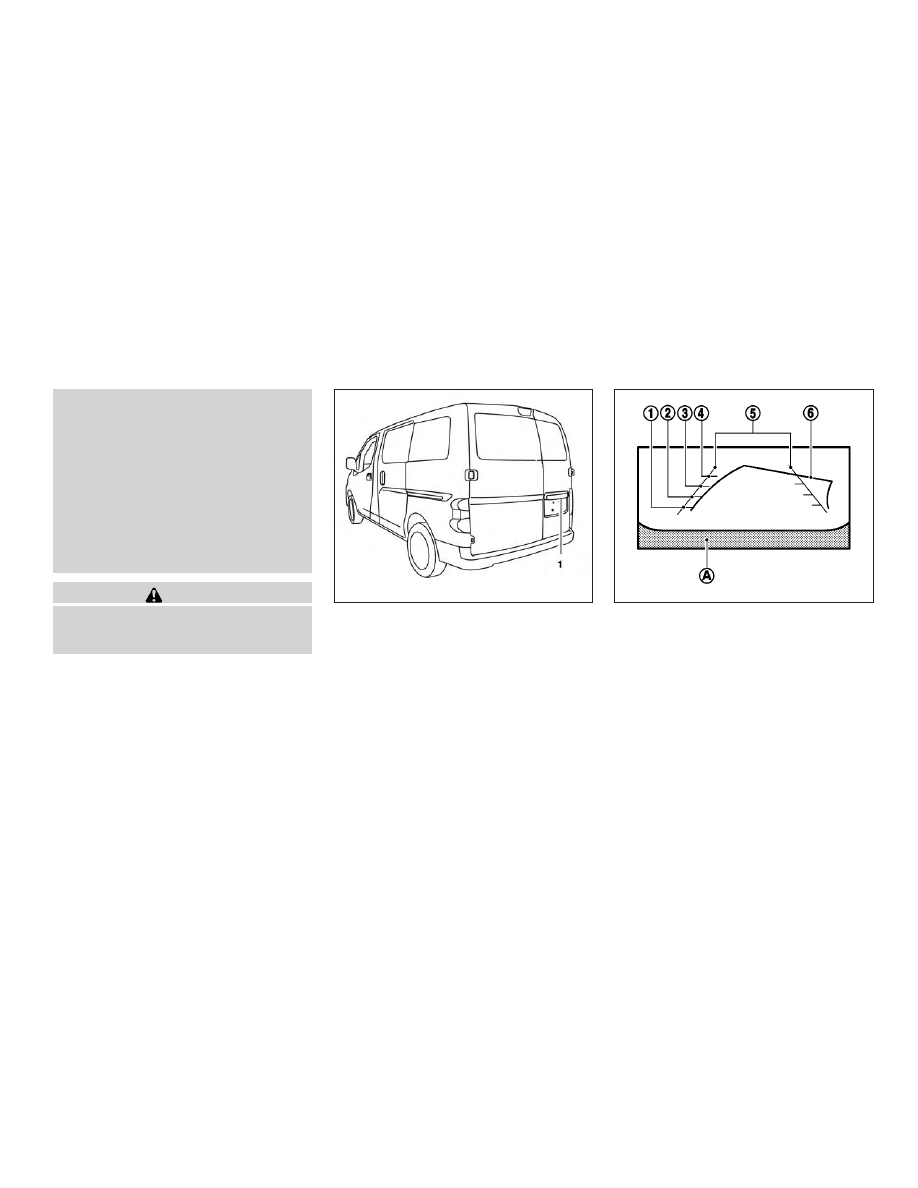
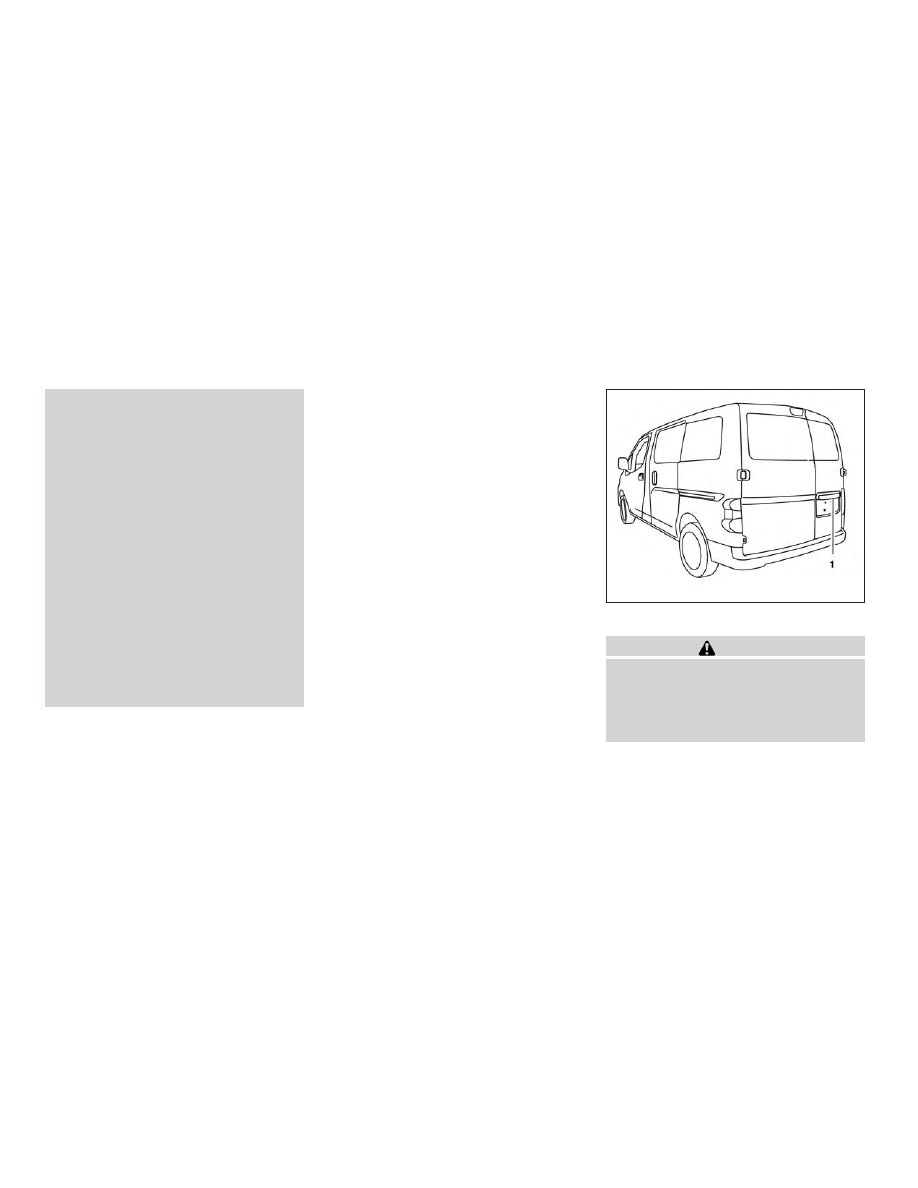
To display the rear view, the RearView Monitor
system uses a camera located just above the
vehicle’s license plate
䊊
1
.
REARVIEW MONITOR SYSTEM
OPERATION
With the ignition switch in the ON position, move
the shift lever to the R (Reverse) position or press
the CAMERA button to operate the RearView
Monitor.
HOW TO READ THE DISPLAYED
LINES
Guiding lines which indicate the vehicle width
and distances to objects with reference to the
vehicle body line
䊊
A
are displayed on the monitor.
Distance guide lines
Indicate distances from the vehicle body.
● Red line
䊊
1
: approx. 1.5 ft (0.5 m)
● Yellow line
䊊
2
: approx. 3 ft (1 m)
● Green line
䊊
3
: approx. 7 ft (2 m)
● Green line
䊊
4
: approx. 10 ft (3 m)
LHA3885
SAA1896
Monitor, climate, audio, phone and voice recognition systems
4-9
Vehicle width guide lines
䊊
5
Indicate the vehicle width when backing up.
Predicted course lines
䊊
6
Indicates the predicted course when operating
the vehicle. The predicted course lines will be
displayed on the monitor when the steering
wheel is turned. The predicted course lines will
move depending on how much the steering
wheel is turned and will not be displayed while
the steering wheel is in the straight-ahead posi-
tion.
DIFFERENCE BETWEEN
PREDICTED AND ACTUAL
DISTANCES
The displayed guidelines and their locations on
the ground are for approximate reference only.
Objects on uphill or downhill surfaces or project-
ing objects will be actually located at distances
different from those displayed in the monitor rela-
tive to the guidelines (refer to illustrations). When
in doubt, turn around and view the objects as you
are backing up, or park and exit the vehicle to
view the positioning of objects behind the ve-
hicle.
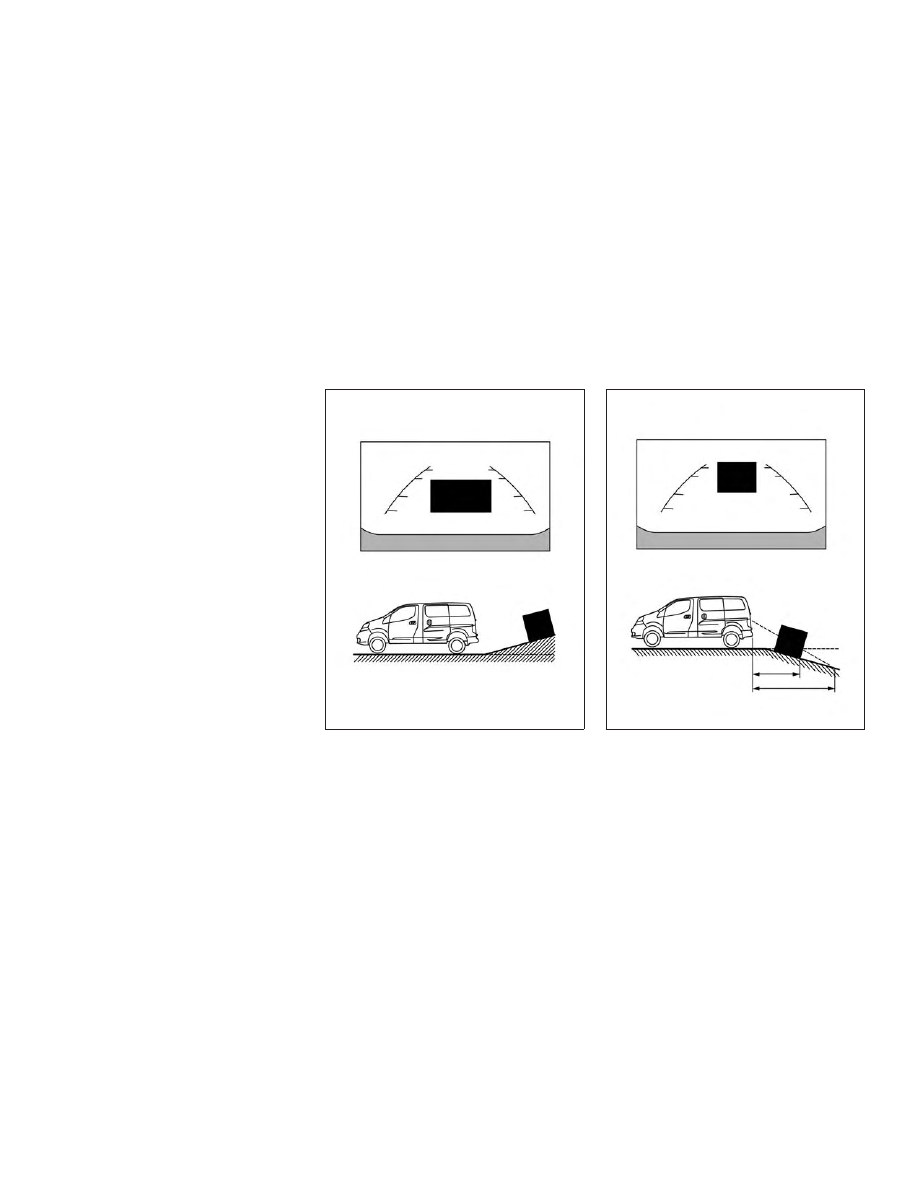
Backing up on a steep uphill
When backing up the vehicle up a hill, the dis-
tance guide lines and the vehicle width guide
lines are shown closer than the actual distance.
Note that any object on the hill is further than it
appears on the monitor.
Backing up on a steep downhill
When backing up the vehicle down a hill, the
distance guide lines and the vehicle width guide
lines are shown farther than the actual distance.
Note that any object on the hill is closer than it
appears on the monitor.
LHA3886
LHA3887
4-10
Monitor, climate, audio, phone and voice recognition systems
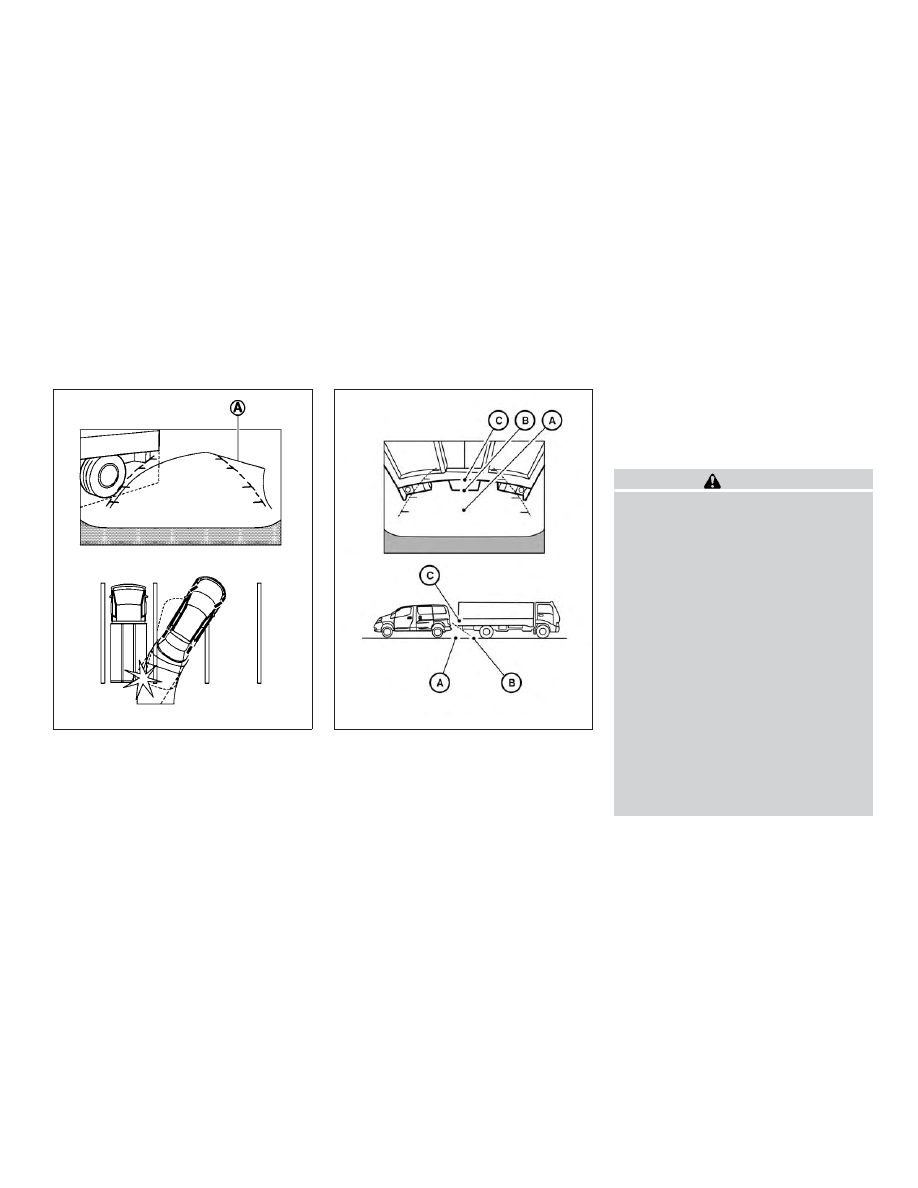
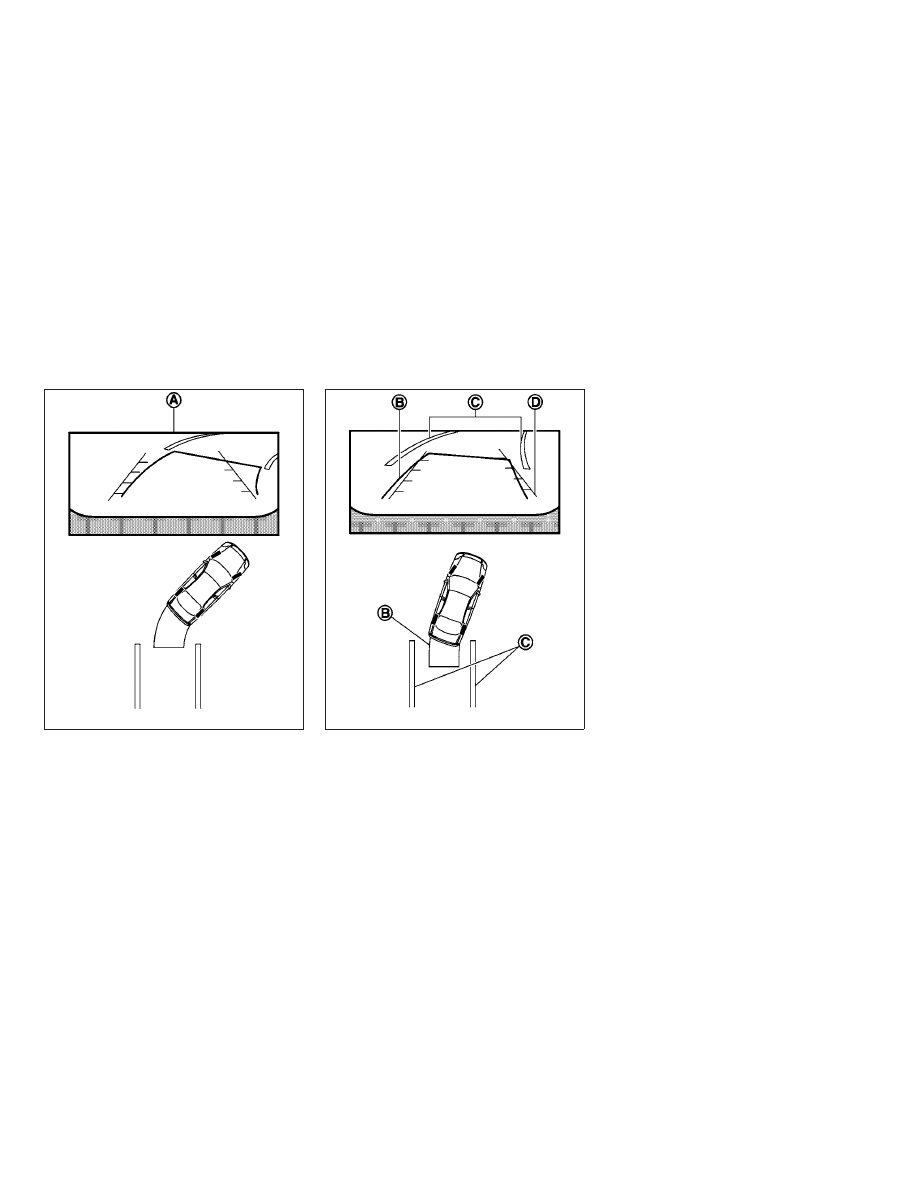
Backing up near a projecting object
The vehicle may seem to nearly clear the object in
the display. However, the vehicle may hit the
object if it projects over the actual backing up
course.
Backing up behind a projecting object
The position
䊊
C
is shown farther than the position
䊊
B
in the display. However, the position
䊊
C
is
actually at the same distance as the position
䊊
A
.
The vehicle may hit the object when backing up to
the position
䊊
A
if the object projects over the
actual backing up course.
HOW TO PARK WITH PREDICTED
COURSE LINES
WARNING
● If the tires are replaced with different
sized tires, the predicted course lines
may be displayed incorrectly.
● On a snow-covered or slippery road,
there may be a difference between the
predicted course line and the actual
course line.
● If the battery is disconnected or be-
comes discharged, the predicted course
lines may be displayed incorrectly. If
this occurs, please perform the follow-
ing procedures:
– Turn the steering wheel from lock to
lock while the engine is running.
– Drive the vehicle on a straight road
for more than 5 minutes.
● When the steering wheel is turned with
the ignition switch in the ACC position,
the predicted course lines may be dis-
played incorrectly.
LHA1201
LHA3888
Monitor, climate, audio, phone and voice recognition systems
4-11
1. Visually check that the parking space is safe
before parking your vehicle.
2. The rear view of the vehicle is displayed on
the screen
䊊
A
when the shift lever is moved
to the R (Reverse) position.
3. Slowly back up the vehicle adjusting the
steering wheel so that the predicted course
lines
䊊
B
enter the parking space
䊊
C
.
4. Maneuver the steering wheel to make the
vehicle width guide lines
䊊
D
parallel to the
parking space
䊊
C
while referring to the pre-
dicted course lines.
5. When the vehicle is parked in the space
completely, move the shift lever to the P
(Park) position and apply the parking brake.
LHA1197
LHA1198
4-12
Monitor, climate, audio, phone and voice recognition systems
ADJUSTING THE SCREEN
The procedure for adjusting the display settings
of the screen differs depending on the type of
screen present on the vehicle.
1. While on a RearView Monitor screen, touch
the touch-screen display. The Camera Set-
tings screen will come up.
2. Touch the Display Settings key.
3. Touch the “Brightness,” “Contrast,” “Tint,”
“Color,” or “Black Level” key.
4. Adjust the item by touching the + or — key
on the touch-screen display.
NOTE:
Do not adjust any of the display settings of
the RearView Monitor while the vehicle is
moving.
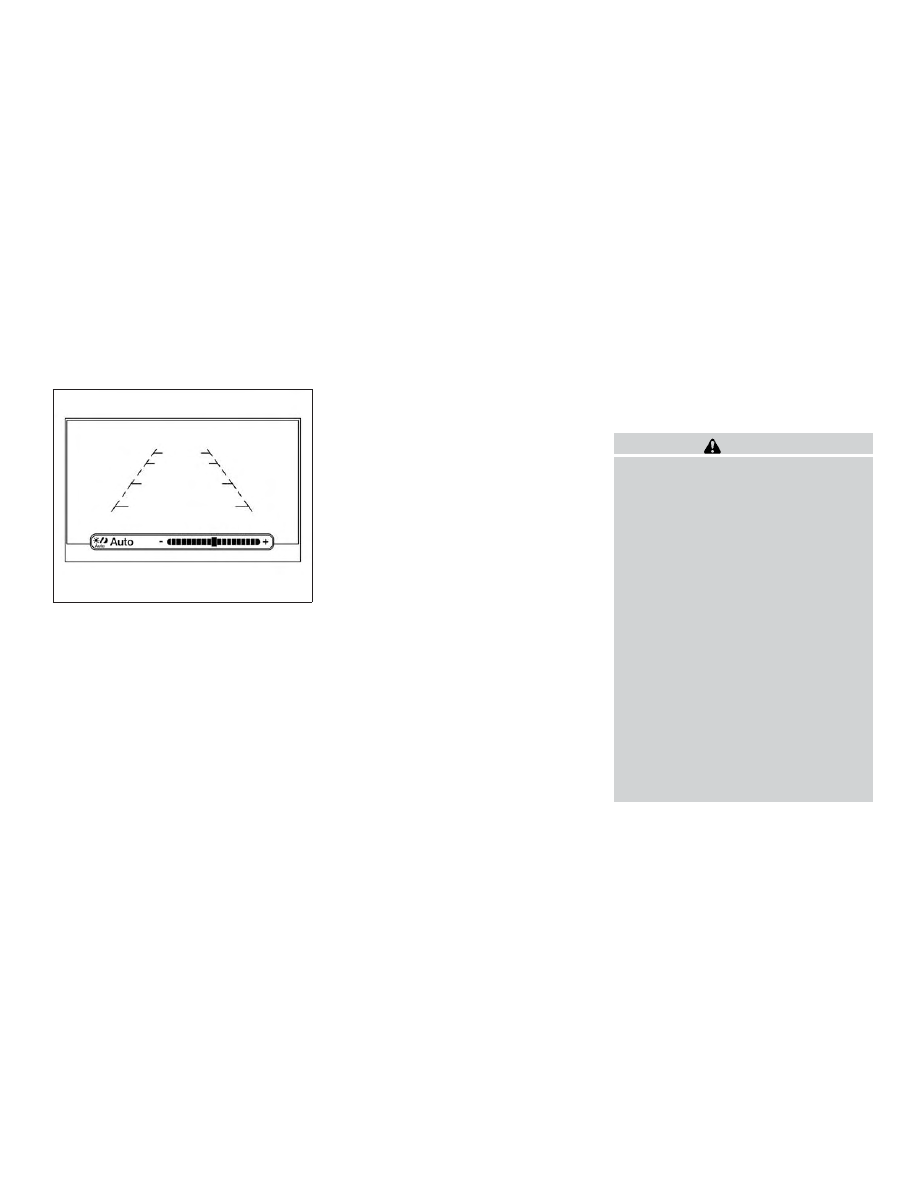
HOW TO TURN ON AND OFF
PREDICTED COURSE LINES
To toggle ON and OFF the predicted course lines
while in the P (Park), D (Drive) or N (Neutral)
positions:
1. Press the CAMERA button.
2. Touch the Predicted Course Lines key to
turn the feature ON or OFF.
To toggle ON and OFF the predicted course lines
while in the R (Reverse) position:
1. Touch the touch-screen display.
2. Touch the Predicted Course Lines key to
turn the feature ON or OFF.
REARVIEW MONITOR SYSTEM
LIMITATIONS
WARNING
Listed below are the system limitations for
RearView Monitor. Failure to operate the
vehicle in accordance with these system
limitations could result in serious injury or
death.
● The system cannot completely elimi-
nate blind spots and may not show ev-
ery object.
● Underneath the bumper and the corner
areas of the bumper cannot be viewed
on the RearView Monitor because of its
monitoring range limitation. The system
will not show small objects below the
bumper, and may not show objects
close to the bumper or on the ground.
● Objects viewed in the RearView Moni-
tor differ from actual distance because
a wide-angle lens is used.
● Objects in the RearView Monitor will
appear visually opposite compared to
when viewed in the rearview and out-
side mirrors.
LHA3679
Monitor, climate, audio, phone and voice recognition systems
4-13
● Use the displayed lines as a reference.
The lines are highly affected by the
number of occupants, fuel level, vehicle
position, road conditions and road
grade.
● Make sure that the back door(s) is se-
curely closed when backing up.
● Do not put anything on the rearview
camera. The rearview camera is in-
stalled above the license plate.
● When washing the vehicle with high
pressure water, be sure not to spray it
around the camera. Otherwise, water
may enter the camera unit causing wa-
ter condensation on the lens, a mal-
function, fire or an electric shock.
● Do not strike the camera. It is a preci-
sion instrument. Otherwise, it may mal-
function or cause damage resulting in a
fire or an electric shock.
The following are operating limitations and do not
represent a system malfunction:
● When the temperature is extremely high or
low, the screen may not clearly display ob-
jects.
● When strong light directly shines on the
camera, objects may not be displayed
clearly.
● Vertical lines may be seen in objects on the
screen. This is due to strong reflected light
from the bumper.
● The screen may flicker under fluorescent
light.
● The colors of objects on the RearView Moni-
tor may differ somewhat from the actual
color of objects.
● Objects on the monitor may not be clear in a
dark environment.
● There may be a delay when switching be-
tween views.
● If dirt, rain or snow accumulate on the cam-
era, RearView Monitor may not display ob-
jects clearly. Clean the camera.
● Do not use wax on the camera lens. Wipe off
any wax with a clean cloth dampened with a
diluted mild cleaning agent, then wipe with a
dry cloth.
SYSTEM MAINTENANCE
CAUTION
● Do not use alcohol, benzine or thinner
to clean the camera. This will cause
discoloration.
● Do not damage the camera as the moni-
tor screen may be adversely affected.
If dirt, rain or snow accumulates on the camera
䊊
1
, the RearView Monitor may not display ob-
jects clearly. Clean the camera by wiping it with a
cloth dampened with a diluted mild cleaning
agent and then wiping it with a dry cloth.
LHA3885
4-14
Monitor, climate, audio, phone and voice recognition systems
Нет комментариевНе стесняйтесь поделиться с нами вашим ценным мнением.
Текст