Nissan Murano Z51. Instruction — part 850
B2630, B2631 SUNLOAD SENSOR
HAC-55
< DTC/CIRCUIT DIAGNOSIS >
[WITHOUT 7 INCH DISPLAY]
C
D
E
F
G
H
J
K
L
M
A
B
HAC
N
O
P
DTC CONFIRMATION PROCEDURE
1.
CHECK WITH SELF-DIAGNOSIS FUNCTION OF CONSULT-III
1.
Using CONSULT-III, perform “SELF-DIAGNOSIS RESULTS” of HVAC.
2.
Check if any DTC No. is displayed in the self-diagnosis results.
NOTE:
• If DTC is displayed along with DTC U1000 or U1010, first diagnose the DTC U1000 or U1010. Refer to
.
• Sunload sensor may register a malfunction when indoors, at dusk, or at other times when light is insufficient.
When performing the diagnosis indoors, light the sunload sensor with a lamp (60W or more).
Is DTC No.“B2630” or “B2631” displayed?
YES
>> Perform trouble diagnosis for the sunload sensor. Refer to
.
NO
>> INSPECTION END
Diagnosis Procedure
INFOID:0000000005514616
1.
CHECK VOLTAGE BETWEEN SUNLOAD SENSOR AND GROUND
1.
Disconnect sunload sensor connector.
2.
Turn ignition switch ON.
3.
Check voltage between sunload sensor harness connector and ground.
Is the inspection result normal?
YES
>> GO TO 2.
NO
>> GO TO 4.
2.
CHECK CIRCUIT CONTINUITY BETWEEN SUNLOAD SENSOR AND A/C AUTO AMP.
1.
Turn ignition switch OFF.
2.
Disconnect A/C auto amp. connector.
3.
Check continuity between sunload sensor harness connector and A/C auto amp. harness connector.
Is the inspection result normal?
YES
>> GO TO 3.
NO
>> Repair harness or connector.
3.
CHECK SUNLOAD SENSOR
1.
Reconnect sunload sensor connector and A/C auto amp. connector.
2.
Check sunload sensor. Refer to
HAC-56, "Component Inspection"
.
Is the inspection result normal?
YES
>> Replace A/C auto amp.
NO
>> Replace sunload sensor.
4.
CHECK CIRCUIT CONTINUITY BETWEEN SUNLOAD SENSOR AND A/C AUTO AMP.
1.
Turn ignition switch OFF.
2.
Disconnect A/C auto amp. connector.
3.
Check continuity between sunload sensor harness connector and A/C auto amp. harness connector.
(+)
(
−
)
Voltage
Sunload sensor
—
Connector
Terminal
M74
1
Ground
Approx. 5 V
Sunload sensor
A/C auto amp.
Continuity
Connector
Terminal
Connector
Terminal
M74
2
M50
37
Existed
HAC-56
< DTC/CIRCUIT DIAGNOSIS >
[WITHOUT 7 INCH DISPLAY]
B2630, B2631 SUNLOAD SENSOR
4.
Check continuity between sunload sensor harness connector and ground.
Is the inspection result normal?
YES
>> Replace A/C auto amp.
NO
>> Repair harness or connector.
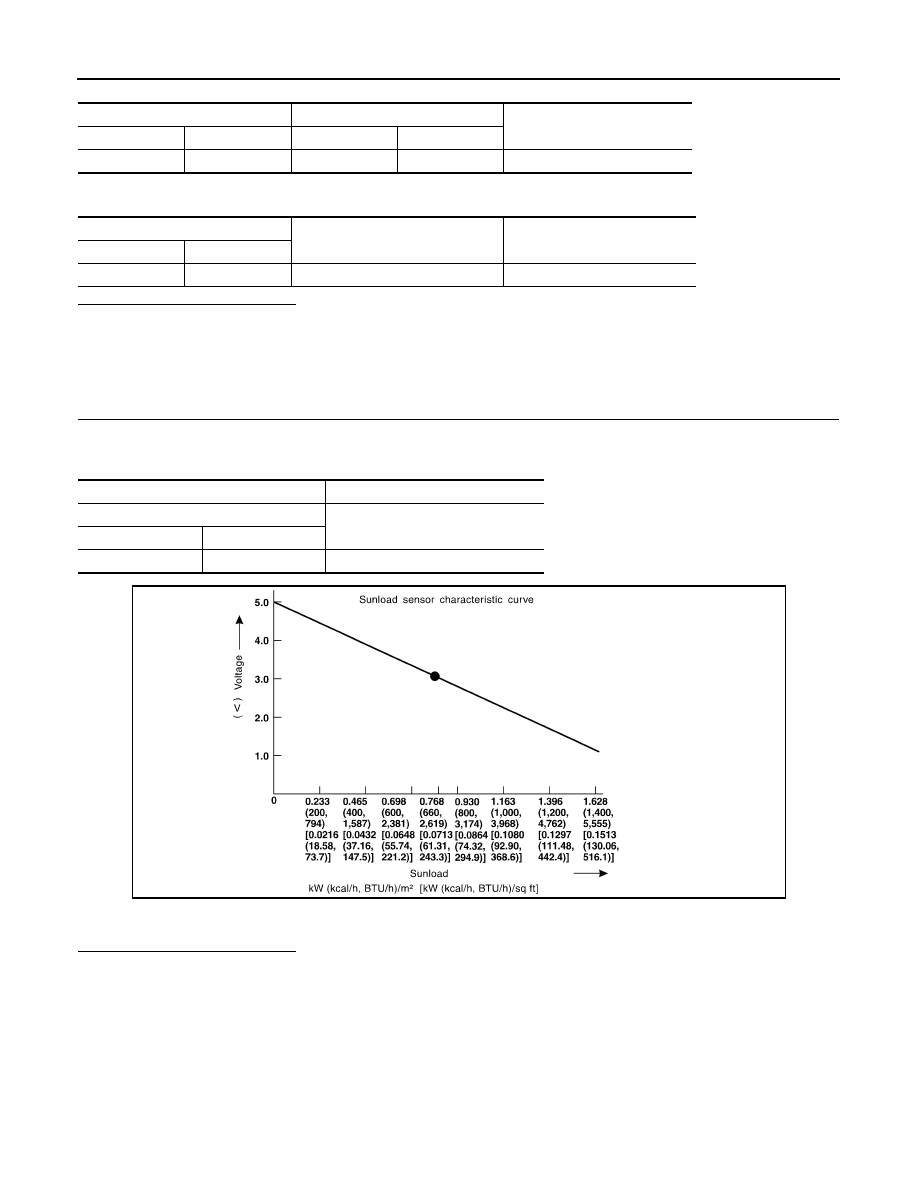
Component Inspection
INFOID:0000000005514617
1.
CHECK SUNLOAD SENSOR
1.
Turn ignition switch ON.
2.
Check voltage between A/C auto amp. harness connector and ground.
NOTE:
Select a place where sunshine directly on it when checking sunload sensor.
Is the inspection result normal?
YES
>> INSPECTION END
NO
>> Replace sunload sensor.
Sunload sensor
A/C auto amp.
Continuity
Connector
Terminal
Connector
Terminal
M74
1
M50
15
Existed
Sunload sensor
—
Continuity
Connector
Terminal
M74
1
Ground
Not existed
(+)
(
−
)
A/C auto amp.
—
Connector
Terminal
M50
15
Ground
SHA930E
B2632, B2633 AIR MIX DOOR MOTOR (DRIVER SIDE)
HAC-57
< DTC/CIRCUIT DIAGNOSIS >
[WITHOUT 7 INCH DISPLAY]
C
D
E
F
G
H
J
K
L
M
A
B
HAC
N
O
P
B2632, B2633 AIR MIX DOOR MOTOR (DRIVER SIDE)
Description
INFOID:0000000005514618
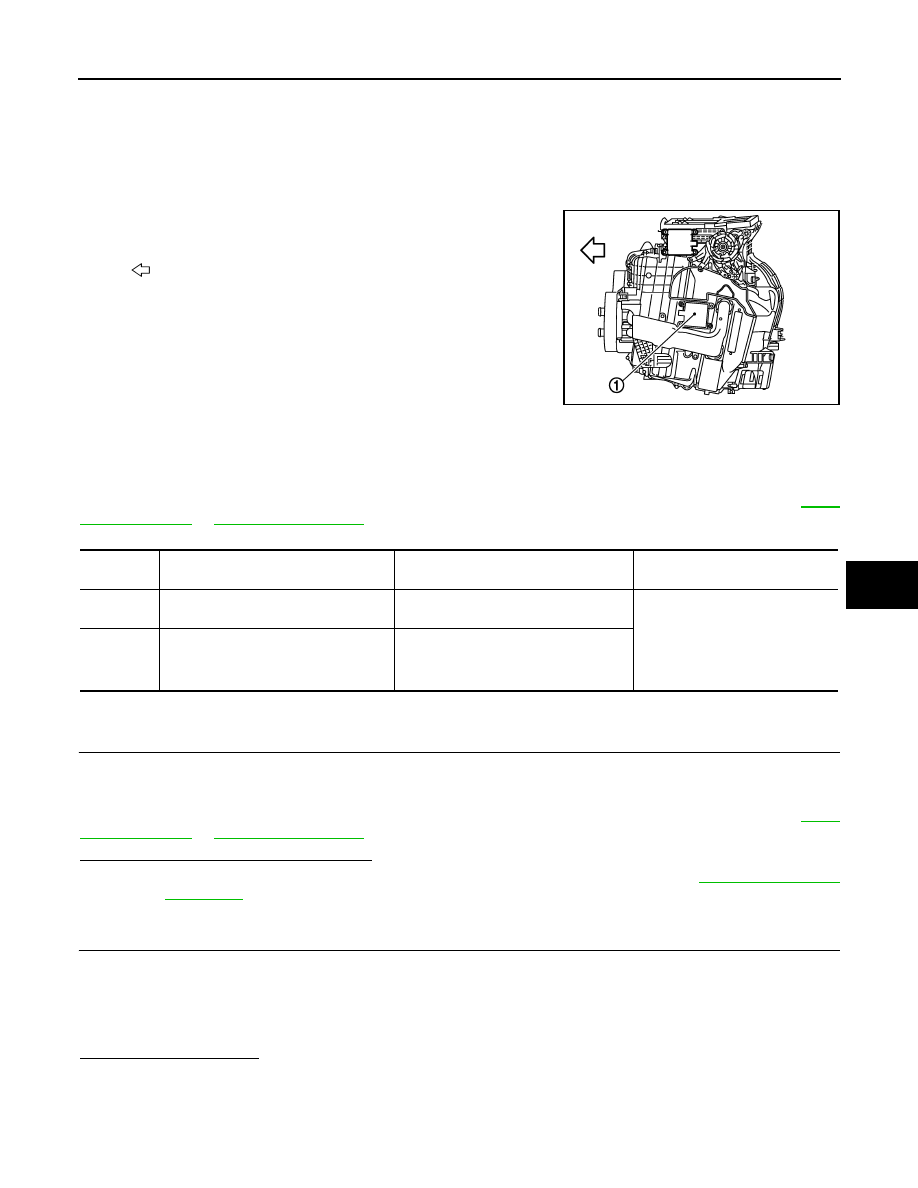
COMPONENT DESCRIPTION
Air Mix Door Motor (Driver Side)
• The air mix door motor (driver side) (1) are attached to the heater
& cooling unit assembly.
• It rotates so that the air mix door is opened or closed to a position
set by the A/C auto amp.
• Motor rotation is then conveyed through a shaft and the air mix
door position feedback is then sent to the A/C auto amp. by PBR
built-in air mix door motor.
DTC Logic
INFOID:0000000005514619
DTC DETECTION LOGIC
NOTE:
If DTC is displayed along with DTC U1000 or U1010, first diagnose the DTC U1000 or U1010. Refer to
.
DTC CONFIRMATION PROCEDURE
1.
CHECK WITH SELF-DIAGNOSIS FUNCTION OF CONSULT-III
1.
Using CONSULT-III, perform “SELF-DIAGNOSIS RESULTS” of HVAC.
2.
Check if any DTC No. is displayed in the self-diagnosis results.
NOTE:
If DTC is displayed along with DTC U1000 or U1010, first diagnose the DTC U1000 or U1010. Refer to
.
Is DTC No.“B2632” or “B2633” displayed?
YES
>> Perform trouble diagnosis for the air mix door motor (driver side). Refer to
.
NO
>> GO TO 2.
2.
FUNCTION INSPECTION
1.
Press temperature control “UP” switch (driver side) until 32
°
C (90
°
F) is displayed.
2.
Check for warm air at discharge air outlets.
3.
Operate the compressor.
4.
Press temperature control “DOWN” switch (driver side) until 18
°
C (60
°
F) is displayed.
5.
Check for cool air at air discharge outlets.
Does it operate normally?
YES
>> INSPECTION END
NO
>> Check air mix door motor (driver side) installation, and repair or replace the malfunctioning parts.
:
Vehicle front
JPIIA0515ZZ
DTC
Items
(CONSULT-III screen terms)
Diagnostic item is detected when...
Possible cause
B2632
DR AIRMIX ACTR SHORT
Air mix door PBR (driver side) position
95% or less
• Air mix door motor (PBR internal
circuit is open or shorted)
• A/C auto amp.
• Harness and connector
(LAN communication line is
open or shorted)
B2633
DR AIRMIX ACTR OPEN
Air mix door PBR (driver side) position
5% or more
HAC-58
< DTC/CIRCUIT DIAGNOSIS >
[WITHOUT 7 INCH DISPLAY]
B2632, B2633 AIR MIX DOOR MOTOR (DRIVER SIDE)
Diagnosis Procedure
INFOID:0000000005514620
1.
CHECK POWER SUPPLY FOR AIR MIX DOOR MOTOR (DRIVER SIDE)
Check voltage between air mix door motor (driver side) harness connector and ground.
Is the inspection result normal?
YES
>> GO TO 2.
NO
>> Repair the harnesses or connectors.
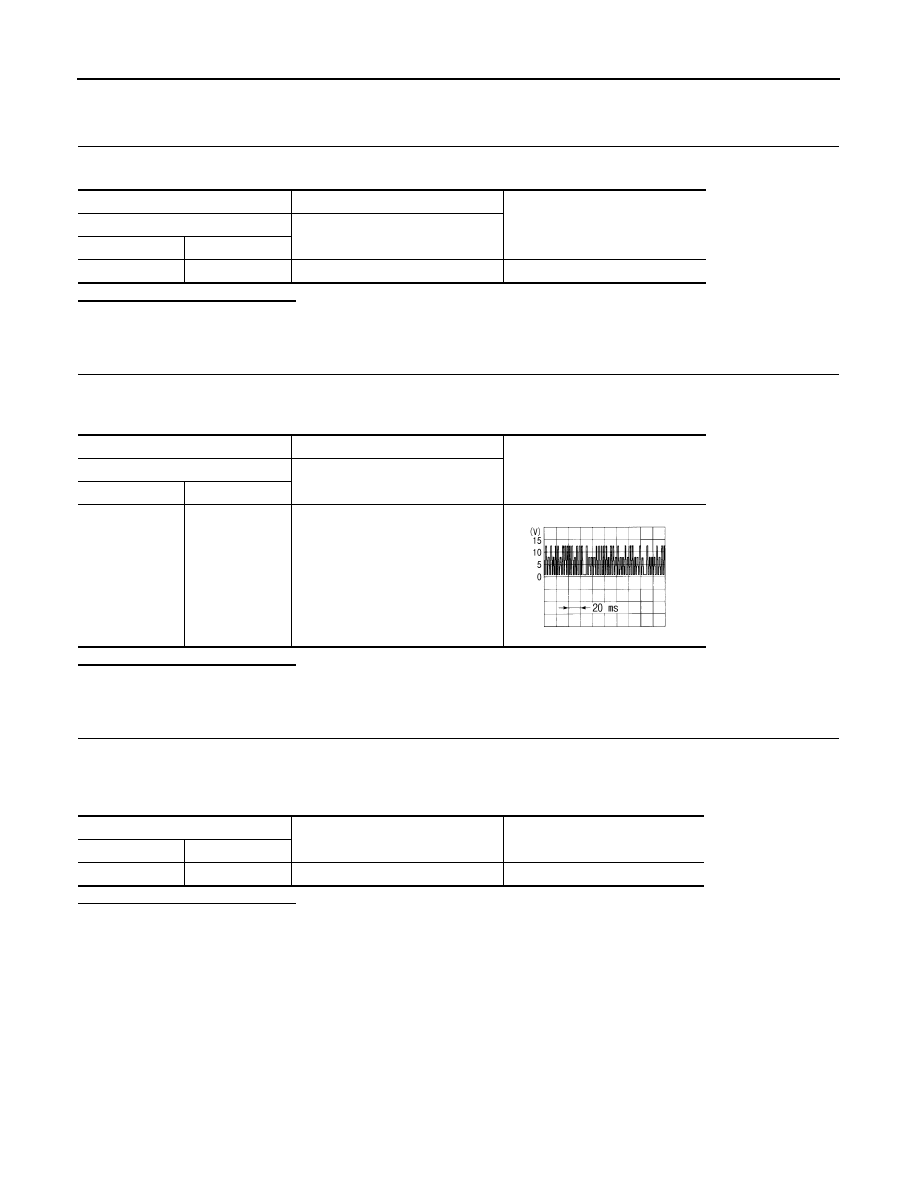
2.
CHECK SIGNAL FOR AIR MIX DOOR MOTOR (DRIVER SIDE)
Check the output waveform (LAN signal) between air mix door motor (driver side) harness connector and
ground using an oscilloscope.
Is the inspection result normal?
YES
>> GO TO 3.
NO
>> Repair the harnesses or connectors.
3.
CHECK AIR MIX DOOR MOTOR (DRIVER SIDE) GROUND CIRCUIT
1.
Turn ignition switch OFF.
2.
Disconnect air mix door motor (driver side) connector.
3.
Check continuity between air mix door motor (driver side) harness connector and ground.
Is the inspection result normal?
YES
>> Replace air mix door motor (driver side).
NO
>> Repair harness or connector.
(+)
(
−
)
Voltage
Air mix door motor (driver side)
—
Connector
Terminal
M306
1
Ground
Battery voltage
(+)
(
−
)
Voltage
Air mix door motor (driver side)
—
Connector
Terminal
M306
3
Ground
SJIA1453J
Air mix door motor (driver side)
—
Continuity
Connector
Terminal
M306
2
Ground
Existed
Нет комментариевНе стесняйтесь поделиться с нами вашим ценным мнением.
Текст