Nissan Pathfinder (2012 year). Instruction — part 177
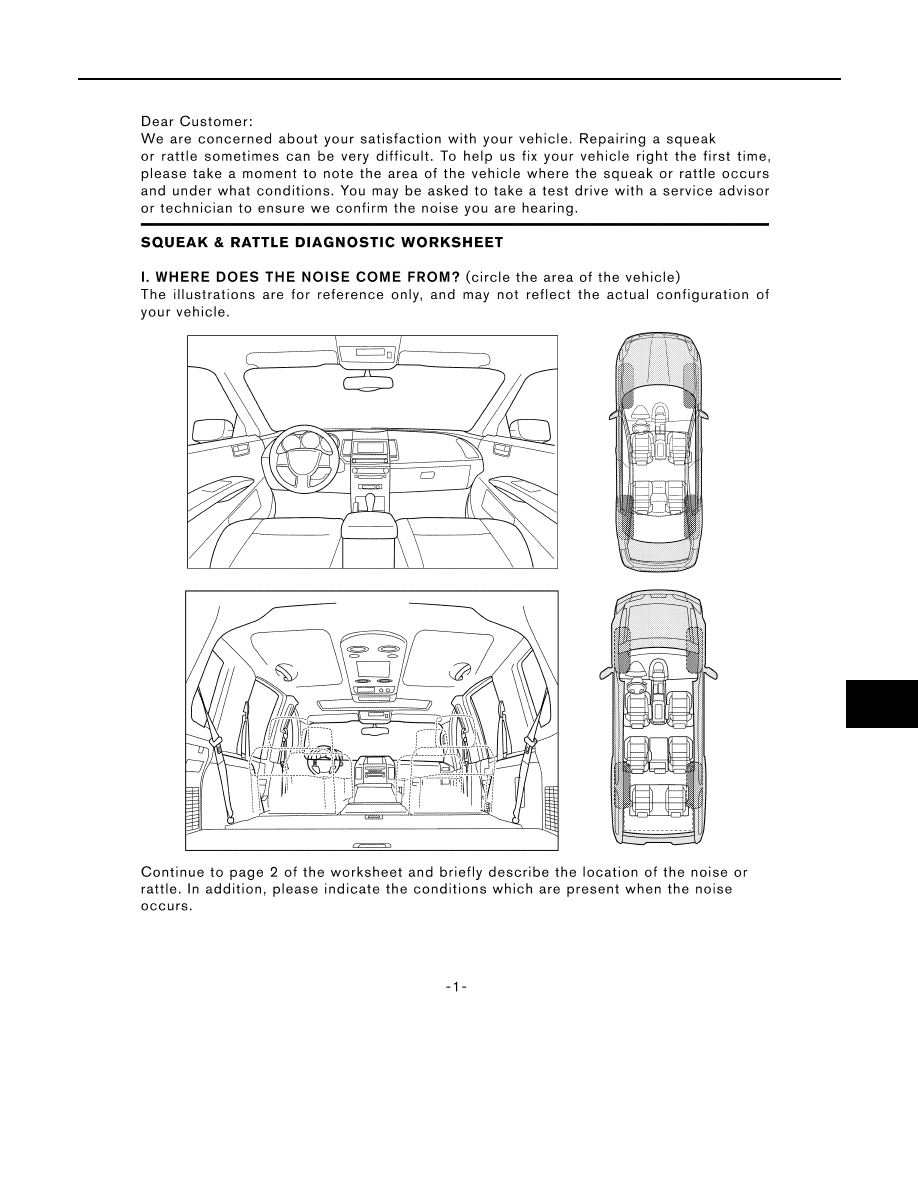
SQUEAK AND RATTLE TROUBLE DIAGNOSES
DLK-311
< SYMPTOM DIAGNOSIS >
[WITHOUT INTELLIGENT KEY SYSTEM]
C
D
E
F
G
H
I
J
L
M
A
B
DLK
N
O
P
Diagnostic Worksheet
INFOID:0000000007830140
LAIA0072E
August 2012
2012 Pathfinder
2012 Pathfinder

DLK-312
< SYMPTOM DIAGNOSIS >
[WITHOUT INTELLIGENT KEY SYSTEM]
SQUEAK AND RATTLE TROUBLE DIAGNOSES
LAIA0071E
August 2012
2012 Pathfinder
2012 Pathfinder
PRECAUTIONS
DLK-313
< PRECAUTION >
[WITHOUT INTELLIGENT KEY SYSTEM]
C
D
E
F
G
H
I
J
L
M
A
B
DLK
N
O
P
PRECAUTION
PRECAUTIONS
Precaution for Supplemental Restraint System (SRS) "AIR BAG" and "SEAT BELT
PRE-TENSIONER"
INFOID:0000000007355645
The Supplemental Restraint System such as “AIR BAG” and “SEAT BELT PRE-TENSIONER”, used along
with a front seat belt, helps to reduce the risk or severity of injury to the driver and front passenger for certain
types of collision. This system includes seat belt switch inputs and dual stage front air bag modules. The SRS
system uses the seat belt switches to determine the front air bag deployment, and may only deploy one front
air bag, depending on the severity of a collision and whether the front occupants are belted or unbelted.
Information necessary to service the system safely is included in the SR and SB section of this Service Man-
ual.
WARNING:
• To avoid rendering the SRS inoperative, which could increase the risk of personal injury or death in
the event of a collision which would result in air bag inflation, all maintenance must be performed by
an authorized NISSAN/INFINITI dealer.
• Improper maintenance, including incorrect removal and installation of the SRS, can lead to personal
injury caused by unintentional activation of the system. For removal of Spiral Cable and Air Bag
Module, see the SR section.
• Do not use electrical test equipment on any circuit related to the SRS unless instructed to in this
Instruction. SRS wiring harnesses can be identified by yellow and/or orange harnesses or har-
ness connectors.
PRECAUTIONS WHEN USING POWER TOOLS (AIR OR ELECTRIC) AND HAMMERS
WARNING:
• When working near the Airbag Diagnosis Sensor Unit or other Airbag System sensors with the Igni-
tion ON or engine running, DO NOT use air or electric power tools or strike near the sensor(s) with a
hammer. Heavy vibration could activate the sensor(s) and deploy the air bag(s), possibly causing
serious injury.
• When using air or electric power tools or hammers, always switch the Ignition OFF, disconnect the
battery, and wait at least 3 minutes before performing any service.
Precaution for Work for Door and Lock
INFOID:0000000007830148
• After removing and installing the opening/closing parts, be sure to carry out fitting adjustments to check their
operation.
• Check the lubrication level, damage, and wear of each part. If necessary, grease or replace it.
• When removing or disassembling each component, be careful not to damage or deform it. If a component
may be subject to interference, be sure to protect it with a shop cloth.
• When removing (disengaging) components with a screwdriver or similar tool, be sure to wrap the component
with a shop cloth or vinyl tape to protect it.
• Protect the removed parts with a shop cloth and prevent them from being dropped.
• Replace a deformed or damaged clip.
• If a part is specified as a non-reusable part, always replace it with new one.
• Be sure to tighten bolts and nuts securely to the specified torque.
• After installation is complete, be sure to check that each part works properly.
• Follow the steps below to clean components.
- Water soluble dirt: Dip a soft cloth into lukewarm water, and wring the water out of the cloth to wipe the dirty
area.
Then rub with a soft and dry cloth.
- Oily dirt: Dip a soft cloth into lukewarm water with mild detergent (concentration: within 2 to 3%), and wipe
the dirty area.
Then dip a cloth into fresh water, and wring the water out of the cloth to wipe the detergent off. Then rub with
a soft and dry cloth.
• Do not use organic solvent such as thinner, benzene, alcohol, or gasoline.
• For genuine leather seats, use a genuine leather seat cleaner.
August 2012
2012 Pathfinder
2012 Pathfinder
DLK-314
< PREPARATION >
[WITHOUT INTELLIGENT KEY SYSTEM]
PREPARATION
PREPARATION
PREPARATION
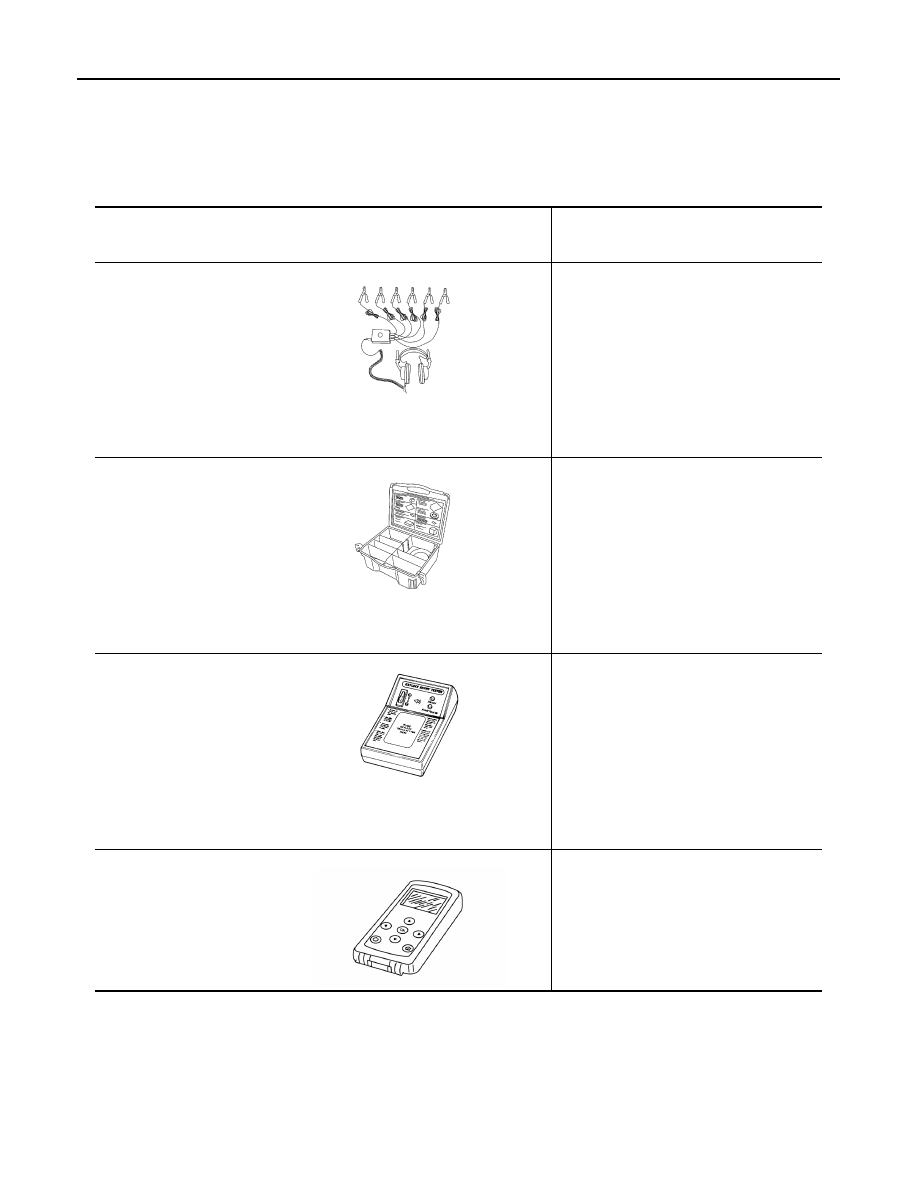
Special Service Tool
INFOID:0000000007830152
Tool number
(Kent-Moore No.)
Tool name
Description
—
(J-39570)
Chassis ear
Locating the noise
—
(J-43980)
NISSAN Squeak and Rat-
tle Kit
Repairing the cause of noise
—
(J-43241)
Remote Keyless Entry
Tester
Used to test key fobs
—
(J-50190)
Signal Tech II
• Activate and display TPMS transmitter
IDs
• Display tire pressure reported by the
TPMS transmitter
• Read TPMS DTCs
• Register TPMS transmitter IDs
• Test remote keyless entry keyfob relative
signal strength
SIIA0993E
SIIA0994E
LEL946A
ALEIA0131ZZ
August 2012
2012 Pathfinder
2012 Pathfinder
PREPARATION
DLK-315
< PREPARATION >
[WITHOUT INTELLIGENT KEY SYSTEM]
C
D
E
F
G
H
I
J
L
M
A
B
DLK
N
O
P
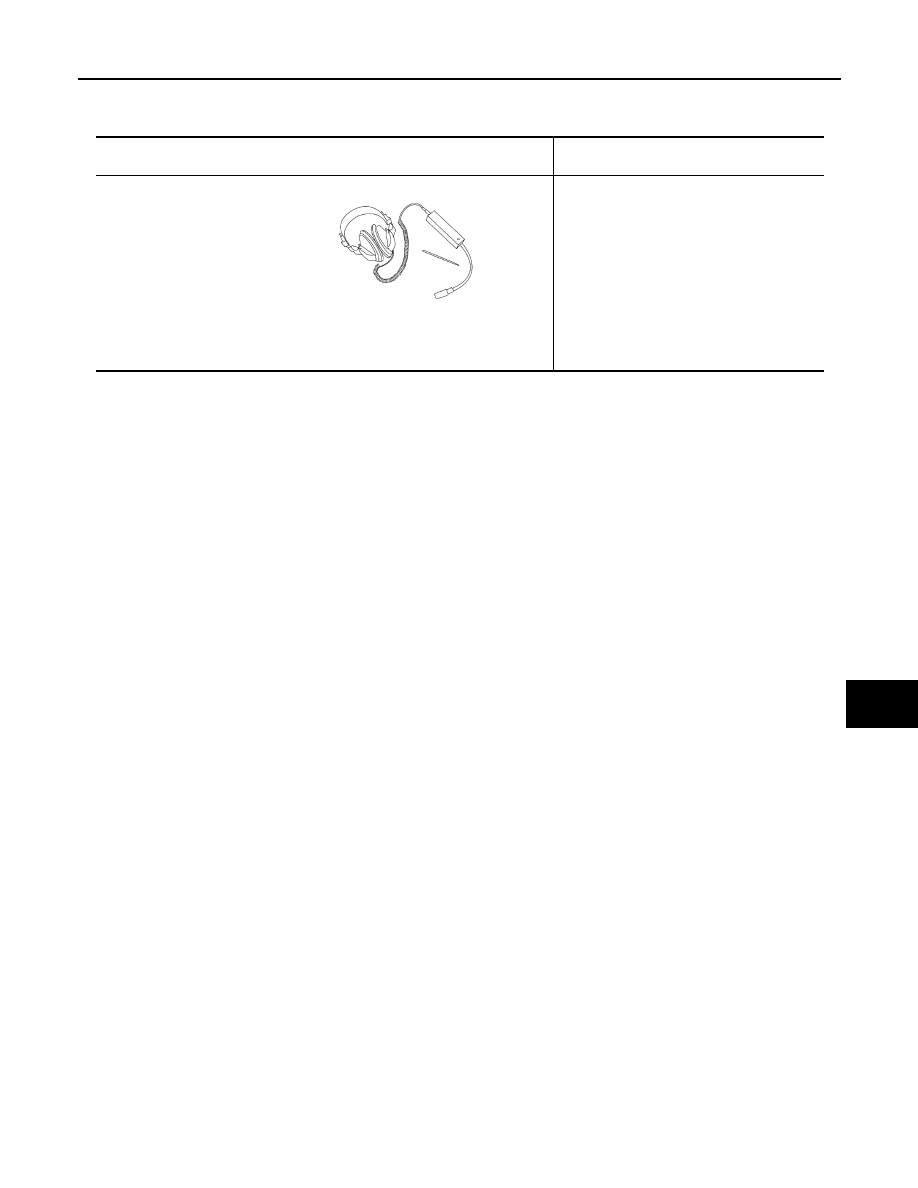
Commercial Service Tool
INFOID:0000000007830151
(Kent-Moore No.)
Tool name
Description
(J-39565)
Engine ear
Locating the noise
SIIA0995E
August 2012
2012 Pathfinder
2012 Pathfinder
DLK-316
< REMOVAL AND INSTALLATION >
[WITHOUT INTELLIGENT KEY SYSTEM]
HOOD
REMOVAL AND INSTALLATION
HOOD
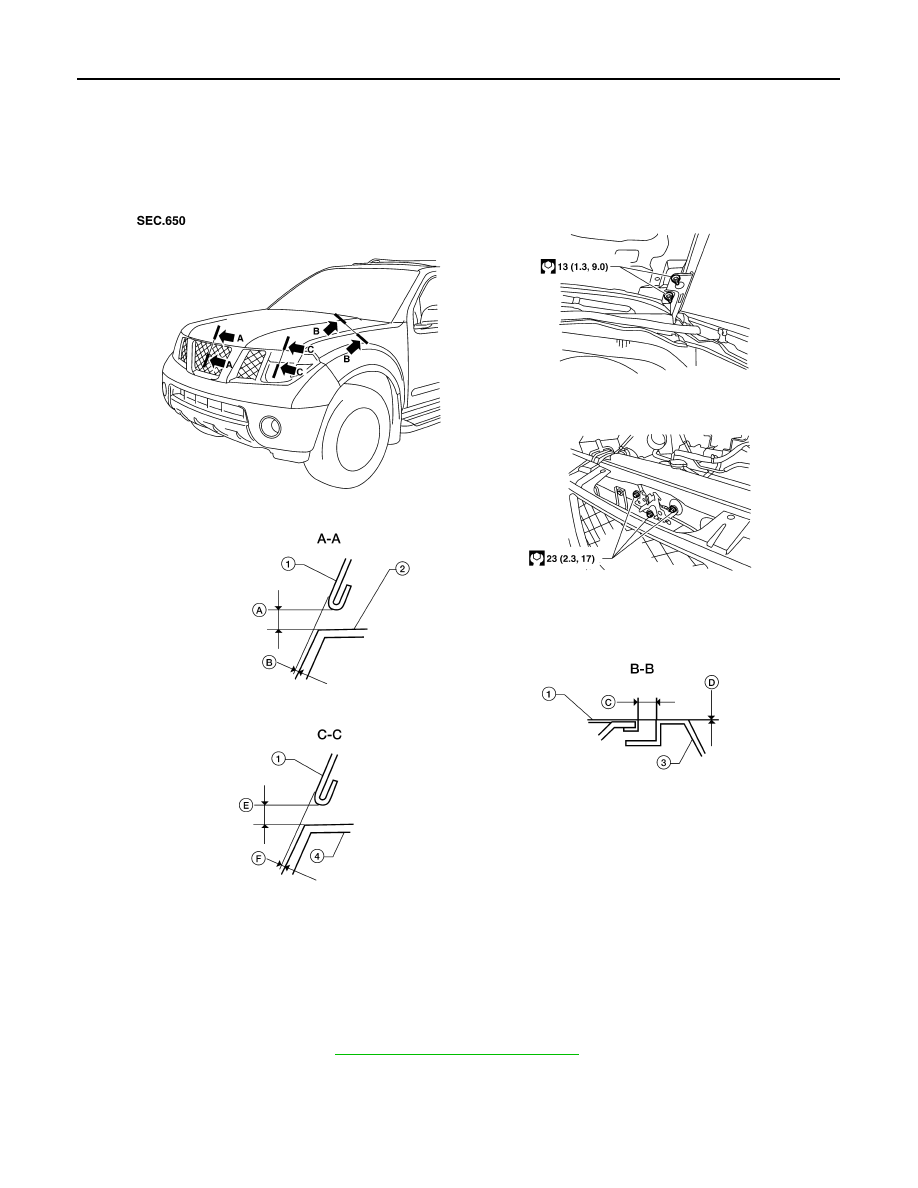
Fitting Adjustment
INFOID:0000000007355649
CLEARANCE AND SURFACE HEIGHT ADJUSTMENT
1. Remove the front grille. Refer to
EXT-20, "Removal and Installation"
2. Loosen the hood lock assembly and adjust the rubber bumpers until the surface height of the hood
becomes 1 mm (0.04 in) lower than the fender.
3. Engage the hood striker and temporarily tighten.
4. Check the lock and striker for looseness.
1.
Hood
2.
Front grille
3.
Front fender
4.
Front combination lamp
A.
6.0
±
2.3 mm (0.24
±
0.09 in)
B.
0.0
±
2.4 mm (0.0
±
0.09 in)
C.
4.6
±
1.0 mm (0.18
±
0.04 in)
D.
0.0
±
1.0 mm (0.0
±
0.04 in)
E.
6.0
±
2.0 mm (0.24
±
0.08 in)
F.
0.0
±
2.0 mm (0.0
±
0.08 in)
WIIA0774E
August 2012
2012 Pathfinder
2012 Pathfinder
HOOD
DLK-317
< REMOVAL AND INSTALLATION >
[WITHOUT INTELLIGENT KEY SYSTEM]
C
D
E
F
G
H
I
J
L
M
A
B
DLK
N
O
P
5. Tighten the bolts to specification.
6. Adjust the surface height of the hood according to the fitting standard dimension by rotating right and left
rubber bumpers.
7. Install the front grille. Refer to
EXT-20, "Removal and Installation"
.
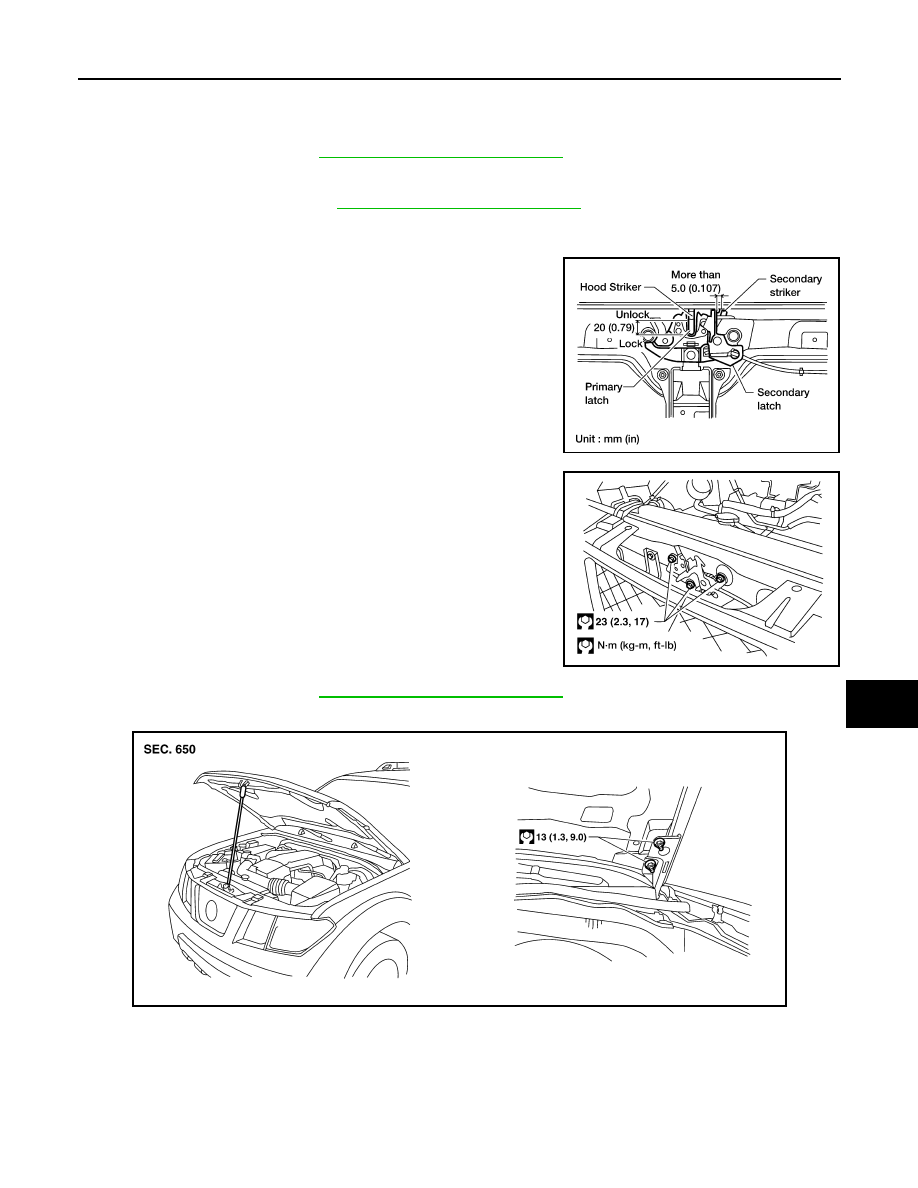
HOOD LOCK ADJUSTMENT
1. Remove the front grille. Refer to
EXT-20, "Removal and Installation"
2. Move the hood lock to the left or right so that striker center is vertically aligned with hood lock center
(when viewed from vehicle front).
3. Make sure the secondary latch is properly engaged with the sec-
ondary striker with hood's own weight by dropping it from
approx. 200 mm (7.87 in) height or by pressing it lightly approx.
29 N (3 kg-f, 6.5 ft-lb).
CAUTION:
Do not drop the hood from 300 mm (11.81 in) height or
higher.
4. After adjusting hood lock, tighten the lock bolts to the specified
torque.
5. Install the front grille. Refer to
EXT-20, "Removal and Installation"
.
Removal and Installation of Hood Assembly
INFOID:0000000007355650
1. Support the hood striker with suitable tool to prevent it from falling.
2.
CAUTION:
Operate with two workers, because of its heavy weight.
Remove the hinge nuts from the hood to remove the hood assembly.
Installation is in the reverse order of removal.
LIIA1696E
LIIA1701E
WIIA1055E
August 2012
2012 Pathfinder
2012 Pathfinder
DLK-318
< REMOVAL AND INSTALLATION >
[WITHOUT INTELLIGENT KEY SYSTEM]
HOOD
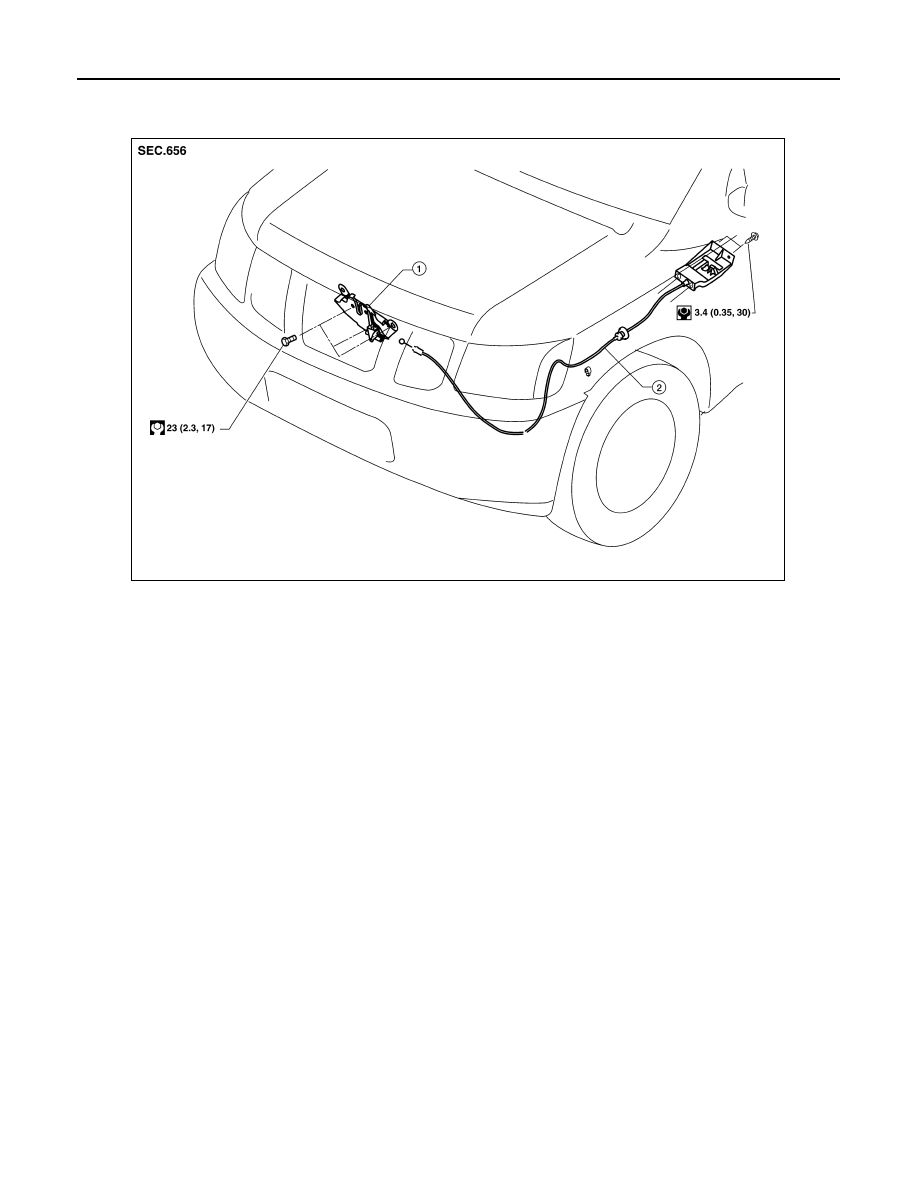
Removal and Installation of Hood Lock Control
INFOID:0000000007355651
REMOVAL
1. Remove the bolts and the hood lock assembly.
2. Disconnect the hood lock cable from the hood lock, and unclip it from the radiator core support upper and
hoodledge.
3. Remove the bolts, and the hood release handle.
4. Separate the grommet from the lower dash panel. Pull the hood lock cable out through the passenger
compartment.
CAUTION:
While pulling, be careful not to damage the outside of the hood lock cable.
INSTALLATION
1. Pull the hood lock cable through the lower dash panel hole into the engine room.
1.
Hood lock assembly
2.
Hood lock cable
WIIA0775E
August 2012
2012 Pathfinder
2012 Pathfinder
Нет комментариевНе стесняйтесь поделиться с нами вашим ценным мнением.
Текст