Nissan Pathfinder (2012 year). Instruction — part 162
PREPARATION
DLK-191
< PREPARATION >
[WITH INTELLIGENT KEY SYSTEM]
C
D
E
F
G
H
I
J
L
M
A
B
DLK
N
O
P
Commercial Service Tool
INFOID:0000000007830149
(Kent-Moore No.)
Tool name
Description
(J-39565)
Engine ear
Locating the noise
SIIA0995E
August 2012
2012 Pathfinder
2012 Pathfinder
DLK-192
< REMOVAL AND INSTALLATION >
[WITH INTELLIGENT KEY SYSTEM]
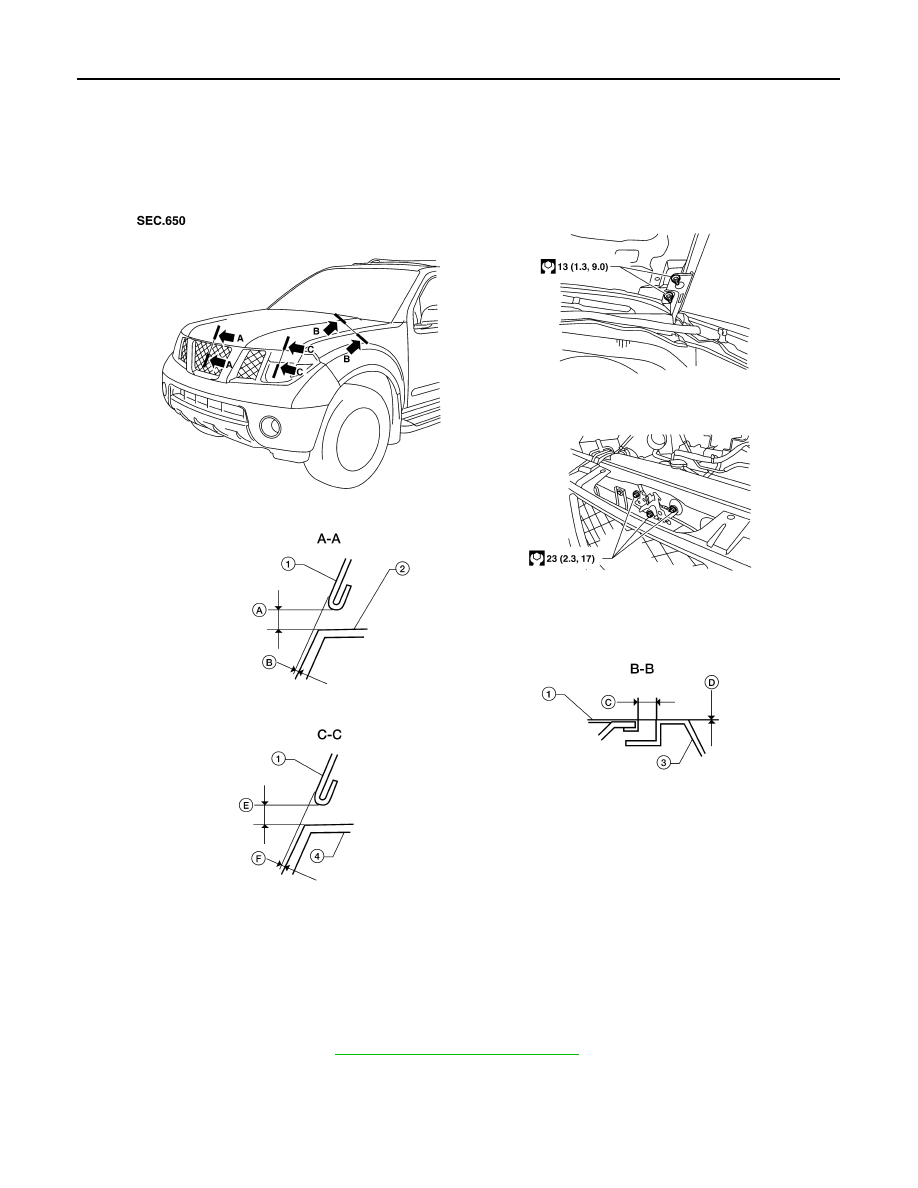
HOOD
REMOVAL AND INSTALLATION
HOOD
Fitting Adjustment
INFOID:0000000007355537
CLEARANCE AND SURFACE HEIGHT ADJUSTMENT
1. Remove the front grille. Refer to
EXT-20, "Removal and Installation"
2. Loosen the hood lock assembly and adjust the rubber bumpers until the surface height of the hood
becomes 1 mm (0.04 in) lower than the fender.
3. Engage the hood striker and temporarily tighten.
4. Check the lock and striker for looseness.
1.
Hood
2.
Front grille
3.
Front fender
4.
Front combination lamp
A.
6.0
±
2.3 mm (0.24
±
0.09 in)
B.
0.0
±
2.4 mm (0.0
±
0.09 in)
C.
4.6
±
1.0 mm (0.18
±
0.04 in)
D.
0.0
±
1.0 mm (0.0
±
0.04 in)
E.
6.0
±
2.0 mm (0.24
±
0.08 in)
F.
0.0
±
2.0 mm (0.0
±
0.08 in)
WIIA0774E
August 2012
2012 Pathfinder
2012 Pathfinder
HOOD
DLK-193
< REMOVAL AND INSTALLATION >
[WITH INTELLIGENT KEY SYSTEM]
C
D
E
F
G
H
I
J
L
M
A
B
DLK
N
O
P
5. Tighten the bolts to specification.
6. Adjust the surface height of the hood according to the fitting standard dimension by rotating right and left
rubber bumpers.
7. Install the front grille. Refer to
EXT-20, "Removal and Installation"
.
HOOD LOCK ADJUSTMENT
1. Remove the front grille. Refer to
EXT-20, "Removal and Installation"
2. Move the hood lock to the left or right so that striker center is vertically aligned with hood lock center
(when viewed from vehicle front).
3. Make sure the secondary latch is properly engaged with the sec-
ondary striker with hood's own weight by dropping it from
approx. 200 mm (7.87 in) height or by pressing it lightly approx.
29 N (3 kg-f, 6.5 ft-lb).
CAUTION:
Do not drop the hood from 300 mm (11.81 in) height or
higher.
4. After adjusting hood lock, tighten the lock bolts to the specified
torque.
5. Install the front grille. Refer to
EXT-20, "Removal and Installation"
.
Removal and Installation of Hood Assembly
INFOID:0000000007355538
1. Support the hood striker with suitable tool to prevent it from falling.
2.
CAUTION:
Operate with two workers, because of its heavy weight.
Remove the hinge nuts from the hood to remove the hood assembly.
Installation is in the reverse order of removal.
LIIA1696E
LIIA1701E
WIIA1055E
August 2012
2012 Pathfinder
2012 Pathfinder
DLK-194
< REMOVAL AND INSTALLATION >
[WITH INTELLIGENT KEY SYSTEM]
HOOD
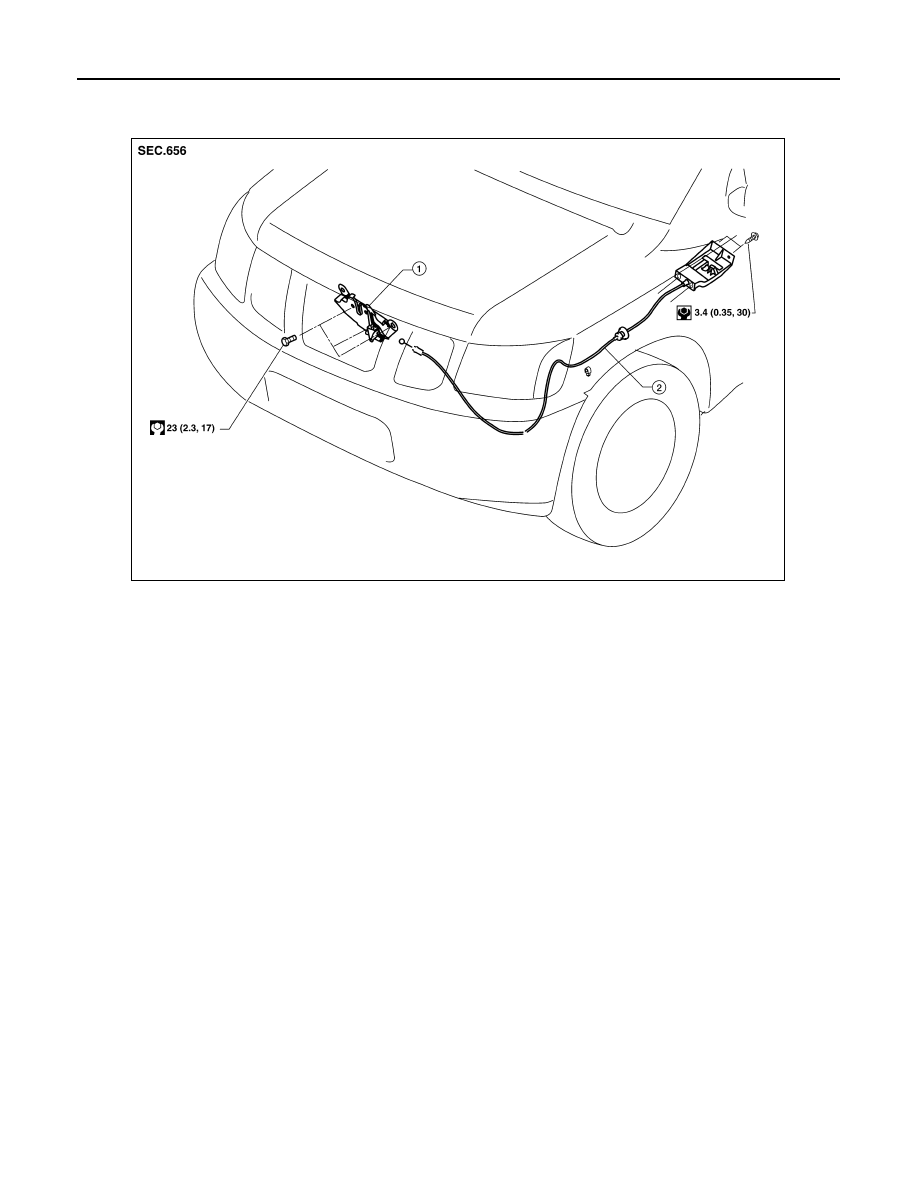
Removal and Installation of Hood Lock Control
INFOID:0000000007355539
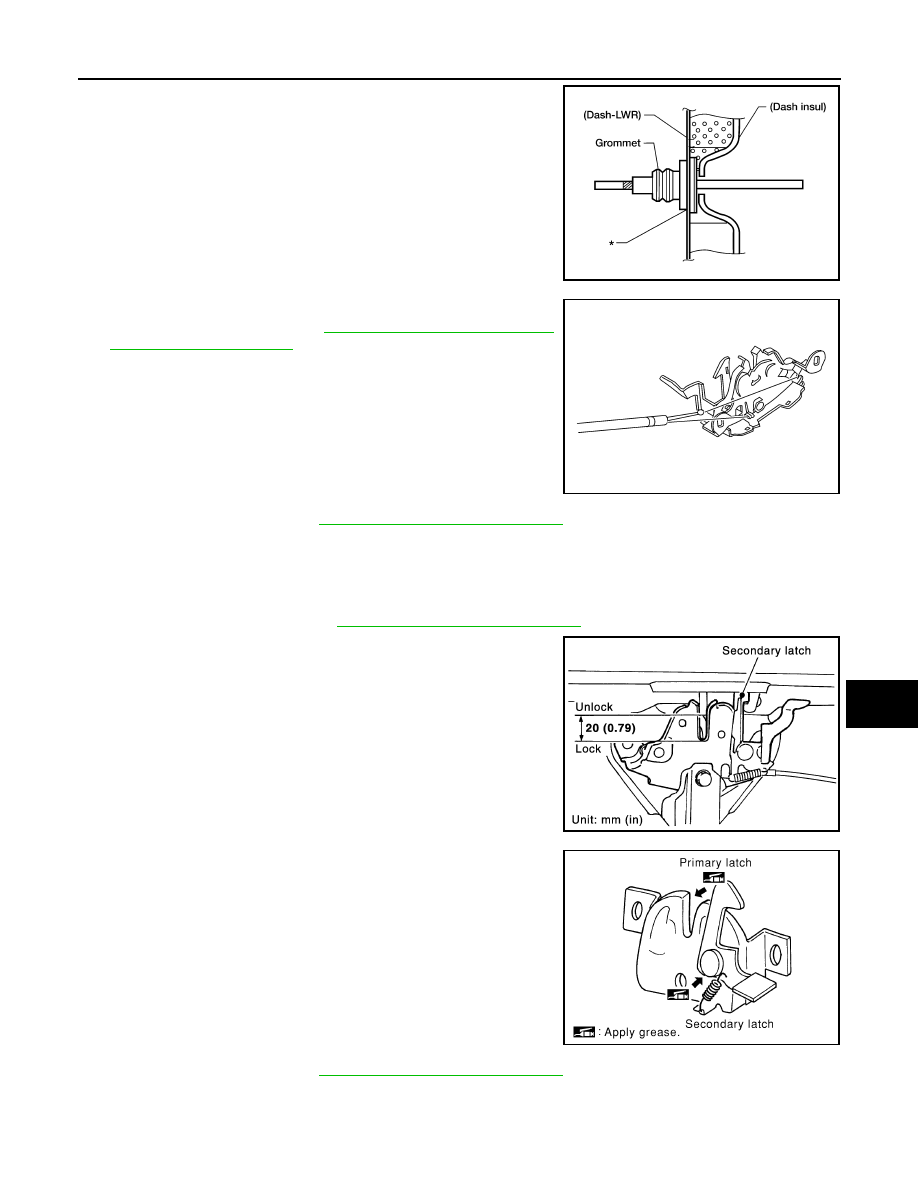
REMOVAL
1. Remove the bolts and the hood lock assembly.
2. Disconnect the hood lock cable from the hood lock, and unclip it from the radiator core support upper and
hoodledge.
3. Remove the bolts, and the hood release handle.
4. Separate the grommet from the lower dash panel. Pull the hood lock cable out through the passenger
compartment.
CAUTION:
While pulling, be careful not to damage the outside of the hood lock cable.
INSTALLATION
1. Pull the hood lock cable through the lower dash panel hole into the engine room.
1.
Hood lock assembly
2.
Hood lock cable
WIIA0775E
August 2012
2012 Pathfinder
2012 Pathfinder
HOOD
DLK-195
< REMOVAL AND INSTALLATION >
[WITH INTELLIGENT KEY SYSTEM]
C
D
E
F
G
H
I
J
L
M
A
B
DLK
N
O
P
Be careful not to bend the cable too much, keep the radius
100mm (3.94 in) or more.
2. Make sure the cable is not offset from the grommet, and push
the grommet into the lower dash panel hole securely.
3. Apply sealant around the grommet at * mark.
4. Install the cable securely to the lock.
5. Adjust the hood lock. Refer to
DLK-194, "Removal and Installa-
6. Install the front grille. Refer to
EXT-20, "Removal and Installation"
.
Hood Lock Control Inspection
INFOID:0000000007355540
CAUTION:
If the hood lock cable is bent or deformed, replace it.
1. Remove the front grille. Refer to
EXT-20, "Removal and Installation"
2. Make sure the secondary latch is properly engaged with the sec-
ondary striker with hood's own weight by dropping it from
approx. 200 mm (7.87 in) height.
3. While operating the hood opener, carefully make sure the front
end of the hood is raised by approx. 20 mm (0.79 in). Also make
sure the hood opener returns to the original position.
4. Check the hood lock lubrication condition. If necessary, apply
“body grease” to the points shown.
5. Install the front grille. Refer to
EXT-20, "Removal and Installation"
.
LIIA1698E
LIIA1699E
PIIA1086E
PIIA0176E
August 2012
2012 Pathfinder
2012 Pathfinder
DLK-196
< REMOVAL AND INSTALLATION >
[WITH INTELLIGENT KEY SYSTEM]
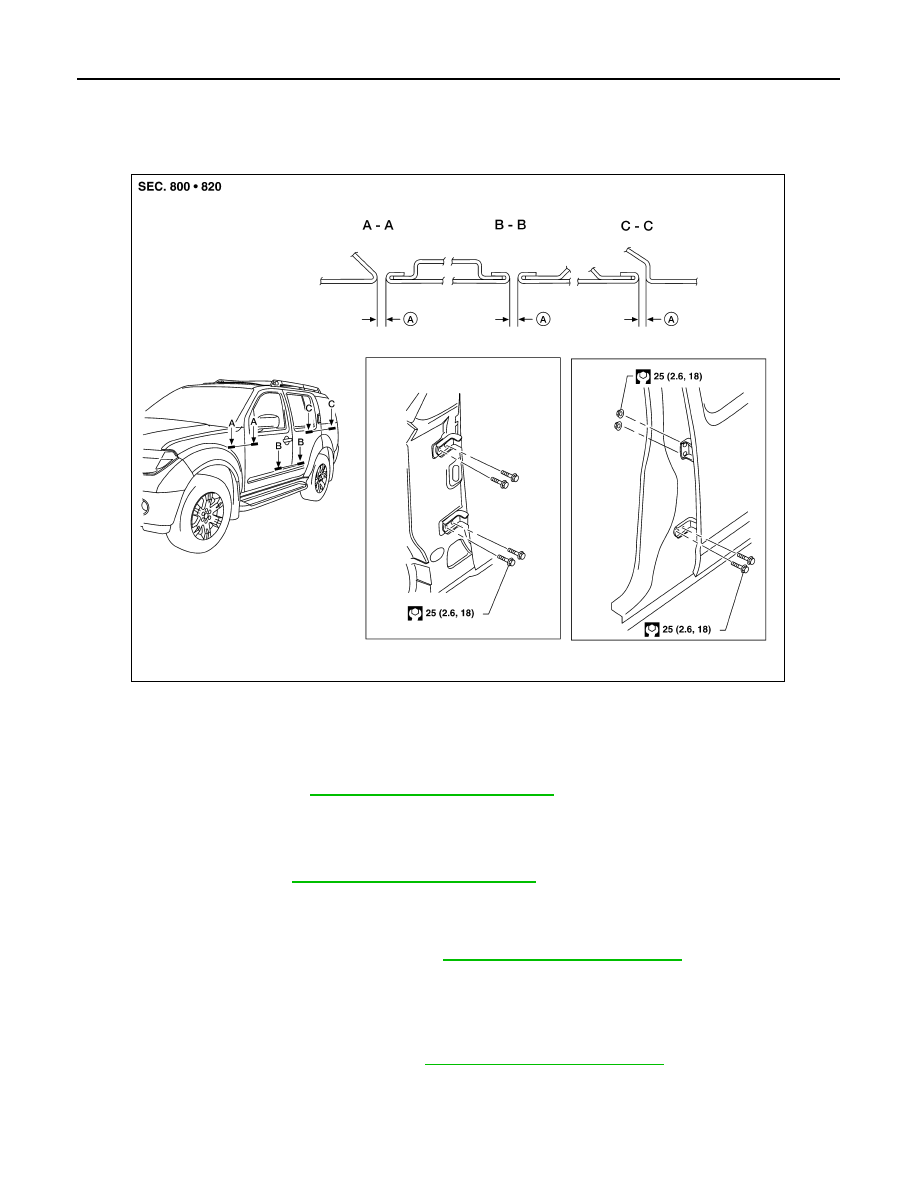
DOOR
DOOR
Fitting Adjustment
INFOID:0000000007355541
FRONT DOOR
Longitudinal clearance and surface height adjustment at front end
1. Remove the fender. Refer to
EXT-22, "Removal and Installation"
2. Loosen the hinge bolts.
3. Raise or lower the front door at rear end to adjust.
4. Tighten the hinge bolts.
5. Install the fender. Refer to
EXT-22, "Removal and Installation"
REAR DOOR
Longitudinal clearance and surface height adjustment at front end
1. Remove the center pillar lower finisher. Refer to
INT-19, "Removal and Installation"
2. Loosen the lower hinge bolts.
3. From inside the vehicle, loosen the upper hinge nuts. Open the door, and raise or lower the rear end of the
door to adjust.
4. Tighten the lower hinge bolts.
5. Install the center pillar lower finisher. Refer to
INT-19, "Removal and Installation"
.
BACK DOOR
Longitudinal clearance and surface height adjustment
A.
4.5
±
1.0 mm (0.177
±
0.039 in)
WIIA0732E
August 2012
2012 Pathfinder
2012 Pathfinder

DOOR
DLK-197
< REMOVAL AND INSTALLATION >
[WITH INTELLIGENT KEY SYSTEM]
C
D
E
F
G
H
I
J
L
M
A
B
DLK
N
O
P
1. Open and support the back door.
2. Slightly loosen the hinge nuts.
3. Reposition the door as necessary and tighten the nuts.
4. Confirm the adjustment. Repeat as necessary to obtain the desired fit.
STRIKER ADJUSTMENT
Body Side Doors
1. Loosen the striker bolts.
1.
Back door assembly
2.
Back door hinge
3.
Rear combination lamp
4.
Rear bumper fascia
5.
Roof
6.
Side window glass
a.
7.2
±
2.0 mm (0.28
±
0.08 in)
b.
6.0
±
1.5 mm (0.24
±
0.06 in)
c.
2.0
±
2.0 mm (0.08
±
0.08 in)
d.
1.0
±
1.5 mm (0.04
±
0.06 in)
e.
8.0
±
1.5 mm (0.31
±
0.06 in)
f.
5.3
±
2.0 mm (0.21
±
0.08 in)
g.
0.8
±
2.0 mm (0.03
±
0.08 in)
h.
0.8
±
1.0 mm (0.03
±
0.04 in)
j.
2.0
±
1.0 mm (0.08
±
0.04 in)
WIIA0733E
August 2012
2012 Pathfinder
2012 Pathfinder

DLK-198
< REMOVAL AND INSTALLATION >
[WITH INTELLIGENT KEY SYSTEM]
DOOR
2. Adjust the striker so that it becomes parallel with the lock inser-
tion direction.
3. Tighten the striker bolts to specification.
Back Door
1. Loosen the striker bolts.
2. Adjust the striker so that it becomes parallel with the lock inser-
tion direction.
3. Tighten the striker bolts to specification.
Removal and Installation
INFOID:0000000007355542
CAUTION:
• When removing and installing a door assembly, support the door with a jack and shop cloth to pro-
tect the door and body.
• When removing and installing a door assembly, be sure to carry out the fitting adjustment.
• Check the hinge rotating point for poor lubrication. If necessary, apply “body grease”.
FRONT DOOR
Removal
1. Remove the front door glass and regulator. Refer to
GW-15, "Front Door Glass Regulator"
2. Remove the door harness.
3. Remove the check link bolt from the hinge pillar.
AWKIA1766ZZ
WIIA0735E
Check link to hinge pillar
bolt
14.7 N·m (1.5 kg-m, 11 ft-lb)
LIIA1726E
August 2012
2012 Pathfinder
2012 Pathfinder
Нет комментариевНе стесняйтесь поделиться с нами вашим ценным мнением.
Текст