Nissan Sentra. Instruction — part 903
TM-248
< SYMPTOM DIAGNOSIS >
[CVT: RE0F11A]
CVT CONTROL SYSTEM
Other
Starter operates in “D”, “L”, or
“R” position.
1
1
1
Starter does not operate in
“P” or “N” position.
1
1
1
Engine stall occurs in “D”, “L”,
or “R” position during stop.
1
1
1
1
Engine stall occurs in “P” or
“N” position during stop.
1
1
1
1
Parking lock does not oper-
ate in “P” position.
1
1
Parking lock cannot be can-
celled when the selector le-
ver is shifted from “P” position
to other position.
1
1
Symptom
Check under on board condition (repair
and part replacement)
Replace the transaxle assembly.
En
gi
ne
s
ys
tem
In
co
rrec
t
adj
ust
me
nt
of
CVT f
lui
d l
ev
el
Li
ne
pre
ss
u
re
is o
u
t of
th
e
st
an
da
rd va
lu
e.
Co
ntro
l c
a
ble
Electric system
TC
M
Ov
erd
riv
e c
on
tro
l s
w
itc
h
Prim
ary
s
p
ee
d se
nso
r (P07
15
)
Se
cond
ary
s
pe
ed
s
en
so
r (P27
65
)
Out
put
sp
ee
d se
ns
or (P0
7
20
)
T
ran
sm
is
si
on
po
si
tio
n
swi
tch
(P0
7
05
, P07
0
6)
Se
cond
ary
p
res
su
re
se
ns
or (P
08
46,
P0
84
7, P
08
48
)
Pri
m
a
ry
pre
ss
ure
s
ole
no
id
va
lv
e
(P09
65
, P0
96
6,
P09
67
)
Li
ne
pre
ss
u
re
s
o
le
no
id
v
a
lve
(P07
46
, P0
96
2,
P09
6
3)
L
oc
k-u
p so
le
noi
d va
lve
(P0
74
0,
P0
743
, P
07
44)
Hi
gh
cl
utc
h
&rev
ers
e
bra
ke
s
ole
no
id
va
lv
e
(P09
9B,
P0
99
C,
P2
85
8,
P28
5
A)
L
ow
b
rak
e so
le
no
id va
lv
e
(P0
99
8,
P0
999
, P
28
57,
P2
85
9)
CVT f
lui
d t
e
m
p
er
at
ur
e se
ns
or (P07
11
, P07
1
2,
P0
71
3)
EC-126
TM-250
TM-149
TM-150
TM-1
14
TM-236
TM-126

CVT CONTROL SYSTEM
TM-249
< SYMPTOM DIAGNOSIS >
[CVT: RE0F11A]
C
E
F
G
H
I
J
K
L
M
A
B
TM
N
O
P
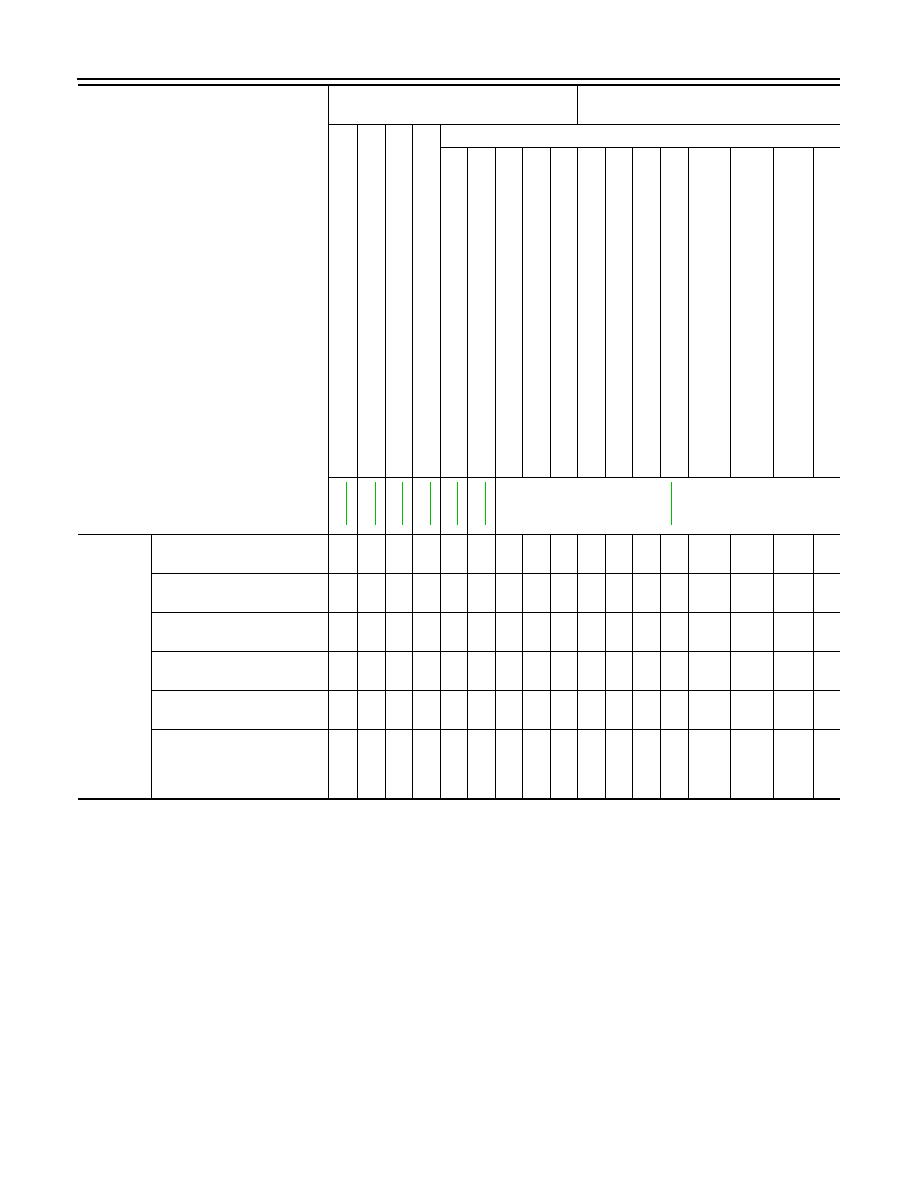
Symptom diagnosis chart 2-2
Symptom
Replace the transaxle assembly.
Oil pres-
sure con-
trol
Power transmission
V
al
ve bo
dy
, co
nt
rol
va
lve
Oil pu
mp
To
rqu
e
co
nv
ert
er
P
ull
ey
, st
ee
l b
elt
L
ow brak
e
Hi
gh
cl
utc
h
Rev
e
rs
e bra
ke
Be
ari
ngs
Co
un
ter ge
ar
P
lan
et
ary
ge
ar
Red
uc
tio
n ge
ar
F
ina
l gea
r, dif
fe
ren
tia
l g
ea
r
Pa
rki
ng me
ch
an
is
m
Shock vi-
bration
Noise
Shock at start is large in “D”,
“L”, or “R” position.
1
1
1
(In “D” or
“L”)
1
(In “R”)
2
2
2
2
Shock is large when the auxil-
iary gearbox is shifted from
1GR
→ 2GR.
1
1
1
Shock in lockup is large dur-
ing driving in “D” or “L” posi-
tion.
1
1
Shock is large when the lever
is shifted from “N”
→ “D” and
“N”
→ “R” positions.
1
1
(“N”
→
“D”)
1
(“N”
→
“D”)
Shock is large when the lever
is shifted from “D”
→ “L” posi-
tion.
1
1
1
Vibration occurs in “D”, “L”, or
“R” position during driving.
1
1
1
1
1
(In “D” or
“L”)
1
(In “D” or
“L”)
1
(In “R”)
1
1
1
1
1
Noise occurs during driving.
1
1
1
1
1
1
1
1
Noise occurs in idling.
1
1
1
1
1
1
Other
Starter operates in “D”, “L”, or
“R” position.
Starter does not operate in “P”
or “N” position.
Engine stall occurs in “D”, “L”,
or “R” position during stop.
1
1
Engine stall occurs in “P” or
“N” position during stop.
Parking lock does not operate
in “P” position.
1
Parking lock cannot be can-
celled when the selector lever
is shifted from “P” position to
other position.
1
TM-250
< PERIODIC MAINTENANCE >
[CVT: RE0F11A]
CVT FLUID
PERIODIC MAINTENANCE
CVT FLUID
Inspection
INFOID:0000000009759496
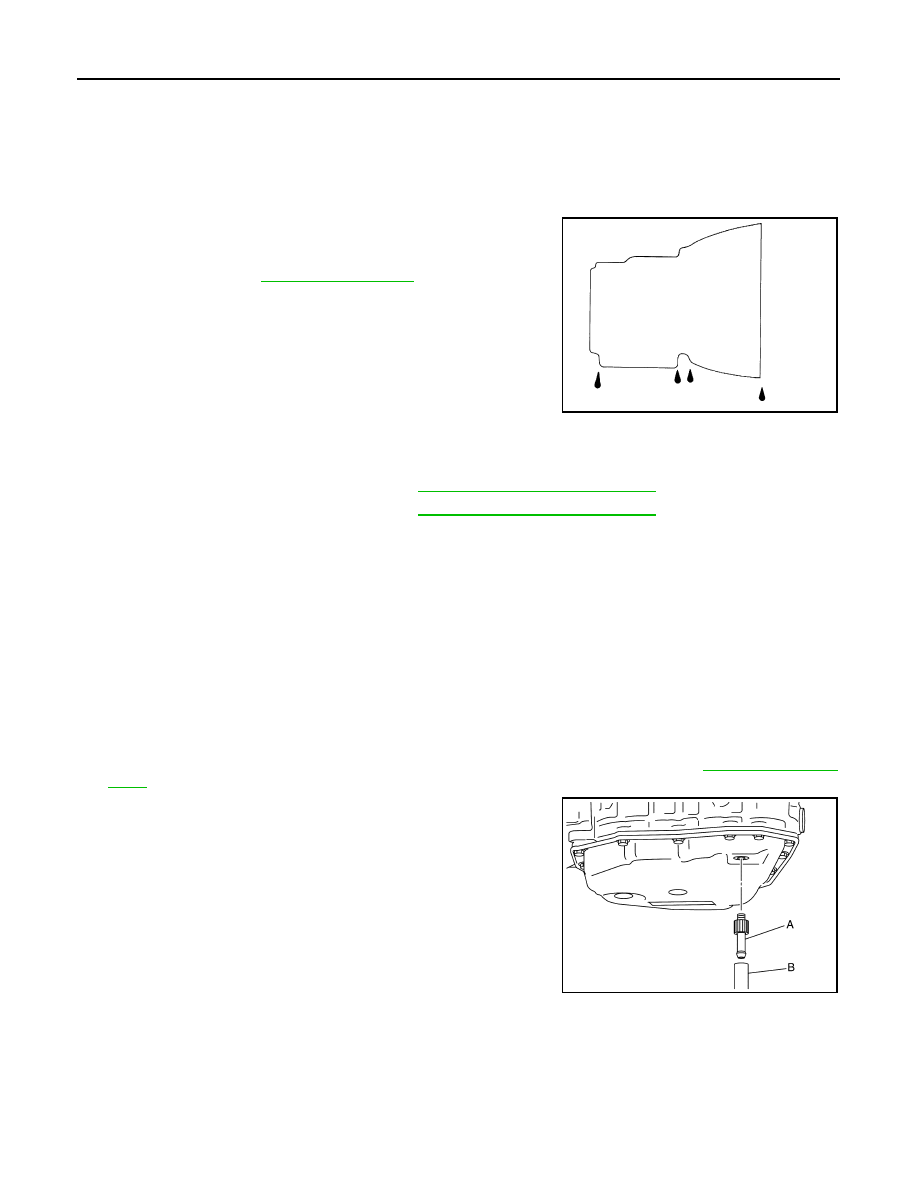
FLUID LEAKAGE
• Check transaxle surrounding area (oil seal and plug etc.) for fluid
leakage.
• If anything is found, repair or replace damaged parts and adjust
CVT fluid level. Refer to
Replacement
INFOID:0000000009759497
CAUTION:
• Use only Genuine NISSAN CVT Fluid NS-3. Using transmission fluid other than Genuine NISSAN
CVT Fluid NS-3 will damage the CVT, which is not covered by the (NISSAN new vehicle limited) war-
ranty.
• Always use shop paper. Never use shop cloth.
• Replace a drain plug gasket with new ones at the final stage of the operation when installing.
• Use caution when looking into the drain hole as there is a risk of dripping fluid entering the eye.
• After replacement, always perform CVT fluid leakage check.
1. Select “Data Monitor” in “TRANSMISSION” using CONSULT.
2. Select “FLUID TEMP” and confirm that the CVT fluid temperature is 40
°C (104°F) or less.
3. Check that the selector lever is in the “P” position, then completely engage the parking brake.
4. Lift up the vehicle.
5. Remove the drain plug and overflow tube and drain the CVT fluid from the oil pan.
.
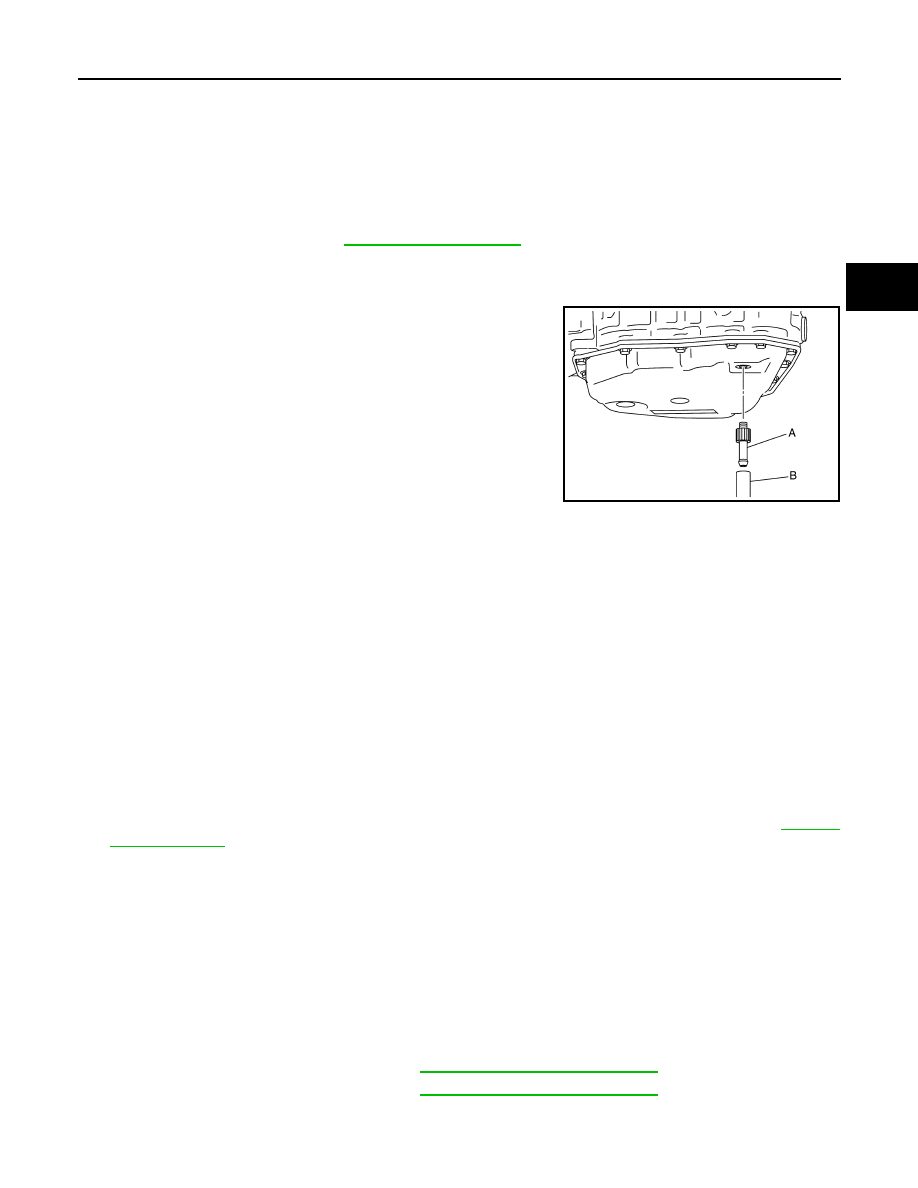
6. Install the charging pipe set (KV311039S0) (A) into the drain
hole.
CAUTION:
Tighten the charging pipe by hand.
7. Install the ATF changer hose (B) to the charging pipe.
CAUTION:
Press the ATF changer hose all the way onto the charging
pipe until it stops.
8. Fill approximately 3 liter (3-1/8 US qt, 2-5/8 lmp qt) of the CVT
fluid.
9. Remove the ATF changer hose and charging pipe, then install
the drain plug.
NOTE:
Perform this work quickly because CVT fluid leaks.
10. Lift down the vehicle.
11. Start the engine.
12. While depressing the brake pedal, shift the selector lever to the entire position from “P” to “L”, and shift it
to the “P” position.
SMA146B
CVT fluid
: Refer to
TM-288, "General Specification"
Fluid capacity
: Refer to
TM-288, "General Specification"
JSDIA1876ZZ
CVT FLUID
TM-251
< PERIODIC MAINTENANCE >
[CVT: RE0F11A]
C
E
F
G
H
I
J
K
L
M
A
B
TM
N
O
P
NOTE:
Hold the lever at each position for 5 seconds.
13. Check that the CONSULT “Data monitor” in “FLUID TEMP” is 35
°C (95°F) to 45°C (113°F).
14. Stop the engine.
15. Lift up the vehicle.
16. Remove the drain plug, and then drain CVT fluid from oil pan.
17. Repeat steps 6 to 16 (one time).
18. Install the overflow tube. Refer to
.
CAUTION:
Be sure to tighten to the specified torque. If it is not tightened to the specified torque, the tube may
be damaged.
19. Install the charging pipe set (KV311039S0) (A) into the drain
hole.
CAUTION:
Tighten the charging pipe by hand.
20. Install the ATF changer hose (B) to the charging pipe.
CAUTION:
Press the ATF changer hose all the way onto the charging
pipe until it stops.
21. Fill approximately 3 liter (3-1/8 US qt, 2-5/8 lmp qt) of the CVT
fluid.
22. Remove the ATF changer hose and charging pipe, then install
the drain plug.
NOTE:
Perform this work quickly because CVT fluid leaks.
23. Lift down the vehicle.
24. Start the engine.
25. While depressing the brake pedal, shift the selector lever to the entire position from “P” to “L”, and shift it
to the “P” position.
NOTE:
Hold the lever at each position for 5 seconds.
26. Check that the CONSULT “Data monitor” in “FLUID TEMP” is 35
°C (95°F) to 45°C (113°F).
27. Lift up the vehicle.
28. Remove the drain plug and confirm that the CVT fluid is drained from the overflow tube.
CAUTION:
Perform this work with the vehicle idling.
NOTE:
If the CVT fluid is not drained, refer to “Adjustment” and refill with the CVT fluid.
29. When the flow of CVT fluid slows to a drip, tighten the drain plug to the specified torque.
CAUTION:
Never reuse drain plug gasket.
30. Lift down the vehicle.
31. Select “Work Support” in “TRANSMISSION” using CONSULT.
32. Select “CONFORM CVTF DETERIORTN”.
33. Touch “Erase”.
34. Stop the engine.
Adjustment
INFOID:0000000009759498
CAUTION:
JSDIA1876ZZ
CVT fluid
: Refer to
TM-288, "General Specification"
Fluid capacity
: Refer to
Нет комментариевНе стесняйтесь поделиться с нами вашим ценным мнением.
Текст