Nissan Qashqai (2007-2010). Manual — part 1050
BACK DOOR OPENER SWITCH
DLK-279
< ON-VEHICLE REPAIR >
[WITH I-KEY, WITHOUT SUPER LOCK]
C
D
E
F
G
H
I
J
L
M
A
B
DLK
N
O
P
BACK DOOR OPENER SWITCH
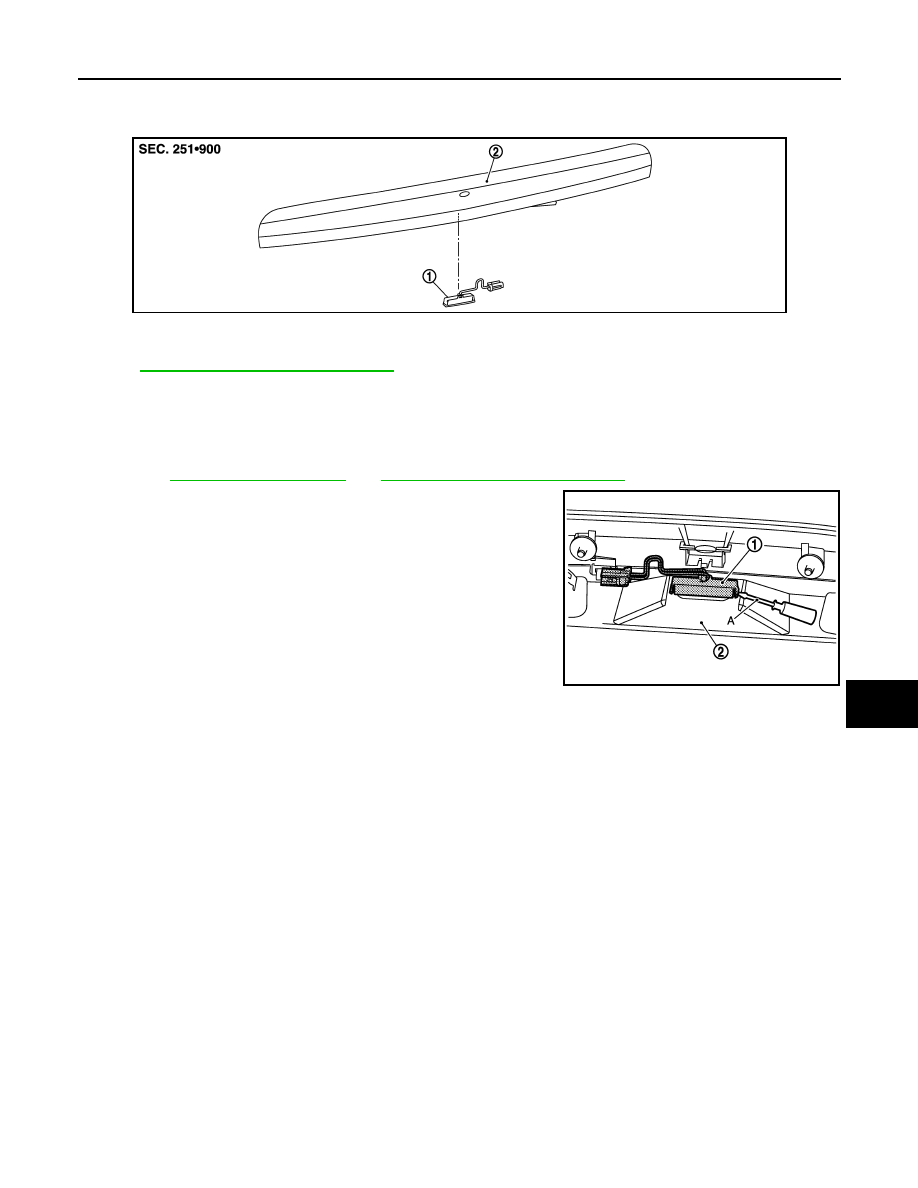
Exploded View
INFOID:0000000000939254
DLK-279, "Removal and Installation"
Removal and Installation
INFOID:0000000000939255
REMOVAL
1.
Remove the back door finisher.
Refer to
EXT-31, "Removal and Installation"
2.
Remove the back door opener switch (1) from back door finisher
(2) using flat-bladed screw driver (A) etc.
INSTALLATION
Install in the reverse order of removal.
JMKIA0516ZZ
1.
Back door opener switch
2.
Back door finisher
JMKIA0519ZZ

DLK-280
< ON-VEHICLE REPAIR >
[WITH I-KEY, WITHOUT SUPER LOCK]
DOOR LOCK AND UNLOCK SWITCH
DOOR LOCK AND UNLOCK SWITCH
Exploded View
INFOID:0000000001102429
DLK-280, "Removal and Installation"
Removal and Installation
INFOID:0000000001102430
REMOVAL
1.
Remove the center console switch panel. Refer to
and
.
2.
Remove the door lock and unlock switch (1) from center console
switch panel (2) using flat-bladed screwdriver (A), etc.
INSTALLATION
Install in the reverse order of removal.
JMKIA0523ZZ
1.
Door lock and unlock switch
2.
Center console switch panel
JMKIA0520ZZ

INTELLIGENT KEY BATTERY
DLK-281
< ON-VEHICLE REPAIR >
[WITH I-KEY, WITHOUT SUPER LOCK]
C
D
E
F
G
H
I
J
L
M
A
B
DLK
N
O
P
INTELLIGENT KEY BATTERY
Exploded View
INFOID:0000000001109238
DLK-281, "Removal and Installation"
Removal and Installation
INFOID:0000000001109237
REMOVAL
1.
Remove Intelligent Key cover.
2.
Insert a flat-bladed screwdriver (A) wrapped with tape as shown
in the illustration and then separate lower and upper cases by
twisting screwdriver.
CAUTION:
• Do not touch the circuit board or battery terminal.
• The Intelligent Key is water-resistant. However, if it does
get wet, immediately wipe it dry.
3.
Remove the circuit board assembly from the upper case (1).
[Substrate assembly: circuit board (3) + rubber (2)]
4.
Gently press the rubber (2) and remove the circuit board (3).
CAUTION:
Do not touch the printed circuits directly.
5.
Remove the battery (4) from the lower case (5) and replace it.
CAUTION:
When replacing battery, keep dirt, grease, and other foreign
materials off the electrode contact area.
6.
After replacement, assemble the upper and lower cases by
engaging the hooks on their circumference while being careful
not to pinch the rubber, etc.
CAUTION:
After replacing the battery, check that all Intelligent Key
functions work normally.
Refer to
DLK-134, "Component Function Check"
INSTALLATION
Install in the reverse order of removal.
MIIB0661E
Battery replacement
: Coin-type lithium battery
(CR2032)
MIIB0662E
DLK-282
< ON-VEHICLE REPAIR >
[WITH I-KEY, WITHOUT SUPER LOCK]
INTELLIGENT KEY UNIT
INTELLIGENT KEY UNIT
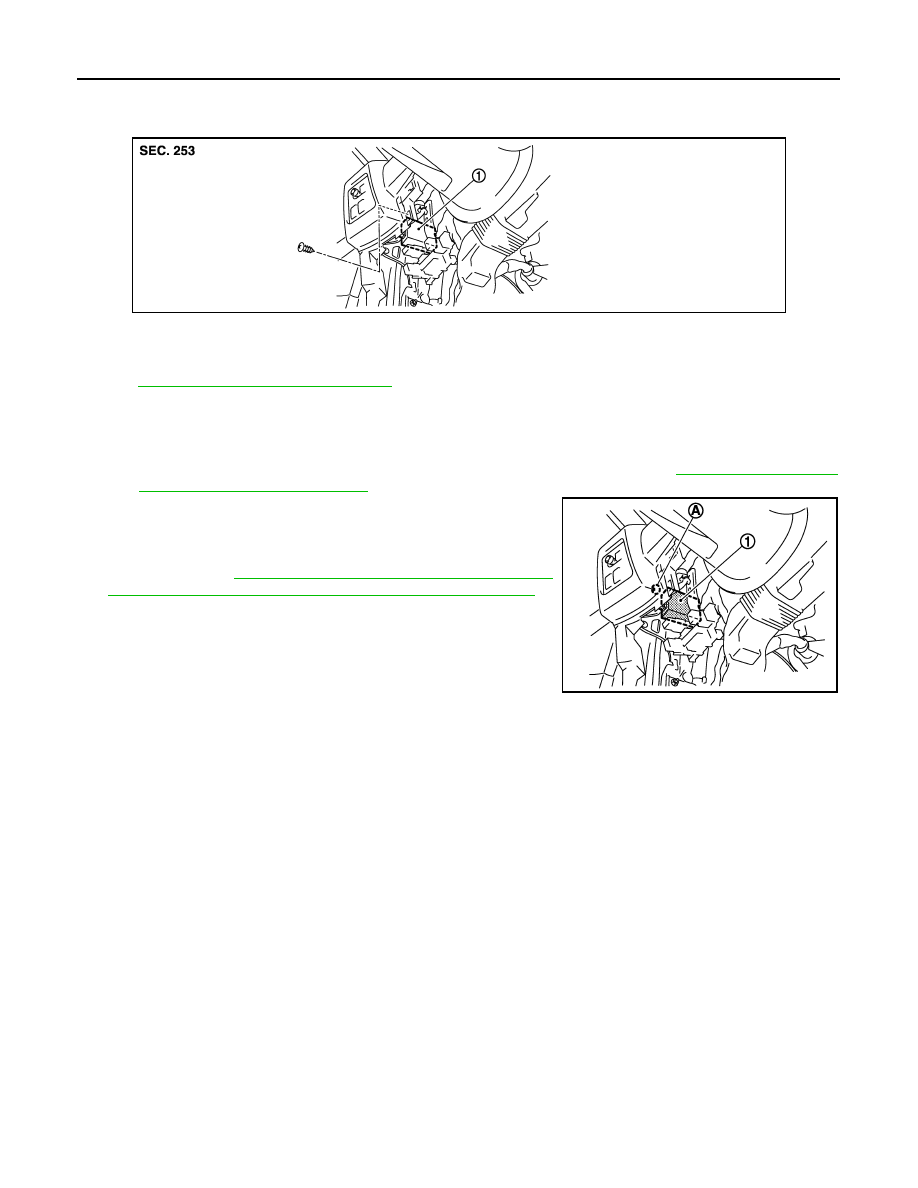
Exploded View
INFOID:0000000001116299
DLK-282, "Removal and Installation"
Removal and Installation
INFOID:0000000001116300
REMOVAL
1.
Remove lower instrument panel (driver side) and mirror switch finisher. Refer to
and
IP-12, "Removal and Installation"
2.
Remove the Intelligent Key unit mounting screw (A), and then
remove Intelligent Key unit (1).
NOTE:
Perform the system initialization when replacing Intelligent Key
unit. Refer to
DLK-23, "ADDITIONAL SERVICE WHEN
REPLACING CONTROL UNIT : Special Repair Requirement"
INSTALLATION
Install in the reverse order of removal.
JMKIA0536ZZ
1.
Intelligent Key unit
M40
JMKIA0537ZZ
Нет комментариевНе стесняйтесь поделиться с нами вашим ценным мнением.
Текст