Nissan Qashqai (2007-2010). Manual — part 2001
ENGINE MAINTENANCE (K9K)
MA-43
< ON-VEHICLE MAINTENANCE >
C
D
E
F
G
H
I
J
K
L
M
B
MA
N
O
A
2.
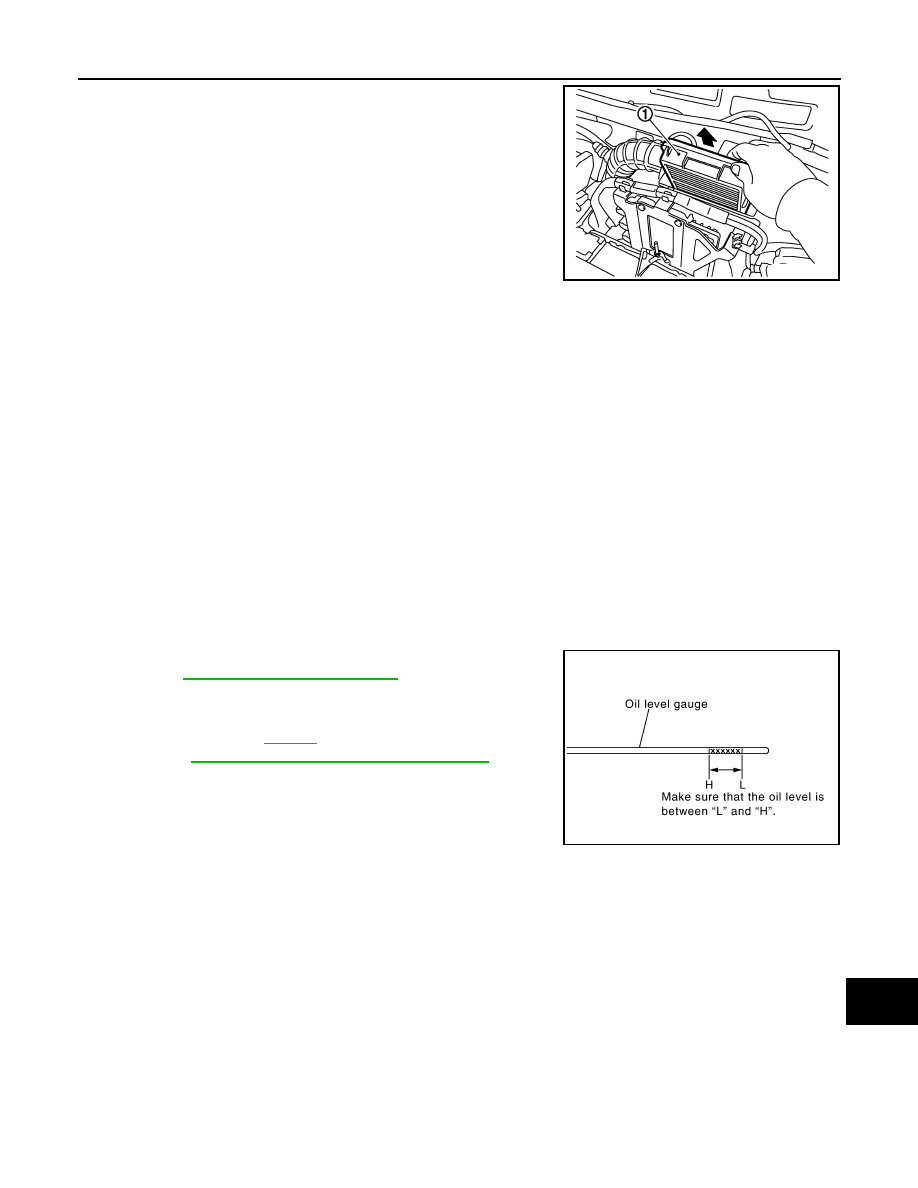
Remove air cleaner filter (1).
INSTALLATION
Install in the reverse order of removal.
ENGINE OIL
ENGINE OIL : Draining
INFOID:0000000001095685
WARNING:
• Be careful not to burn yourself, as the engine oil is hot.
• Prolonged and repeated contact with used engine oil may cause skin cancer: try to avoid direct skin
contact with used oil. If skin contact is made, wash thoroughly with soap or hand cleaner as soon as
possible.
1.
Put vehicle horizontally.
2.
Warm up engine, and check for oil leakage from engine components.
3.
Stop engine and wait for 10 minutes.
4.
Loosen oil filler cap.
5.
Remove drain plug and then drain engine oil.
ENGINE OIL : Refilling
INFOID:0000000001095686
1.
Refill with new engine oil.
• Refer to
MA-21, "Fluids and Lubricants"
• The refill capacity depends on the oil temperature and drain time.
Use these specifications for reference only.
Always use the dipstick to the determine when the proper amount
of oil is in the engine.
CAUTION:
• Be sure to clean drain plug and install with new washer.
• The refill capacity depends on the oil temperature and drain time. Use these specifications for ref-
erence only.
Always use the dipstick to the determine when the proper amount of oil is in the engine.
2.
Warm up engine and check area around drain plug and oil filter for oil leakage.
3.
Stop engine and wait for 10 minutes.
4.
Check oil level.
OIL FILTER
OIL FILTER : Replacement
INFOID:0000000001095718
E1BIA0037ZZ
Oil capacity (Approximate)
: Refer to
"Periodical Maintenance Specification"
.
MBIB0548E
MA-44
< ON-VEHICLE MAINTENANCE >
ENGINE MAINTENANCE (K9K)
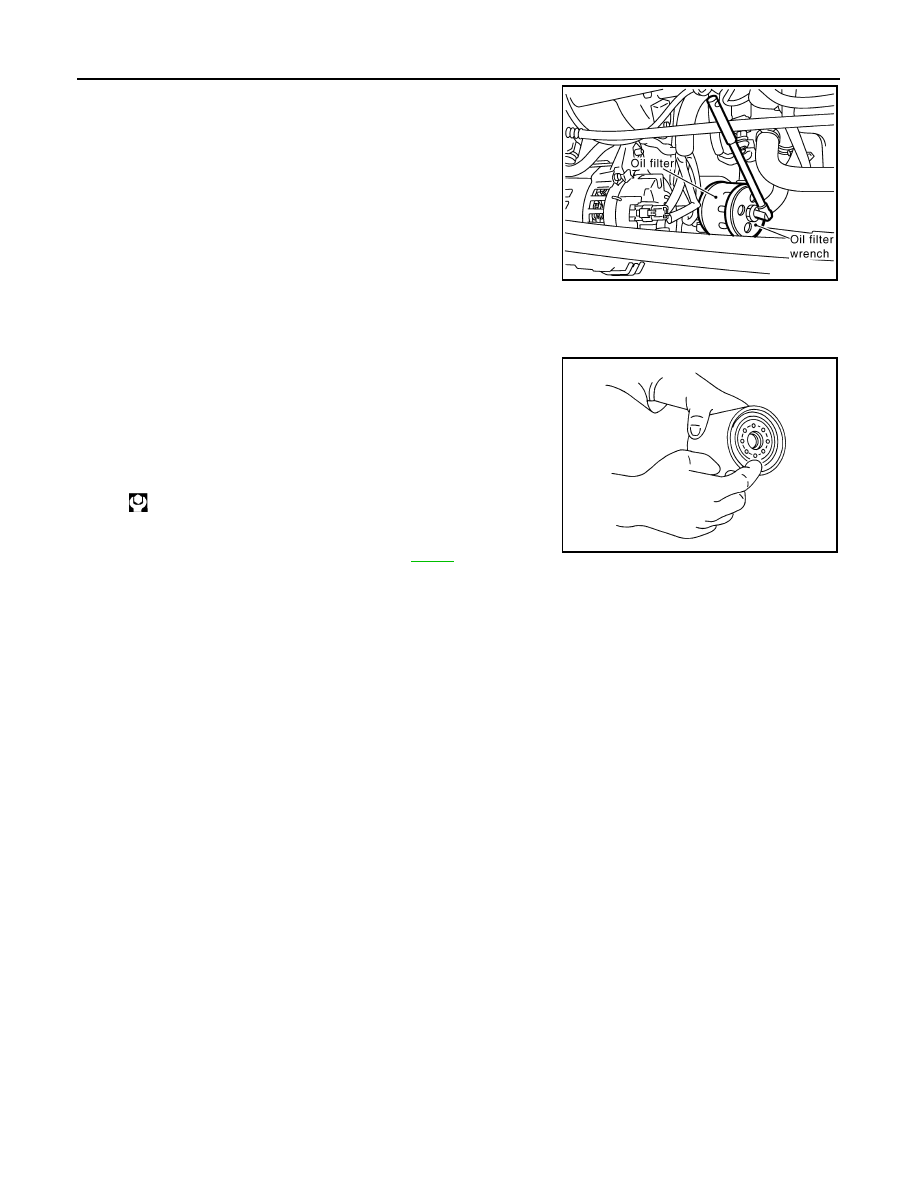
1.
Using an oil filter wrench [SST: KV113C0010 (Mot. 1329)],
remove oil filter.
CAUTION:
• Be careful not to get burned when the engine and engine
oil are hot.
• When removing, prepare a shop cloth to absorb any oil
leakage or spillage.
• Do not allow engine oil to adhere to the drive belts.
• Completely wipe off any oil that adhere to the engine and
the vehicle.
2.
Remove foreign materials adhering to the oil filter installation
surface.
3.
Install oil filter bracket to oil cooler.
CAUTION:
Install oil filter bracket, positioning lug in the hole of oil cooler.
4.
Apply engine oil to the oil seal contact surface of the new oil fil-
ter.
5.
Install the oil filter until it comes into contact with the oil seal on
the engine bracket.
6.
Using an oil filter wrench [SST: KV113C0010 (Mot. 1329)],
tighten oil filter.
7.
After warming up the engine, check for engine oil leakage.
8.
Check oil level and add engine oil. Refer to
: 14 N·m (1.4 kg-m, 10 ft-lb)
MBIB0551E
SMA010
CHASSIS MAINTENANCE
MA-45
< ON-VEHICLE MAINTENANCE >
C
D
E
F
G
H
I
J
K
L
M
B
MA
N
O
A
CHASSIS MAINTENANCE
HEADLAMP AIMING ADJUSTMENT (XENON TYPE - LHD)
HEADLAMP AIMING ADJUSTMENT (XENON TYPE - LHD) : Description
INFOID:0000000001116100
PREPARATION BEFORE ADJUSTING
NOTE:
• For details, refer to the regulations in your own country.
• Perform aiming if the vehicle front body has been repaired and/or the headlamp assembly has been
replaced.
Before performing aiming adjustment, check the following.
• Adjust the tire pressure to the specification.
• Fill with fuel, engine coolant and each oil.
• Maintain the unloaded vehicle condition. (Remove luggage from the passenger compartment and the lug-
gage room.)
NOTE:
Do not remove the temporary tire, jack and on-vehicle tool.
• Wipe out dirt on the headlamp.
CAUTION:
Never use organic solvent (thinner, gasoline etc.)
• Ride alone on the driver seat.
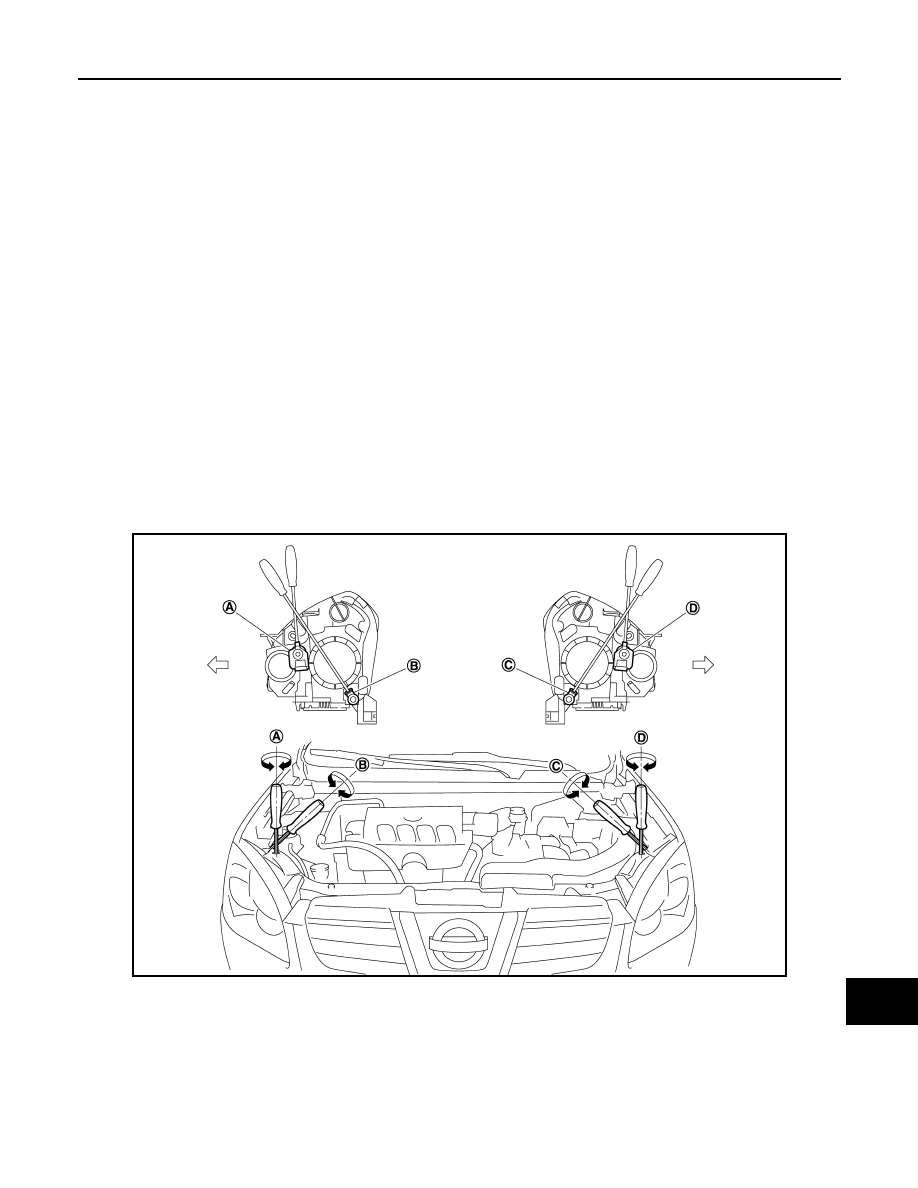
AIMING ADJUSTMENT SCREW
JPLIA0250ZZ
A.
Headlamp RH (UP/DOWN) adjust-
ment screw
B.
Headlamp RH (INSIDE/OUTSIDE)
adjustment screw
C.
Headlamp LH (INSIDE/OUTSIDE)
adjustment screw
D.
Headlamp LH (UP/DOWN) adjust-
ment screw
: Vehicle center
MA-46
< ON-VEHICLE MAINTENANCE >
CHASSIS MAINTENANCE
HEADLAMP AIMING ADJUSTMENT (XENON TYPE - LHD) : Aiming Adjustment Pro-
cedure
INFOID:0000000001116101
1.
Place the screen.
NOTE:
• Stop the vehicle at the perpendicular angle to the wall.
• Set the screen perpendicularly to the ground.
2.
Face the vehicle squarely toward the screen and make the distance between the headlamp center and
the screen 10 m (32.8 ft).
3.
Start the engine and illuminate the headlamp (LO).
NOTE:
Block light from the headlamp that is not being adjusted with a thick fabric or another object, so that it
does not reach the adjustment screen.
CAUTION:
Never cover lens surface with tape, etc. because it is made from plastic.
4.
Use the aiming adjustment screw to adjust the elbow point projected by the low beams on the screen, so
that it is within the aiming adjustment area.
Low beam distribution on the screen
Unit: mm (in)
Adjustment screw
Screw driver rotation
Facing direction
A
Headlamp RH (UP/DOWN)
Clockwise
UP
Counterclockwise
DOWN
B
Headlamp RH (INSIDE/OUTSIDE)
Clockwise
INSIDE
Counterclockwise
OUTSIDE
C
Headlamp LH (INSIDE/OUTSIDE)
Clockwise
INSIDE
Counterclockwise
OUTSIDE
D
Headlamp LH (UP/DOWN)
Clockwise
UP
Counterclockwise
DOWN
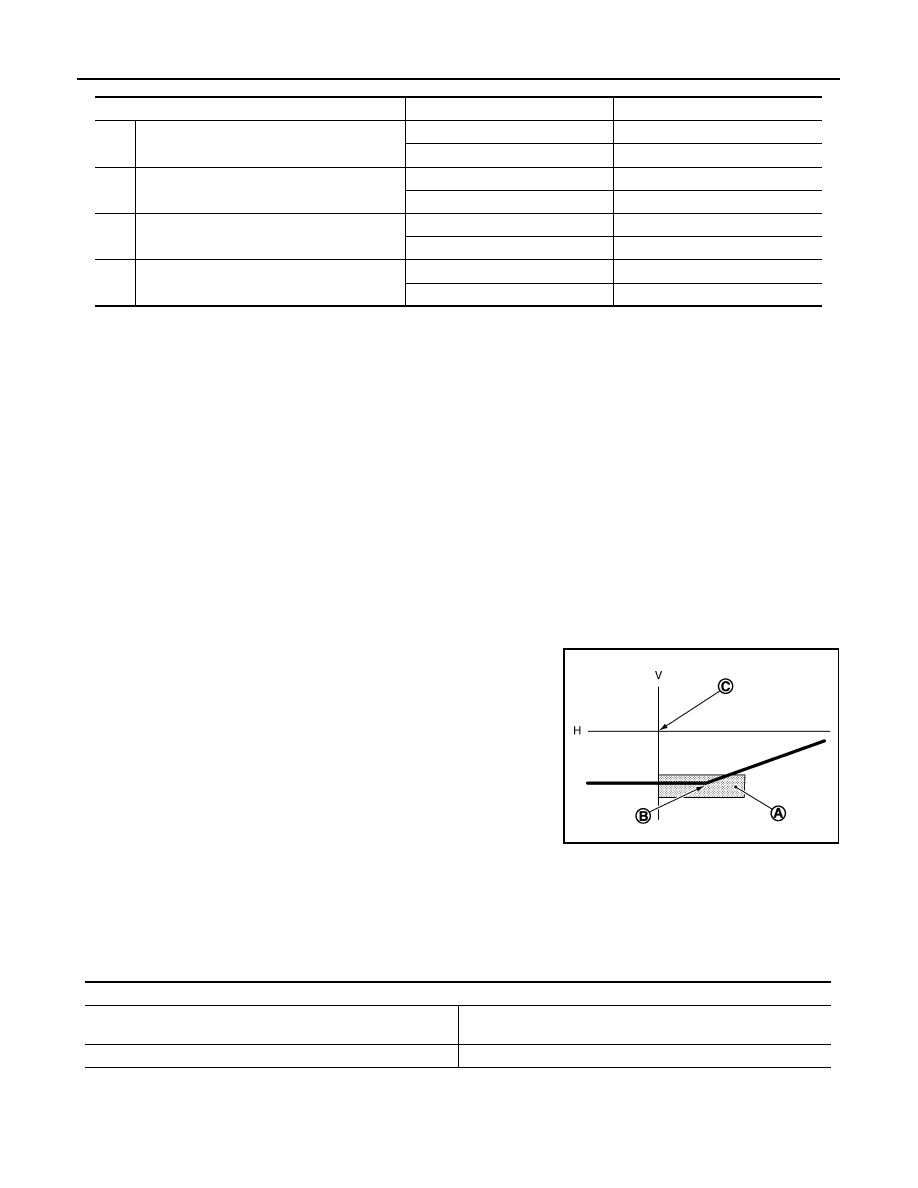
JSLIA0030ZZ
A.
Aiming adjustment area
B.
Elbow point
C.
Headlamp center
H.
Horizontal center line of headlamp
V.
Vertical center line of headlamp
Aiming adjustment area
Vertical direction (Y)
(Lower side from headlamp center height)
Lateral direction (X)
(Right side from headlamp centerline)
100 – 124 (3.94 – 4.88)
Within 120 (4.72)
Нет комментариевНе стесняйтесь поделиться с нами вашим ценным мнением.
Текст