Nissan Qashqai (2007-2010). Manual — part 1996
RECOMMENDED FLUIDS AND LUBRICANTS
MA-23
< ON-VEHICLE MAINTENANCE >
C
D
E
F
G
H
I
J
K
L
M
B
MA
N
O
A
The engine cooling system is filled at the factory with a high-quality,
year-round and extended life engine coolant. The high quality engine
coolant contains the specific solutions effective for the anti-corrosion
and the anti-freeze function. Therefore, additional cooling system
additives are not necessary.
CAUTION:
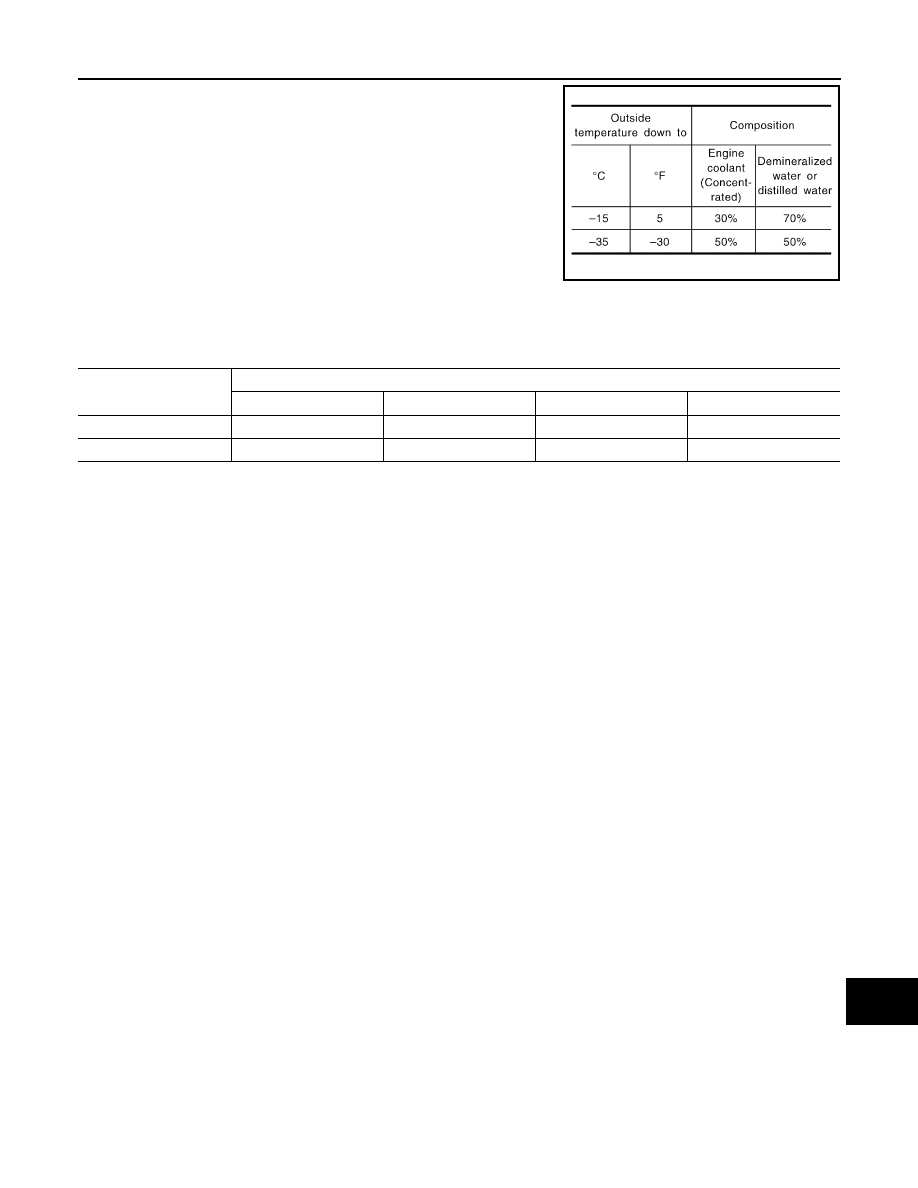
• When adding or replacing coolant, be sure to use only Genu-
ine NISSAN Engine Coolant or equivalent in its quality. Genu-
ine NISSAN Engine Coolant is premixed (mixture ratio 50%)
type coolant.
The use of other types of engine coolant may damage your
cooling system.
• When checking the engine coolant mixture ratio by the coolant hydrometer, use the chart below to correct
your hydrometer reading (specific gravity) according to coolant temperature.
Mixed coolant specific gravity
Unit: specific gravity
WARNING:
Never remove the radiator cap when the engine is hot. Serious burns could be caused by high pres-
sure fluid escaping from the radiator. Wait until the engine and radiator cool down.
SMA089D
Engine coolant mixture
ratio
Coolant temperature
°
C (
°
F)
15 (59)
25 (77)
35 (95)
45 (113)
30%
1.046 - 1.050
1.042 - 1.046
1.038 - 1.042
1.033 - 1.038
50%
1.076 - 1.080
1.070 - 1.076
1.065 - 1.071
1.059 - 1.065

MA-24
< ON-VEHICLE MAINTENANCE >
ENGINE MAINTENANCE (HR16DE)
ENGINE MAINTENANCE (HR16DE)
DRIVE BELTS
DRIVE BELTS : Checking
INFOID:0000000001095237
• Inspection should be done only when engine is cold or over 30
minutes after the engine is stopped.
• Visually check belts for wear, damage, and cracks on inside and
edges.
• Turn crankshaft pulley two time clockwise, and make sure tension on all pulleys is equal before doing the
test.
• When measuring deflection, apply 98 N (10 kg, 22 lb) at the ( ) marked point.
• Measure the belt tension and frequency with acoustic tension gauge (commercial service tool) at the ( )
marked point.
CAUTION:
• When the tension and frequency are measured, the acoustic tension gauge should be used.
• When checking immediately after installation, first adjust it to the specified value. Then, after turning
crankshaft two turns or more, re-adjust to the specified value to avoid variation in deflection
between pulleys.
DRIVE BELTS : Tension Adjustment
INFOID:0000000001095238
CAUTION:
• When belt is replaced with new one, adjust belt tension to the value for “New belt”, because new belt
will not fully seat in the pulley groove.
• When tension of the belt being used exceeds “Limit”, adjust it to the value for “After adjusted”.
• When installing a belt, make sure it is correctly engaged with the pulley groove.
• Never allow oil or engine coolant to get on the belt.
• Never twist or bend the belt strongly.
1.
Remove front fender protector (RH). Refer to
2.
Loosen the idler pulley lock nut (A) from the tightening position
with the specified torque by 45 degrees.
1
: Alternator
2
: Water pump
3
: Crankshaft pulley
4
: A/C compressor (with A/C models)
: Idler pulley (without A/C models)
5
: Idler pulley
6
: Drive belt
Belt Deflection / Belt Tension and Frequency:
Refer to
.
PBIC3642E
Location
Location of adjuster and tightening method
Drive belt
Adjusting bolt on idler pulley
1
: Alternator
2
: Water pump
3
: Crankshaft pulley
4
: A/C compressor (with A/C models)
: Idler pulley (without A/C models)
5
: Idler pulley
6
: Drive belt
B
: Adjusting bolt
PBIC3643E

ENGINE MAINTENANCE (HR16DE)
MA-25
< ON-VEHICLE MAINTENANCE >
C
D
E
F
G
H
I
J
K
L
M
B
MA
N
O
A
CAUTION:
• When the lock nut is loosened excessively, the idler pulley tilts and the correct tension adjust-
ment cannot be performed. Never loosen it excessively (more than 45 degrees).
• Put a matching mark on the lock nut, and check turning angle with a protractor. Never visually
check the tightening angle.
3.
Adjust the belt tension by turning the adjusting bolt.
CAUTION:
• When checking immediately after installation, first adjust it to the specified value. Then, after
turning crankshaft two turns or more, re-adjust to the specified value to avoid variation in deflec-
tion between pulleys.
• When the tension adjustment is performed, the lock nut should be in the condition at step“2”. If
the tension adjustment is performed when the lock nut is loosened more than the standard, the
idler pulley tilts and the correct tension adjustment cannot be performed.
4.
Tighten the lock nut.
ENGINE COOLANT
ENGINE COOLANT : Inspection
INFOID:0000000001095240
LEVEL
• Check if the reservoir tank engine coolant level is within the “MIN”
to “MAX” when the engine is cool.
• Adjust the engine coolant level as necessary.
• Check that the reservoir tank cap is tightened.
WARNING:
Never remove reservoir tank cap when engine is hot. Serious
burns could occur from high-pressure engine coolant escaping
from reservoir tank.
LEAKAGE
• To check for leakage, fit the adapter to the reservoir tank, and then
connect it to the reservoir tank cap tester [SST: — (M.S.554-07)]
(A) as shown.
WARNING:
Never remove reservoir tank cap when engine is hot. Serious
burns could occur from high-pressure engine coolant escap-
ing from reservoir tank.
CAUTION:
Higher test pressure than specified may cause radiator dam-
age.
• If anything is found, repair or replace damaged parts.
ENGINE COOLANT : Draining
INFOID:0000000001095241
WARNING:
• Never remove reservoir tank cap when engine is hot. Serious burns could occur from high-pressure
engine coolant escaping from reservoir tank.
• Wrap a thick cloth around the reservoir tank cap. Slowly turn it a quarter of a turn to release built-up
pressure. Then turn it all the way.
1.
Disconnect radiator hose (lower) and reservoir tank cap.
When draining all of engine coolant in the system, open water drain plugs on cylinder block. Refer
to
: 34.8 N·m (3.5 kg-m, 26 ft-lb)
JPBIA0306ZZ
Testing pressure: Refer to
JPBIA0404ZZ

MA-26
< ON-VEHICLE MAINTENANCE >
ENGINE MAINTENANCE (HR16DE)
CAUTION:
• Perform this step when engine is cold.
• Never spill engine coolant on drive belt.
2.
Remove reservoir tank if necessary, and drain engine coolant and clean reservoir tank before installing.
Refer to
3.
Check drained engine coolant for contaminants such as rust, corrosion or discoloration. If contaminated,
flush the engine cooling system. Refer to
MA-27, "RADIATOR : Inspection"
.
ENGINE COOLANT : Refilling
INFOID:0000000001095242
1.
Install reservoir tank if removed.
2.
Connect radiator hose (lower).
• If water drain plugs on cylinder block are removed, close and tighten them. Refer to
.
3.
Make sure that each hose clamp has been firmly tightened.
4.
Disconnect heater hose (1) at position (
) in the figure.
• Enhance heater hose as high as possible, keeping heater
hose end above reservoir tank MAX level.
5.
Fill reservoir tank to specified level.
• Pour coolant slowly of less than 2 (1-3/4 lmp qt) a minute
to allow air in system to escape.
• When coolant from heater unit starts to drain, connect
heater hose and continue to fill up to reservoir tank MAX
level.
• Start engine without closing reservoir tank cap.
• Keep engine racing at 1,500 rpm for about 2-3 minutes,
filling reservoir tank up to MAX. Level, if necessary.
• Use Genuine Nissan Engine Coolant or equivalent mixed
with water (distilled or demineralized). Refer to
.
6.
Install reservoir tank cap.
7.
Warm up engine until opening thermostat. Standard for warming-up time is approximately 10 minutes at
2,000 - 2,500 rpm.
• Make sure thermostat opening condition by touching radiator hose (lower) to see a flow of warm water.
CAUTION:
Watch water temperature gauge so as not to overheat engine.
8.
Stop the engine and cool down to less than approximately 50
°
C (122
°
F).
• Cool down using fan to reduce the time.
9.
Refill reservoir tank to “MAX” level line with engine coolant, if necessary.
: Vehicle front
PBIC3802E
Engine coolant capacity
(With reservoir tank at “MAX” level)
Refer to
CO-23, "Periodical Maintenance Specification"
.
Reservoir tank engine coolant capacity
(At “MAX” level)
Refer to:
CO-23, "Periodical Maintenance Specification"
JPBIA0306ZZ
Нет комментариевНе стесняйтесь поделиться с нами вашим ценным мнением.
Текст