Nissan Qashqai (2007-2010). Manual — part 44
EM-124
< SERVICE DATA AND SPECIFICATIONS (SDS)
[HR16DE]
SERVICE DATA AND SPECIFICATIONS (SDS)
UNDERSIZE TABLE
Unit: mm (in)
CONNECTING ROD BEARING OIL CLEARANCE
Unit: mm (in)
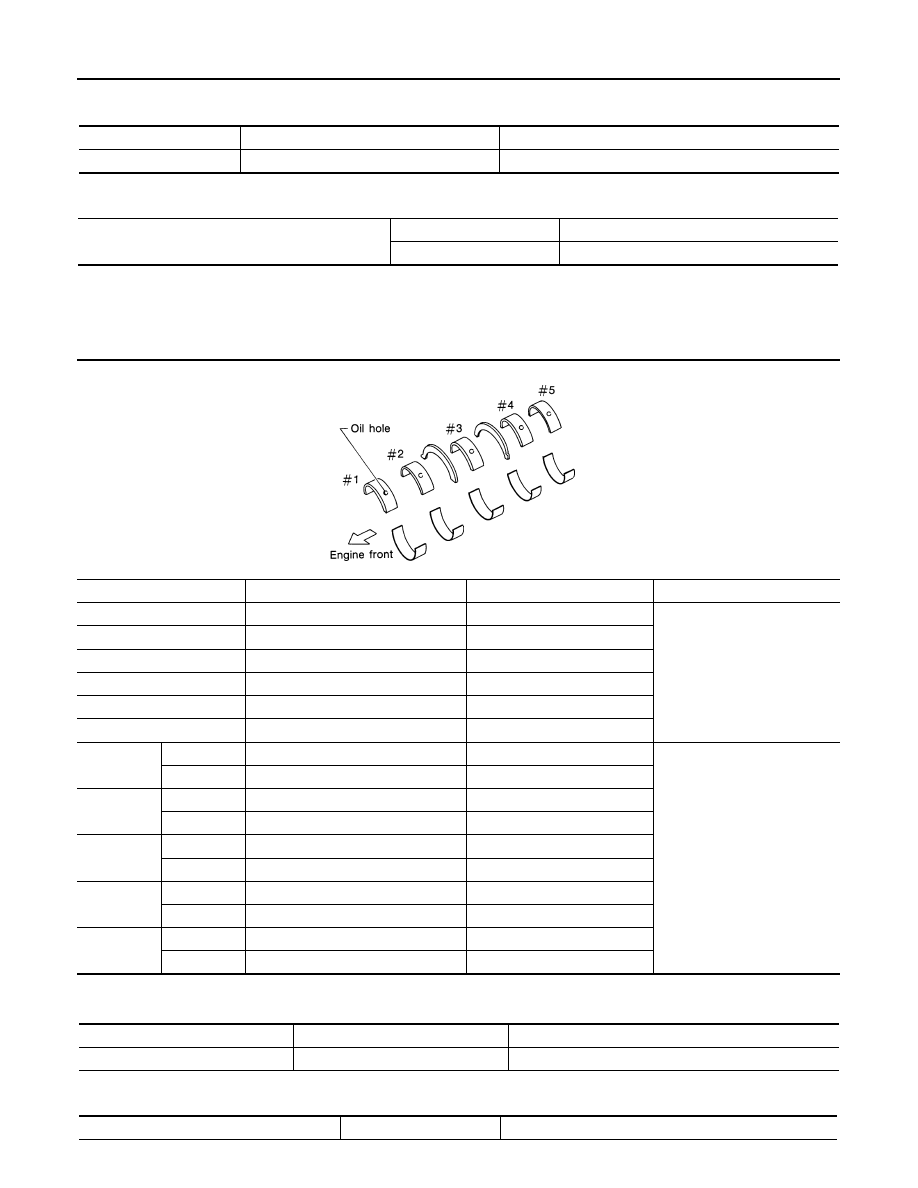
Main Bearing
INFOID:0000000000893905
MAIN BEARING GRADE TABLE
Unit: mm (in)
UNDERSIZE TABLE
Unit: mm (in)
MAIN BEARING OIL CLEARANCE
Unit: mm (in)
Item
Thickness
Crankshaft pin journal diameter
US 0.25 (0.0098)
1.627 - 1.635 (0.0641 - 0.0644)
Grind so that bearing clearance is the specified value.
Connecting rod bearing oil clearance
Standard
0.029 - 0.039 (0.0011 - 0.0015)
Limit
0.10 (0.0039)
Grade number
Thickness
Identification color
Remarks
0
1.996 - 1.999 (0.0786 - 0.0787)
Black
Grade and color are the same
for upper and lower bearings.
1
1.999 - 2.002 (0.0787 - 0.0788)
Brown
2
2.002 - 2.005 (0.0788 - 0.0789)
Green
3
2.005 - 2.008 (0.0789 - 0.0791)
Yellow
4
2.008 - 2.011 (0.0791 - 0.0792)
Blue
5
2.011 - 2.014 (0.0792 - 0.0793)
Pink
01
UPR
1.996 - 1.999 (0.0786 - 0.0787)
Black
Grade and color are different
for upper and lower bearings.
LWR
1.999 - 2.002 (0.0787 - 0.0788)
Brown
12
UPR
1.999 - 2.002 (0.0787 - 0.0788)
Brown
LWR
2.002 - 2.005 (0.0788 - 0.0789)
Green
23
UPR
2.002 - 2.005 (0.0788 - 0.0789)
Green
LWR
2.005 - 2.008 (0.0789 - 0.0791)
Yellow
34
UPR
2.005 - 2.008 (0.0789 - 0.0791)
Yellow
LWR
2.008 - 2.011 (0.0791 - 0.0792)
Blue
45
UPR
2.008 - 2.011 (0.0791 - 0.0792)
Blue
LWR
2.011 - 2.014 (0.0792 - 0.0793)
Pink
SEM685D
Items
Thickness
Main journal diameter
0.25 (0.0098)
2.126 - 2.134 (0.0837 - 0.0840)
Grind so that bearing clearance is the specified value.
Main bearing oil clearance
Standard
0.024 - 0.034 (0.0009 - 0.0013)
NOISE, VIBRATION AND HARSHNESS (NVH) TROUBLESHOOTING
EM-125
< SYMPTOM DIAGNOSIS >
[MR20DE]
C
D
E
F
G
H
I
J
K
L
M
A
EM
N
P
O
SYMPTOM DIAGNOSIS
NOISE, VIBRATION AND HARSHNESS (NVH) TROUBLESHOOTING
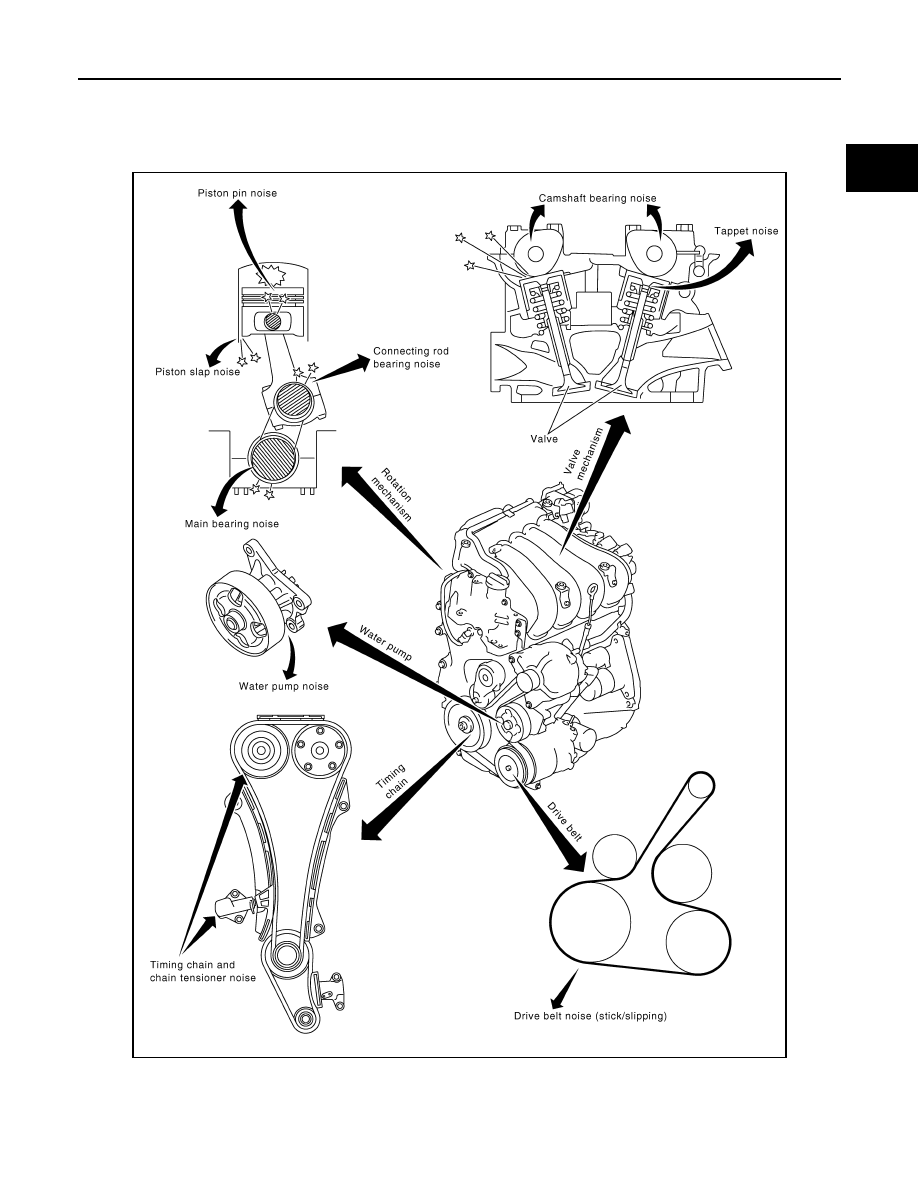
NVH troubleshooting Chart
INFOID:0000000000893919
1.
Locate the area where noise occurs.
2.
Confirm the type of noise.
3.
Specify the operating condition of engine.
4.
Check specified noise source.
PBIC3932E
EM-126
< SYMPTOM DIAGNOSIS >
[MR20DE]
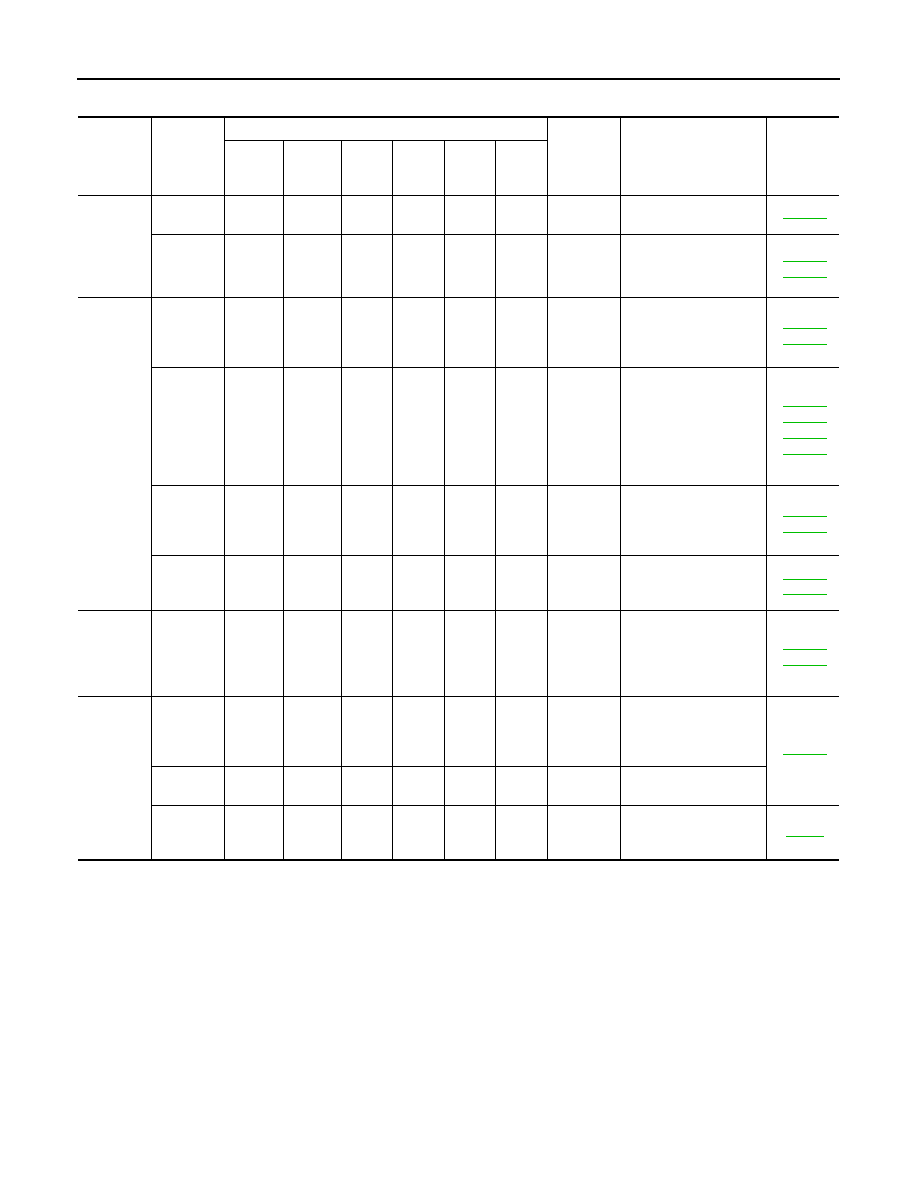
NOISE, VIBRATION AND HARSHNESS (NVH) TROUBLESHOOTING
If necessary, repair or replace these parts.
A: Closely related
B: Related
C: Sometimes related
—: Not related
Location
of noise
Type of
noise
Operating condition of engine
Source of
noise
Check item
Refer-
ence page
Before
warm-
up
After
warm-
up
When
start-
ing
When
idling
When
racing
While
driving
Top of en-
gine
Rocker
cover
Cylinder
head
Ticking or
clicking
C
A
—
A
B
—
Tappet
noise
Valve clearance
Rattle
C
A
—
A
B
C
Camshaft
bearing
noise
Camshaft journal oil
clearance
Camshaft runout
Crank-
shaft pul-
ley
Cylinder
block
(Side of
engine)
Oil pan
Slap or
knock
—
A
—
B
B
—
Piston pin
noise
Piston to piston pin oil
clearance
Connecting rod bushing
oil clearance
Slap or
rap
A
—
—
B
B
A
Piston
slap noise
Piston to cylinder bore
clearance
Piston ring side clear-
ance
Piston ring end gap
Connecting rod bend
and torsion
Knock
A
B
C
B
B
B
Connect-
ing rod
bearing
noise
Connecting rod bushing
oil clearance
Connecting rod bearing
oil clearance
Knock
A
B
—
A
B
C
Main bear-
ing noise
Main bearing oil clear-
ance
Crankshaft runout
Front of
engine
Front cov-
er
Tapping or
ticking
A
A
—
B
B
B
Timing
chain and
chain ten-
sioner
noise
Timing chain cracks
and wear
Timing chain tensioner
operation
Front of
engine
Squeak-
ing or fizz-
ing
A
B
—
B
—
C
Drive belt
(Sticking
or slip-
ping)
Drive belt deflection
Creaking
A
B
A
B
A
B
Drive belt
(Slipping)
Idler pulley bearing op-
eration
Squall
Creak
A
B
—
B
A
B
Water
pump
noise
Water pump operation

PRECAUTIONS
EM-127
< PRECAUTION >
[MR20DE]
C
D
E
F
G
H
I
J
K
L
M
A
EM
N
P
O
PRECAUTION
PRECAUTIONS
Precaution for Procedure without Cowl Top Cover
INFOID:0000000001117288
When performing the procedure after removing cowl top cover, cover
the lower end of windshield with urethane, etc.
Precaution Necessary for Steering Wheel Rotation After Battery Disconnect
INFOID:0000000001117287
NOTE:
• This Procedure is applied only to models with Intelligent Key system and NATS (NISSAN ANTI-THEFT SYS-
TEM).
• Remove and install all control units after disconnecting both battery cables with the ignition knob in the
″
LOCK
″
position.
• Always use CONSULT-III to perform self-diagnosis as a part of each function inspection after finishing work.
If DTC is detected, perform trouble diagnosis according to self-diagnostic results.
For models equipped with the Intelligent Key system and NATS, an electrically controlled steering lock mech-
anism is adopted on the key cylinder.
For this reason, if the battery is disconnected or if the battery is discharged, the steering wheel will lock and
steering wheel rotation will become impossible.
If steering wheel rotation is required when battery power is interrupted, follow the procedure below before
starting the repair operation.
OPERATION PROCEDURE
1.
Connect both battery cables.
NOTE:
Supply power using jumper cables if battery is discharged.
2.
Use the Intelligent Key or mechanical key to turn the ignition switch to the
″
ACC
″
position. At this time, the
steering lock will be released.
3.
Disconnect both battery cables. The steering lock will remain released and the steering wheel can be
rotated.
4.
Perform the necessary repair operation.
5.
When the repair work is completed, return the ignition switch to the
″
LOCK
″
position before connecting
the battery cables. (At this time, the steering lock mechanism will engage.)
6.
Perform a self-diagnosis check of all control units using CONSULT-III.
Draining Engine Coolant
INFOID:0000000000893910
Drain engine coolant and engine oil when the engine is cooled.
Disconnecting Fuel Piping
INFOID:0000000000893911
• Before starting work, make sure no fire or spark producing items are in the work area.
• Release fuel pressure before disconnecting and disassembly.
• After disconnecting pipes, plug openings to stop fuel leakage.
Removal and Disassembly
INFOID:0000000000893912
PIIB3706J
Нет комментариевНе стесняйтесь поделиться с нами вашим ценным мнением.
Текст