Nissan Qashqai (2007-2010). Manual — part 23
EM-40
< ON-VEHICLE REPAIR >
[HR16DE]
OIL PAN (LOWER)
OIL PAN (LOWER)
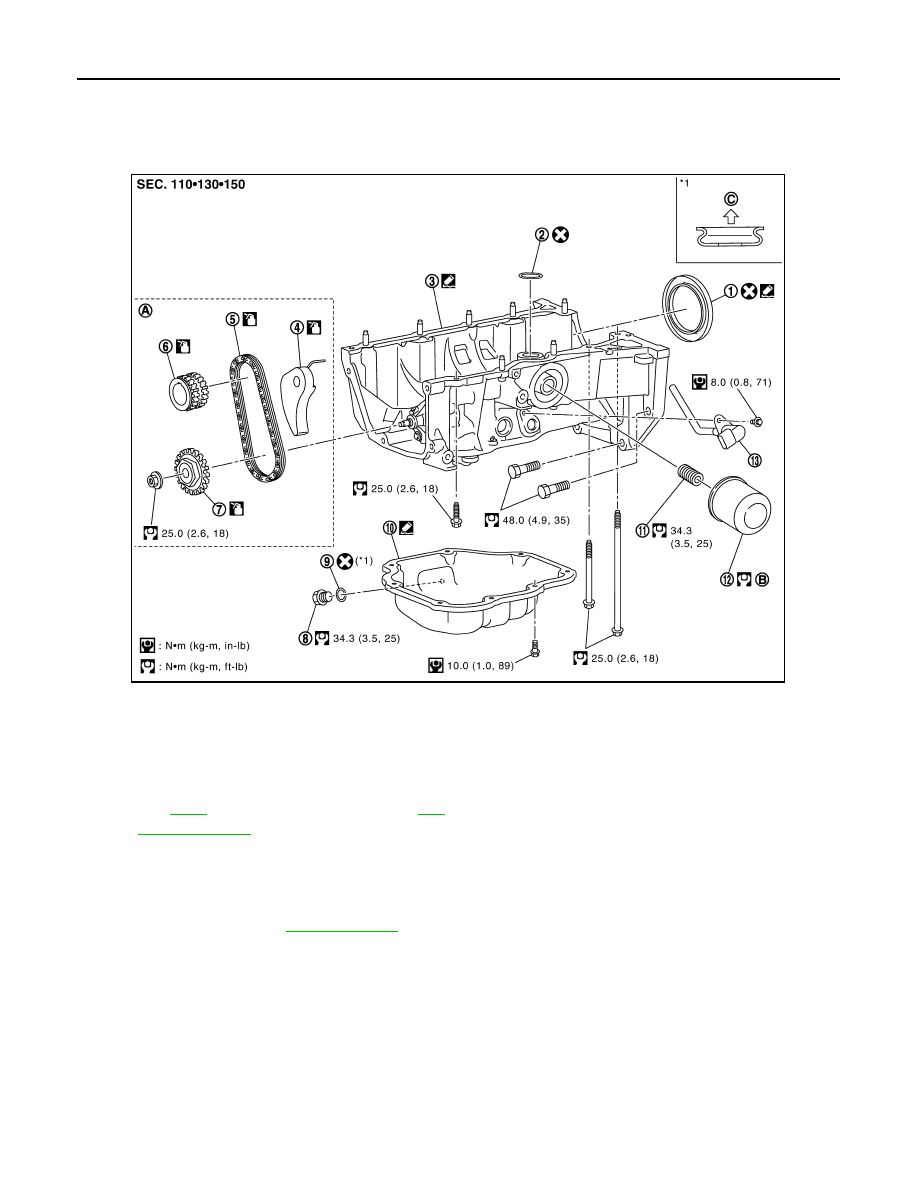
Exploded View
INFOID:0000000000894120
Removal and Installation
INFOID:0000000000894123
REMOVAL
1.
Drain engine oil. Refer to
.
2.
Remove the oil pan (lower) with the following procedure.
1.
Rear oil seal
2.
O-ring
3.
Oil pan (upper)
4.
Chain tensioner
5.
Oil pump drive chain
6.
Crankshaft sprocket
7.
Oil pump sprocket
8.
Oil pan drain plug
9.
Washer
10.
Oil pan (lower)
11.
Oil filter stud bolt
12.
Oil filter
13.
Oil level sensor
A.
Refer to
B.
Refer to
C.
Oil pan side
for symbols in the figure.
JPBIA0553GB
OIL PAN (LOWER)
EM-41
< ON-VEHICLE REPAIR >
[HR16DE]
C
D
E
F
G
H
I
J
K
L
M
A
EM
N
P
O
a.
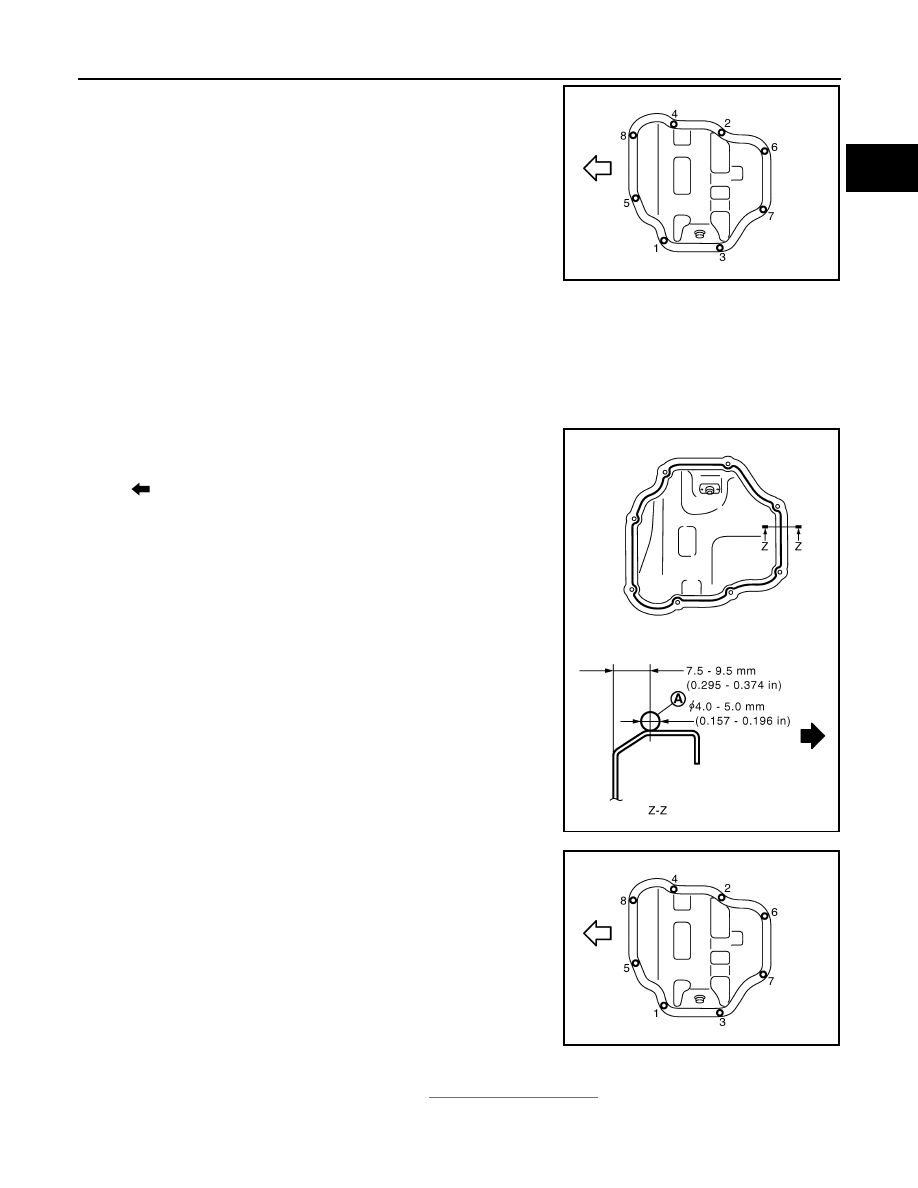
Loosen bolts in the reverse of the order shown in the figure.
b.
Insert the seal cutter [SST: KV10111100] between oil pan
(upper) and oil pan (lower).
CAUTION:
• Be careful not to damage the mating surface.
• A more adhesive liquid gasket is applied compared to pre-
vious types when shipped, so it should not be forced off
using a flat- bladed screwdriver, etc.
INSTALLATION
1.
Install oil pan (lower) with the following procedure.
a.
Use scraper to remove old liquid gasket from mating surfaces.
• Also remove the old liquid gasket from mating surface of oil pan (upper).
• Remove old liquid gasket from the bolt holes and threads.
CAUTION:
Never scratch or damage the mating surfaces when cleaning off old liquid gasket.
b.
Apply a continuous bead of liquid gasket (A) with the tube
presser (commercial service tool) to areas shown in the figure.
Use Genuine Liquid Gasket or equivalent.
CAUTION:
Attaching should be done within 5 minutes after coating.
c.
Tighten bolts in the numerical order shown in the figure.
2.
Install oil pan drain plug.
• For installation direction of washer. Refer to
.
3.
Install in the reverse order of removal, for the rest of parts.
CAUTION:
: Engine front
PBIC4345E
: Engine out side
PBIC5006E
: Engine front
PBIC4345E
EM-42
< ON-VEHICLE REPAIR >
[HR16DE]
OIL PAN (LOWER)
Pour engine oil at least 30 minutes after oil pan is installed.
Inspection
INFOID:0000000000893856
INSPECTION AFTER INSTALLATION
1.
Check the engine oil level and adjust engine oil. Refer to
2.
Start engine, and check there is no leak of engine oil.
3.
Stop engine and wait for 10 minutes.
4.
Check the engine oil level again. Refer to
.
IGNITION COIL, SPARK PLUG AND ROCKER COVER
EM-43
< ON-VEHICLE REPAIR >
[HR16DE]
C
D
E
F
G
H
I
J
K
L
M
A
EM
N
P
O
IGNITION COIL, SPARK PLUG AND ROCKER COVER
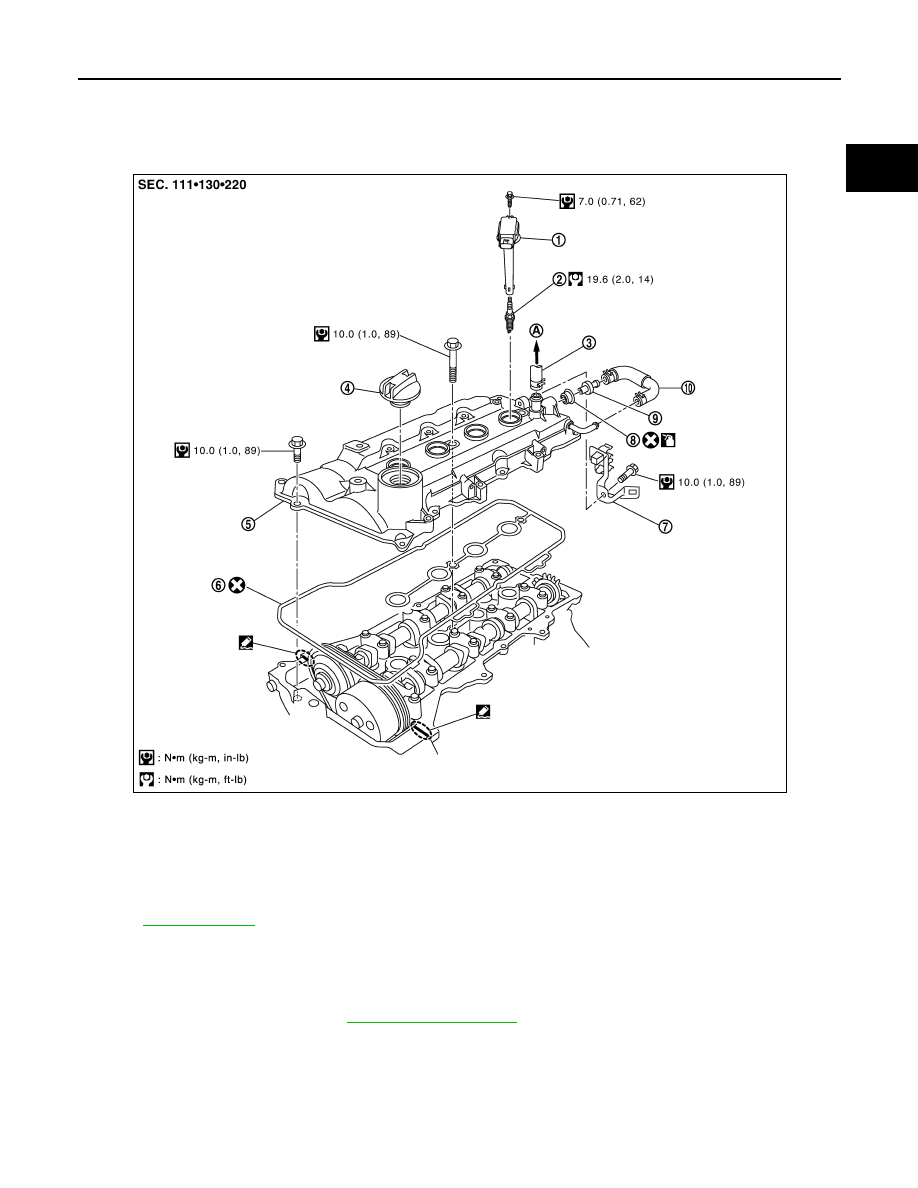
Exploded View
INFOID:0000000000893857
Removal and Installation
INFOID:0000000000893858
REMOVAL
1.
Remove intake manifold. Refer to
2.
Remove ignition coil.
CAUTION:
• Handle ignition coil carefully and avoid impacts.
• Never disassemble.
3.
Remove grand cable (RH).
1.
Ignition coil
2.
Spark plug
3.
PCV hose
4.
Oil filler cap
5.
Rocker cover
6.
Gasket
7.
Bracket
8.
Grommet
9.
PCV valve
10.
PCV hose
A.
To air duct
Refer to
for symbols in the figure.
PBIC4257E
Нет комментариевНе стесняйтесь поделиться с нами вашим ценным мнением.
Текст