Nissan Leaf. Instruction — part 669

REAR COMBINATION LAMP
EXL-277
< REMOVAL AND INSTALLATION >
[HALOGEN HEADLAMP]
C
D
E
F
G
H
I
J
K
M
A
B
EXL
N
O
P
• When using protective tape, apply protective tape to both rear fender panel and rear combination
lamp.
3. Pull rear combination lamp toward vehicle rear side, as shown
by the arrow in the figure.
4. Rotate bulb socket counterclockwise and unlock it.
5. Remove bulb from the socket.
BACK-UP LAMP BULB
1. Remove rear combination lamp mounting bolts.
2. Insert a shop cloth (B) into clearance (A) between rear combination lamp (1) and rear fender panel (2), or
apply protective tape.
CAUTION:
• To prevent rear fender panel paint surface from being damaged, always apply protection using a
shop cloth or protective tape.
• When using protective tape, apply protective tape to both rear fender panel and rear combination
lamp.
JMLIA2386ZZ
: Clip
JMLIA2385ZZ
JMLIA2386ZZ

EXL-278
< REMOVAL AND INSTALLATION >
[HALOGEN HEADLAMP]
REAR COMBINATION LAMP
3. Pull rear combination lamp toward vehicle rear side, as shown
by the arrow in the figure.
4. Rotate bulb socket counterclockwise and unlock it.
5. Remove bulb from the socket.
: Clip
JMLIA2385ZZ

HIGH-MOUNTED STOP LAMP
EXL-279
< REMOVAL AND INSTALLATION >
[HALOGEN HEADLAMP]
C
D
E
F
G
H
I
J
K
M
A
B
EXL
N
O
P
HIGH-MOUNTED STOP LAMP
Exploded View
INFOID:0000000010121506
Removal and Installation
INFOID:0000000010121507
REMOVAL
1. Remove rear spoiler. Refer to
EXT-36, "Removal and Installation"
.
2. Remove high-mounted stop lamp cover mounting screws, and then remove high-mounted stop lamp
cover.
3. Remove high-mounted stop lamp mounting screws.
4. Disconnect high-mounted stop lamp harness connector.
5. Remove high-mounted stop lamp.
INSTALLATION
Install in the reverse order of removal.
1.
Rear spoiler
2.
High-mounted stop lamp
3.
High-mounted stop lamp cover
4.
Rear washer nozzle
: N·m (kg-m, in-lb)
, : Indicates that the part is connected at points with same symbol in actual vehicle.
JMLIA2084GB
EXL-280
< REMOVAL AND INSTALLATION >
[HALOGEN HEADLAMP]
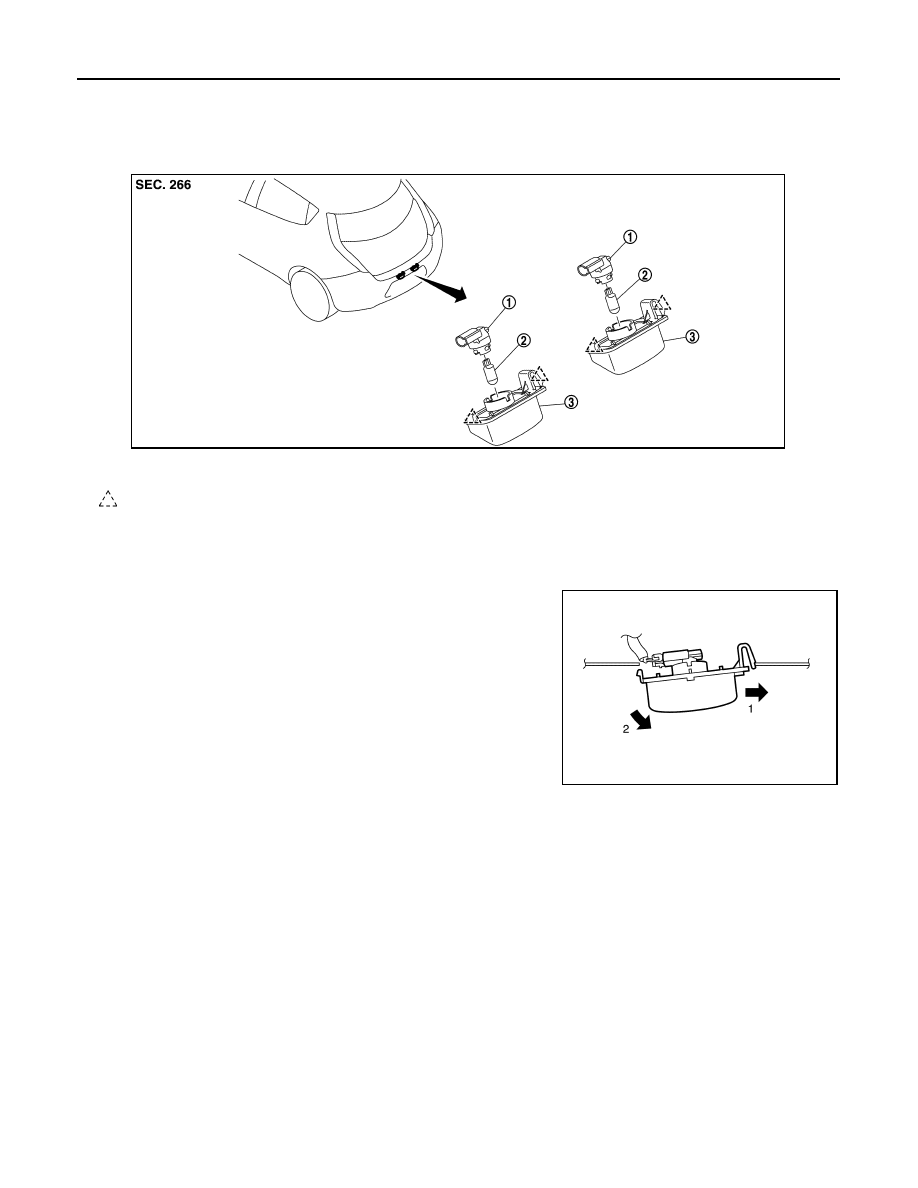
LICENSE PLATE LAMP
LICENSE PLATE LAMP
Exploded View
INFOID:0000000010121508
Removal and Installation
INFOID:0000000010121509
REMOVAL
1. Remove license plate lamp in numerical order shown in the fig-
ure.
2. Disconnect license plate lamp connector, and then remove license plate lamp.
INSTALLATION
Install in the reverse order of removal.
Replacement
INFOID:0000000010121510
CAUTION:
• Never touch the glass of bulb directly by hand. Keep grease and other oily matters away from it to
prevent damage to the bulb.
• Never touch bulb by hand while it is lit or right after being turned off to prevent a burns.
• Never leave bulb out of lamp reflector for a long time because dust, moisture smoke, etc. may affect
the performance of lamp. When replacing bulb, be sure to replace it with new one.
LICENSE PLATE LAMP BULB
1. Remove license plate lamp.
2. Turn the bulb socket counterclockwise and unlock it.
3. Remove the bulb from the socket.
1.
License plate lamp bulb socket
2.
License plate lamp bulb
3.
License plate lamp housing
: Pawl
JMLIA1663ZZ
JPLIA0056ZZ
Нет комментариевНе стесняйтесь поделиться с нами вашим ценным мнением.
Текст