Chrysler Pacifica (2019 year). Instruction — part 37
CYBERSECURITY
Your vehicle may be a connected vehicle and may be
equipped with both wired and wireless networks. These
networks allow your vehicle to send and receive informa-
tion. This information allows systems and features in your
vehicle to function properly.
Your vehicle may be equipped with certain security fea-
tures to reduce the risk of unauthorized and unlawful
access to vehicle systems and wireless communications.
Vehicle software technology continues to evolve over time
and FCA US LLC, working with its suppliers, evaluates
and takes appropriate steps as needed. Similar to a com-
puter or other devices, your vehicle may require software
updates to improve the usability and performance of your
systems or to reduce the potential risk of unauthorized and
unlawful access to your vehicle systems.
The risk of unauthorized and unlawful access to your
vehicle systems may still exist, even if the most recent
version of vehicle software (such as Uconnect software) is
installed.
WARNING!
• It is not possible to know or to predict all of the
possible outcomes if your vehicle’s systems are
breached. It may be possible that vehicle systems,
including safety related systems, could be impaired
or a loss of vehicle control could occur that may
result in an accident involving serious injury or
death.
• ONLY insert media (e.g., USB, SD card, or CD) into
your vehicle if it came from a trusted source. Media
of unknown origin could possibly contain malicious
software, and if installed in your vehicle, it may
increase the possibility for vehicle systems to be
breached.
• As always, if you experience unusual vehicle behav-
ior, take your vehicle to your nearest authorized
dealer immediately.
10
MULTIMEDIA
585
-------------------------------------------------------------------------------------------------------------------------------------------------------------
NOTE:
• FCA US LLC or your dealer may contact you directly
regarding software updates.
• To help further improve vehicle security and minimize
the potential risk of a security breach, vehicle owners
should:
• Routinely check www.driveuconnect.com (U.S. Resi-
dents) or www.driveuconnect.ca (Canadian Residents)
to learn about available Uconnect software updates.
• Only connect and use trusted media devices (e.g.
personal mobile phones, USBs, CDs).
Privacy of any wireless and wired communications cannot
be assured. Third parties may unlawfully intercept infor-
mation and private communications without your consent.
For further information, refer to “Data Collection & Pri-
vacy” in your Uconnect Owner’s Instruction Supplement or
“Onboard Diagnostic System (OBD II) Cybersecurity” in
“Getting To Know Your Instrument Panel”.
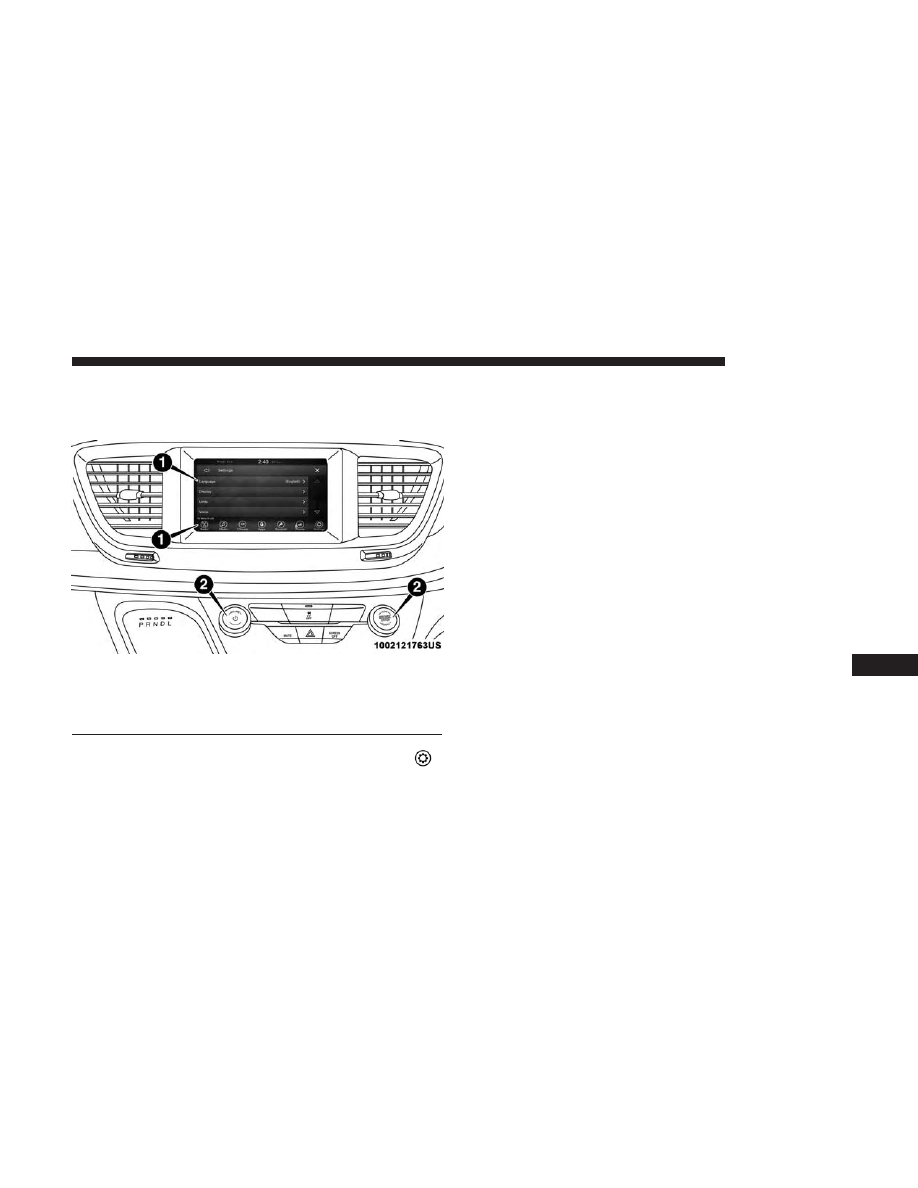
UCONNECT SETTINGS
The Uconnect system uses a combination of buttons on the
touchscreen and/or buttons on the faceplate located on the
center of the instrument panel that allow you to access and
change the customer programmable features. Many fea-
tures can vary by vehicle.
Buttons on the touchscreen are accessible on the Uconnect
touchscreen.
Buttons on the faceplate are located below, and in the
center of the instrument panel. In addition, there is a
Scroll/Enter control knob located on the right side. Turn
the control knob to scroll through menus and change
settings (i.e., 30, 60, 90), push the center of the control knob
one or more times to select or change a setting (i.e., ON,
OFF).
Your Uconnect system may also have Screen Off and Mute
buttons on the faceplate.
Push the Screen Off button on the faceplate to turn off the
Uconnect screen. Push the Screen Off button on the face-
plate a second time to turn the screen on.
586
MULTIMEDIA
-------------------------------------------------------------------------------------------------------------------------------------------------------------
Customer Programmable Features — Uconnect 4
Settings
Press the ”Apps” button then press the “Settings
”
button on the touchscreen to display the settings menu
screen and press the Up or Down Arrow buttons on the
right side of the screen to move up or down through the
available settings. Settings gives you to access all of the
available programmable features.
NOTE:
Only one touchscreen area may be selected at a
time.
Depending on the vehicle options, feature settings may
vary.
To change features, select the desired feature. This will
bring you to the available options for the feature. Change
feature settings as desired by pressing and releasing the
preferred setting option until a check-mark appears next to
the setting. Once the desired selection is made, either press
the back arrow or the “X” button on the touchscreen to
close the settings screen. Pressing the Up or Down arrow
buttons on the touchscreen allows you to toggle through
the available settings. The list of programmable features
include:
NOTE:
All settings should be changed with the ignition in
the “ON/RUN” position.
KeySense
This feature allows you to control specific settings when
the KeySense key is in use. The vehicle’s KeySense settings
are protected by a unique 4-digit PIN, which the vehicle
Uconnect 4 Buttons On The Touchscreen And Buttons On
The Faceplate
1 — Uconnect Buttons On The Touchscreen
2 — Uconnect Buttons On The Faceplate
10
MULTIMEDIA
587
-------------------------------------------------------------------------------------------------------------------------------------------------------------

owner creates when accessing the specific settings for the
first time. This 4-digit PIN can only be reset by an autho-
rized dealer.
After pressing the “KeySense” button on the touchscreen,
and entering the KeySense PIN, the following settings will
be available:
Setting Name
Selectable Options
ParkSense — If Equipped
Sound Only
Sound and Display
NOTE:
The “ParkSense” system setting will scan for objects behind the vehicle when the transmission gear selector is in RE-
VERSE and the vehicle speed is less than 7 mph (11 km/h), when enabled. It will provide an alert (audible and/or
visual) to indicate the proximity to other objects. The system can be enabled with “Sound Only,” or “Sound and Dis-
play.”
Front ParkSense Volume
Low
Medium
High
Rear ParkSense Volume
Low
Medium
High
Rear ParkSense Braking
Assist
On
Off
NOTE:
When the “Rear ParkSense Braking Assist” feature is selected, the park assist system will detect objects located be-
hind the vehicle and utilize autonomous braking to stop the vehicle.
588
MULTIMEDIA
-------------------------------------------------------------------------------------------------------------------------------------------------------------

Setting Name
Selectable Options
Blind Spot Alert — If
Equipped
Lights
Lights & Chime
NOTE:
When the “Blind Spot Alert” feature is selected, it will alert, visibly and/or audibly, to indicate objects are in your
blind spot. The “Blind Spot Alert” feature can be activated in “Lights” mode. When this mode is selected, the Blind
Spot Monitor (BSM) system is activated and will only show a visual alert in the exterior mirrors. When “Lights &
Chime” mode is activated, the Blind Spot Monitor (BSM) will show a visual alert in the exterior mirrors as well as an
audible alert when the turn signal is on. If your vehicle has experienced any damage in the area where the sensor is
located, even if the fascia is not damaged, the sensor may have become misaligned. Take your vehicle to an autho-
rized dealer to verify sensor alignment. Having a sensor that is misaligned will result in the BSM not operating to
specification.
Maximum Vehicle Speed
+
-
NOTE:
The “Maximum Vehicle Speed” feature can be set to 65, 70, 75, 80, or 85 mph (90, 95, 100, 105, 110 km/h).
10
MULTIMEDIA
589
-------------------------------------------------------------------------------------------------------------------------------------------------------------

Setting Name
Selectable Options
Start Up Fuel Level
Message
On
Off
Early Low Fuel Alert
On
Off
SiriusXM Setup
Channel Skip
Subscription Information
NOTE:
SiriusXM can be programmed to skip channels. To make your selection, press the “Channel Skip” button on the
touchscreen, and select the channels you would like to skip.
New vehicle purchasers or lessees will receive a free limited time subscription to SiriusXM Satellite Radio with your
radio. Following the expiration of the free services, it will be necessary to access the information on the Subscription
Information screen to re-subscribe.
1. Press the “Subscription Info” button on the touchscreen to access the Subscription Information screen.
2. Write down the Sirius ID numbers for your receiver. To reactivate your service, either call the number listed on the
screen or visit the provider online.
590
MULTIMEDIA
-------------------------------------------------------------------------------------------------------------------------------------------------------------

Language
After pressing the “Language” button on the touchscreen,
the following settings will be available:
Setting Name
Selectable Options
Language
English
Français
Español
NOTE:
When the “Set Language” feature is selected, you may select one of multiple languages (English / Français / Espa-
ñol) for all display nomenclature, including the trip functions and the navigation system (if equipped). Press the “Set
Language” button on the touchscreen, then press the desired language button on the touchscreen until a check-mark
appears next to the language, showing that setting has been selected.
10
MULTIMEDIA
591
-------------------------------------------------------------------------------------------------------------------------------------------------------------

Display
After pressing the “Display” button on the touchscreen, the
following settings will be available.
Setting Name
Selectable Options
Display Mode
Auto
Instruction
Display Brightness With Headlights
ON
1-10
1-10
NOTE:
To make changes to the
⬙Display Brightness with Headlights ON⬙ setting, the headlights must be on and the interior
dimmer switch must not be in the
⬙party⬙ or ⬙parade⬙ positions. The setting can be changed from 1-10.
Display Brightness With Headlights
OFF
1-10
1-10
NOTE:
To make changes to the
⬙Display Brightness with Headlights OFF⬙ setting, the headlights must be off and the interior
dimmer switch must not be in the
⬙party⬙ or ⬙parade⬙ positions.
Set Theme
List of Themes
NOTE:
When the “Set Theme” feature is selected, you may select the theme for the display screen. To make your selection,
press the
⬙Set Theme⬙ button on the touchscreen, then select the desired theme option button until a check-mark ap-
pears showing that the setting has been selected.
592
MULTIMEDIA
-------------------------------------------------------------------------------------------------------------------------------------------------------------

Setting Name
Selectable Options
Touchscreen Beep
On
Off
Control Screen Time-Out — If
Equipped
On
Off
NOTE:
When the “Control Screen Time-Out” feature is selected, the Controls Screen will stay open for five seconds before
the screen times out. With the feature deselected, the screen will stay open until it is instructionly closed.
Navigation Turn-By-Turn In Cluster
— If Equipped
On
Off
NOTE:
When the “Navigation Turn-By-Turn In Cluster” feature is selected, the turn-by-turn directions will appear in the in-
strument cluster display as the vehicle approaches a designated turn within a programmed route.
Phone Pop-Ups Displayed in
Cluster
On
Off
10
MULTIMEDIA
593
-------------------------------------------------------------------------------------------------------------------------------------------------------------

Units
After pressing the “Units” button on the touchscreen, the
following settings will be available:
Setting Name
Selectable Options
Units
US
Metric
Custom
NOTE:
The “Custom” option allows you to set the “Speed” (MPH, or km/h), “Distance” (mi, or km), “Fuel Consumption”
[MPG (US), MPG (UK), L/100 km, or km/L], “Pressure” (psi, kPa, or bar), and “Temperature” (°C, or °F) units of
measure independently.
Voice
After pressing the “Voice” button on the touchscreen, the
following settings will be available:
Setting Name
Selectable Options
Voice Response Length
Brief
Detailed
Show Command List
Always
With Help
Never
594
MULTIMEDIA
-------------------------------------------------------------------------------------------------------------------------------------------------------------

Clock
After pressing the “Clock” button on the touchscreen, the
following settings will be available:
Setting Name
Selectable Options
Sync Time With GPS — If
Equipped
On
Off
Set Time Hours
+
-
NOTE:
The “Set Time Hours” feature will allow you to adjust the hours. The “Sync Time With GPS” button on the touch-
screen must be unchecked.
Set Time Minutes
+
-
NOTE:
The “Set Time Minutes” feature will allow you to adjust the minutes. The “Sync Time With GPS” button on the
touchscreen must be unchecked.
Time Format
12 hr
24 hr
AM
PM
NOTE:
Within the “Set Time and Format” setting, press the corresponding arrow buttons on the touchscreen to adjust to the
correct time.
10
MULTIMEDIA
595
-------------------------------------------------------------------------------------------------------------------------------------------------------------

Camera
After pressing the “Camera” button on the touchscreen, the
following settings will be available:
Setting Name
Selectable Options
Surround View Camera Delay — If
Equipped
On
Off
NOTE:
The “Surround View Camera Delay” setting determines whether or not the screen will display the 360 degree view
image with guidelines for up to ten seconds after the vehicle is shifted out of REVERSE. This delay will be canceled if
the vehicle’s speed exceeds 8 mph (13 km/h), the transmission is shifted into PARK, or the ignition is switched to the
OFF position.
Surround View Camera Guidelines
— If Equipped
On
Off
NOTE:
The “Surround View Rear Back Up Camera Active Guidelines” feature allows you to see active guidelines over the
Surround View camera display whenever the gear selector is put into REVERSE or the Surround View button on the
touchscreen is pressed. The image will be displayed on the radio touchscreen display.
596
MULTIMEDIA
-------------------------------------------------------------------------------------------------------------------------------------------------------------
Setting Name
Selectable Options
Active ParkView Backup Camera
Guide Lines
On
Off
NOTE:
The “ParkView Backup Camera Active Guide Lines” setting overlays the Rear Backup Camera image with active, or
dynamic, grid lines to help illustrate the width of the vehicle and its project back up path, based on the steering
wheel position when the option is checked. A dashed center line overlay indicates the center of the vehicle to assist
with parking or aligning to a hitch/receiver.
Fixed ParkView Backup Camera
Guide Lines
On
Off
Safety/Assistance
After pressing the “Safety/Assistance” button on the
touchscreen, the following settings will be available:
Setting Name
Selectable Options
LaneSense Warning — If
Equipped
Early
Medium
Late
NOTE:
The “LaneSense Warning” setting determines at what distance the LaneSense system warns you, through steering
wheel feedback, of a possible lane departure.
10
MULTIMEDIA
597
-------------------------------------------------------------------------------------------------------------------------------------------------------------

Setting Name
Selectable Options
LaneSense Strength — If
Equipped
Low
Medium
High
ParkSense — If Equipped
Sound Only
Sound and Display
Front ParkSense Volume
Low
Medium
High
Rear ParkSense Volume
Low
Medium
High
Rear ParkSense Braking
Assist — If Equipped
On
Off
Blind Spot Alert — If
Equipped
Off
Lights
Lights and Chime
NOTE:
When the “Blind Spot Alert” feature is selected, the Blind Spot Monitor (BSM) system is activated and will show a
visual alert in the outside mirrors, or it will show a visual alert in the outside mirrors as well as play an audible alert
when the turn signal is on. When “Off” is selected, the Blind Spot Monitor (BSM) system is deactivated.
If your vehicle has experienced any damage in the area where the sensor is located, even if the fascia is not damaged,
the sensor may have become misaligned. Take your vehicle to an authorized dealer to verify sensor alignment. A sen-
sor that is misaligned will result in the BSM not operating to specification.
Hill Start Assist — If
Equipped
On
Off
Keysense
On
Off
598
MULTIMEDIA
-------------------------------------------------------------------------------------------------------------------------------------------------------------
Mirrors & Wipers
After pressing the “Mirror and Wipers” button on the
touchscreen, the following settings will be available:
Setting Name
Selectable Options
Tilt Side Mirrors in Reverse
On
Off
Rain Sensing Auto Wipers
On
Off
Headlights with Wipers
On
Off
Brakes
After pressing the “Brakes” button on the touchscreen, the
following settings will be available:
Setting Name
Selectable Options
Auto Park Brake
On
Off
Brake Service
Yes
No
NOTE:
Selecting the “Brake Service” feature will display a pop-up asking whether or you would like to retract the park
brakes to all break system service.
10
MULTIMEDIA
599
-------------------------------------------------------------------------------------------------------------------------------------------------------------

Lights
After pressing the “Lights” button on the touchscreen, the
following settings will be available.
Setting Name
Selectable Options
Headlight Off Delay
0 sec
60 sec
30 sec
90 sec
NOTE:
When the “Headlight Off Delay” feature is selected, it allows the adjustment of the amount of time the headlights
remain on after the engine is shut off.
Headlight Illumination On Ap-
proach
0 sec
60 sec
30 sec
90 sec
NOTE:
When this feature is selected, it allows the adjustment of the amount of time the headlights remain on after the doors
are unlocked with the key fob.
Headlights With Wipers — If
Equipped
On
Off
Auto Dim High Beams— If
Equipped
On
Off
Daytime Running Lights
Yes
No
600
MULTIMEDIA
-------------------------------------------------------------------------------------------------------------------------------------------------------------
Нет комментариевНе стесняйтесь поделиться с нами вашим ценным мнением.
Текст