KIA Borrego (2017 year). Manual — part 22

Driving your vehicle
ESC OFF usage
✽ NOTICE
CAUTION
When driving
•
When operating the vehicle on a
Driving with varying tire or wheel
• ESC should be turned on for daily
dynamometer, ensure that the ESC
sizes may cause the ESC system
driving whenever possible.
is turned off by pressing the ESC
to malfunction. When replacing
OFF button for more than 3 sec-
• To turn ESC off while driving, press
tires, make sure they are the
onds (ESC OFF light illuminated).
the ESC OFF button while driving
same size as your original tires.
If the ESC is left on, it may prevent
on a flat road surface.
the vehicle speed from increasing,
and result in false diagnosis.
WARNING
WARNING
•
Turning the ESC off does not affect
ABS or brake system operation.
The Electronic Stability Control
Never press the ESC OFF but-
system is only a driving aid; use
ton while ESC is operating (ESC
precautions for safe driving by
indicator light blinks).
slowing down on curved,
If ESC is turned off while ESC is
snowy, or icy roads. Drive slow-
operating, the vehicle may slip
ly and don’t attempt to acceler-
out of control.
ate whenever the ESC indicator
light is blinking, or when the
road surface is slippery.
6 44

Driving your vehicle
Hill-start assist control (HAC)
✽ NOTICE
Good braking practices
(if equipped)
•
The HAC does not operate when
A vehicle has the tendency to slip
the transaxle shift lever is in the P
WARNING
back on a steep hill when it starts to
(Park) or N (Neutral) position.
•
Whenever you leave or park
go after stopping. The Hill-start
•
The HAC activates even though the
your vehicle, always set the
Assist Control
(HAC) prevents the
ESC is off but it does not activate
parking brake as far as possi-
vehicle from slipping back by operat-
when the ESC has malfunctioned.
ble and fully engage the vehi-
ing the brakes automatically for
cle's transaxle into the P
about 1~2 seconds. The brakes are
(Park) position. If the parking
released when the accelerator pedal
brake is not fully engaged, the
is depressed or after about 1~2 sec-
vehicle may move inadver-
onds.
tently and injure yourself and
others.
WARNING
•
All vehicles should always
have the parking brake fully
The HAC is activated only for
engaged when parking to
about 1~2 seconds, so when the
avoid inadvertent movement
vehicle is starting off always
of the vehicle which can injure
depress the accelerator pedal.
occupants or pedestrians.
6 45
Driving your vehicle
•
Check to be sure the parking brake
•
Do not coast down hills with the
•
If your vehicle is equipped with an
is not engaged and that the park-
vehicle out of gear. This is extreme-
automatic transaxle, do not let your
ing brake indicator light is out
ly hazardous. Keep the vehicle in
vehicle creep forward. To avoid
before driving away.
gear at all times, use the brakes to
creeping forward, keep your foot
slow down, then shift to a lower
firmly on the brake pedal when the
•
Driving through water may get the
gear so that engine braking will
vehicle is stopped.
brakes wet. They can also get wet
help you maintain a safe speed.
when the vehicle is washed. Wet
•
Be cautious when parking on a hill.
brakes can be dangerous! Your
•
Do not "ride" the brake pedal.
Firmly engage the parking brake
vehicle will not stop as quickly if the
Resting your foot on the brake
and place the shift lever in P
brakes are wet. Wet brakes may
pedal while driving can be danger-
(Park). If your vehicle is facing
cause the vehicle to pull to one side.
ous because it can result in the
downhill, turn the front wheels into
brakes overheating and losing their
the curb to help keep the vehicle
To dry the brakes, apply the brakes
effectiveness. It also increases the
from rolling.
lightly until the braking action
wear of the brake components.
returns to normal, taking care to
If your vehicle is facing uphill, turn
keep the vehicle under control at
•
If a tire goes flat while you are driv-
the front wheels away from the
all times. If the braking action does
ing, apply the brakes gently and
curb to help keep the vehicle from
not return to normal, stop as soon
keep the vehicle pointed straight
rolling. If there is no curb or if it is
as it is safe to do so and we rec-
ahead while you slow down. When
required by other conditions to
ommend that you call an author-
you are moving slowly enough for it
keep the vehicle from rolling, block
ized Kia dealer.
to be safe to do so, pull off the road
the wheels.
and stop in a safe place.
6 46
Driving your vehicle
•
Under some conditions your park-
ing brake can freeze in the engaged
position. This is most likely to hap-
pen when there is an accumulation
of snow or ice around or near the
rear brakes or if the brakes are wet.
If there is a risk that the parking
brake may freeze, apply it only tem-
porarily while you put the shift lever
in P(Park) and block the rear
wheels so the vehicle cannot roll.
Then release the parking brake.
•
Do not hold the vehicle on the
upgrade with the accelerator
pedal. This can cause the transaxle
to overheat. Always use the brake
pedal or parking brake.
6 47

Driving your vehicle
LOCKING DIFFERENTIAL (IF EQUIPPED)
A locking differential, if equipped, is
The following procedures can be
for the rear wheel differential only.
used to confirm that the locking dif-
CAUTION
The features of this locking differen-
ferential is functioning properly:
•
Never start the engine with the
tial are described below:
gearshift lever placed in the
1. Position the vehicle so that one
Just as with a conventional differen-
wheel is on a dry paved surface
forward or reverse while one
tial, the wheel on one side is allowed
and the other on ice, snow, mud,
of the rear wheels is jacked up
to turn at a different speed from the
etc. Drive the vehicle, and observe
and the other in contact with
wheel on the other side when the
the operation of the locking differ-
the ground; doing so may
vehicle is cornering. The difference
ential. The vehicle should not
cause the vehicle to jump for-
between the locking differential and a
become stuck if the differential is
ward.
conventional differential is that if the
functioning properly.
•
If one of the rear wheels
wheel on one side of the vehicle
begins to spin in mud, snow,
2. Depress the accelerator pedal
loses traction, a greater amount of
etc., the vehicle can some-
gradually, and then when traction
torque is applied to the rear wheel on
times be driven out by
is good, depress it forcefully. If the
the other side to improve traction.
depressing the accelerator
vehicle accelerates well, the differ-
ential is functioning properly.
pedal further; however, avoid
running the engine continu-
✽ NOTICE
ously at high rpm because
In a stationary position, the LD
✽ NOTICE
doing so could damage the
(Locking Differential) will operate
Usually a locking differential will
locking differential.
when the difference of the revolution
operate and release automatically
speed between the rear right wheel
but occasionally it may not release
and the rear left wheel occurs.
automatically.
At this time you will feel the tire is
dragged when you are driving or
cornering. You can release it manu-
ally by slightly turning the steering
wheel right and left while the vehicle
is moving slowly.
6 48

Driving your vehicle
AIR LEVELING SYSTEM (ALS) (IF EQUIPPED)
N (Normal) - Ordinary driving
HI (High) - Off road driving
mode
mode
OHM058025
The Air Leveling System improves
driving stability and riding comfort
OHM056026L
OHM056027L
with continuous maintenance of vehi-
cle height regardless of the load and
The normal height of the vehicle is
The rear part of the vehicle is lifted to
number of passengers. The rear
maintained.
drive on rough roads such as off-
height is controlled automatically and
roads.
The indicator will illuminate at N
manually into three modes; Ordinary
(Normal) on the LCD display.
With the engine running press the top
driving mode (N), Off road driving
part of the switch. The HI (High) mode
mode (HI) and Loading mode (LO).
activates only when the vehicle is not
moving or the speed is less than 35
km/h (22mph). The indicator blinks
when the system is adjusting itself to
the HI (High) mode. When the adjust-
ment is completed (about 40mm (2
in.) raised) the indicator will illuminate
at HI (High) on the LCD display.
6 49

Driving your vehicle
To go to the N (Normal) mode, press
LO (Low) - Loading mode
To go to the N (Normal) mode, press
the bottom part of the switch. Also, if
the top part of the switch. Also, if the
the vehicle speed is over 60 km/h
vehicle speed is over
2 km/h
(1
(38mph) or drives over 10 seconds
mph), the vehicle will lift itself to the
at the speed of about
45 km/h
N (Normal) mode.
(28mph), the vehicle will lower itself
to the N (Normal) mode.
✽ NOTICE
The ALS will adjust the rear height
of the vehicle according to the load
and number of passengers when the
ignition switch is in the ON position
or when the engine is on.
OHM056028L
The rear part of the vehicle is low-
ered to make it easy to load or
unload cargo.
With the engine running press the
bottom part of the switch. The LO
(Low) mode activates only when the
vehicle is not moving. The indicator
blinks when the system is adjusting
itself to the LO (Low) mode. When
the adjustment is completed (about
40mm (2 in.) lowered) the indicator
will illuminate at LO
(Low) on the
LCD display.
6 50

Driving your vehicle
CAUTION
•
Always check if there is any-
thing under the rear part of the
vehicle before adjusting the
ALS.
•
There may be noise heard
while the ALS is adjusting the
height to a mode.
•
Do not turn off the engine or
press the switch to another
mode while the ALS is adjust-
ing to the mode selected.
•
Do not activate the ALS when
the air filter of the compressor
has been submerged.
•
Inspect or replace the ALS air
filter and air spring according
to the maintenance schedule.
•
Do not drive the vehicle when
the air spring is damaged or
airless. Have the vehicle
towed with all the wheels lifted
from the ground.
6 51

Driving your vehicle
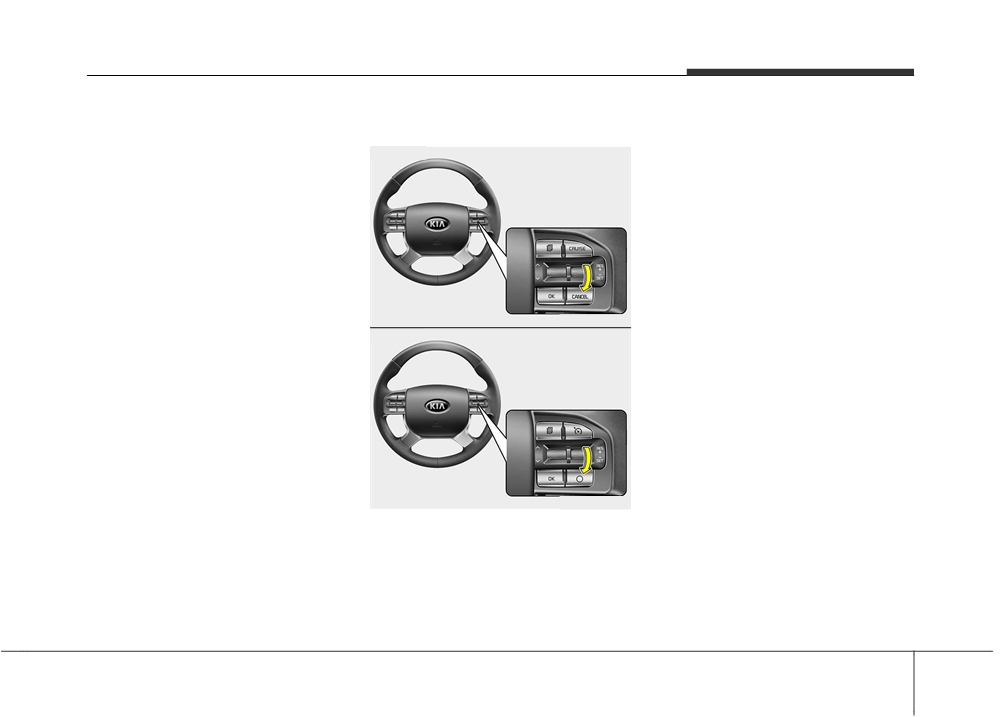
CRUISE CONTROL SYSTEM (IF EQUIPPED)
■ Type A
This system is designed to function
(Continued)
above approximately
40 km/h (25
mph).
•
Pay particular attention to the
driving conditions whenever
using the cruise control sys-
WARNING
tem.
•
If the cruise control is left on,
•
Be careful when driving
(cruise indicator light is illu-
downhill using the cruise con-
minated), the cruise control
trol system, which may
can be switched on acciden-
increase the vehicle speed.
OHM056051L
tally. Keep the cruise control
■ Type B
system off when the cruise
control is not in use, to avoid
inadvertently setting a speed.
•
Use the cruise control system
only when traveling on open
highways in good weather.
•
Do not use the cruise control
when it may not be safe to
keep the vehicle at a constant
speed, for instance, driving in
OHM056052L
heavy or varying traffic, or on
1. Cruise indicator
slippery (rainy, icy or snow-
2. Cruise set indicator
covered) or winding roads or
The cruise control system allows you
over 6% up-hill or down-hill
to program the vehicle to maintain a
roads.
constant speed without pressing the
(Continued)
accelerator pedal.
6 52

Driving your vehicle
✽ NOTICE
Cruise control switch
To set cruise control speed:
•
During normal cruise control oper-
■ Type A
■ Type A
ation, when the SET switch is acti-
vated or reactivated after applying
the brakes, the cruise control will
energize after approximately 3 sec-
onds. This delay is normal.
•
To activate cruise control, depress
■ Type B
the brake pedal at least once after
turning the ignition switch to the ON
position or starting the engine. This
is to check if the brake switch which
OHM056055L
is important part to cancel cruise
■ Type B
OHM056053L
control is in normal condition.
CANCEL/O : Cancels cruise control
operation.
CRUISE /
: Turns cruise control
system on or off.
RES+ : Resumes or increases cruise
control speed.
SET- : Sets or decreases cruise con-
trol speed.
OHM056054L
1. Press the CRUISE /
button on
the steering wheel, to turn the sys-
tem on. The cruise indicator light
will illuminate.
2. Accelerate to the desired speed,
which must be more than approxi-
mately 40 km/h (25 mph).
6 53

Driving your vehicle
■ Type A
On a steep grade, the vehicle may
To increase cruise control set
slow down or speed up slightly while
speed:
going downhill.
■ Type A
OHM056057L
■ Type B
OHM056058L
■ Type B
OHM056056L
3. Move the lever down (to SET-),
and release it at the desired
OHM056059L
speed. The cruise set indicator
light will illuminate. Release the
Follow either of these procedures:
accelerator pedal at the same
• Move the lever up (to RES+) and
time. The desired speed will auto-
hold it. Your vehicle will accelerate.
matically be maintained.
Release the lever at the speed you
want.
6 54
Driving your vehicle
• Move the lever up (to RES+) and
To decrease the cruising speed:
• Move the lever down (to SET-) and
release it immediately. The cruising
release it immediately. The cruising
■ Type A
speed will increase by 2 km/h (1
speed will decrease by 2 km/h (1
mph) each time you move the lever
mph) each time you move the lever
up (to RES+) in this manner.
down (to SET-) in this manner.
OHM056057L
■ Type B
OHM056056L
Follow either of these procedures:
• Move the lever down (to SET-) and
hold it. Your vehicle will gradually
slow down. Release the lever at the
speed you want to maintain.
6 55

Driving your vehicle
To temporarily accelerate with
To cancel cruise control, do
• Decrease the vehicle speed lower
the cruise control on:
one of the following:
than the memory speed by approx-
imately 15 km/h (9 mph).
If you want to speed up temporarily
■ Type A
when the cruise control is on,
• Decrease the vehicle speed to less
than approximately
40 km/h (25
depress the accelerator pedal.
Increased speed will not interfere
mph).
with cruise control operation or
change the set speed.
Each of these actions will cancel
To return to the set speed, take your
cruise control operation (the cruise
foot off the accelerator pedal.
set indicator light will go off), but it
will not turn the system off. If you
wish to resume cruise control opera-
OHM056061L
tion, move up the lever (to RES+)
■ Type B
located on your steering wheel. You
will return to your previously preset
speed.
OHM056060L
• Depress the brake pedal.
• Shift into N (Neutral) with an auto-
matic transaxle.
• Press the CANCEL/O button locat-
ed on the steering wheel.
6 56

Driving your vehicle
To resume cruising speed at
If any method other than the
To turn cruise control off, do
more than approximately 40
CRUISE /
button was used to
one of the following:
km/h (25 mph).
cancel cruising speed and the sys-
• Press the CRUISE/
button (the
tem is still activated, the most recent
■ Type A
cruise indicator light will be turn
set speed will automatically resume
off).
when the RES+ switch is pushed.
• Turn the ignition off.
It will not resume, however, if the
vehicle speed has dropped below
Both of these actions cancel cruise
approximately 40 km/h (25 mph).
control operation. If you want to
resume cruise control operation,
repeat the steps provided in “To set
cruise control speed” on the previous
page.
OHM056058L
■ Type B
OHM056059L
6 57

Driving your vehicle
LANE DEPARTURE WARNING SYSTEM (LDWS) (IF EQUIPPED)
This system detects the lane with the
(Continued)
sensor at the front windshield and
warns you when your vehicle leaves
•
Do not let water or any kind of
the lane.
liquid come in contact with
the LDWS sensor.
•
Do not remove the LDWS
WARNING
parts and do not affect the
•
The LDWS does not make the
sensor by a strong impact.
vehicle change lanes. It is the
OHM056062L
•
Do not put objects that reflect
driver's responsibility to always
light on the dash board.
check the road conditions.
•
Always check road conditions
•
Do not turn the steering wheel
because you may not hear the
suddenly, when the LDWS
warning chime because of
warns you that your vehicle is
audio and external condi-
leaving the lane.
tions.
•
If the sensor can not detect
the lane or if the vehicle speed
does not exceed around
OUM054149
60km/h, the LDWS won't warn
you even though the vehicle
leaves the lane.
•
If your vehicle has window tint
or other types of coating and
accessory on the front wind-
shield, the LDWS may not
work properly.
(Continued)
OHM056063L
6 58

Driving your vehicle
To operate the LDWS, press the
■ Left lane departure warning
switch with the ignition in the ON
position. The indicator illuminates
white on the cluster.
To cancel the LDWS, press LDWS
button again. The indicator on the
cluster will go off.
OHM056107L
■ Right lane departure warning
OHM056105L
If you select this symbol, the LDWS
mode on the LCD display will appear.
If your vehicle leaves the lane when
the LDWS is operating and vehicle
speed exceeds around 60km/h, the
warning operates as follows:
OHM056106L
1. Visual warning
If you leave a lane, the lane you
cross will blink (yellow) and LDWS
indicator will blink green on LCD dur-
ing max 3 seconds.
6 59

Driving your vehicle
2. Auditory warning
Warning indicator
We recommend that the system be
checked by an authorized Kia dealer.
If you leave the lane, the warning
sound operates for maximum 3 sec-
onds.
The color of symbol will change
depend on the condition of LDWS
system.
- White color : When you activate the
lane departure warn-
ing system by press-
OHM056108L
ing the LDWS button,
system operating con-
ditions are not satis-
fied or the sensor does
not detect the lane line
- Green color : When you activate the
lane departure warn-
ing system by press-
ing the LDWS button,
system operating con-
ditions are satisfied
OHM056109L
and the sensor detect
When the LDWS is not working prop-
the lane line
erly, the warning light will illuminate
- Yellow color : when there is a mal-
and the warning message will come
function with the lane
on for a few second. After the mes-
departure warning
sage disappears, the master warning
system.
light will illuminate.
6 60
Большое спасибо!
Ваше мнение очень важно для нас.
Нет комментариевНе стесняйтесь поделиться с нами вашим ценным мнением.
Текст