KIA Borrego (2017 year). Manual — part 30
Maintenance
LIGHT BULBS
Please prepare bulbs with appropri-
ate standards in case of emergen-
WARNING
CAUTION
cies. (Refer to chapter 9 for further
•
If unauthentic parts or sub-
Be sure to replace the burned-
information)
out bulb with one of the same
standard lights are used when
When changing bulbs and sorts, first
wattage rating. Otherwise, it
changing lights, it may lead to
turn off the engine at a safe place,
may cause extensive wiring
fuse disconnection and mal-
firmly apply the side brake and take
damage and possible fire.
function, and other wiring
out the battery's negative (-) terminal.
damages.
•
Do not install extra lamps or
LED to the vehicle. If supple-
WARNING - Working on
CAUTION
mentary lights are installed, it
the lights
If you don’t have necessary
may lead to lamp malfunction
Prior to working on the light,
tools, the correct bulbs and the
and flickering of the lights. In
firmly apply the parking brake,
expertise, consult an authorized
addition, the fuse box and
ensure that the ignition switch
Kia dealer. In many cases, it is
other writing may be damaged.
is turned to the LOCK position
difficult to replace vehicle light
and turn off the lights to avoid
bulbs because other parts of the
sudden movement of the vehi-
vehicle must be removed before
cle and burning your fingers or
you can get to the bulb. This is
receiving an electric shock.
especially true if you have to
remove the headlight assembly
to get to the bulb(s). Removing/
Use only the bulbs of the specified
installing the headlight assem-
wattage.
bly can result in damage to the
vehicle.
8 68

Maintenance
■ Lamp part malfunction due to
✽ NOTICE
✽ NOTICE
net-work failure
•
If the light bulb or lamp connector
After driving in heavy rain or wash-
The headlamp, taillight, and fog light
is removed from an operating lamp
ing, headlamp and taillamp lenses
may lit up when the head lamp switch
activated by electricity, the fuse
could appear frosty. This condition is
is turned ON, and not light up when
box’s electronic device may scan it
caused by the temperature differ-
the taillight or for light switch is turned
as a malfunction. Therefore, a lamp
ence between the lamp inside and
ON. This may be cause by network
malfunction history may be record-
outside. This is similar to the con-
failure or vehicle electrical control
ed in Diagnostic Trouble Code
densation on your windows inside
system malfunction. If there is a prob-
(DTC) in the fuse box.
your vehicle during the rain and
lem, we recommend the system be
•
It is normal for an operating lamp
doesn’t indicate a problem with your
serviced by an authorized Kia dealer.
may blink temporarily. Since this
vehicle. If the water leaks into the
occurrence is due stabilization
lamp bulb circuitry, have the vehicle
function of the vehicle’s electronic
checked by an authorized Kia dealer.
■ Lamp part malfunction due to
control device, if the lamp lights up
electrical control system stabi-
normally after temporary blinking,
lization
there is no problem in the vehicle.
A normally functioning lamp may
However, if the lamp continues to
flicker momentarily. This momentary
blink several times or turn off com-
occurrence is due to stabilization
pletely, there may be an error in the
unction of the vehicle's electrical on
vehicle’s electronic control device.
control system. If the lamp soon
So we recommend that you have
returns to normal, the vehicle does
the vehicle checked by an author-
not require service.
ized Kia dealer immediately.
However, if the lamp goes out after
he momentary flickering, or the flick-
ering continues, we recommend the
system be serviced by an authorized
Kia dealer.
8 69

Maintenance
Headlamp, Front position lamp,
Headlamp bulb
(Continued)
Front turn signal lamp, Front
A bulb should be operated
fog lamp bulb replacement
only when installed in a head-
light.
• If a bulb becomes damaged or
cracked, replace it immediate-
ly and carefully dispose of it.
• Wear eye protection when
changing a bulb. Allow the
bulb to cool down before han-
dling it.
OHD076046
OHM076030L
WARNING - Halogen
(1) Headlamp (High)
bulbs
• Halogen bulbs contain pres-
(2) Headlamp (Low)
surized gas that will produce
(3) Front turn signal lamp
flying pieces of glass if broken.
(4) Front position lamp /
• Always handle them carefully,
Daytime running lamp (LED)*
and avoid scratches and abra-
(5) Front fog lamp (Bulb)
sions. If the bulbs are lit, avoid
contact with liquids. Never
touch the glass with bare
* : if equipped
hands. Residual oil may cause
the bulb to overheat and burst
when lit.
(Continued)
8 70

Maintenance
7. Connect the headlight bulb socket-
Headlight (HID type), position,
connector.
turn signal, and front fog light
8. Install the headlight bulb cover by
bulb replacement
turning it clockwise.
If the light bulb does not operate, we
recommend that you have the vehi-
✽ NOTICE
cle checked by an authorized Kia
dealer.
If the headlight aiming adjustment
is necessary after the headlight
assembly is reinstalled, we recom-
WARNING
mend that you consult an authorized
- HID Headlight low beam
Kia dealer.
OEN076051
(if equipped)
1. Open the hood.
Do not attempt to replace or
2. Remove the headlight bulb cover
inspect the low beam (XENON
by turning it counterclockwise.
bulb) due to electric shock dan-
ger. If the low beam
(XENON
3. Disconnect the headlight bulb
bulb) is not working, we recom-
socket-connector.
mend that you have your vehi-
4. Unsnap the headlight bulb retain-
cle checked by an authorized
ing wire by depressing the end
Kia dealer.
and pushing it upward.
5. Remove the bulb from the head-
light assembly.
6. Install a new headlight bulb and
snap the headlight bulb retaining
wire into position by aligning the
wire with the groove on the bulb.
8 71

Maintenance
✽ NOTICE
Side repeater lamp replacement
Rear combination light bulb
replacement
HID lamps have superior perform-
ance vs. halogen bulbs. HID lamps
■ Type A
are estimated by the manufacturer to
last twice as long or longer than halo-
gen bulbs depending on their fre-
quency of use. They will probably
require replacement at some point in
the life of the vehicle. Cycling the
headlamps on and off more than typ-
ical use will shorten HID lamps life.
HID lamps do not fail in the same
manner as halogen incandescent
OHM078033
OHM078032
lamps. If a headlamp goes out after a
■ Type B
period of operation but will immedi-
If the light bulb does not operate, we
ately relight when the headlamp
recommend that you checked an
switch is cycled it is likely the HID
authorized Kia dealer.
lamp needs to be replaced. HID light-
ing components are more complex
than conventional halogen bulbs thus
have higher replacement cost.
OHM076074L
(1) Stop and tail light
(2) Tail light
(3) Back-up light
(4) Rear turn signal light
8 72

Maintenance
Outside light
3. Remove the rear combination light
assembly from the body of the
vehicle.
OHM078046N
OHM078044N
OHM078047N
4. Remove the socket from the
OHM078045N
assembly by turning the socket
Type A
counterclockwise until the tabs on
1. Open the tailgate.
the socket align with the slots on
the assembly.
2. Loosen the light assembly retain-
ing screws with a philips head
screwdriver.
8 73
Maintenance
5. Remove the bulb from the socket
Inside light
by pressing it in and rotating it
counterclockwise until the tabs on
the bulb align with the slots in the
socket. Pull the bulb out of the
socket.
6. Insert a new bulb by inserting it
into the socket and rotating it until
it locks into place.
7. Install the socket in the assembly
by aligning the tabs on the socket
OHM078049
with the slots in the assembly.
Push the socket into the assembly
5. Insert a new bulb by inserting it
OHM078048
and turn the socket clockwise.
into the socket and rotating it until
1. Open the tailgate.
8. Reinstall the light assembly to the
it locks into place.
body of the vehicle.
2. Remove the service cover using a
6. Install the socket in the assembly
flat-blade screwdriver.
by aligning the tabs on the socket
3. Remove the socket from the
with the slots in the assembly.
Type B
assembly by turning the socket
Push the socket into the assembly
If the light bulb does not operate, we
counterclockwise until the tabs on
and turn the socket clockwise.
recommend that you have the vehi-
the socket align with the slots on
7. Install the service cover by putting
cle checked by an authorized Kia
the assembly.
it into the service hole.
dealer.
4. Remove the bulb from the socket
by pressing it in and rotating it
counterclockwise until the tabs on
the bulb align with the slots in the
socket. Pull the bulb out of the
socket.
8 74
Maintenance
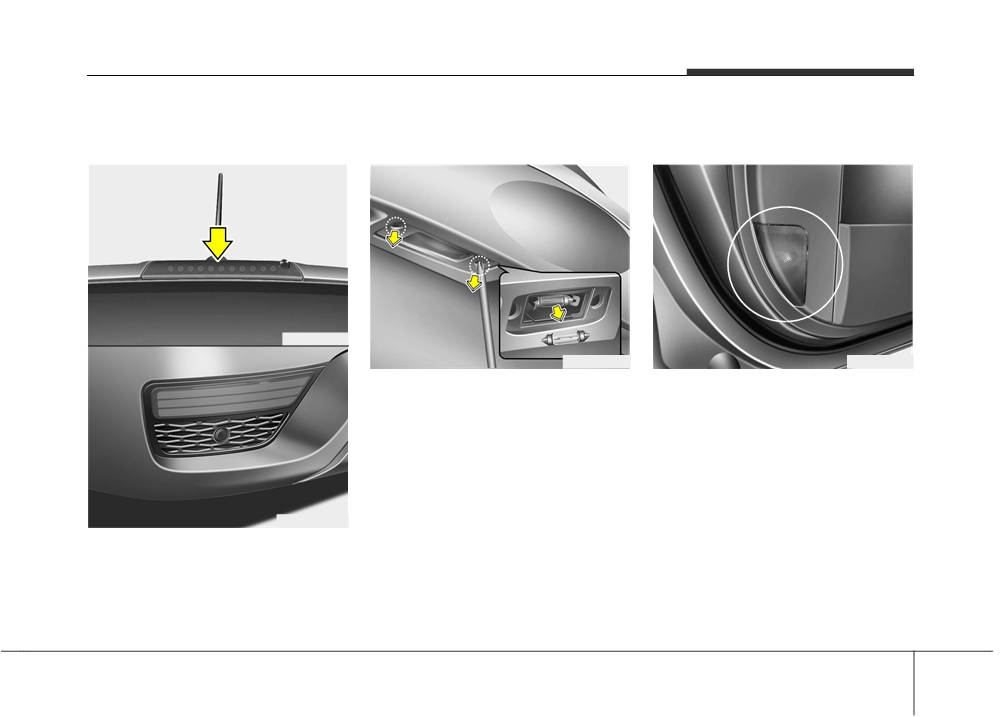
High mounted stop light and
License plate light bulb
Door courtesy lamp bulb
rear fog light bulb replacement
replacement
replacement
■ Higt mounted stop light
OHM078041
■ Rear fog light
OHM078050
OHM078058
1. Loosen the lens retaining screws
If the light does not operate, we rec-
with a philips head screwdriver.
ommend that you have the vehicle
checked by an authorized Kia dealer.
2. Remove the lens.
3. Remove the bulb by pulling it
straight out.
4. Install a new bulb.
5. Reinstall the lens securely with the
OHM076066
lens retaining screws.
If the light does not operate, we rec-
ommend that you have the vehicle
checked by an authorized Kia dealer.
8 75

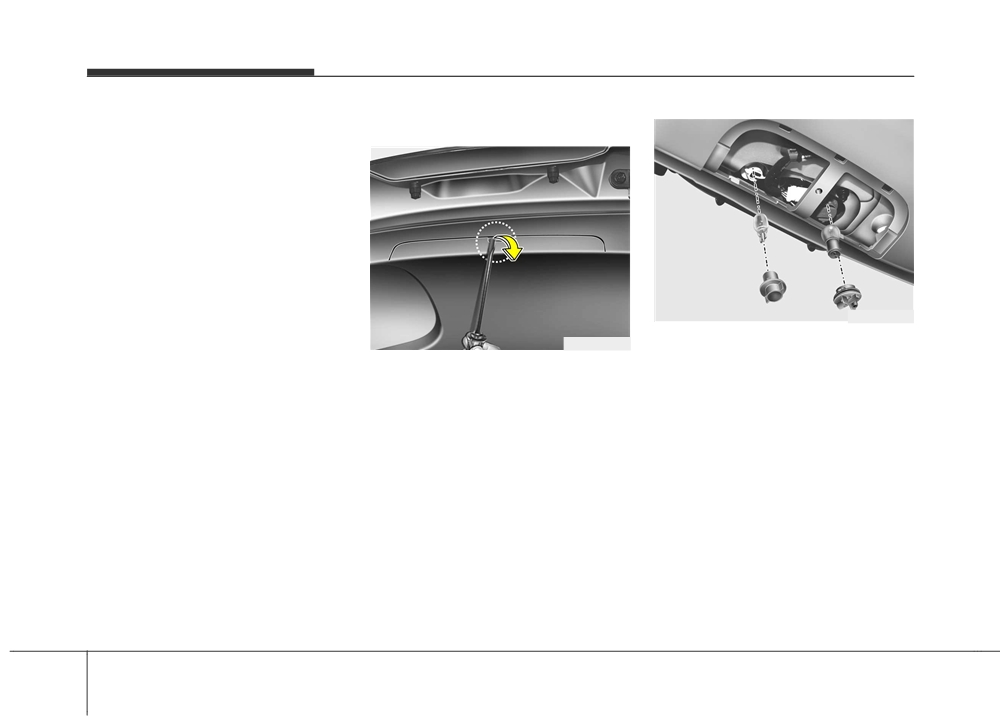
Maintenance
Map lamp
Luggage lamp
Interior light bulb replacement
1. Using a flat-blade screwdriver,
gently pry the lens from the interi-
or light housing.
WARNING
Prior to working on the Interior
Lights, ensure that the “OFF”
button is depressed to avoid
burning your fingers or receiv-
Room lamp
Vanity mirror lamp
ing an electric shock.
2. Remove the bulb by pulling it
straight out.
3. Install a new bulb in the socket.
4. Align the lens tabs with the interior
light housing notches and snap
the lens into place.
Glove box lamp
OHM076051/OHM076052/OHM079055
CAUTION
OHM078054/OHM078053
Be careful not to dirty or dam-
age the lens, lens tab, and plas-
tic housings.
8 76

Maintenance
APPEARANCE CARE
Exterior care
Finish maintenance
CAUTION
Exterior general caution
Washing
•
Do not use strong soap, chem-
To help protect your vehicle’s finish
It is very important to follow the label
ical detergents or hot water,
directions when using any chemical
from rust and deterioration, wash it
and do not wash the vehicle in
thoroughly and frequently at least
cleaner or polish. Read all warning
direct sunlight or when the
and caution statements that appear
once a month with lukewarm or cold
body of the vehicle is warm.
water.
on the label.
If you use your vehicle for off-road
•
Be careful when washing the
driving, you should wash it after each
side windows of your vehicle.
off-road trip. Pay special attention to
Especially, with high-pressure
the removal of any accumulation of
water, water may leak through
salt, dirt, mud, and other foreign mate-
the windows and wet the inte-
rials. Make sure the drain holes in the
rior.
lower edges of the doors and rocker
•
To prevent damage to the
panels are kept clear and clean.
plastic parts and lamps, do
Insects, tar, tree sap, bird droppings,
not clean with chemical sol-
industrial pollution and similar
vents or strong detergents.
deposits can damage your vehicle’s
finish if not removed immediately.
Even prompt washing with plain water
may not completely remove all these
WARNING - Wet brakes
deposits. A mild soap, safe for use on
After washing the vehicle, test
painted surfaces, may be used.
the brakes while driving slowly
After washing, rinse the vehicle thor-
to see if they have been affected
oughly with lukewarm or cold water.
by water. If braking performance
Do not allow soap to dry on the finish.
is impaired, dry the brakes by
applying them lightly while main-
taining a slow forward speed.
8 77

Maintenance
High-pressure washing
Waxing
•
When using high-pressure wash-
Wax the vehicle when water will no
ers, make sure to maintain suffi-
longer bead on the paint.
cient distance from the vehicle.
Always wash and dry the vehicle
before waxing. Use a good quality
Insufficient clearance or excessive
pressure can lead to component
liquid or paste wax, and follow the
manufacturer’s instructions. Wax all
damage or water penetration.
metal trim to protect it and to main-
•
Do not spray the camera, sensors
tain its luster.
or its surrounding area directly with
Removing oil, tar, and similar materi-
a high pressure washer. Shock
als with a spot remover will usually
applied from high pressure water
OJB037800
strip the wax from the finish. Be sure to
may cause the device to not oper-
re-wax these areas even if the rest of
ate normally.
the vehicle does not yet need waxing.
CAUTION
•
Do not bring the nozzle tip close to
Do not apply wax on embossed
boots (rubber or plastic covers) or
•
Water washing in the engine
unpainted unit, as it may tarnish the
connectors as they may be dam-
compartment including high
unit.
aged if they come into contact with
pressure water washing may
high pressure water.
cause the failure of electrical
circuits located in the engine
compartment.
•
Never allow water or other liq-
uids to come in contact with
electrical/electronic compo-
nents inside the vehicle as
this may damage them.
8 78

Maintenance
Finish damage repair
Bright-metal maintenance
CAUTION
Deep scratches or stone chips in the
• To remove road tar and insects,
• Wiping dust or dirt off the
painted surface must be repaired
use a tar remover, not a scraper or
body with a dry cloth will
promptly. Exposed metal will quickly
other sharp object.
scratch the finish.
rust and may develop into a major
• To protect the surfaces of bright-
• Do not use steel wool, abra-
repair expense.
metal parts from corrosion, apply a
sive cleaners, acid detergents
coating of wax or chrome preser-
or strong detergents contain-
vative and rub to a high luster.
✽ NOTICE
ing high alkaline or caustic
• During winter weather or in coastal
If your vehicle is damaged and
agents on chrome-plated or
areas, cover the bright metal parts
anodized aluminum parts.
requires any metal repair or
with a heavier coating of wax or
replacement, be sure the body shop
This may result in damage to
preservative. If necessary, coat the
the protective coating and
applies anti-corrosion materials to
parts with non-corrosive petroleum
the parts repaired or replaced.
cause discoloration or paint
jelly or other protective compound.
deterioration.
8 79

Maintenance
Underbody maintenance
Aluminum wheel maintenance
WARNING
Corrosive materials used for ice and
The aluminum wheels are coated
snow removal and dust control may
After washing the vehicle, test
with a clear protective finish.
collect on the underbody. If these
the brakes while driving slowly
•
Do not use any abrasive cleaner,
materials are not removed, acceler-
to see if they have been affected
polishing compound, solvent, or
ated rusting can occur on underbody
by water. If braking performance
wire brushes on aluminum wheels.
parts such as the fuel lines, frame,
is impaired, dry the brakes by
They may scratch or damage the
floor pan and exhaust system, even
applying them lightly while main-
finish.
though they have been treated with
taining a slow forward speed.
•
Clean the wheel when it has cooled.
rust protection.
•
Use only a mild soap or neutral
Thoroughly flush the vehicle under-
detergent, and rinse thoroughly
body and wheel openings with luke-
with water. Also, be sure to clean
warm or cold water once a month,
the wheels after driving on salted
after off-road driving and at the end
roads. This helps prevent corrosion.
of each winter. Pay special attention
to these areas because it is difficult
•
Avoid washing the wheels with
to see all the mud and dirt. It will do
high-speed car wash brushes.
more harm than good to wet down
•
Do not use any alkaline or acid
the road grime without removing it.
detergent. It may damage and cor-
The lower edges of the doors, rocker
rode the aluminum wheels coated
panels, and frame members have
with a clear protective finish.
drain holes that should not clog with
dirt; trapped water in these areas can
cause rusting.
8 80

Maintenance
Corrosion protection
High-corrosion areas
For all these reasons, it is particular-
ly important to keep your vehicle
Protecting your vehicle from corrosion
If you live in an area where your vehi-
clean and free of mud or accumula-
cle is regularly exposed to corrosive
By using the most advanced design
tions of other materials. This applies
materials, corrosion protection is par-
and construction practices to combat
not only to the visible surfaces but
ticularly important. Some of the com-
corrosion, we produce vehicles of the
particularly to the underside of the
mon causes of accelerated corrosion
highest quality. However, this is only
vehicle.
are road salts, dust control chemicals,
part of the job. To achieve the long-
ocean air and industrial pollution.
term corrosion resistance your vehi-
To help prevent corrosion
cle can deliver, the owner's coopera-
tion and assistance is also required.
Moisture breeds corrosion
You can help prevent corrosion from
getting started by observing the fol-
Moisture creates the conditions in
Common causes of corrosion
which corrosion is most likely to
lowing:
occur. For example, corrosion is
The most common causes of corro-
accelerated by high humidity, partic-
sion on your vehicle are:
ularly when temperatures are just
• Road salt, dirt and moisture that is
above freezing. In such conditions,
allowed to accumulate underneath
the corrosive material is kept in con-
the vehicle.
tact with the vehicle’s surface by
• Removal of paint or protective
moisture that evaporate slowly.
coatings by stones, gravel, abra-
Mud is particularly corrosive
sion or minor scrapes and dents
because it dries slowly and holds
which leave unprotected metal
moisture in contact with the vehicle.
exposed to corrosion.
Although the mud appears to be dry,
it can still retain moisture and pro-
mote corrosion.
High temperatures can also acceler-
ate corrosion of parts that are not
properly ventilated so the moisture
can be dispersed.
8 81

Maintenance
Keep your vehicle clean
• When cleaning lower door panels,
Keep paint and trim in good con-
rocker panels and frame members,
dition
The best way to prevent corrosion is
be sure that drain holes are kept
to keep your vehicle clean and free
Scratches or chips in the finish
open so that moisture can escape
of corrosive materials. Attention to
should be covered with "touch-up"
and not be trapped inside to accel-
the underside of the vehicle is partic-
paint as soon as possible to reduce
erate corrosion.
ularly important.
the possibility of corrosion. If bare
metal is showing through, the atten-
tion of a qualified body and paint
• If you live in a high-corrosion area
Keep your garage dry
shop is recommended.
— where road salts are used, near
Don't park your vehicle in a damp,
the ocean, areas with industrial pol-
poorly ventilated garage. This cre-
lution, acid rain, etc.—, you should
ates a favorable environment for cor-
Bird droppings : Bird droppings are
take extra care to prevent corrosion.
rosion. This is particularly true if you
highly corrosive and may damage
In winter, hose off the underside of
wash your vehicle in the garage or
painted surfaces in just a few hours.
your vehicle at least once a month
drive it into the garage when it is still
Always remove bird droppings as
and be sure to clean the underside
wet or covered with snow, ice or
soon as possible.
thoroughly when winter is over.
mud. Even a heated garage can con-
tribute to corrosion unless it is well
• When cleaning underneath the
Don't neglect the interior
ventilated so moisture is dispersed.
vehicle, give particular attention to
Moisture can collect under the floor
the components under the fenders
mats and carpeting and cause corro-
and other areas that are hidden
sion. Check under the mats periodi-
from view. Do a thorough job; just
cally to be sure the carpeting is dry.
dampening the accumulated mud
Use particular care if you carry fertil-
rather than washing it away will
izers, cleaning materials or chemi-
accelerate corrosion rather than
cals in the vehicle.
prevent it. Water under high pres-
sure and steam are particularly
These should be carried only in prop-
effective in removing accumulated
er containers and any spills or leaks
mud and corrosive materials.
should be cleaned up, flushed with
clean water and thoroughly dried.
8 82

Maintenance
Interior care
Cleaning the upholstery and inte-
CAUTION - Nappa leather
rior trim
Interior general precautions
seat cover (If equipped)
Vinyl
Prevent chemicals such as perfume,
Nappa leather retains the hide’s
cosmetic oil, sun cream, hand clean-
Remove dust and loose dirt from
own soft texture with visible
er, and air freshener from contacting
vinyl with a whisk broom or vacuum
pores, scars or blood vessels,
the interior parts because they may
cleaner. Clean vinyl surfaces with a
etc. Pressure marks or wrinkles
cause damage or discoloration. If
vinyl cleaner.
may be made when used.
they do contact the interior parts,
Prolonged exposure to sunlight
wipe them off immediately. If neces-
or heat may cause discol-
Fabric
sary, use a vinyle cleaner, see
oration. These things occur due
Remove dust and loose dirt from fab-
instructions for correct usage.
to the natural characteristics of
ric with a whisk broom or vacuum
cowhides. If the leather is
cleaner. Clean with a mild soap solu-
CAUTION
exposed to rain or gets wet,
tion recommended for upholstery or
remove water with a dry cloth
Never allow water or other liq-
carpets. Remove fresh spots imme-
and dry the leather in the shade
uids to come in contact with
diately with a fabric spot cleaner. If
to minimize damage. Make sure
electrical/electronic
compo-
fresh spots do not receive immediate
to keep sharp objects away from
nents inside the vehicle as this
attention, the fabric can be stained
the leather as these can create
may damage them.
and its color can be affected. Also, its
scratches on the surface. For
fire-resistant properties can be
light-colored leather, be careful
reduced if the material is not proper-
CAUTION
of spots or color transfer, such
ly maintained.
as from jeans.
When cleaning leather products
(steering wheel, seats etc.), use
CAUTION
neutral detergents or low alco-
Using anything but recommend-
hol content solutions. If you use
ed cleaners and procedures may
high alcohol content solutions
affect the fabric’s appearance
or acid/alkaline detergents, the
and fire-resistant properties.
color of the leather may fade or
the surface may get stripped off.
8 83

Maintenance
Cleaning the lap/shoulder belt
Leather seat cover using precau-
Fabric seat cover using precau-
webbing
tions (If equipped)
tions (if equipped)
Clean the belt webbing with any mild
Natural leather has visible pores,
Please clean the fabric seats regu-
soap solution recommended for
scars or blood vessels, etc. Pressure
larly with a vacuum cleaner in con-
cleaning upholstery or carpet. Follow
marks or wrinkles may be made
sideration of fabric material charac-
the instructions provided with the
when used. Prolonged exposure to
teristics. If they are heavily soiled
soap. Do not bleach or re-dye the
sunlight or heat may cause discol-
with beverage stains, etc., use a suit-
webbing because this may weaken it.
oration. These things occur due to
able interior cleaner. To prevent dam-
the natural characteristics of
age to seat covers, wipe off the seat
cowhides. If the leather is exposed to
covers down to the seams with a
Cleaning the interior window
rain or gets wet, remove water with a
large wiping motion and moderate
glass
dry cloth and dry the leather in the
pressure using a soft sponge or
If the interior glass surfaces of the
shade to minimize damage. Make
microfiber cloth.
vehicle become fogged (that is, cov-
sure to keep sharp objects away
Velcro closures on clothing or sharp
ered with an oily, greasy or waxy
from the leather as these can create
objects may cause snagging or
film), they should be cleaned with a
scratches on the surface. For light-
scratches on the surface of the
glass cleaner. Follow the directions
colored leather, be careful of spots or
seats. Make sure not to rub such
on the glass cleaner container.
color transfer, such as from jeans.
objects against the surface.
CAUTION
Do not scrape or scratch the
inside of the rear window. This
may result in damage of the rear
window defroster grid.
8 84
Большое спасибо!
Ваше мнение очень важно для нас.
Нет комментариевНе стесняйтесь поделиться с нами вашим ценным мнением.
Текст