KIA Cadenza (2018 year). Manual — part 9
4 61
Features of your vehicle
The transceiver has been tested and
complies with FCC and Industry
Canada rules. Changes or modifica-
tions not expressly approved by the
party responsible for compliance
could void the user's authority to
operate the device.
NVS
®
and Z-NAV™ are registered
trademarks. Nav
®
are of Gentex
Corporation, Zeeland, Michigan.
HomeLink
®
is a registered trademark
owned by Johnson Controls
Technology Company, Holland,
Michigan.
Outside rearview mirror
Be sure to adjust the mirror angles
before driving.
Your vehicle is equipped with both
left-hand and right-hand outside
rearview mirrors. The mirrors can be
adjusted remotely with the remote
switch. The mirror heads can be fold-
ed back to prevent damage during an
automatic vehicle wash or when
passing through a narrow street.
The right outside rearview mirror is
convex. Objects seen in the mirror
are closer than they appear.
Use your interior rearview mirror or
direct observation to determine the
actual distance of following vehicles
when changing lanes.
If the mirror is jammed with ice, do
not adjust the mirror by force. Use an
approved spray de-icer (not radiator
antifreeze) to release the frozen
mechanism or move the vehicle to a
warm place and allow the ice to melt.
WARNING
- Mirror
adjustment
Do not adjust or fold the outside
rearview mirrors while the vehi-
cle is moving. This could result
in loss of control.
CAUTION -
Rearview
mirror
Do not scrape ice off the mirror
face; this may damage the sur-
face of the glass. If ice should
restrict the movement of the mir-
ror, do not force the mirror for
adjustment. To remove ice, use a
deicer spray, a sponge or soft
cloth with very warm water.
Features of your vehicle
62
4
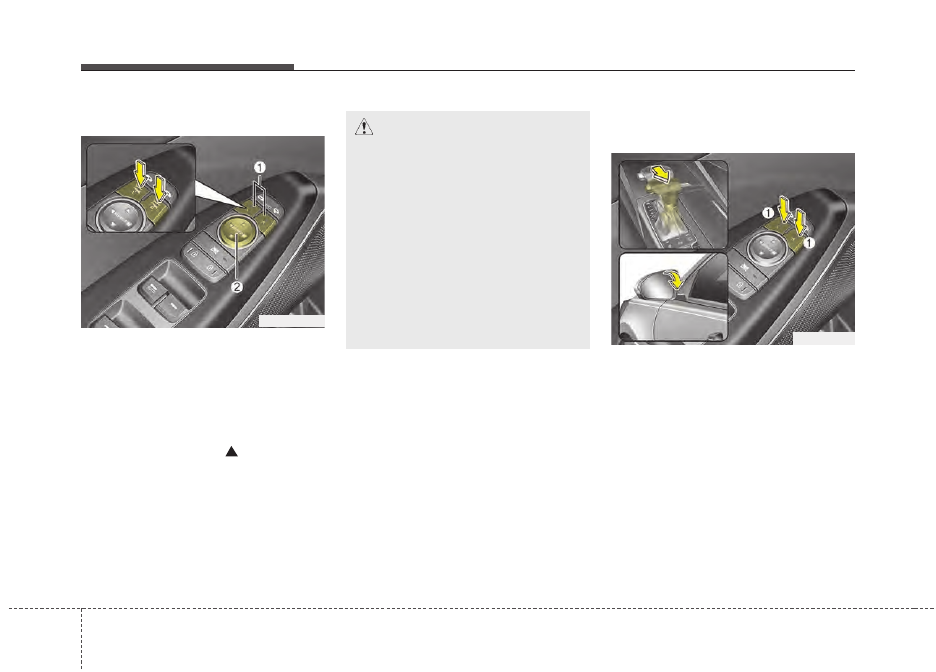
Adjusting outside rearview mirror
The electric remote control mirror
switch allows you to adjust the posi-
tion of the left and right outside
rearview mirrors. To adjust the posi-
tion of either mirror, press the R or L
button (1) to select the right side mir-
ror or the left side mirror, then press a
corresponding point (
) on the mir-
ror adjustment control to position the
selected mirror up, down, left or right.
After adjustment, press the R or L
button again to prevent the inadver-
tent adjustment.
Reverse parking aid function
(if equipped)
While the vehicle is moving in
reverse, the outside rearview mir-
ror(s) will move downward to aid
reverse parking. According to the
position of the outside rearview mir-
ror switch (1), the outside rearview
mirror(s) will operate as follows:
OYG046047
CAUTION -
Outside mirror
• The mirrors stop moving when
they reach the maximum
adjusting angles,
but the
motor continues to operate
while the switch is pressed.
Do not press the switch longer
than necessary, the motor
may be damaged.
• Do not attempt to adjust the
outside rearview mirror by
hand. Doing so may damage
the parts.
OYG046049
4 63
Features of your vehicle
L/R : When the remote control outside
rearview mirror switch (1) is
selected to the L (left) or R (right)
position, both outside rearview
mirrors will move downward.
Neutral : When the remote control
outside rearview mirror
switch is placed in the mid-
dle, the outside rearview
mirrors will not operate
while the vehicle is moving
rearward.
The outside rearview mirrors will auto-
matically revert to their original posi-
tions under the following conditions:
1. The Engine Start/Stop button is in
the OFF position.
2. Shift lever is moved to any position
except R (Reverse).
3. Remote control outside rearview
mirror switch is placed in the middle.
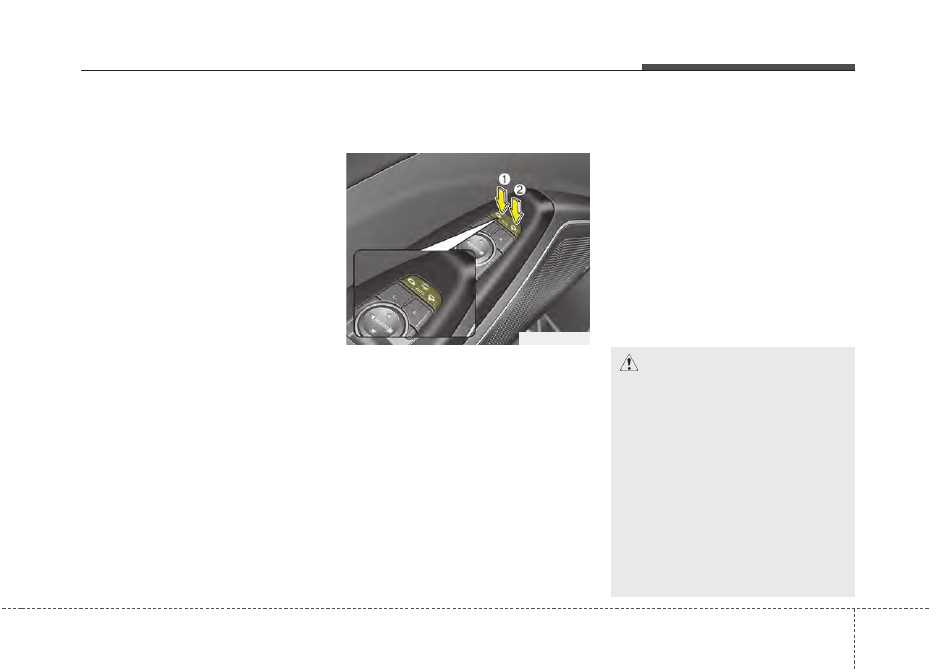
Folding the outside rearview mirror
(if equipped)
Electric type
The outside rearview mirror can be
folded or unfolded by pressing the
switch as below.
Left (1) : The mirror will unfold.
Right (2) : The mirror will fold.
Center (AUTO, 3) :
The mirror will fold or unfold automat-
ically as follows:
• The mirror will fold or unfold when
the door is locked or unlocked by
the folding key or smart key.
• The mirror will fold or unfold when
the door is locked or unlocked by the
button on the outside door handle.
• The mirror will unfold when you
approach the vehicle (all doors
closed and locked) with a smart
key in possession. (if equipped)
OYG046048L
CAUTION -
Electric type
outside rearview mirror
The electric type outside rearview
mirror operates even though the
engine start/stop button is in the
OFF position. However, to prevent
unnecessary battery discharge,
do not adjust the mirrors longer
than necessary while the engine
is not running.
In case it is an electric type out-
side rearview mirror, don’t fold it
by hand. It could cause motor fail-
ure.
Features of your vehicle
64
4
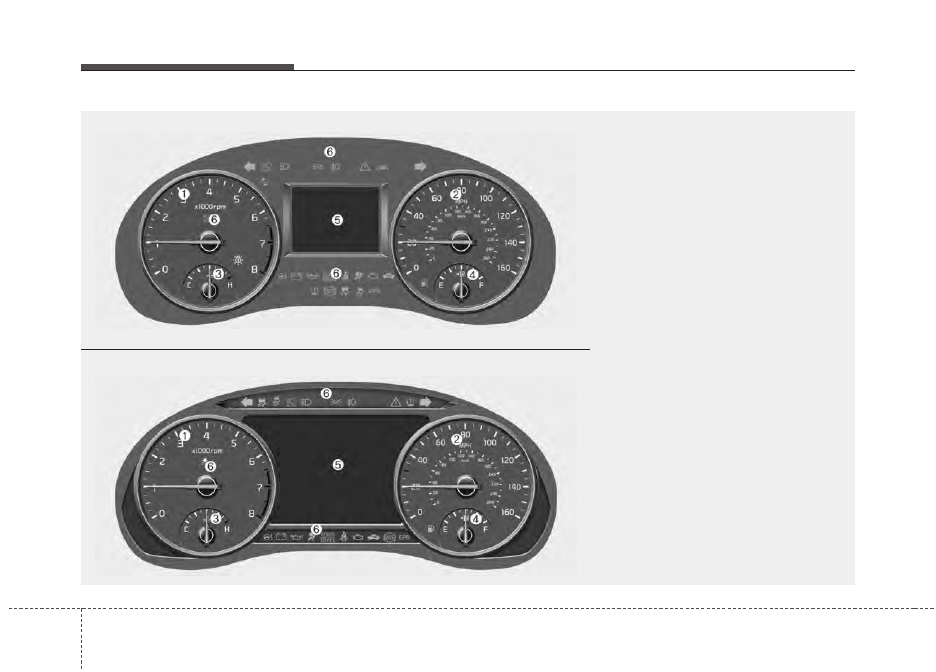
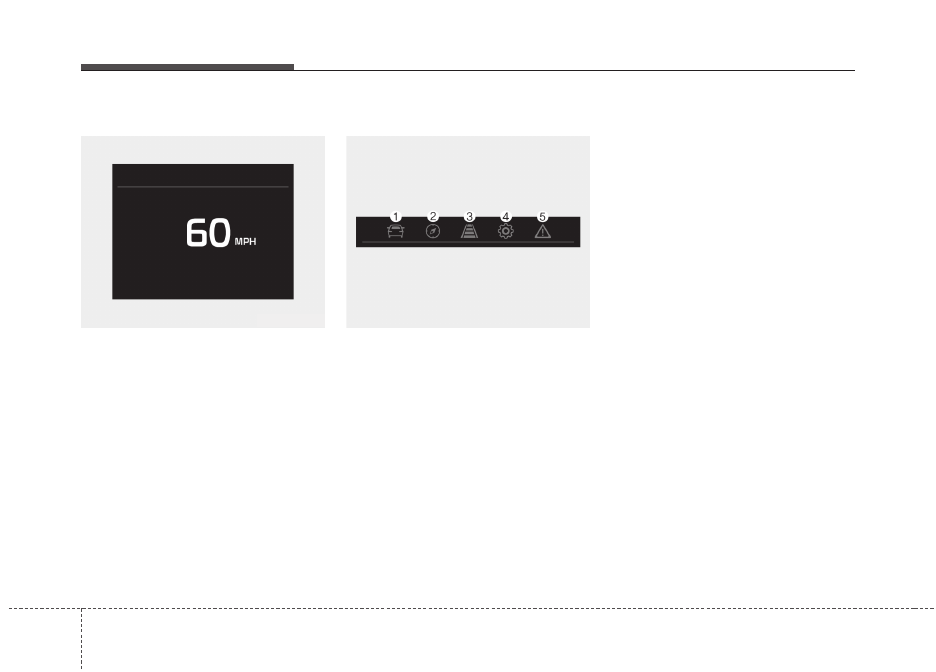
INSTRUMENT CLUSTER
1. Tachometer
2. Speedometer
3. Engine coolant temperature gauge
4. Fuel gauge
5. LCD display
6. Warning and indicator lights
OYG046100N/OYG046101N
■
■
Type A
❈
The actual cluster in the vehicle may differ
from the illustration.
For more details, refer to the “Gauges” in
this chapter.
■
■
Type B
4 65
Features of your vehicle
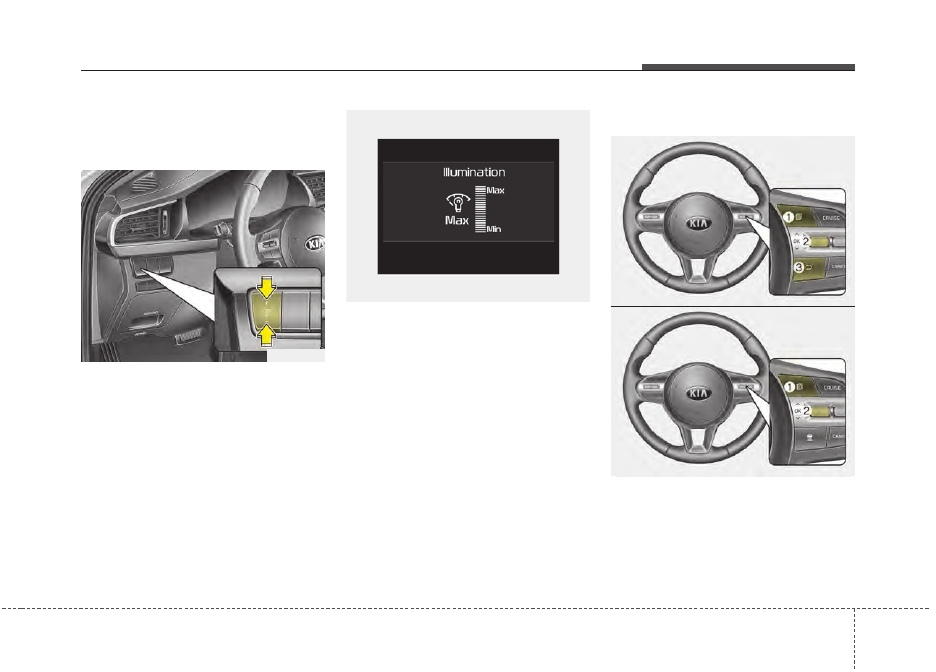
Instrument Cluster Control
Adjusting Instrument Cluster
Illumination
The brightness of the instrument
panel illumination is changed by
pressing the illumination control button
(“+” or “-”) when the Engine Start/Stop
button is ON, or the taillights are
turned on.
• If you hold the illumination control
button (“+” or “-”), the brightness
will be changed continuously.
• If the brightness reaches to the
maximum or minimum level, an
alarm will sound.
LCD Display Control
The LCD display modes can be
changed by using the control buttons
on the steering wheel.
OYG046102
OYG046157L
OYG046103L
OYG046104L
■
Type A
■
Type B

Features of your vehicle
66
4
(1)
: MODE button for changing
modes
(2)
/
/OK : SELECT scroll switch
for setting the
selected item and
RESET scroll switch
for resetting items
(3)
: RETURN button for moving
the previous mode or item
(if equipped)
❈
For the LCD modes, refer to “LCD
Display” in this chapter.
Gauges
Speedometer
The speedometer indicates the
speed of the vehicle and is calibrated
in miles per hour (mph) and/or kilo-
meters per hour (km/h).
Tachometer
The tachometer indicates the
approximate number of engine revo-
lutions per minute (rpm).
Use the tachometer to select the cor-
rect shift points and to prevent lug-
ging and/or over-revving the engine.
OQL045184
OYG046106
CAUTION -
Red zone
Do not operate the engine with-
in the tachometer's RED ZONE.
This may cause severe engine
damage.
4 67
Features of your vehicle
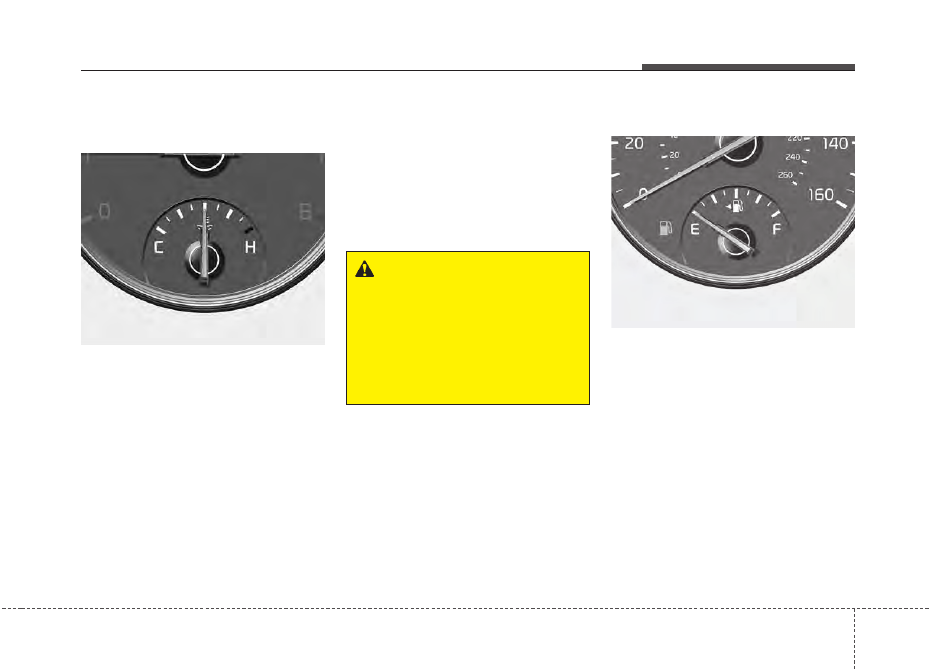
Engine Coolant Temperature
Gauge
This gauge indicates the tempera-
ture of the engine coolant when the
Engine Start/Stop button is ON.
If the gauge pointer moves beyond
the normal range area toward the “H”
position, it indicates overheating that
may damage the engine.
Do not continue driving with an over-
heated engine. If your vehicle over-
heats, refer to “If the Engine
Overheats” in chapter 6.
Fuel Gauge
This gauge indicates the approxi-
mate amount of fuel remaining in the
fuel tank.
✽
✽
NOTICE
• The fuel tank capacity is given in
chapter 8.
• The fuel gauge is supplemented by
a low fuel warning light which will
illuminate when the fuel tank is
nearly empty.
• On inclines or curves, the fuel
gauge pointer may fluctuate or the
low fuel warning light may come
on earlier than usual due to the
movement of fuel in the tank.
OYG046108
WARNING -
Hot radiator
Never remove the radiator cap
when the engine is hot. The
engine coolant is under pres-
sure and could cause severe
burns. Wait until the engine is
cool before adding coolant to
the reservoir.
OYG046168N

Features of your vehicle
68
4
✽
✽
NOTICE -
Fuel gauge
Running out of fuel can expose vehi-
cle occupants to danger. You must
top and obtain additional fuel as
soon as possible after the warning
light comes on or when the gauge
indicator comes close to the “E
(Empty)” level.
✽
✽
NOTICE
Fuel display may not be accurate if
you are filling in sloping places.
Odometer
The odometer Indicates the total dis-
tance that the vehicle has been driv-
en and should be used to determine
when periodic maintenance should
be performed.
- Odometer range : 0 ~ 999999 miles
or 0 ~ 1599999 kilometers.
Outside Temperature Gauge
This gauge indicates the current out-
side air temperatures by 1°F (1°C).
- Temperature range : -40°F ~ 211°F
(-40°C ~ 85°C)
CAUTION
- Low fuel
Avoid driving with an extremely
low fuel level. Running out of
fuel could cause the engine to
misfire damaging the catalytic
converter.
OYG046116N
OYG046117N
■
Type A
■
Type B
OYG046118N
OYG046119N
■
Type A
■
Type B
4 69
Features of your vehicle
The outside temperature on the dis-
play may not change immediately
like a general thermometer to pre-
vent the driver from being distracted.
To change the temperature unit (from
°C to °F or from °F to °C)
The temperature unit can be
changed by using the “User Settings”
mode of the LCD display.
❈
For more details, refer to “LCD
Display” in this chapter.
Transaxle Shift Indicator
Automatic Transaxle Shift Indicator
This indicator displays which auto-
matic transaxle shift lever is selected.
• Park : P
• Reverse : R
• Neutral : N
• Drive : D
• Sports Mode : 1, 2, 3, 4, 5, 6, 7, 8
OYG046120
OYG046121
■
Type A
■
Type B
Features of your vehicle
70
4
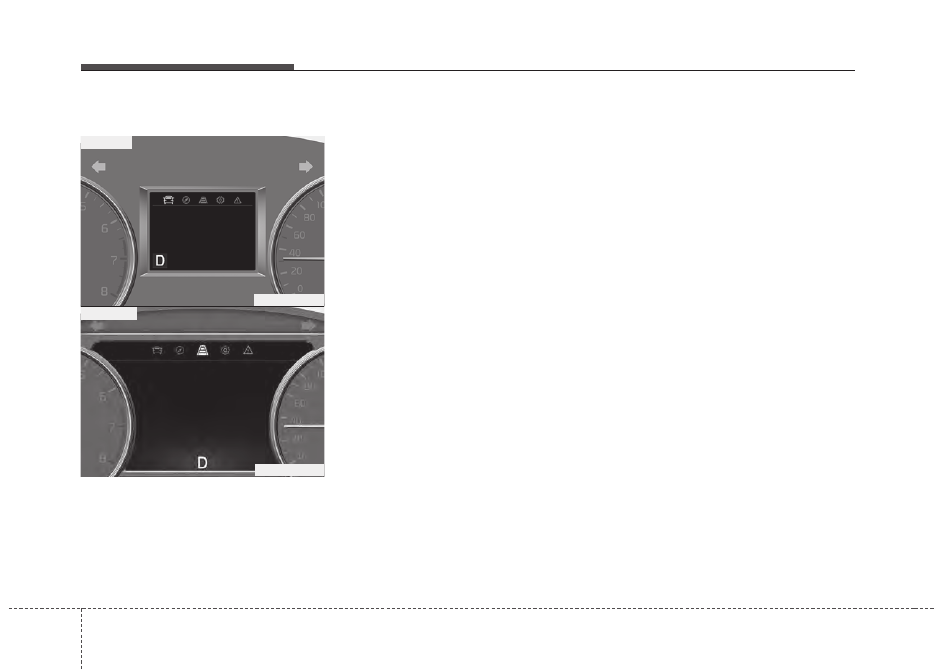
Over view
LCD windows show the following var-
ious information to drivers.
- Trip information
- LCD modes
- Warning messages
Trip information (Trip computer)
The trip computer is a microcomput-
er-controlled driver information sys-
tem that displays information related
to driving.
✽
✽
NOTICE
Some driving information stored in
the trip computer (for example
Average Vehicle Speed) resets if the
battery is disconnected.
LCD WINDOWS (IF EQUIPPED)
OYG046162L
OYG046161L
■
Type A
■
Type B
4 71
Features of your vehicle
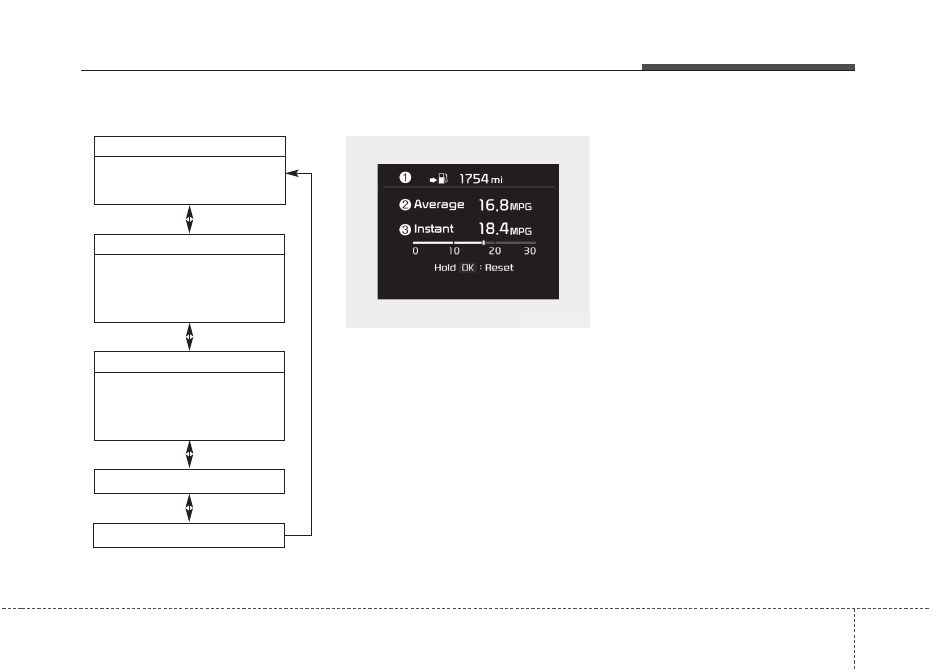
Trip Modes
Fuel Economy
Distance To Empty (1)
• The distance to empty is the esti-
mated distance the vehicle can be
driven with the remaining fuel.
- Distance range : 1 ~ 9999mi or 1
~ 9999km.
• If the estimated distance is below
1mi (1km) the trip computer will dis-
play “---” as distance to empty.
✽
✽
NOTICE
• If the vehicle is not on level ground
or the battery power has been
interrupted, the distance to empty
function may not operate correctly.
• The distance to empty may differ
from the actual driving distance as
it is an estimate of the available
driving distance.
• The trip computer may not regis-
ter additional fuel if less than
1.6gallons (6liters) of fuel are
added to the vehicle.
• The fuel economy and distance to
empty may vary significantly based
on driving conditions, driving
habits, and condition of the vehicle.
OYG046153N
• Tripmeter
• Fuel Economy
• Timer
Accumulated Info
• Tripmeter
• Fuel Economy
• Timer
Digital speedometer
Drive Info
• Average Fuel Economy
• Instant Fuel Economy
TRIP
Smart Shift
Features of your vehicle
72
4
Average Fuel Economy (2)
• The average fuel economy is calcu-
lated by the total driving distance
and fuel consumption since the last
average fuel economy reset.
- Fuel economy range: 0.0 ~ 99.9
MPG or L/100km
• The average fuel economy can be
reset both manually and automati-
cally.
Manual reset
To clear the average fuel economy
manually, press the OK button
(reset) on the steering wheel for
more than 1 second when the aver-
age fuel economy is displayed.
Automatic reset
To make the average fuel economy
be reset automatically whenever
refueling, select the “Fuel economy
auto reset” mode in User Setting
menu of the LCD window (Refer to
“LCD window”).
Under “Fuel economy auto reset”
mode, the average fuel economy will
be cleared to zero (---) when the vehi-
cle speed exceeds 1 mph (1 km/h)
after refueling more than 2 gallons (6
liters).
✽
✽
NOTICE
The average fuel economy is not dis-
played for more accurate calculation
if the vehicle does not drive more
than 10 seconds or 0.03 miles (50
meters) since Engine Start/Stop but-
ton is turned to ON.
Instant Fuel Economy (3)
• This mode displays the instant fuel
economy during the last few sec-
onds when the vehicle speed is
more than 4.9 mph (8 km/h).
- Fuel economy range: 0 ~ 50
(MPG), 0 ~ 30 (km/L, L/100 km).
CAUTION -
Low Fuel
Level
Level warning light on or with
the fuel level below “0 or E” can
cause the engine to misfire and
damage the catalytic converter
(if equipped).
4 73
Features of your vehicle
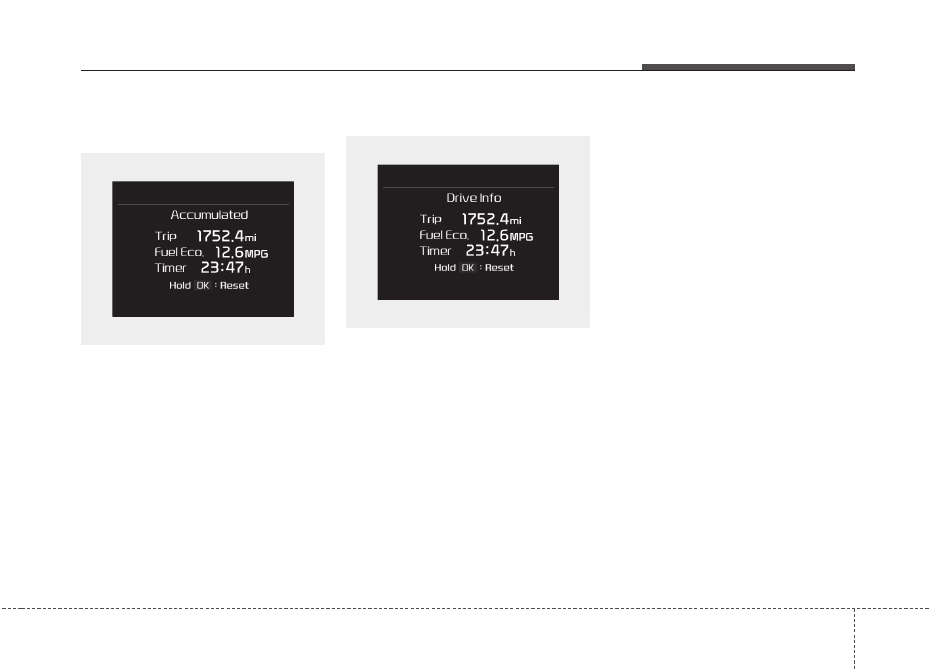
Accumulated driving information
mode
Displays accumulated information
starting from mileage/fuel
efficiency/time default point.
• Accumulated information is calcu-
lated after the vehicle has run for
more than 0.19 mi (300 meters).
• If you press “OK” button for more
than 1 second after the Cumulative
Information is displayed, the infor-
mation will be reset.
• If the engine is running, even when
the vehicle is not in motion, the
information will be accumulated.
One time driving information mode
The vehicle will display Driving
Information once per one ignition cycle.
- Fuel efficiency is calculated after the
vehicle has run for more than 0.19 mi
(300 meters).
- The Driving Information will be reset
4 hours after ignition has been turned
off. So, when the vehicle ignition is
turned on within 4 hours, the informa-
tion will not be reset.
- If you press “OK” button for more
than 1 second after the Driving
Information is displayed, the informa-
tion will be reset.
- If the engine is running, even when
the vehicle is not in motion, the infor-
mation will be accumulated.
OYG046154N
OYG046155N
Features of your vehicle
74
4
Digital speedometer
This mode displays the current
speed of the vehicle.
LCD Modes
(1) Trip Computer mode
This mode displays driving informa-
tion like the tripmeter, fuel economy,
and so on.
❈
For more details, refer to “Trip
Computer” in this chapter.
(2) Turn By Turn mode (if equipped)
This mode displays the state of the
navigation.
(3) ASCC/LDWS (if equipped)
This mode displays the state of the
Advanced Smart Cruise Control
(ASCC) and Lane Departure
Warning System (LDWS).
(4) User Setting mode
On this mode, you can change set-
tings of the doors, lamps and so on.
(5) Master warning mode
This mode informs of warning mes-
sages related to washer fluid or mal-
function of Blind Spot Detection sys-
tem (BSD) and so on.
❈
For controlling the LCD modes,
refer to “LCD window Control” in
this chapter.
OYG048156N
OYG046453L
4 75
Features of your vehicle
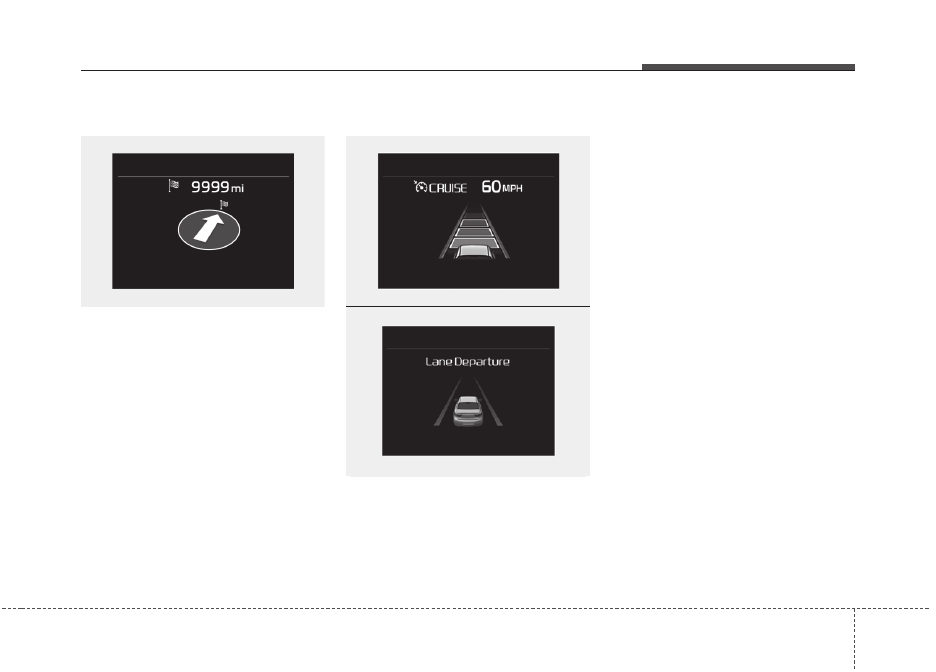
Turn By Turn Mode (if equipped)
This mode displays the state of the
navigation.
ASCC/LDWS Mode (if equipped)
This mode displays the state of the
Advanced Smart Cruise Control
(ASCC) and Lane Departure
Warning System (LDWS).
❈
For more information, refer to
“Advanced Smart Cruise Control
(ASCC)” and “Lane Departure
Warning System (LDWS)” in chap-
ter 5.
OYG046123N
OYG048124N
OYG046169N
■
LDWS
■
ASCC
Features of your vehicle
76
4
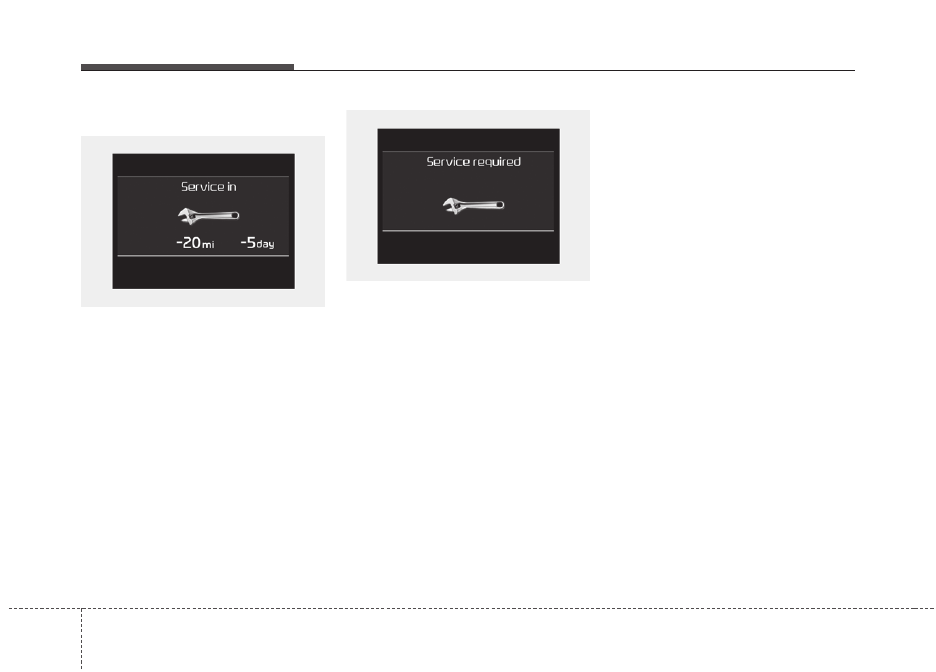
Service Mode
Service in
It calculates and displays when you
need a scheduled maintenance
service (mileage or days).
If the remaining mileage or time
reaches 900 mi (1,500 km) or 30
days, “Service in” message is dis-
played for several seconds each time
you set the Engine Start/Stop Button
to the ON position.
Service required
If you do not have your vehicle serv-
iced according to the already inputted
service interval, “Service required”
message is displayed for several sec-
onds each time you set the Engine
Start/Stop Button to the ON position.
To reset the service interval to the
mileage and days you inputted before:
• Press the OK button (reset) for
more than 1 second.
✽
✽
NOTICE
If any of the following conditions
occurs, the mileage and days may be
incorrect.
- The battery cable is disconnected.
- The fuse switch is turned off.
- The battery is discharged.
OYG046164L
OYG046163N
Нет комментариевНе стесняйтесь поделиться с нами вашим ценным мнением.
Текст