KIA Forte 5 / Forte Koup (2018 year). Manual — part 34

Maintenance
78
7
EMS Block (NU 2.0L GDI)
Fuse Name
Fuse rating
Circuit Protected
F/PUMP
20A
F/Pump Relay
ECU 4
15A
PCM/ECM
A/CON
15A
A/CON COMP Relay
INJECTOR
10A
EMS Block (F/Pump Relay)
ECU 2
10A
PCM/ECM
IGN COIL
20A
Ignition Coil #1/#2/#3/#4, Condenser
ECU 1
20A
PCM/ECM
SENSOR 2
10A
Oxygen Sensor (Up), Oxygen Sensor (Down), Variable Intake Solenoid Valve, EMS Block (A/CON
COMP Relay)
Purge Control Solenoid Valve, Canister Close Valve, E/R Junction Block (C/Fan 2 Relay)Oil Control
Valve #1 (Intake), Oil Control Valve #2 (Exhaust)
SPARE
10A
-
SPARE
10A
-
SPARE
15A
-
SPARE
20A
-
Relay Name
Type
ENGINE CONTROL RELAY
PCB
A/CON COMP RELAY
PCB
F/PUMP RELAY
PCB

7 79
Maintenance
EMS Block GAMMA 1.6L T-GDI
Fuse Name
Fuse rating
Circuit Protected
F/PUMP
20A
F/Pump Relay
ECU 4
15A
PCM/ECM
A/CON
15A
A/CON COMP Relay
INJECTOR
10A
EMS Block (F/Pump Relay)
ECU 2
10A
PCM/ECM
IGN COIL
20A
Ignition Coil #1/#2/#3/#4, Condenser
ECU 1
20A
PCM/ECM
SENSOR 2
10A
Oxygen Sensor (Up), Oxygen Sensor (Down), Variable Intake Solenoid Valve, EMS Block (A/CON
COMP Relay)
Purge Control Solenoid Valve, Canister Close Valve, E/R Junction Block (C/Fan 2 Relay)Oil Control
Valve #1 (Intake), Oil Control Valve #2 (Exhaust)
SPARE
10A
-
SPARE
10A
-
SPARE
15A
-
SPARE
20A
-
Relay Name
Type
ENGINE CONTROL RELAY
PCB
A/CON COMP RELAY
PCB
F/PUMP RELAY
PCB

Maintenance
80
7
LIGHT BULBS
Use only the bulbs of the specified
wattage.
If you don’t have necessary tools, the
correct bulbs and the expertise, con-
sult an authorized Kia dealer. In
many cases, it is difficult to replace
vehicle light bulbs because other
parts of the vehicle must be removed
before you can get to the bulb. This is
especially true if you have to remove
the headlight assembly to get to the
bulb(s).
Removing/installing the
headlight assembly can result in
damage to the vehicle.
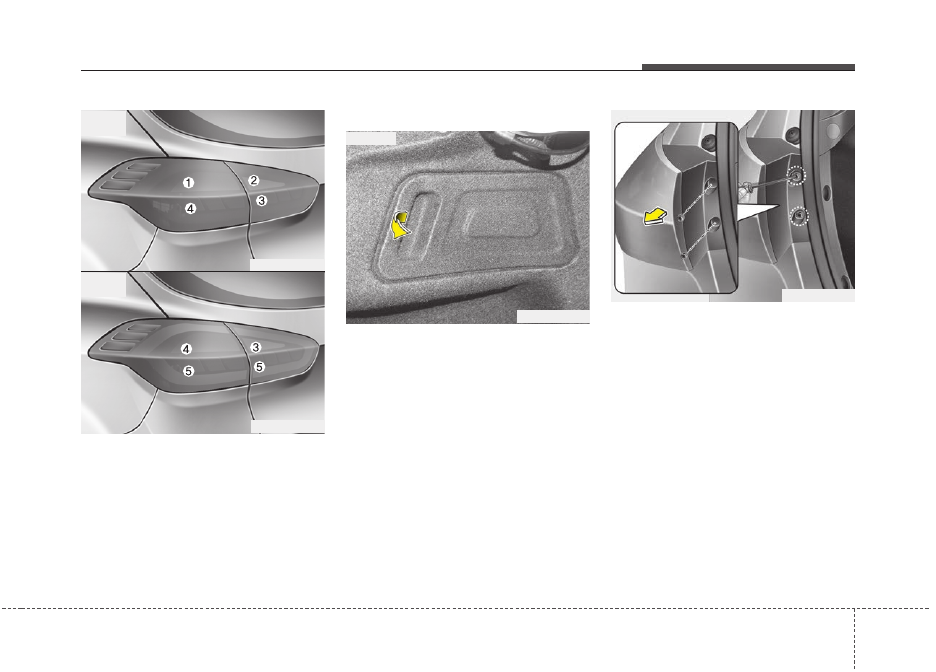
Front lights replacement
(1) Headlight (High)/Daytime running
light (DRL)
(2) Headlight (Low)
(3) Front turn signal light
(4) Front fog light*
(5) Front position light*
(6) Side marker
* : if equipped
WARNING
- Lights
Prior to working on the light,
firmly apply the parking brake,
ensure that the ignition switch
is turned to the “LOCK” position
and turn off the lights to avoid
burning your fingers or receiv-
ing an electric shock.
CAUTION
- Light
replacement
Be sure to replace the burned-
out bulb with one of the same
wattage rating. Otherwise, it
may cause damage to the fuse
or electric wiring system.
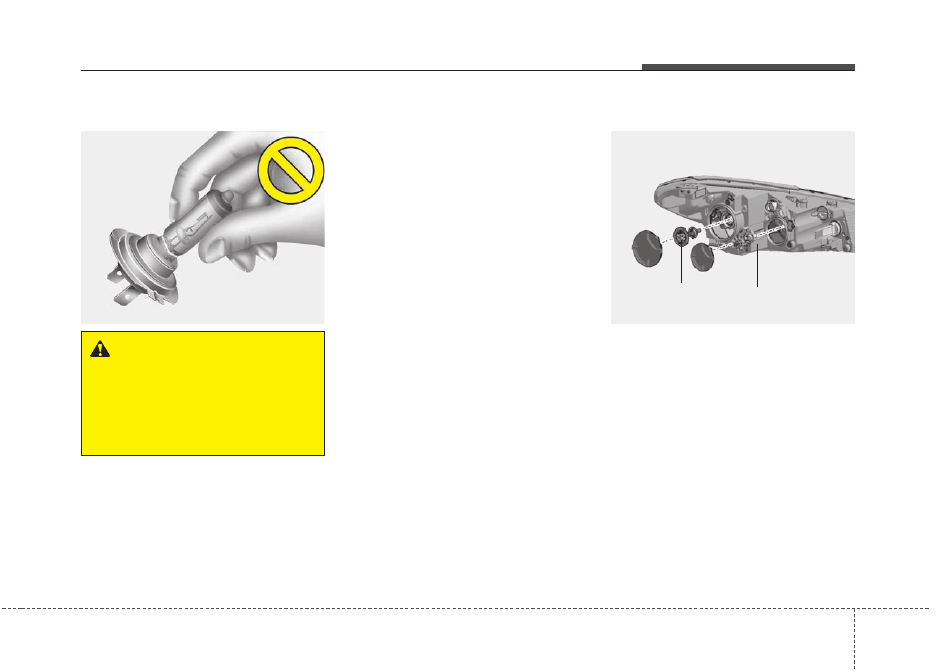
OYDM076048
7 81
Maintenance
Headlight bulb
Always handle them carefully, and
avoid scratches and abrasions. If the
bulbs are lit, avoid contact with liq-
uids. Never touch the glass with bare
hands. Residual oil may cause the
bulb to overheat and burst when lit. A
bulb should be operated only when
installed in a headlight.
If a bulb becomes damaged or
cracked, replace it immediately and
carefully dispose of it.
Wear eye protection when changing
a bulb. Allow the bulb to cool down
before handling it.
Headlight (bulb type)
1. Turn off the engine.
2. Open the hood.
3. Remove the headlight bulb cover
by turning it counterclockwise.
4. Disconnect the headlight bulb
socket-connector.
5. Remove the bulb from the head-
light assembly.
6. Install a new headlight bulb.
7. Connect the headlight bulb socket-
connector.
8. Install the headlight bulb cover by
turning it clockwise.
OHD076046
WARNING
- Halogen
bulbs
Handle halogen bulbs with care.
Halogen bulbs contain pressur-
ized gas that will produce flying
pieces of glass if broken.
OYD076010L
Low
HIgh
Maintenance
82
7
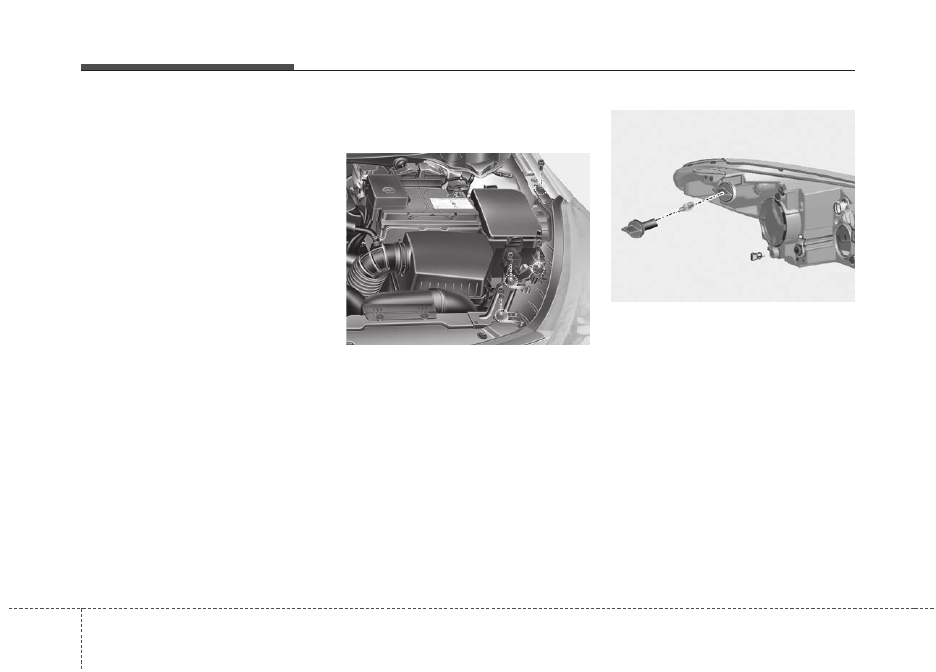
If the headlight aiming adjustment is
necessary after the headlight
assembly is reinstalled, consult an
authorized Kia dealer.
Front side marker/Front turn sig-
nal light
1. Open the hood.
2. Disconnect the negative battery
cable.
3. Loosen the retaining bolts and
remove the headlamp assembly
from the body of the vehicle. If you
can reach to the bulb without
removing the headlamp assembly,
you don’t need to do step 3.
4. Disconnect the power connec
tor(s) from the back of the head
lamp assembly.
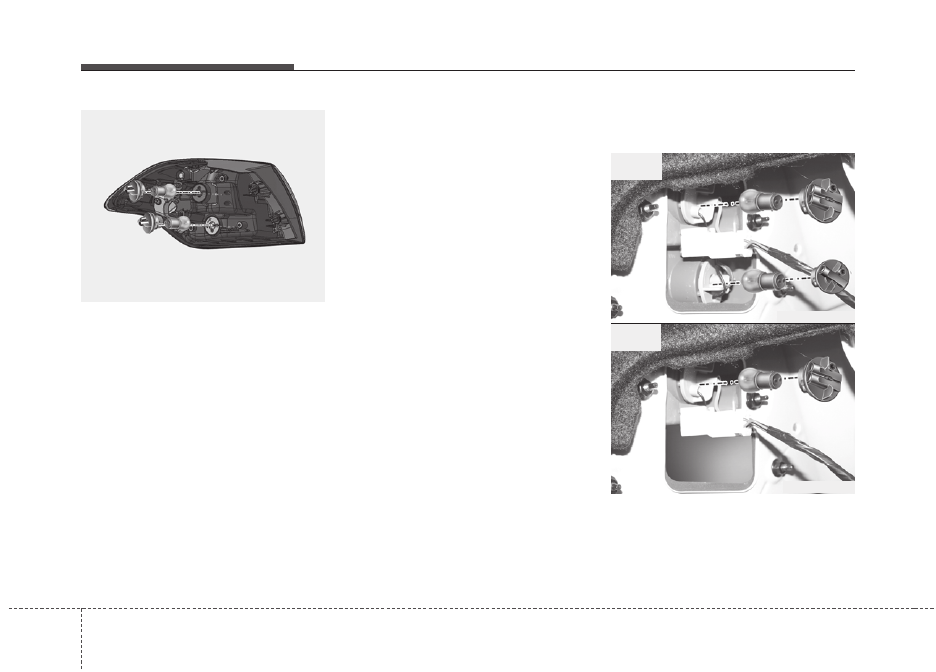
Front side marker
5. Remove the socket from the
assembly by turning the socket
counterclockwise until the tabs on
the socket align with the slots on
the assembly.
6. Pull the bulb out of the socket.
7. Insert a new bulb.
8. Install the socket in the assembly
by aligning the tabs on the socket
with the slots in the assembly.
Push the socket into assembly
and turn the socket clockwise.
9. Reinstall the headlamp assembly,
bumper to the body of the vehicle.
OYDDMC2043
OYDM076073
7 83
Maintenance
Front turn signal light
5. Remove the socket from the
assembly by turning the socket
counterclockwise until the tabs on
the socket align with the slots on
the assembly.
6. Remove the bulb from the socket
by pressing it in and rotating it
counterclockwise until the tabs on
the bulb align with the slots in the
socket. Pull the bulb out of the
socket.
7. Insert a new bulb by inserting it
into the socket and rotating it until
it locks into place.
8. Install the socket in the assembly
by aligning the tabs on the socket
with the slots in the assembly.
Push the socket into assembly
and turn the socket clockwise.
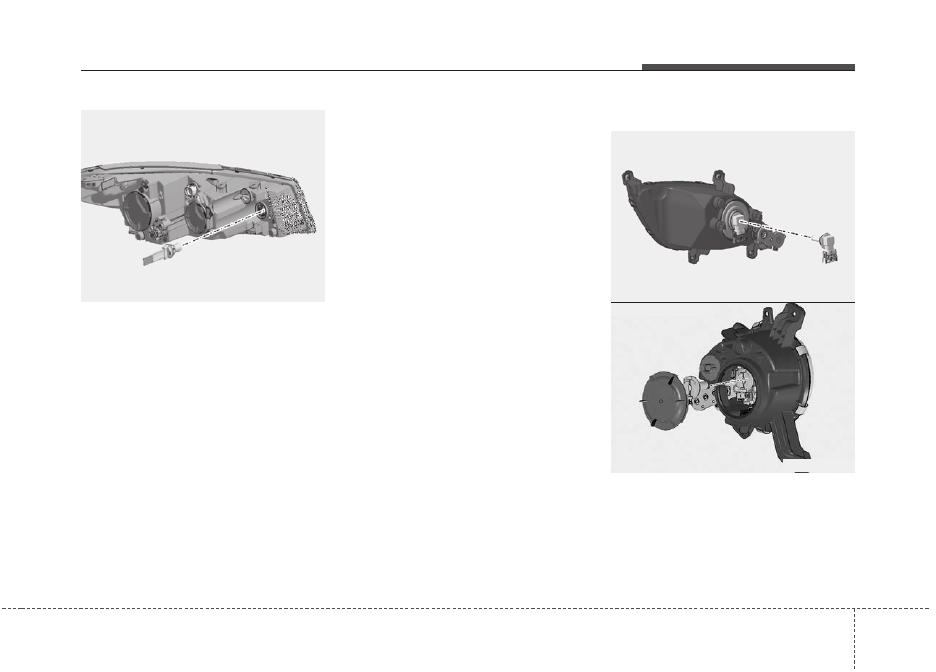
Front fog light (if equipped)
1. Turn off the engine.
2. Remove the under cover by rotat-
ing the screws.
3. Reach your hand into the back of
the front bumper.
4. Disconnect the power connector.
OYD076085L
OYD076012L
OYDM076083
■
4 Door, 5 Door
■
5 Door Turbo
Maintenance
84
7
5.Remove the bulb-socket from the
housing by turning the socket
counter clockwise until the tabs on
the socket align with the slots on
the housing.
6.Install the new bulb-socket into the
housing by aligning the tabs on the
socket with the slots in the hous-
ing.
Push the socket into the housing
and turn the socket clockwise.
7.Connect the power connector.
8.Reinstall the front under cover.
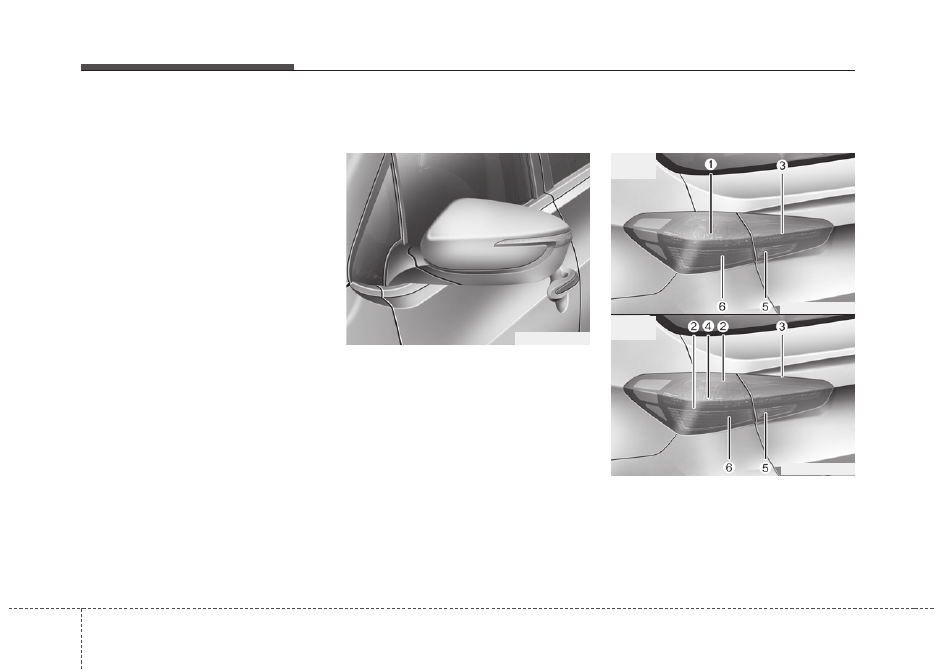
Outside Mirrors with Turn
Signal Indicators (if equipped)
If the light (LED) does not operate,
have the vehicle checked by an
authorized Kia dealer
Rear combination lamp bulb
replacement
(1) Tail and Stop and Side marker lamp
(2) Tail and Side marker lamp
(3) Tail lamp
(4) Stop lamp
(5) Back up lamp
(6) Rear turn signal lamp
OYDDMC2017
OYDM076079
OYDM076080
• 4 Door
Type A
• 4 Door
Type B
7 85
Maintenance
(1) Stop and tail lamp
(2) Tail lamp
(3) Back-up lamp
(4) Rear turn signal lamp
(5) Tail stop lamp or stop lamp (LED)
If the light (LED) does not operate,
have the vehicle checked by an
authorized Kia dealer
Outside lamp
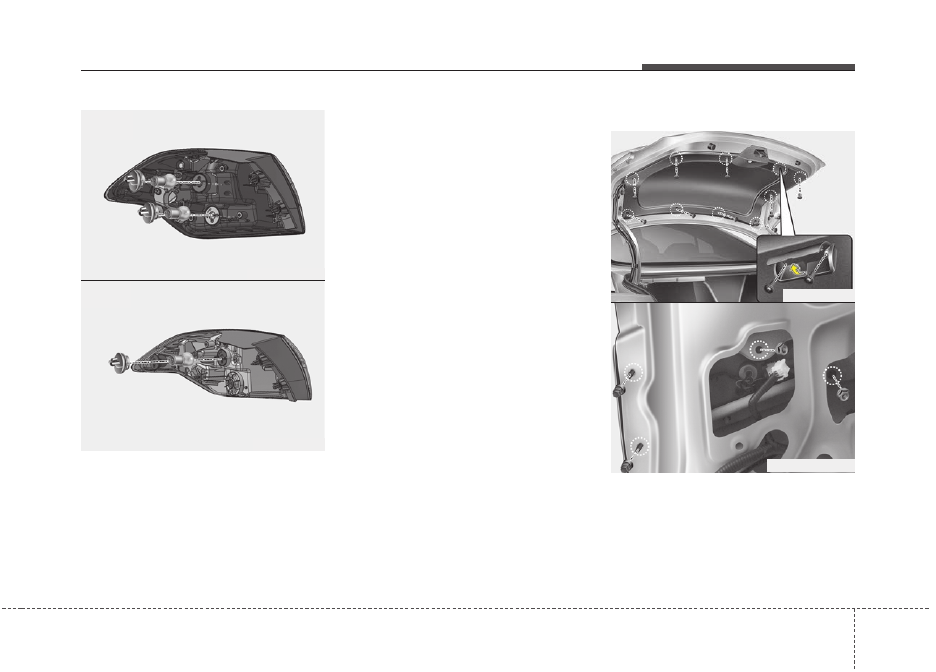
• 4 Door
1. Open the trunk lid.
2. Remove the service cover by
pulling out the service cover.
• 5 Door
1. Turn off the engine.
2. Open the tailgate.
3. Loosen the light assembly retain-
ing screws with a cross-tip screw-
driver.
4. Remove the rear combination light
assembly from the body of the
vehicle.
OYDDMC2029
• 4 Door
OYDDMC3064
• 5 Door
OYDDMC3075
OYDDMC3063
• 5 Door
Type A
• 5 Door
Type B
Maintenance
86
7
5. Remove the socket from the
assembly by turning the socket
counterclockwise until the tabs on
the socket align with the slots on
the assembly.
6. Remove the bulb from the socket
by pressing it in and rotating it
counterclockwise until the tabs on
the bulb align with the slots in the
socket. Pull the bulb out of the
socket.
7. Insert a new bulb by inserting it
into the socket and rotating it until
it locks into place.
8. Install the socket in the assembly
by aligning the tabs on the socket
with the slots in the assembly.
Push the socket into the assembly
and turn the socket clockwise.
9. Reinstall the light assembly to the
body of the vehicle.
Stop/Tail lamp and turn signal
lamp
OYDDMC3068
• 5 Door
OYDDMC2030
OYDDMC2031
• 4 Door
Type A
• 4 Door
Type B
7 87
Maintenance
1. Remove the socket from the
assembly by turning the socket
counterclockwise until the tabs on
the socket align with the slots on
the assembly.
2. Remove the bulb from the socket
by pressing it in and rotating it
counterclockwise until the tabs on
the bulb align with the slots in the
socket. Pull the bulb out of the
socket.
3. Insert a new bulb by inserting it
into the socket and rotating it until
it locks into place.
4. Install the socket in the assembly
by aligning the tabs on the socket
with the slots in the assembly.
Push the socket into the assembly
and turn the socket clockwise.
5. Install the service cover by putting
it into the service hole.
Stop and tail light (LED type)
If the light does not operate, we rec-
ommend that the system be checked
by an authorized Kia dealer.
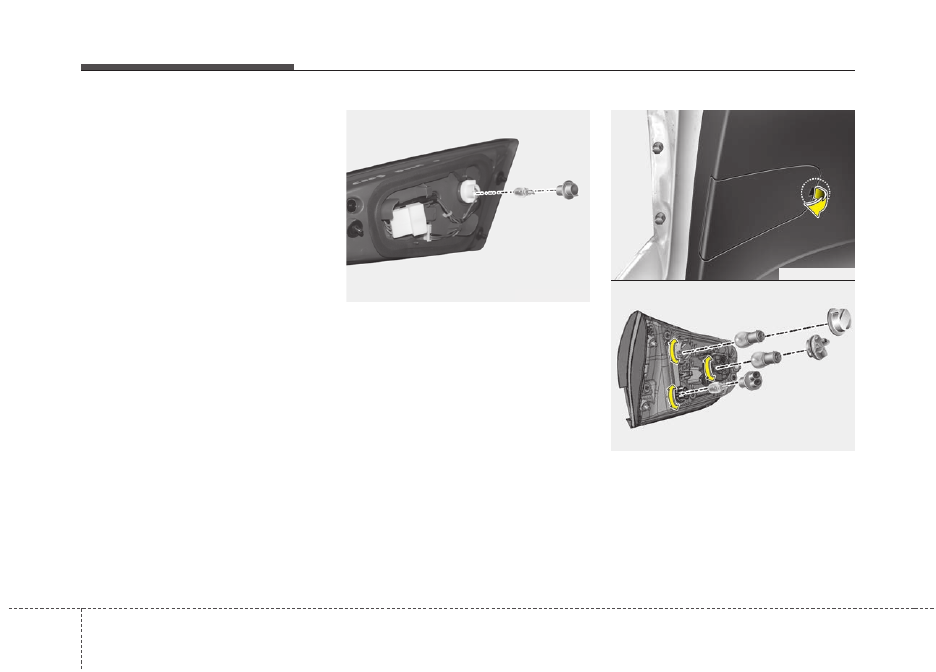
Inside lamp
• 4 Door
1. Open the trunk.
2. Loosen the retaining screw of the
trunk lid cover and then remove
the cover.
OYDDMC3068
OYDDMC3067
• 5 Door
Type A
• 5 Door
Type B
OYDDMC2021
OYDDMC2022CN
• 4 Door
Maintenance
88
7
3. Disconnect the connector and
then remove the nuts by turning
the nuts counter clockwise.
• 4 Door
Back up lamp
1. Take the lamp assembly out.
2. Remove the socket from the
assembly by turning the socket
counterclockwise until the tabs on
the socket align with the slots on
the assembly.
3. Remove the bulb by pulling it out.
4. Insert a new bulb by inserting it
into the socket.
5. Install the light assembly to the
trunk.
6. Reinstall the nuts and connector
and then the trunk lid cover by
pushing in the screw.
• 5 Door
1. Turn off the engine.
2. Open the tailgate.
3. Remove the service cover.
OYDDMC2023
OYDDMC3065
OYDDMC3070
• 5 Door
7 89
Maintenance
4. Remove the socket from the
assembly by turning the socket
counterclockwise until the tabs on
the socket align with the slots on
the assembly.
5. Remove the bulb from the socket
by pressing it in and rotating it
counterclockwise until the tabs on
the bulb align with the slots in the
socket. Pull the bulb out of the
socket.
6. Insert a new bulb by inserting it
into the socket and rotating it until
it locks into place.
7. Install the socket in the assembly
by aligning the tabs on the socket
with the slots in the assembly.
Push the socket into the assembly
and turn the socket clockwise.
8. Install the service cover by putting
it into the service hole.
Stop/tail light (LED type)
If the light does not operate, we rec-
ommend that the system be checked
by an authorized Kia dealer.
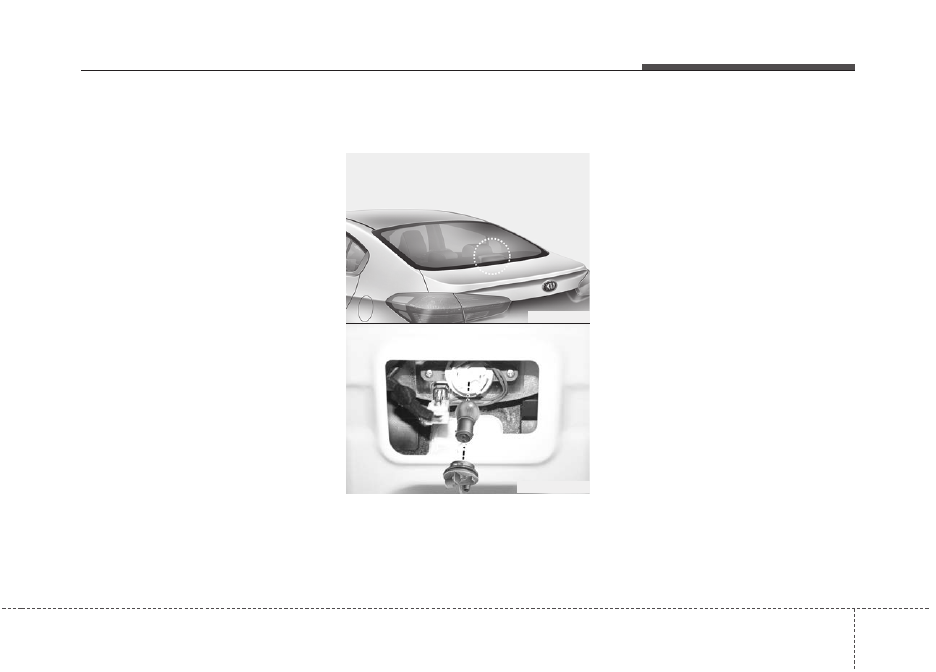
High mounted stop lamp
replacement
• 4 Door
1. Open the trunk.
2. Remove the socket by turning it
counterclockwise until the tabs on
the socket align with the slots.
3. Remove the bulb from the socket
by pressing it in and rotating it
counterclockwise until the tabs on
the bulb align with the slots in the
socket. Pull the bulb out of the
socket.
4. Insert a new bulb by inserting it
into the socket and rotating it until
it locks into place.
5. Install the socket in the assembly
by aligning the tabs on the socket
with the slots in the assembly.
Push the socket into the assembly
and turn the socket clockwise.
OYD046058
OYDDMC2025
• 4 Door
Maintenance
90
7
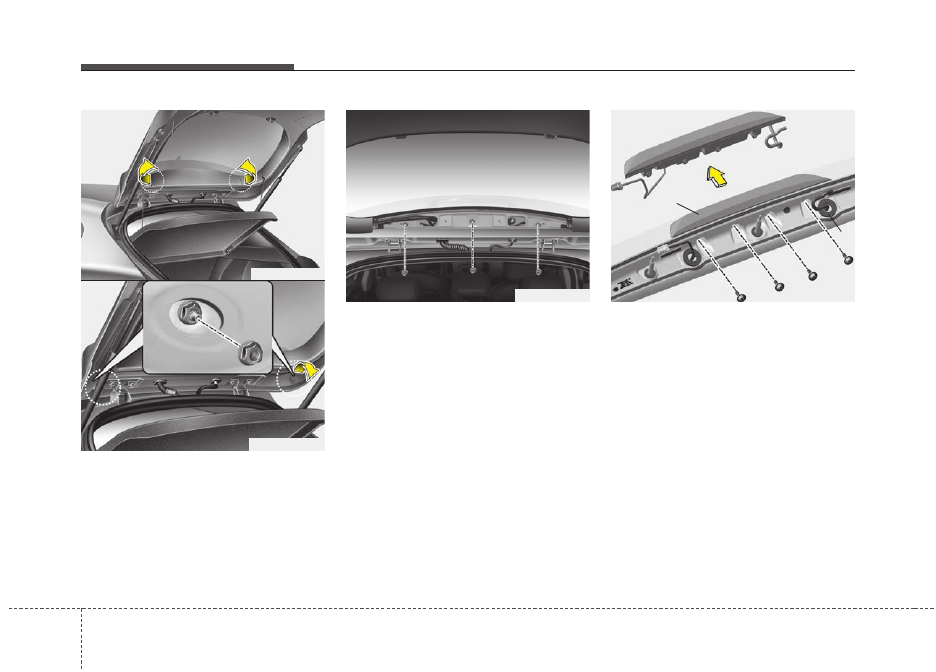
• 5 Door
1. Open the tailgate.
2. Gently remove the center cover of
the rear tailgate trim.
3. Disconnect the electrical connector.
4. Loosen the retaining nuts and
remove the spoiler.
5. Remove the high mounted stop
lamp assembly (A) after loosening
the nuts and washer nozzle (B).
6. Reinstall a new lamp assembly in
the reverse order of removal.
OYDDMC3072
OYDDMC3074
• 5 Door
OYDDMC3073
OYDDMC3071
B
A
7 91
Maintenance
License plate lamp bulb
replacement
1. Remove the cover by pressing it
as direction of the arrows.
2. Remove the socket by turning it
counterclockwise.
3. Remove the bulb by pulling it
straight out.
4. Install a new bulb.
5. Reinstall the bulb assembly
securely with the retaining screws.
OYDDMC2032
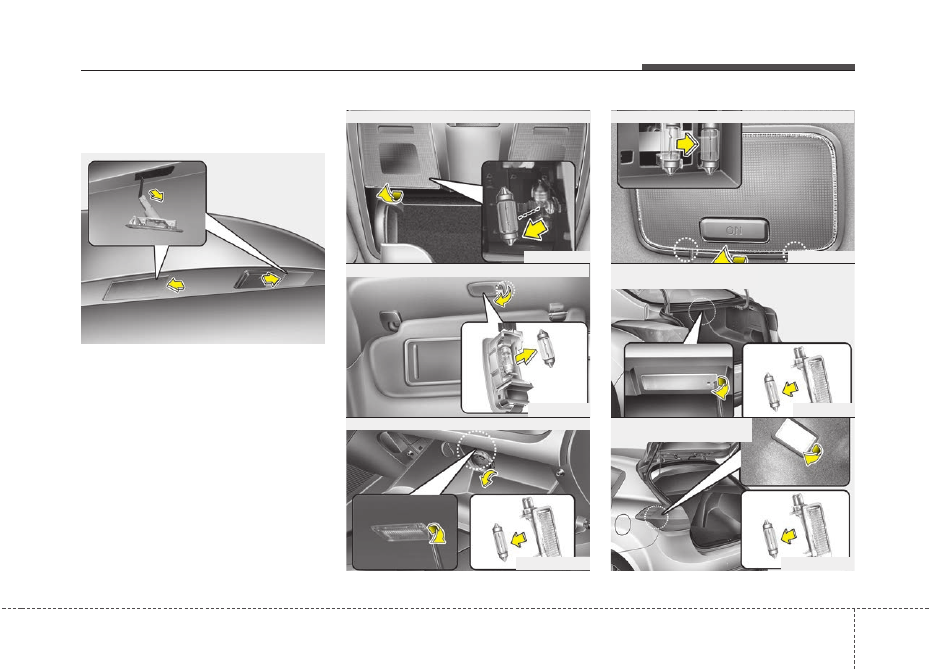
Vanity mirror lamp
Front map lamp
OVG079040
Glove box lamp
OYDEMC2065
OJF075144L
Luggage lamp (if equipped)
• 4 Door
Room lamp
OMD070045
Luggage lamp (if equipped)
• 5 Door
OYDDMC3076
OMD070043
Maintenance
92
7
Interior lamp bulb replacement
1. Using a flat-blade screwdriver,
gently pry the lens from the interi-
or light housing.
2. Remove the bulb by pulling it
straight out.
3. Install a new bulb in the socket.
4. Align the lens tabs with the interior
lamp housing notches and snap
the lens into place.
WARNING
Prior to working on the Interior
Lamps, ensure that the “OFF”
button is depressed to avoid
burning your fingers or receiv-
ing an electric shock.
CAUTION
- Interior lights
Use care not to dirty or damage
lens, lens tab, and plastic hous-
ings.
7 93
Maintenance
APPEARANCE CARE
Exterior care
Exterior general caution
It is very important to follow the label
directions when using any chemical
cleaner or polish. Read all warning
and caution statements that appear
on the label.
Finish maintenance
Washing
To help protect your vehicle’s finish
from rust and deterioration, wash it
thoroughly and frequently at least
once a month with lukewarm or cold
water.
If you use your vehicle for off-road
driving, you should wash it after each
off-road trip. Pay special attention to
the removal of any accumulation of
salt, dirt, mud, and other foreign mate-
rials. Make sure the drain holes in the
lower edges of the doors and rocker
panels are kept clear and clean.
Insects, tar, tree sap, bird droppings,
industrial pollution and similar
deposits can damage your vehicle’s
finish if not removed immediately.
Even prompt washing with plain water
may not completely remove all these
deposits. A mild soap, safe for use on
painted surfaces, may be used.
After washing, rinse the vehicle thor-
oughly with lukewarm or cold water.
Do not allow soap to dry on the finish.
After washing the vehicle, test the
brakes while driving slowly to see if
they have been affected by water. If
braking performance is impaired, dry
the brakes by applying them lightly
while maintaining a slow forward
speed.
CAUTION -
Headlight
Lens
To prevent damage, do not
clean headlight lens with chem-
ical solvents or strong deter-
gents.
CAUTION
• Do not use strong soap, chem-
ical detergents or hot water,
and do not wash the vehicle in
direct sunlight or when the
body of the vehicle is warm.
• Be careful when washing the
side windows of your vehicle.
Especially, with high-pressure
water. Water may leak through
the windows and wet the inte-
rior.
• To prevent damage to the
plastic parts and lamps, do
not clean with chemical sol-
vents or strong detergents.
Нет комментариевНе стесняйтесь поделиться с нами вашим ценным мнением.
Текст