KIA Soul EV (2018 year). Manual — part 1
4
• High Voltage Junction Block: Supplies power from the high voltage bat-
tery to the inverter, LDC, air-conditioner compressor, and PTC heater.
• On-Board Charger (OBC): External device (low speed) to charge the high
voltage battery.
• Inverter: Transforms direct current into alternating current to supply power
to the motor, and transforms alternating current into direct current to
charge the high voltage battery.
• LDC: Transforms power from the high voltage battery to low voltage (12 V)
to supply power to the vehicle (DC-DC).
• Motor: Uses electrical energy stored inside the high voltage battery to
drive the vehicle (functions like an engine in a standard vehicle).
• Reduction Gear : Delivers rotational force of the motor to the tires at
appropriate speeds and torque.
• High voltage battery (lithium-
ion polymer) : Stores and sup-
plies power necessary for the
electric vehicle to operate (12 V
auxiliary battery provides power to
the vehicle features such as lights
and wipers).
❈
OBC : On-Board Charger
❈
LDC : Low Voltage DC-DC Converter
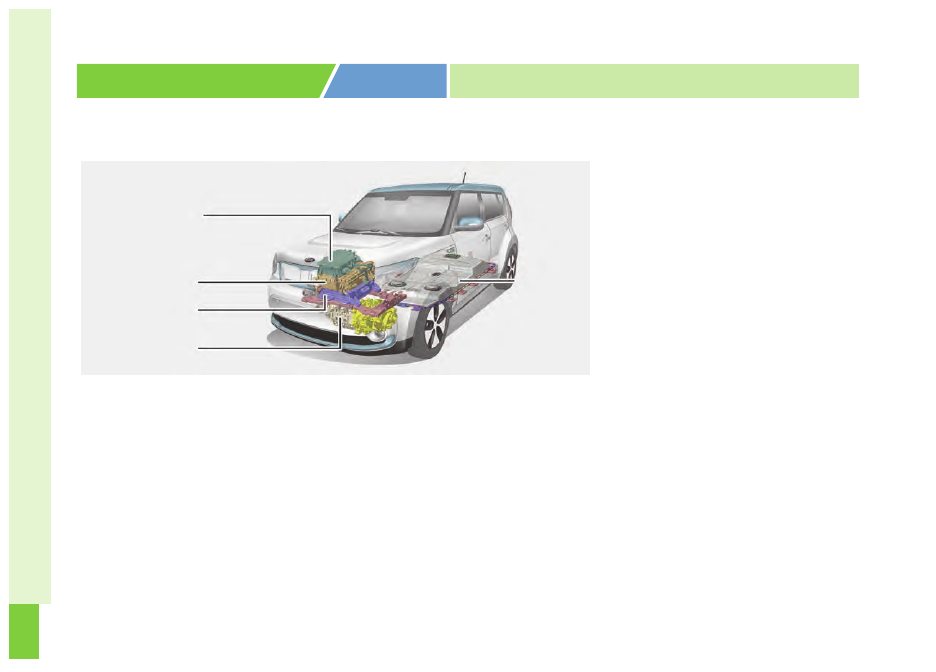
MAIN COMPONENTS OF
ELECTRIC VEHICLE
Main Components of Electric Vehicle
OPSE0Q4002
High Voltage
Junction Block
On-Board Charger
(OBC)
High Voltage
Battery
EPCU
(Inverter + LDC)
Motor/
Reduction Gear
5
• The charge amount of the high volt-
age battery may gradually decrease
when the vehicle is not driving.
• The battery capacity of the high
voltage battery may decrease
when the vehicle is stored in
high/low temperatures.
• Distance to empty may vary
depending on the driving conditions,
even if the charge amount is the
same. The high voltage battery may
expend more energy when driving at
quick speed or uphill. These actions
may reduce the distance to empty.
• The high voltage battery is used
when using the air-conditioner /
heater. This may reduce the dis-
tance to empty. Make sure to set
moderate temperatures when
using the air-conditioner/heater.
• Natural degradation may occur
with the high voltage battery
depending on the number of years
the vehicle is used. This may
reduce the distance to empty.
• When the charge capacity and
distance to empty keep falling, we
recommend that you contact an
authorized Kia dealer for inspec-
tion and maintenance.
• If the vehicle will not be in use for
an extended period of time,
charge the high voltage battery
once every three months to pre-
vent it from discharging. Also, if
the charge amount is not enough
to store the vehicle for an extend-
ed period of time, immediately
charge to enough state of charge
and store the vehicle.
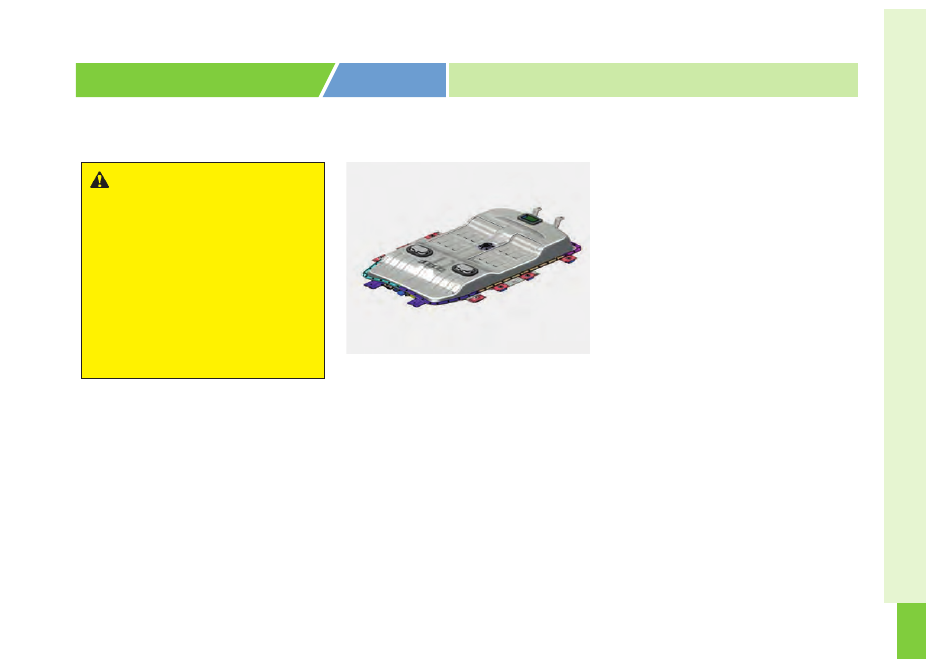
High Voltage Battery (lithium-ion polymer)
MAIN COMPONENTS OF
ELECTRIC VEHICLE
OPSE0Q44001
WARNING
- Repair of
high voltage components
The high voltage battery in your
system in very dangerous and
can cause severe burns and
electric shock. Never inspect,
remove or disassemble any of
the high voltage components in
your vehicle.
Kia recommends
that all inspections and repairs
be performed by an authorized
and trained Kia dealer.

6
• Normal charge is recommended
to keep the high voltage battery in
optimal condition.
If the high voltage battery charge
amount is below 20%, you can
keep the high voltage battery per-
formance in optimal condition if
you charge the high voltage bat-
tery to 100%. (Once a month or
more is recommended.)
•
If the vehicle is in a collision, we
recommend that you contact an
authorized Kia dealer to inspect
whether the high voltage battery
is still connected.
The high voltage battery warmer
system prevents reduction of battery
output when battery temperature is
low. If the charging connector is con-
nected, the warmer system automat-
ically operate according to the bat-
tery temperature.
Charging time may shorten compare
to vehicles without the high voltage
battery warmer system. But, electric-
ity charge may increase because of
high voltage battery warmer system
operation.
The high voltage battery warmer sys-
tem operates when the charging con-
nector is connected to the vehicle.
However, the high voltage warmer
system may not operate when bat-
tery temperature drops below -31°F
(-35°C)
High Voltage Battery
Warmer System
MAIN COMPONENTS OF
ELECTRIC VEHICLE
CAUTION
- Damaging
high voltage battery
• Make sure to use a designated
charger when charging the
high voltage battery. Using dif-
ferent types of chargers may
have a serious impact on vehi-
cle durability.
• Make sure that the high volt-
age battery charger gauge
does not reach SOC 0% on
cluster gauge. If the vehicle is
kept at SOC 0% for a long peri-
od, it may damage the high
voltage battery and the high
voltage battery may have to be
replaced depending on the
level of degradation.
7
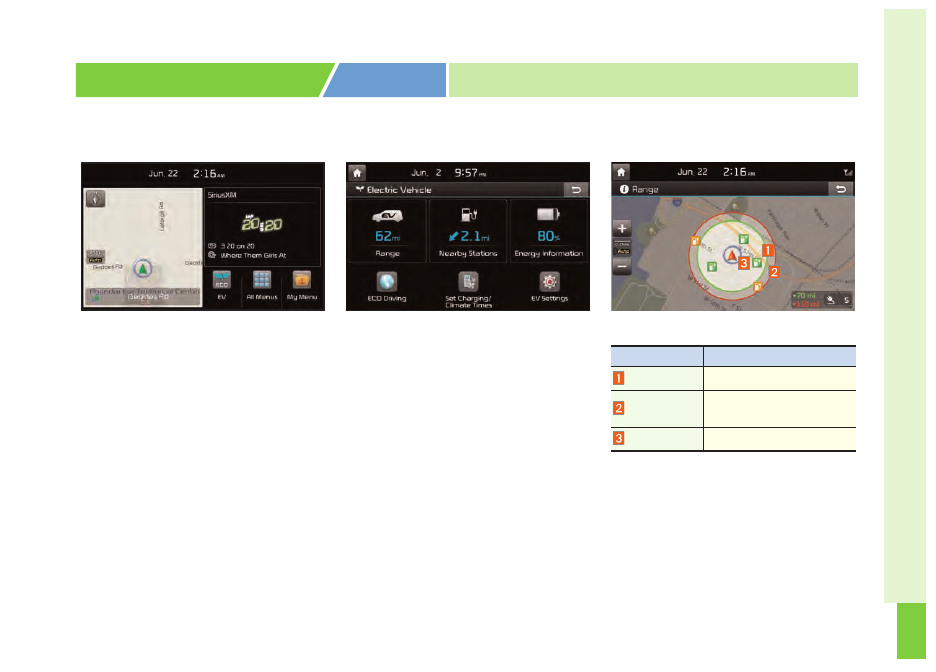
If you select the "EV" menu at the
AVN home screen or press the "EV"
button on the left side of the air-con-
ditioning button panel, you can enter
EV mode.
❈
Refer to the AVN manual for details.
The EV mode has a total of 6 menus
including Available Range, Near by
stations, Energy information, ECO
driving, Set timings for Charging
/Climate and EV settings.
■
■
Available Range
EV MODE
EV Mode (if equipped)
Name
Description
Green Circle
Reachable area
Red Circle
Risky area (depending on
circumstances)
Grey Area
Unreachable area
8
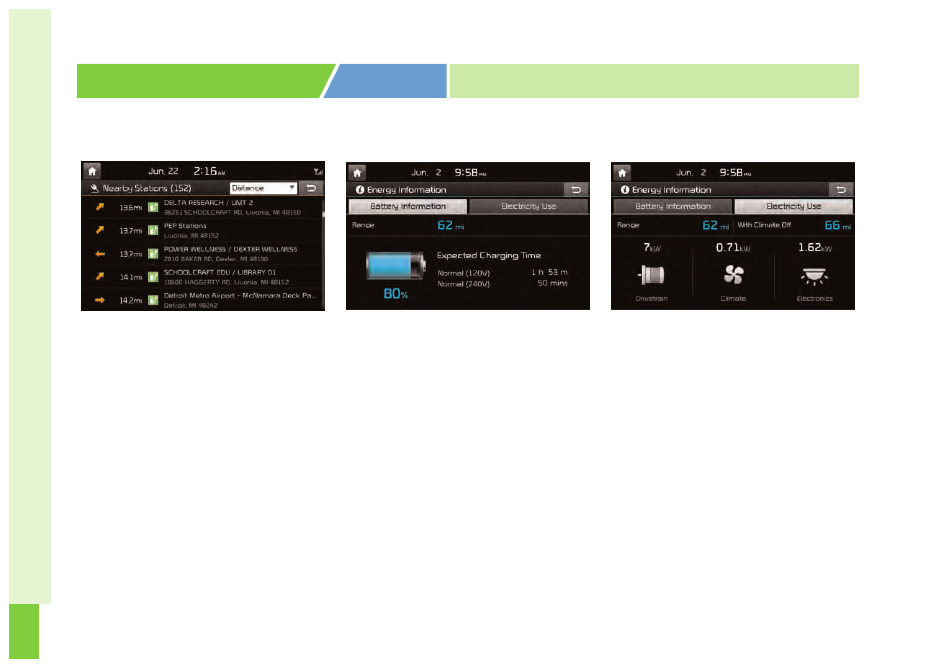
■
■
Near by stations
Stations around the current location
is searched. Depending on the sym-
bol color of the station, it is catego-
rized as Reachable area, Risky area
and Unreachable area.
■
■
Energy Information
You can check battery information
and power consumption.
Battery Information
You can check the available range,
battery charge amount that can be
used, and approximate expected
charging time for each charge type.
More accurate time will be
appeared while charging.
Power Consumption
Power that is consumed by the
drive system, climate and electri-
cal components are displayed
respectively.
You can check how far the vehicle
can drive currently, and how much
more the vehicle can drive if the
climate is turned OFF.
EV MODE
9
■
■
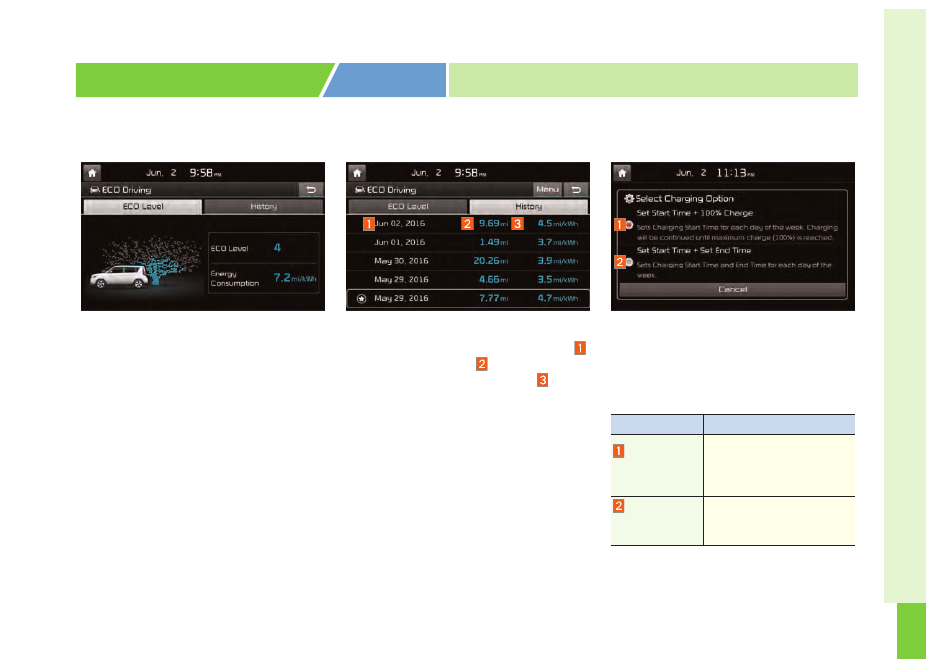
ECO Driving
You can check ECO level information
and ECO driving history.
ECO Level
A total of 8 ECO levels and the
average energy consumption are
displayed depending on vehicle
driving style.
Driving History
You can check the driving date
,
driving distance
, and the aver-
age energy consumption
rating
for previous 30 driving trips. The
date with the highest ECO level is
marked with a star shaped icon.
■
■
Set Charging Times
This is a feature that starts charging
the battery on the date and time that
is designated by the user. One reser-
vation can be set between 2 options.
Name
Description
Set Start Time
+ Charging
Ratio 100%
You can set start charging
time and ratio is set 100
automatically by days of
the week.
Set Start Time
+ Set End
Time
You can set charging time
from start to end by days of
the week.
EV MODE
10
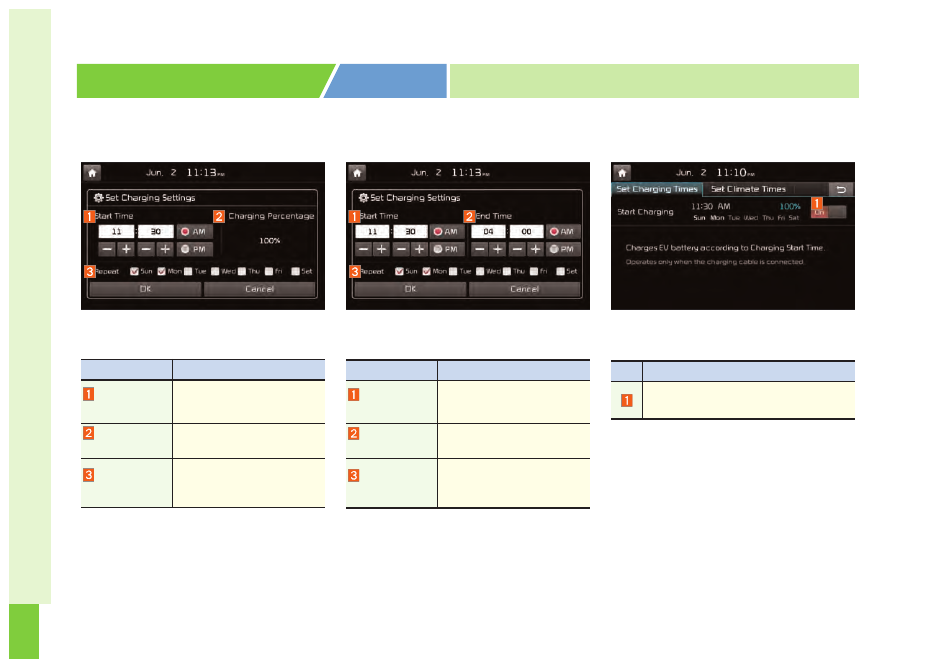
Set Start Time + Charging
Ratio 100%
Set Start Time + Set End
Time
Setting is saved and setting informa-
tion is displayed on the screen.
Name
Description
Start charging
time
Select the time that you
wish to start charging
the battery
Charging
Ratio
100 %
Repeat Day
of Week
Select the day of the
week you wish to reserve
for automatic charging.
Name
Description
Start charging
time
Select the time that you
wish to start charging
the battery
End charging
time
Select the time that you
wish to end charging.
Repeat Day
of Week
Select the day of the
week you wish to reserve
for automatic charging.
Description
If you do not want to use the reserved
setting, select OFF.
11
■
■
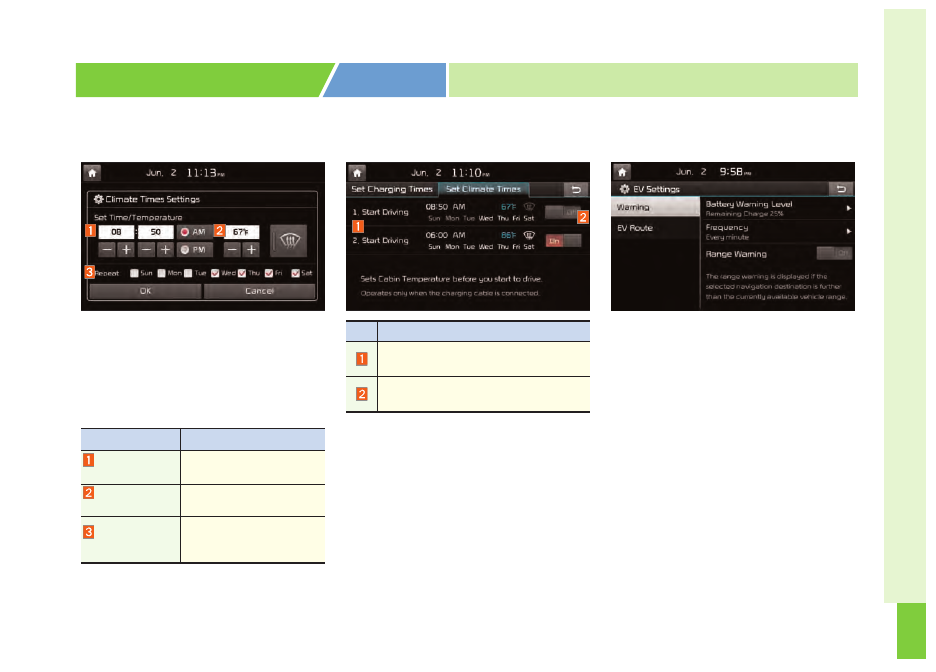
Set Climate Times
This is a feature that automatically
starts climate control on the reserved
day and time along with the tempera-
ture designated by the user. Two sep-
arate reservations can be set.
■
■
EV Setting
You can change the EV warning alarm.
Warning Settings
– Low battery warning : You can
select several battery levels at
which to display an alarm mes-
sage.
– Frequency : You can select the
repetition interval to display the
Low battery warning.
Description
When selecting the list again, change
the setting.
If you do not want use the reserved
setting, select OFF.
Name
Description
Vehicle
Departure Time
Enter the anticipated depar-
ture time for the vehicle.
Set
Temperature
Enter the temperature that
you desire.
Repeat Day of
Week
Select the day of the week
you wish to reserve for
automatic air conditioning.
EV MODE
12
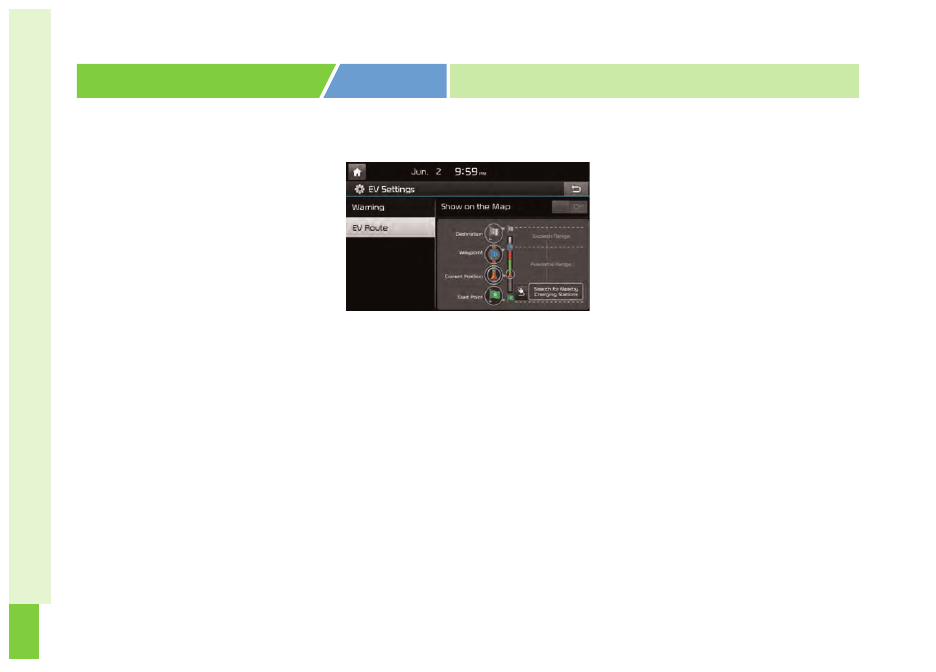
– Destination Unreachable
Warning : If the destination set
in the navigation cannot be
reached with the remaining bat-
tery charge, a warning message
is displayed.
EV Route Settings
Displays the EV route on the map.
Non-drivable and drivable sections
across start point, current position,
waypoint and destination are sepa-
rately marked.
EV MODE

13
• Normal Charge :
We recommend using normal
charging for usual charging of the
vehicle.
(Refer to “Normal Charge.“ in this
chapter)
• Quick Charge (if equipped) :
You can charge at high speeds at
public charging stations. Refer to
the respective company's manual
that is provided for each quick
charger type.
Battery performance and durability
can deteriorate if the quick charger
is used constantly.
Use of quick charge should be
minimized in order to help prolong
high voltage battery life.
• Trickle Charge :
Trickle Charge can be used when
Normal Charge or Quick Charge
is not available by using house-
hold electricity.
• Normal Charge :
Takes about 5-6 hours at room
temperature (depending on charg-
er ) for a full charge (208V : about
6 hours, 240V : about 5h 10min.)
(Can be charged to 100%.)
• Quick Charge (if equipped) :
Takes about 33 minutes at room
temperature to 80% of SOC.
(50kw charger) (Can be charged
directly to 94%)
DC cable shorter than 10m.
• Trickle Charge :
Takes about 33 hours at room
temperature. (120V-12A : about 33
hours) (Can be charged to 100%.)
Depending on the condition and dura-
bility of the high voltage battery, charg-
er specifications, and ambient temper-
ature, the time required for charging
the high voltage battery may vary.
CHARGE TYPES FOR ELECTRIC
VEHICLE
Charging Information
Charging Time Information
14
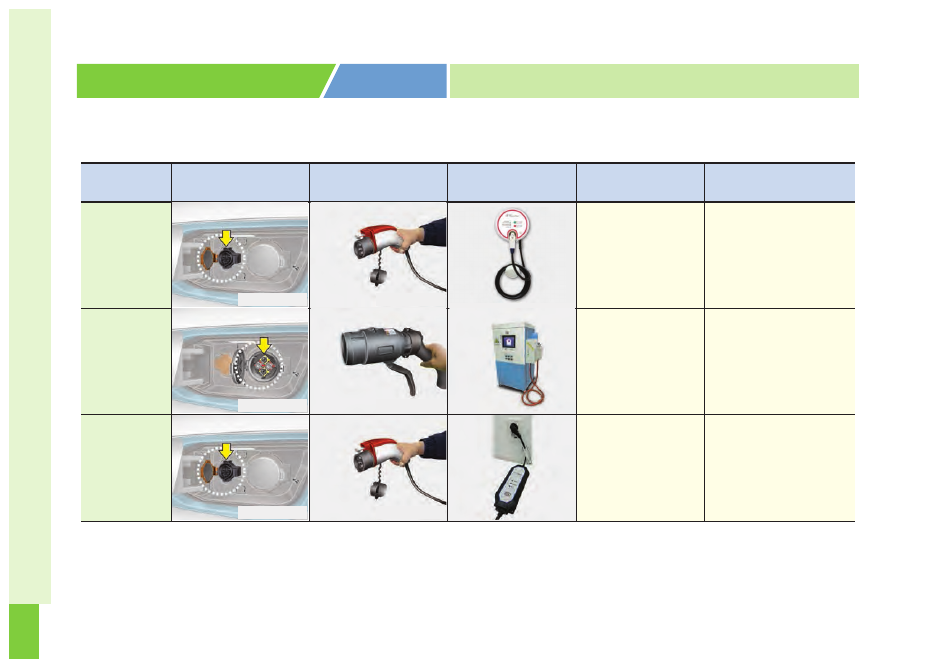
CHARGE TYPES FOR ELECTRIC
VEHICLE
Charging Types
Category
Charging Inlet
(Vehicle)
Charging Connector Charging Outlet
How to Charge
Charging Time
Normal
Charge
Use the normal
charger that is
installed in your
home or public
charging station
Approx. 5-6 hours
(208V : Approx. 6
hours, 240V : about
5h 10min. room tem-
perature) (Can be
charged to 100%)
Quick
Charge
(if equipped)
Use the quick
charger at public
charging station
Approx. 33min to
80% of SOC (50kw,
room temperature)
(Can be charged
directly to 94%)
Trickle
Charge
Use household
electricity
Approx. 33hours
(120V-12A :
Approx.33hours, room
temperature) (Can be
charged to 100%)
OPSE0Q4035
OPSE0Q4036
OPSE0Q4035
OPSE0Q4005
OPSE0Q4006
OPSE0Q4005
OPSE0Q4057N
OPSE0Q4004
OPSE0Q4007
❈
Shape of charger and how to use the charger may be different for each manufacturer.
❈
Depending on the condition and durability of the high voltage battery, charger specifications, and ambient temper-
ature, the time required for charging the high voltage battery may vary.
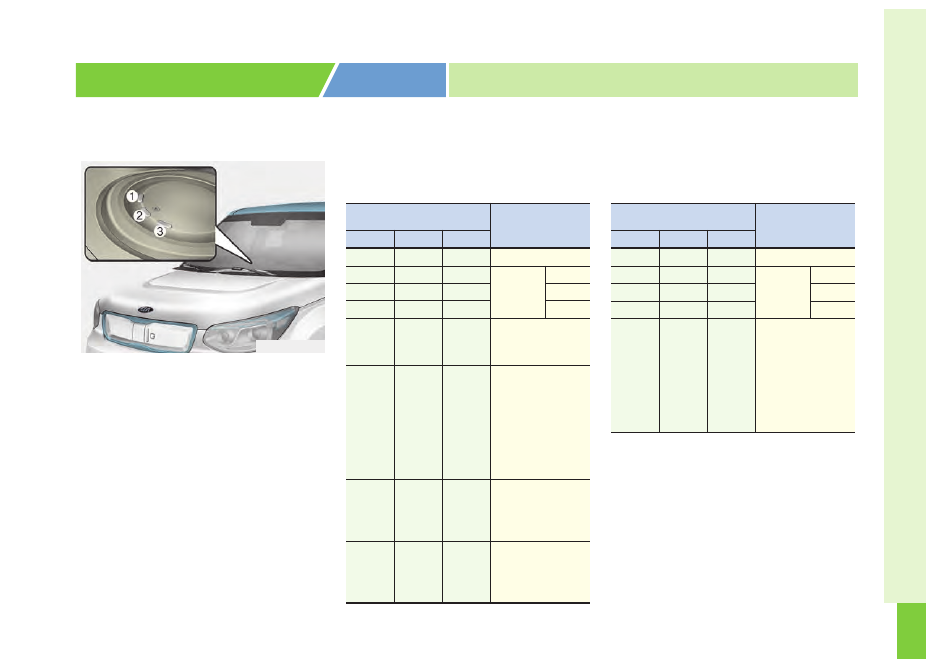
15
When charging the high voltage bat-
tery, the charge level can be checked
from outside the vehicle.
■
■
Normal charging and trickle
charging
■
■
Quick charge
Charging Status
Information
OPSE0Q4008
CHARGE INDICATOR LAMP FOR
ELECTRIC VEHICLE
Operation of Charging
Indicator Lamp
Details
(1)
(2)
(3)
(OFF)
(OFF)
(OFF)
Not Charged
Blinking
(OFF)
(OFF)
Charging
0~33%
(ON) Blinking
(OFF)
34~66%
(ON)
(ON) Blinking
67~99%
(ON)
(ON)
(ON)
Charging complete
(100%)(turns OFF
in 3 seconds)
Blinking Blinking Blinking
Error while charg-
ing /If charging
cables are con-
nected when the
vehicle is in the
ready mode or the
POWER button is
in the ON position.
(OFF)
(OFF) Blinking
Charging 12 V aux-
iliary battery or
reserved air condi-
tioner is operating
(OFF) Blinking
(OFF)
Reserved charging
is operating
(turns OFF after 3
minutes)
Operation of Charging
Indicator Lamp
Details
(1)
(2)
(3)
(OFF)
(OFF)
(OFF)
Not Charged
Blinking
(OFF)
(OFF)
Charging
0~33%
(ON) Blinking
(OFF)
34~66%
(ON)
(ON) Blinking
67~94%
Blinking Blinking Blinking
Error while charg-
ing /If charging
cables are con-
nected when the
vehicle is in the
ready mode or the
POWER button is
in the ON position.
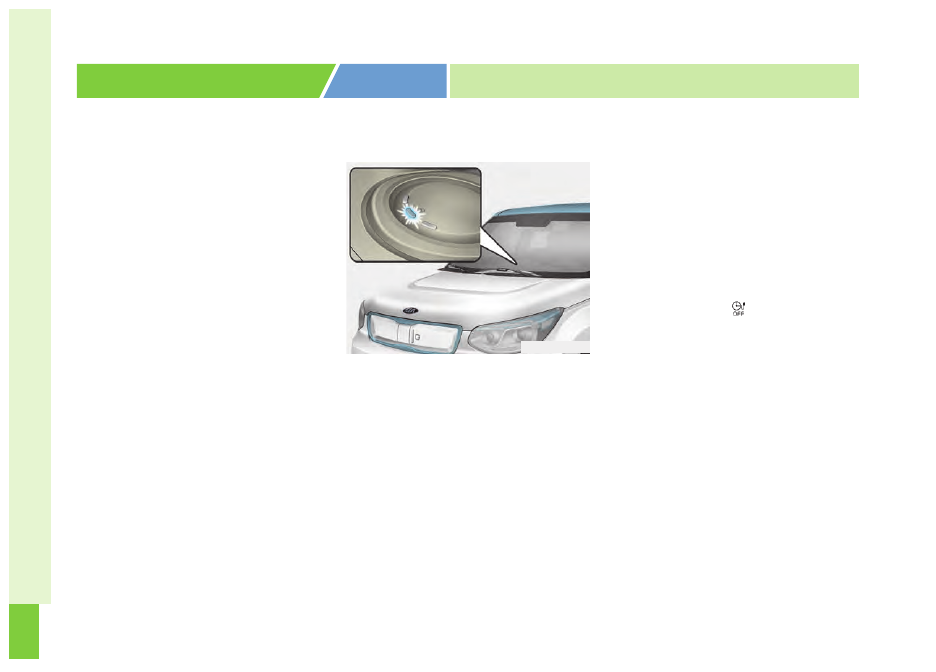
16
• You can set-up a charging sched-
ule for your vehicle through the
UVO audio control unit, the UVO
eco App, or by logging into
MyUVO.com.
Refer to the AVN manual or the
UVO manual for detailed informa-
tion about setting reserved charg-
ing.
• Reserved charging can only be
done when using a normal charg-
er or the portable charging cable
(ICCB: In-Cable Control Box).
• When reserved charging is set and
the normal charger or the portable
charging cable (ICCB: In-Cable
Control Box) is connected for
charging, the indicator lamp in the
middle blinks (for 3 minutes) to indi-
cate that reserved charging is set.
• When reserved charging is set,
charging is not initiated immedi-
ately when the normal charger or
portable charging cable (ICCB: In-
Cable Control Box) is connected.
When immediate charging is
required, use the AVN to deacti-
vate the reserved charge setting
or press the Deactivate Reserved
Charge button [ ].
RESERVED CHARGING
Reserved Charging
(if equipped)
OPSE0Q4027

17
RESERVED CHARGING
To immediately charge the battery
(not at reserved time only) first con-
nect the charging cables. Then, the
Deactivate Reserved Charge button
[ ] should be pressed within three
minutes after the cable connection.
If the battery does not charge after
the Deactivate Reserved Charge
button [
] has been pressed,
remove the charging cable and
reconnect it.
After the Deactivate Reserved
Charge button [ ] has been pressed
(pressed position), you can charge
the battery at any given time.
To change the status to reserved
charging, please press the
Deactivate Reserved Charge button
[ ] again (not pressed position).
❈
Refer to "Normal Charge, Trickle
Charge" for details about connect-
ing the normal charger and the
portable charging cable (ICCB: In-
Cable Control Box).
OPSE0Q40013
18
• You can set reserved climate con-
trol using the AVN.
Refer to the AVN for detailed infor-
mation about the reserved climate
control setting.
• Reserved climate control can only
be done when using the normal
charger or portable charging cable
(ICCB: In-Cable Control Box).
• If reserved climate control is set
and the charging cable is connect-
ed, reserved climate control starts
operating 30 minutes prior to the
set time (departure time).
❈
Refer to "Normal Charge, Trickle
Charge" for details about connect-
ing the normal charger and the
portable charging cable (ICCB: In-
Cable Control Box).
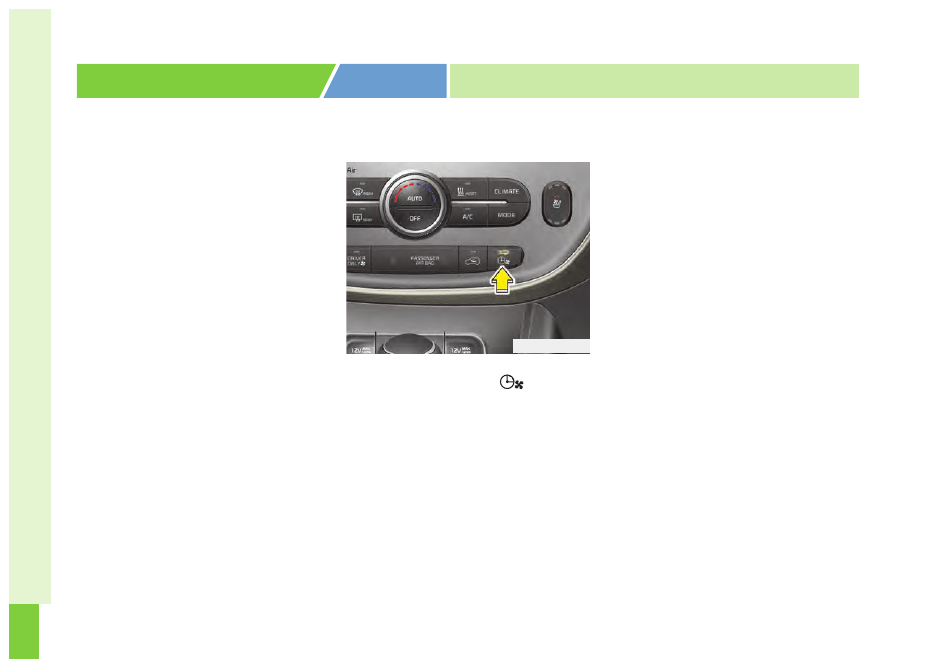
• If you press the Set Reserved cli-
mate control button [
], the indi-
cator lamp on the button blinks
three times and the reserved cli-
mate control setting screen is dis-
played on the AVN.
Refer to the AVN manual for
details about setting reserved cli-
mate control.
❈
Lamp ON Conditions
1. Blinks three times: When you
press the set button and enter the
AVN reserved climate control set-
ting screen.
2. ON: When reserved air condition-
ing is set.
3. Blinking: Reserved climate control
is operating (only operates when
the charging cable is connected).
RESERVED CLIMATE CONTROL
Reserved Climate Control
(if equipped)
OPSE0Q4010N
19
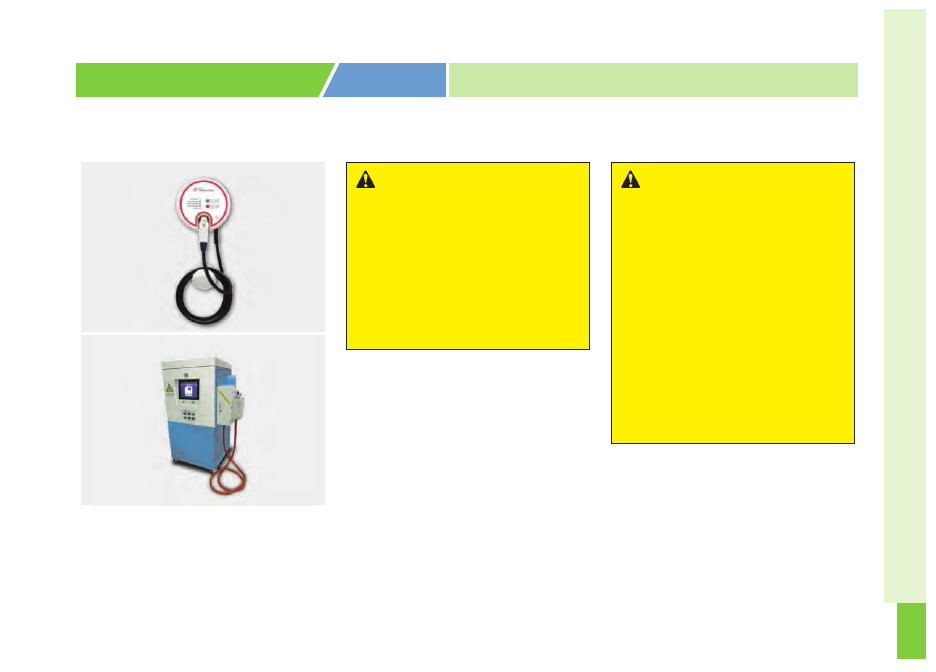
❈
Shape of charger and how to use
the charger may be different for
each manufacturer.
PRECAUTIONS FOR CHARGING
ELECTRIC VEHICLE
Charging Precautions
OPSE0Q4057N
■
Normal Charger
OPSE0Q4004
■
Quick Charger
WARNING
- Fires caused
by dust or water
Do not connect the charging
cable connector plug to the
vehicle if there is water or dust
on the charging inlet.
Connecting while there is water
or dust on the charging cable
connector and plug may cause
a fire or electric shock.
WARNING
- Interference
with electronic medical
devices
When using medical electric
devices such as an implantable
cardiac pacemaker, make sure
to ask the medical team and
manufacturer whether charging
your electric vehicle will impact
the operation of the medical
devices. In some instances,
electromagnetic waves that are
generated from the charger can
seriously impact medical elec-
tric devices such as an
implantable cardiac pacemaker.
Нет комментариевНе стесняйтесь поделиться с нами вашим ценным мнением.
Текст