Peugeot 407 C (2010.5). Manual — part 4

3
49
In order to ensure optimum vis-
ibility during your manoeuvres,
the mirror lightens automati-
cally when reverse gear is en-
gaged.
By means of a sensor, which mea-
sures the light from the rear of the ve-
hicle, this system automatically and
progressively changes between the
day and night uses.
It has an anti-dazzle system which
darkens the mirror glass: this reduces
any driver discomfort caused by the
light beams of following vehicles, the
sun...
Automatic day/night model
Rear view mirror
Adjustable mirror providing a central
rearward view.
Equipped with an anti-dazzle system,
useful in poor light.

3
50
ELECTRIC ADJUSTMENT OF
STEERING WHEEL HEIGHT
AND REACH
When stationary, adjust the height or
reach of the steering wheel by moving
the control:
forwards or backwards to adjust
the reach.
up or down to adjust the height.
You can activate or deac-
tivate this function via the
"personalisation - confi gu-
ration" menu in the multi-
function screen.
WELCOME FUNCTION
When the driver's door is opened with
the ignition off, the steering wheel rises
to make access to or exit from the ve-
hicle easier.
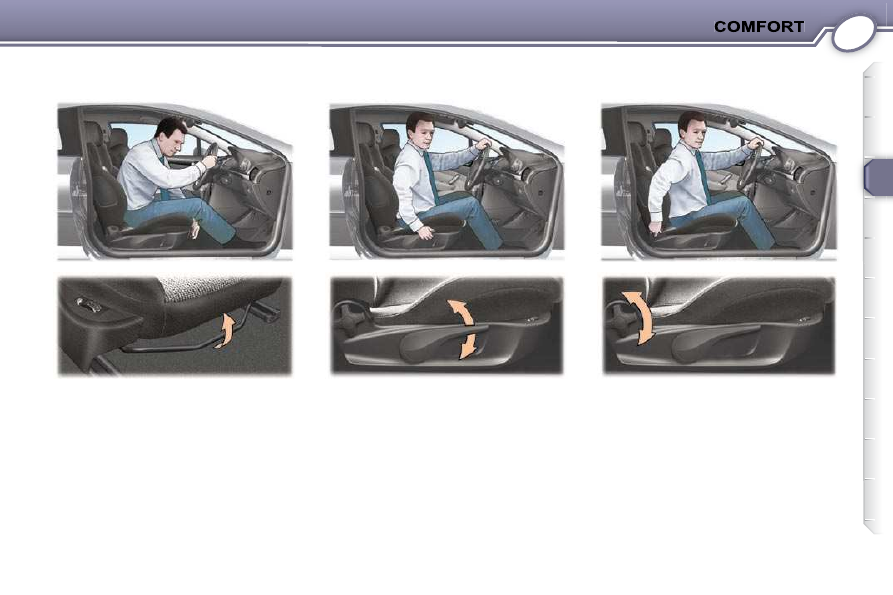
MANUAL ADJUSTMENT OF
STEERING WHEEL HEIGHT
AND REACH
When the vehicle is stationary, un-
lock the steering wheel adjustment by
pushing the lever forwards.
Adjust the height and reach of the
steering wheel then lock the adjust-
ment by pulling the lever fully back.
Reinitialisation
Following reconnection of the battery,
the welcome function must be reini-
tialised:
- move the control in the direction of
the required adjustment,
- release the control,
- move the control again until it
reaches its stop.
This procedure must be carried out for
all four directions.
3
51
MANUAL FRONT SEATS
Longitudinal adjustment
Lift the control bar and slide the seat
forwards or backwards.
Driver and passenger seat cushion
height and angle adjustment
Pump up or down to the required position.
Seat back angle adjustment
Without resting your back against the
seat, turn the control to adjust the
angle of the seat back.

3
53
Heated seat adjustment
With the engine running, turn the knob.
The temperature of the seat is regu-
lated automatically.
0: Off.
1:
Low.
2:
Medium.
3: High.
Driver and passenger seat lumbar
adjustment *
Operate the lever to obtain the re-
quired position.
Access to the rear seats
If necessary, detach the seat belt from
the handle and position it along the
door pillar.
Pull the handle A upwards and for-
wards to fold the seat back, then move
the seat forward pushing the seat
back.
The driver has a courtesy handle B
to enable him to move the passenger
seat from his seat.
When it is put back in place, the seat
returns to its initial position.
No person or object must pre-
vent the seat from returning
to its initial longitudinal
and
angle position.
Depending on your seat's set-
tings, it is possible that the access
to the rear seats manoeuvre may be
limited. In this case, the seat settings
must be altered fi rst.
The seat must return to this position
for correct locking of the seat back.
Ensure that the seat back returns to
its position correctly and never drive
with the seat back disengaged (able to
move freely).
If the seat back jams on repositioning,
operate the handle A again to release
it and return it to its initial position.
* With electric seat only.
Do not use the seat back an-
gle adjustment control when
using the access to the rear
seats (risk of disengaging of
the seat back with loss of the angle
adjustment function).

3
54
Head restraint height and angle
adjustment
To raise or lower the head restraint,
pull it forwards then slide it.
To tilt the head restraint, tilt the lower
part forwards or backwards.
To remove the head restraint, move it
almost to the highest position, lift the
tab using a coin and pull the head re-
straint forwards and upwards at the
same time.
To refi t the head restraint, engage the
stalks in the holes keeping in line with
the seat back.
Front seat active head restraint
This system prevents whiplash.
In the event of a rear impact, the action
of the body on the seat back moves
the head restraint forwards and up-
wards preventing the head from being
thrown backwards.
Front armrest
To change the position of the armrest:
Lift the lever 1 .
The adjustment is correct
when the top of the head re-
straint is level with the top of
the head.
Never drive with the head
restraints removed; they must
be in place and adjusted
correctly.
The armrest folds forwards and up-
wards.
To return to the initial position, push
the armrest backwards and press it to
engage.

3
52
ELECTRIC FRONT SEATS
Longitudinal adjustment
Push the control forwards or back-
wards to slide the seat.
Driver and passenger seat cushion
height and angle adjustment
Height
: tilt the rear of the control up
or down.
Angle
: tilt the front of the control up
or down.
Seat back angle adjustment
Tilt the control forwards or backwards
to adjust the angle of the seat back.
The electrical functions of the
driver's seat (with the exception
of the access to the rear seats)
are deactivated approximately
one minute after the ignition is switched
off.
To reactivate them, open the door or
switch on the ignition.

3
53
Heated seat adjustment
With the engine running, turn the knob.
The temperature of the seat is regu-
lated automatically.
0: Off.
1:
Low.
2:
Medium.
3: High.
Driver and passenger seat lumbar
adjustment *
Operate the lever to obtain the re-
quired position.
Access to the rear seats
If necessary, detach the seat belt from
the handle and position it along the
door pillar.
Pull the handle A upwards and for-
wards to fold the seat back, then move
the seat forward pushing the seat
back.
The driver has a courtesy handle B
to enable him to move the passenger
seat from his seat.
When it is put back in place, the seat
returns to its initial position.
No person or object must pre-
vent the seat from returning
to its initial longitudinal
and
angle position.
Depending on your seat's set-
tings, it is possible that the access
to the rear seats manoeuvre may be
limited. In this case, the seat settings
must be altered fi rst.
The seat must return to this position
for correct locking of the seat back.
Ensure that the seat back returns to
its position correctly and never drive
with the seat back disengaged (able to
move freely).
If the seat back jams on repositioning,
operate the handle A again to release
it and return it to its initial position.
* With electric seat only.
Do not use the seat back an-
gle adjustment control when
using the access to the rear
seats (risk of disengaging of
the seat back with loss of the angle
adjustment function).

3
54
Head restraint height and angle
adjustment
To raise or lower the head restraint,
pull it forwards then slide it.
To tilt the head restraint, tilt the lower
part forwards or backwards.
To remove the head restraint, move it
almost to the highest position, lift the
tab using a coin and pull the head re-
straint forwards and upwards at the
same time.
To refi t the head restraint, engage the
stalks in the holes keeping in line with
the seat back.
Front seat active head restraint
This system prevents whiplash.
In the event of a rear impact, the action
of the body on the seat back moves
the head restraint forwards and up-
wards preventing the head from being
thrown backwards.
Front armrest
To change the position of the armrest:
Lift the lever 1 .
The adjustment is correct
when the top of the head re-
straint is level with the top of
the head.
Never drive with the head
restraints removed; they must
be in place and adjusted
correctly.
The armrest folds forwards and up-
wards.
To return to the initial position, push
the armrest backwards and press it to
engage.

3
Storing driving positions
The electrical adjustments of the
driver's seat, steering wheel and door
mirrors are stored.
Two driving positions can be stored
using buttons M/ 1 and M/2 .
An audible signal confi rms that a posi-
tion has been stored.
Storing a new position cancels the
previous one.
Recalling a stored driving position
During access to the rear seats,
the storing and recalling of the
driving positions are deactivated.
Vehicle moving
Keep button 1 or 2 pressed down
until the audible signal indicates
that setting of the corresponding
memorised position is complete.
REAR HEAD RESTRAINTS
The rear head restraints have a high
position for use and a low position for
stowing.
They can also be removed.
To remove them, pull upwards fully
and press the lug.
Never drive with the head
restraints removed; they must
be in place and adjusted
correctly.
Storing using the controls on the
driver's door
To store a driving position:
Switch on the ignition,
Adjust your seat, steering wheel
and mirrors,
Press button M , then button 1 "fi rst
driving position" or button 2 "second
driving position" within four seconds.
Ignition on, vehicle stationary
Briefl y press button 1 or 2 to recall
the corresponding stored position.
The end of the setting is indicated
by an audible signal.
After recalling a stored position a few
times in succession, the function will be
cancelled until the engine is started.

3
56
REAR SEATS
To fold down the rear left seat or the
rear right seat, always start with the
seat cushion, never with the seat back
(risk of damage):
move the front seat(s) forward if
necessary,
place the head restraints in the low
position or remove them if necessary.
Check that the seat belt strap is
positioned correctly at the side of
the seat back,
release the front of the seat cushion 1
by passing your hands underneath and
lifting at each end A ,
lift the front of the seat cushion 1 ,
tilt the seat cushion 1 against the
front seat(s),
pull control 3
forwards to release
the seat back 2 ,
fold down the seat back 2 (left 1/3
or right 2/3).
Note:
the one-piece seat cushion 1
can be removed, with care, to increase
the volume of the load space.
Squeeze the seat cushion fi xings to
detach them from their fastenings.
When repositioning:
fold up the seat back 2 and lock it
(the red marker of control 3 should
no longer be visible),
fold up the seat 1 ,
refi t the head restraints if they were
removed.
to the boot via the rear seats
Your vehicle's boot can be isolated
from the passenger compartment.
The red indicator on the control 3
should no longer be visible. If it is,
push the seat fully.
Insert the ignition key in the lock 4 .
Transporting long objects
In exceptional circumstances
, a rear
seat back can be folded without folding
the seat cushion 1 in order to transport
long, light objects (risk of damage to
the seat cushion).
When putting the seat backs
and the seat cushion back in
place, ensure that they are
secured correctly to ensure
your safety and take care not to trap
the seat belts.
When transporting long ob-
jects, do not place a load
weighing more than 30 kg on
the rear of the seat back.
Do not place rough objects on the rear of
the seat back as this could damage it.

3
57
Although one of PEUGEOT's main cri-
teria when designing your vehicle, the
safety of your children also depends
on you.
"Forwards-facing"
* The rules for carrying children are
specifi c to each country. Refer to the
current legislation in your country.
GENERAL POINTS RELATING
TO CHILD SEATS
"Rearwards-facing"
For maximum safety, please
observe the following recom-
mendations:
When a "rearwards-facing"
child seat is installed on the
front passenger seat , it is
essential that the passenger
airbag is deactivated. Otherwise, the
child would risk being seriously in-
jured or killed if the airbag were to
infl ate .
- in accordance with European reg-
ulations, all children under the
age of 12 or less than one and
a half metres tall must travel in
approved child seats suited to
their weight
, on seats fi tted with a
seat belt or ISOFIX mountings * ,
- statistically, the safest seats in
your vehicle for carrying chil-
dren are the rear seats,
- a child weighing less than 9 kg
must travel in the "rearwards-
facing" position both in the front
and in the rear.
PEUGEOT recommends
that chil-
dren should travel in the rear seats of
your vehicle:
- "rearwards-facing" up to the age of 2,
- "forwards-facing" over the age of 2.
When a "forwards-facing" child seat
is installed on the front passenger
seat
, adjust the vehicle's seat to the
intermediate longitudinal position with
the seat back upright and leave the
passenger airbag activated.
Intermediate
longitudinal position

3
63
ADVICE ON CHILD
SEATS
If the head restraint has to be removed,
ensure that it is stored or attached se-
curely to prevent it from being thrown
around the vehicle in the event of
sharp braking.
Children under the age of 10 must not
travel in the "forward facing" position
on the front passenger seat, unless
the rear seats are already occupied by
other children, cannot be used or are
absent.
Deactivate the passenger airbag *
when a "rear facing" child seat is in-
stalled on the front seat.
Otherwise, the child would risk being
seriously injured or killed if the airbag
were to infl ate.
As a safety precaution, do not leave:
- one or more children alone and un-
supervised in a vehicle,
- a child or an animal in a vehicle
which is exposed to the sun, with
the windows closed,
- the keys within reach of children
inside the vehicle.
To protect young children from the
rays of the sun, fi t side blinds on the
rear windows.
* According to country.
The incorrect installation of a child seat
in a vehicle compromises the child's
protection in the event of an accident.
Remember to fasten the seat belts or
the child seat harness keeping the
slack
in relation to the child's body to
a minimum
, even for short journeys.
To install a child seat using the ve-
hicle's seat belt, ensure that the belt
is well tightened on the child seat
and that it holds the child seat fi rmly
against the vehicle's seat.
For optimum installation of the "for-
ward facing" child seat, ensure that
the back of the child seat is in contact
with the back of the vehicle's seat and
that the head restraint does not cause
any discomfort.
Installing a booster seat
The chest part of the seat belt must
be positioned on the child's shoulder
without touching the neck.
Ensure that the lap part of the seat
belt passes correctly over the child's
thighs.
PEUGEOT recommends the use of
a booster seat which has a back, fi t-
ted with a seat belt guide at shoulder
level.

3
58
Passenger airbag OFF
CHILD SEATS RECOMMENDED BY PEUGEOT
PEUGEOT offers a complete range of recommended child seats which are se-
cured using a three point seat belt :
Group 0+: from birth to 13 kg
Groups 1, 2 and 3: from 9 to 36 kg
L1
"RÖMER Baby-
Safe Plus"
Installed in the
rearwards-facing
position.
L2
"KIDDY Life"
The use of the
restraining cushion
is compulsory for
carrying young
children
(from 9 to 18 kg).
Groups 2 and 3: from 15 to 36 kg
L3
"RECARO Start''
L4
"KLIPPAN Optima"
From the age of
6 years
(approximately
22 kg), the booster
is used on its own.
L5
"RÖMER KIDFIX"
Can be fi tted to the vehicle's ISOFIX mountings.
The child is restrained by the seat belt.

3
59
LOCATIONS FOR CHILD SEATS ATTACHED USING THE SEAT BELT
In accordance with European regulations, this table indicates the options for installing child seats secured using a seat belt
and universally approved in accordance with the weight of the child and the seat in the vehicle.
a
: group 0: from birth to 10 kg.
b
: consult the legislation in force in
your country before installing your
child on this seat.
c
: vehicle seat in the intermediate lon-
gitudinal position.
U
: seat suitable for the installation of
a universally approved child seat
secured using a seat belt, "rear fac-
ing" and/or "forward facing".
Installation of the L1 (RÖMER
Baby-Safe Plus) child seat on
the rear seats of your vehicle
is not recommended.
Weight of the child and indicative age
Seat
Under 13 kg
(groups 0 (a) and 0+)
Up to 1 year approx
From 9 to 18 kg
(group 1)
1 to 3 years approx
From 15 to 25 kg
(group 2)
3 to 6 years approx
From 22 to 36 kg
(group 3)
6 to 10 years approx
Front passenger
seat (b)
U
U
U(c)
U(c)
Rear seats
U
U
U
U

3
63
ADVICE ON CHILD
SEATS
If the head restraint has to be removed,
ensure that it is stored or attached se-
curely to prevent it from being thrown
around the vehicle in the event of
sharp braking.
Children under the age of 10 must not
travel in the "forward facing" position
on the front passenger seat, unless
the rear seats are already occupied by
other children, cannot be used or are
absent.
Deactivate the passenger airbag *
when a "rear facing" child seat is in-
stalled on the front seat.
Otherwise, the child would risk being
seriously injured or killed if the airbag
were to infl ate.
As a safety precaution, do not leave:
- one or more children alone and un-
supervised in a vehicle,
- a child or an animal in a vehicle
which is exposed to the sun, with
the windows closed,
- the keys within reach of children
inside the vehicle.
To protect young children from the
rays of the sun, fi t side blinds on the
rear windows.
* According to country.
The incorrect installation of a child seat
in a vehicle compromises the child's
protection in the event of an accident.
Remember to fasten the seat belts or
the child seat harness keeping the
slack
in relation to the child's body to
a minimum
, even for short journeys.
To install a child seat using the ve-
hicle's seat belt, ensure that the belt
is well tightened on the child seat
and that it holds the child seat fi rmly
against the vehicle's seat.
For optimum installation of the "for-
ward facing" child seat, ensure that
the back of the child seat is in contact
with the back of the vehicle's seat and
that the head restraint does not cause
any discomfort.
Installing a booster seat
The chest part of the seat belt must
be positioned on the child's shoulder
without touching the neck.
Ensure that the lap part of the seat
belt passes correctly over the child's
thighs.
PEUGEOT recommends the use of
a booster seat which has a back, fi t-
ted with a seat belt guide at shoulder
level.

3
60
"ISOFIX" MOUNTINGS
Your vehicle has been approved in
accordance with the new ISOFIX reg-
ulation .
The seats * , represented below, are fi tted
with regulation ISOFIX mountings:
These are three rings for each seat:
This ISOFIX mounting system pro-
vides fast, reliable and safe fi tting of
the child seat in your vehicle.
The ISOFIX child seats are fi tted with
two latches which are secured easily
on these lower rings A .
Some also have an upper strap which
is attached to the upper ring B .
- two lower rings A , located between
the vehicle seat back and cushion,
indicated by a label,
* According to version.
- an upper ring B , referred to as the
TOP TETHER
, indicated by a label.
To attach this strap, raise the
vehicle seat's head restraint
then pass the hook between
its rods. Then fi x the hook on
the upper ring B and tighten the upper
strap.
The incorrect installation of a
child seat in a vehicle compro-
mises the child's protection in
the event of an accident.
For information on where ISOFIX child
seats can be installed in your vehicle,
refer to the table showing the locations
for ISOFIX child seats.
Нет комментариевНе стесняйтесь поделиться с нами вашим ценным мнением.
Текст