Peugeot 207 Dag (2010 year). Manual — part 13
197
1
2
3
4
1
3
4
3
4
2
2
2
3
4
4
4
4
2
3
3
3
2
3
3
3
2
3
4
4
4
4
2
4
3
4
3
3
3
3
3
3
3
3
2
4
4
2
3
4
4
3
4
4
4
2
3
3
3
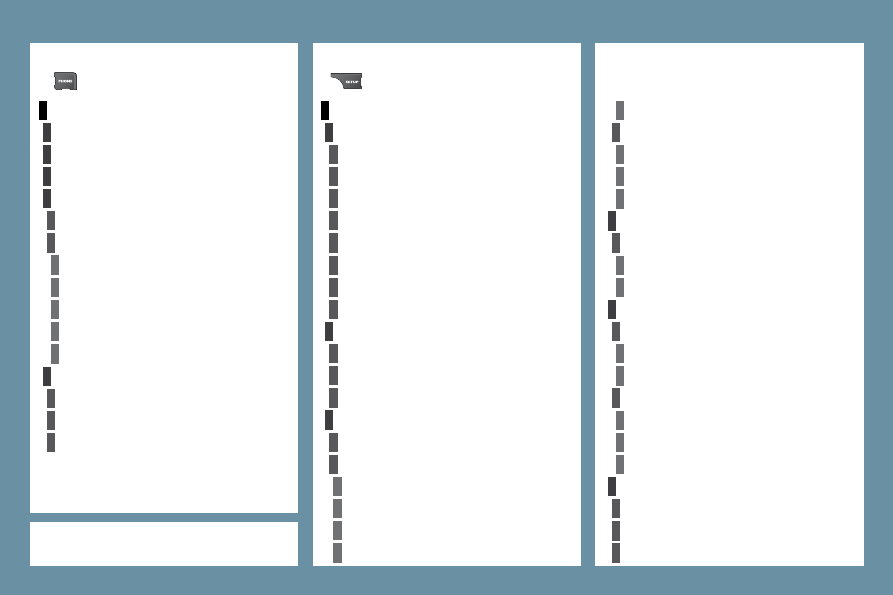
"PHONE" MENU
"SETUP" MENU
DIAL NUMBER
SETTINGS
Select ring tone
Phone/Ring tone volume
Enter mailbox number
SYSTEM LANGUAGE *
Deutsch
English
Español
Français
Italiano
Nederlands
Polski
Portuguese
DATE & TIME *
Set date & time
Date format
Time format
Dark blue
Map colour
Day mode for map
Night mode for map
Auto. Day/Night for map
VEHICLE *
Vehicle information
Alert log
Status of functions
DISPLAY
Brightness
Colour
Pop titanium
Toffee
Blue steel
Technogrey
UNITS
Temperature
Celsius
Fahrenheit
Metric/Imperial
Kilometres (Consumption: l/100)
Kilometres (Consumption: km/l)
Miles (Consumption: MPG)
SYSTEM
Factory reset
Software version
Automatic scrolling
DIAL FROM ADDRESS BOOK
CALL LISTS
CONNECT PHONE
Search phone
Phones connected
Disconnect phone
Rename phone
Delete pairing
Delete all pairings
Show details
* Available according to model.

198
sound quality between
the different audio
sources (radio, CD...).
Check that the audio settings (Volume, Bass,
Treble, Ambience, Loudness) are adapted to
the sources listened to. It is advisable to set
the AUDIO functions (Bass, Treble, Front-Rear
Balance, Left-Right Balance) to the middle
position, select the Linear musical ambience
and set the loudness correction to the "Active"
position in CD mode or to the "Inactive" position
in radio mode.
For optimum sound quality, the audio settings (Volume, Bass, Treble,
Ambience, Loudness) can be adapted to the different sound sources,
which may result in audible differences when changing source (radio,
CD...).
The CD is ejected
automatically or is not
played by the player.
- Check that the CD is inserted in the player the
right way up.
- Check the condition of the CD: the CD cannot
be played if it is too damaged.
- Check the content in the case of a recorded
CD: consult the advice in the Audio section.
- The audio equipment's CD player does not
play DVDs.
- Because of their quality level, certain writeable
CDs will not be played by the audio system.
The CD is inserted upside down, is unplayable, does not contain any audio
data or contains an audio format which the player cannot play.
The CD is protected by an anti-pirating protection system which is not
recognised by the audio equipment.
The CD player sound
is poor.
Insert good quality CDs and store them in
suitable conditions.
The CD used is scratched or of poor quality.
The audio equipment settings (bass, treble, ambiences) are unsuitable.
Set the treble or bass level to 0, without selecting
an ambience.
QUESTION
SOLUTION
ANSWER
FREQUENTLY ASKED QUESTIONS

199
SOLUTION
ANSWER
The quality of reception
of the radio station
listened to gradually
deteriorates or the
stored stations do
not function (no
sound, 87.5 Mhz is
displayed...).
The vehicle is too far from the transmitter used by the station listened to or
there is no transmitter in the geographical area through which the vehicle
is travelling.
The environment (hills, buildings, tunnels, basement car parks...) block
reception, including in RDS mode.
The aerial is absent or has been damaged (for example when going
through a car wash or into an underground car park).
Activate the RDS function to enable the system
to check whether there is a more powerful
transmitter in the geographical area.
This phenomenon is normal and does not
indicate a failure of the audio equipment.
Have the aerial checked by a PEUGEOT dealer.
Sound cut-outs of 1
to 2 seconds in radio
mode.
During this brief sound cut-out, the RDS searches for any frequency
permitting better reception of the station.
Deactivate the RDS function if the phenomenon
is too frequent and always on the same route.
With the engine off,
the audio equipment
switches off after a few
minutes of use.
When the engine is switched off, the audio equipment operating time
depends on the battery charge.
The switch-off is normal: the audio equipment switches to economy mode
and switches off to prevent discharging of the vehicle's battery.
Start the vehicle's engine to increase the battery
charge.
The stored stations do
not function (no sound,
87.5 Mhz is displayed...).
An incorrect waveband is selected.
Press the BAND AST button to return to the
waveband (AM, FM1, FM2, FMAST) on which the
stations are stored.

200
QUESTION
SOLUTION
ANSWER
The TA box is ticked.
However, certain traffi c
jams along the route
are not indicated in real
time.
On starting, it is several minutes before the system begins to receive the
traffi c information.
Wait until the traffi c information is being received
correctly (displaying of the traffi c information
symbols on the map).
In certain countries, only major routes (motorways...) are listed for the
traffi c information.
The time taken to
calculate a route
sometimes seems
longer than usual.
This phenomenon is normal. The system is
dependent on the traffi c information available.
The performance of the system may slow down temporarily if a CD is
being copied onto the Jukebox at the same time as a route is being
calculated.
Wait until the CD has been copied or stop the
copying before starting the guidance function.
I receive a speed
camera alert for a
camera which is not on
my route.
The system announces all speed cameras located in a conical zone
forward of the vehicle. It may detect speed cameras on nearby or parallel
roads.
Zoom the map to view the exact position of the
speed camera.
The audible speed
camera alert is not
working.
Audible alerts are not active.
The altitude is not
displayed.
On starting, the initialisation of the GPS may take up to 3 minutes to
receive more than 3 satellites correctly.
Wait until the system has started up completely.
Check that there is a GPS coverage of at least
3 satellites (long press on the SETUP button,
then select GPS coverage).
Depending on the geographical environment (tunnel...) or the weather, the
conditions of reception of the GPS signal may vary.
This phenomenon is normal. The system is
dependent on the conditions of reception of the
GPS signal.
The route is not
calculated successfully.
The exclusion criteria may confl ict with the current location (exclusion of
toll roads on a motorway with tolls).
Check the exclusion criteria.
The alert volume level is set to minimum.
Activate audible alerts in Navigation Menu,
Settings, Set parameters for risk areas.
Increase the speed camera alert volume.

201
There is a long waiting
time after inserting a CD.
When a new medium is inserted, the system reads a certain amount of
data (directory, title, artist, etc.).
This may take a few seconds.
This phenomenon is normal.
I cannot connect my
Bluetooth telephone.
A telephone connected
by Bluetooth is
inaudible.
The telephone's Bluetooth function may be deactivated or the equipment
may not be visible.
The volume level depends on both the system and the telephone.
- Check that your telephone's Bluetooth function
is activated.
- Check that your telephone is visible.
Increase the Peugeot Connect Navigation volume
setting, possibly to maximum, and increase the
telephone volume level if necessary.
QUESTION
SOLUTION
ANSWER
203
Peugeot Connect Sound
CONTENTS
01 First steps
p.
02 Steering mounted controls p.
03 Main menu
p.
04 Audio
p.
05 Peugeot Connect USB
p.
06 Bluetooth
p.
07 Confi guration
p.
08 Trip computer
p.
09 Screen menu map
p.
Frequently asked questions
p.
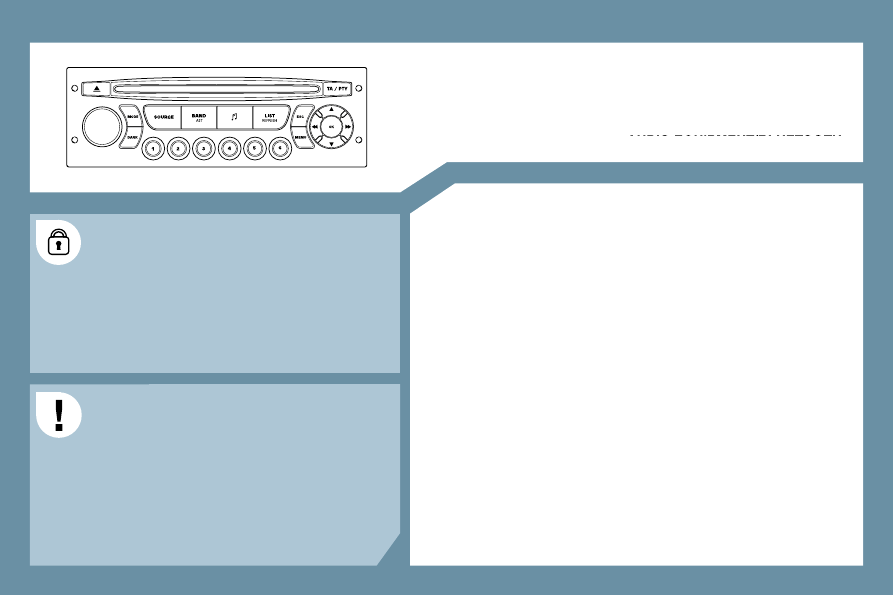
Your Peugeot Connect Sound is coded in such a way that
it will only operate in your vehicle. If it is to be installed
in another vehicle, contact your PEUGEOT dealer for
confi guration of the system.
For safety reasons, the driver must carry out operations
which require prolonged attention while the vehicle is
stationary.
When the engine is switched off and to prevent
discharging of the battery, the audio equipment may
switch off after a few minutes.
AUDIO EQUIPMENT/BLUETOOTH
Connect Sound
Connect Sound
204
205
206
207
210
213
215
216
217
219
204
1
22
10
10
11
11
13
13
14
14
15
15
33
44
55
66
77
88
99
12
12
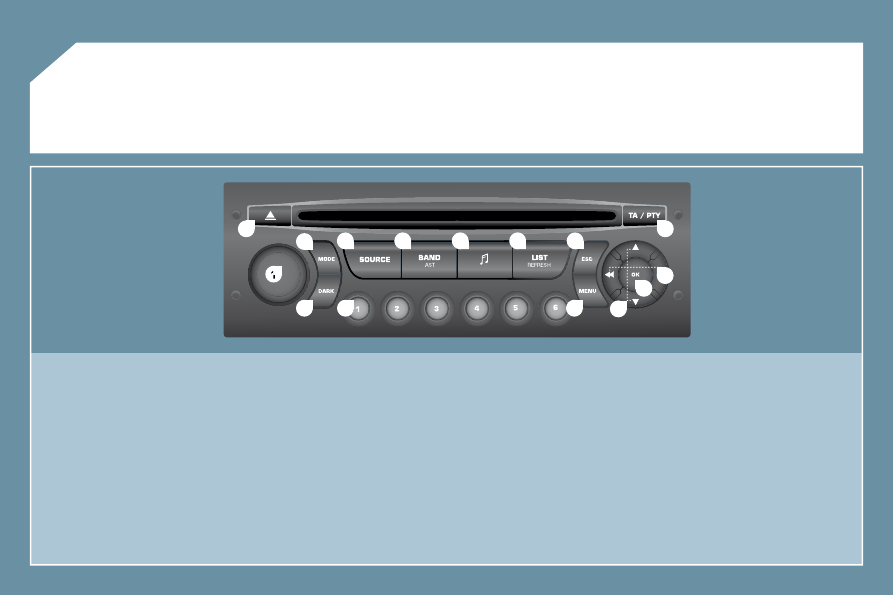
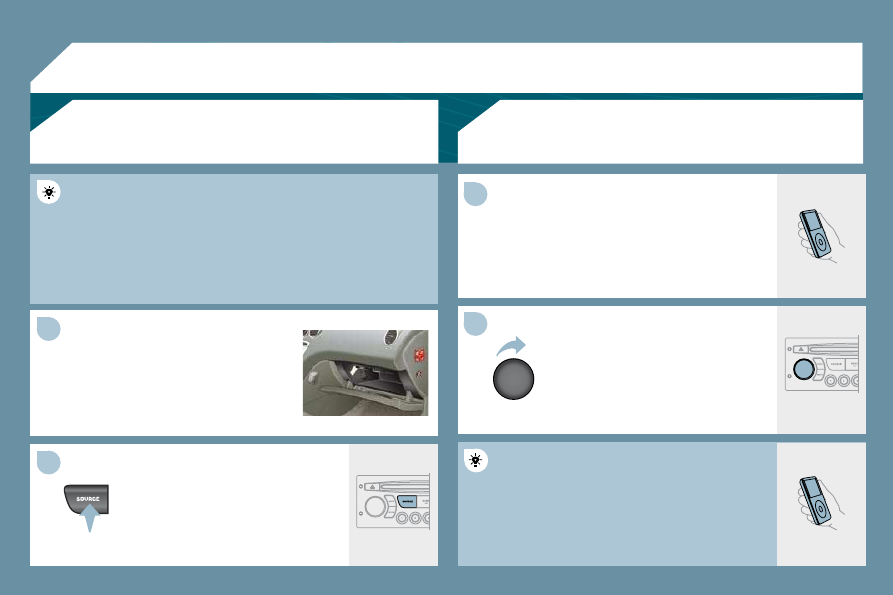
01 FIRST STEPS
1. On/Off and volume adjustment.
2. CD eject.
3. Selection of the display on the screen from the following
modes:
Audio (AUDIO), Trip Computer (TRIP) and Telephone (TEL)
functions.
4. Selection of source:
radio, audio CD/MP3 CD, USB, Jack connection, Streaming.
5. Selection of FM1, FM2, FMast and AM wavebands.
6. Setting audio options: front/rear balance, left/right balance,
loudness, sound ambience.
7. Display the list of local stations, of the tracks on the CD or of
the MP3 folders.
8. Abandon current operation.
9. TA (Traffi c Announcement) function on/off.
Long press: access to the PTY (Types of radio programme)
mode.
10. Confi rmation.
11. Automatic search for a lower/higher frequency.
Selection of previous/next CD, MP3 or USB track.
12. Selection of a lower/higher radio frequency.
Selection of the previous/next MP3 folder.
Selection of the previous/next USB equipment folder/genre/
artist/playlist.
13. Display the general menu.
14. Buttons 1 to 6:
Selection of a stored radio station.
Long press: store a station.
15. The DARK button changes the display on the screen to
improve driving comfort at night.
1st press: lighting the upper band only.
2nd press: display of a black screen.
3rd press: return to the standard display.
205
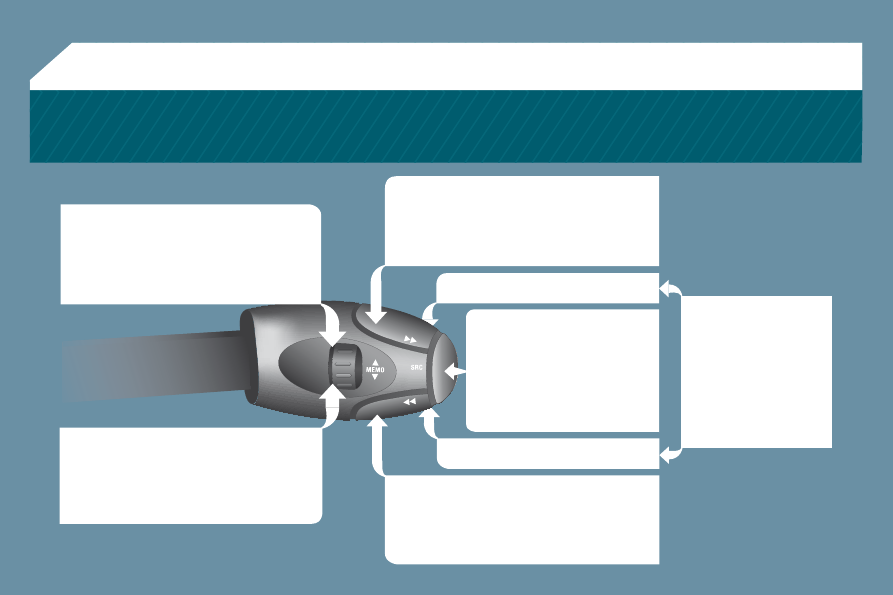
02
RADIO: selection of the previous stored
station.
USB: selection of the previous genre/artist/
directory from the classifi cation list.
Selection of the previous item on a menu.
RADIO: automatic search for a higher frequency.
CD/MP3/USB: selection of the next track.
CD/USB: continuous press: fast forwards play.
Selection of the previous item.
RADIO: automatic search for a lower frequency.
CD/MP3/USB: selection of the previous track.
CD/USB: continuous press: fast reverse.
Selection of the next item.
Volume increase.
Volume decrease.
STEERING MOUNTED CONTROLS
Mute: press the volume
increase and decrease
buttons simultaneously.
The sound is restored by
pressing one of the two
volume buttons.
- Change of sound source.
- Confi rmation of a selection.
- Pick up/Hang up the
telephone.
- Press for more than 2 seconds:
access to the telephone menu.
RADIO: selection of the next stored station.
USB: selection of the next genre/artist/
directory from the classifi cation list.
Selection of the next item on a menu.

206
03 MAIN MENU
AUDIO FUNCTIONS : radio,
CD, USB, options.
TRIP COMPUTER : entering of
TRIP COMPUTER
TRIP COMPUTER
distances, alerts, status of functions.
TELEPHONE : Bluetooth
hands-free, pairing,
management of a call.
PERSONALISATION-
CONFIGURATION : vehicle parameters,
display, languages.
> MONOCHROME SCREEN C
> MONOCHROME SCREEN A
For a detailed global view of the
menus available, refer to the
"Screen menu map" section of
this chapter.
207
22
33
44
11
22
44
33
11
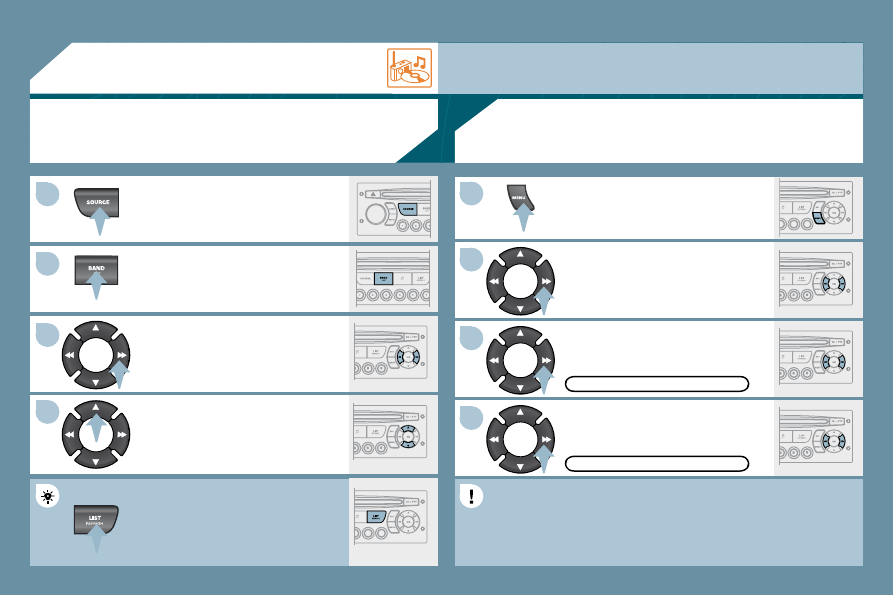
04 AUDIO
Press the SOURCE button several
times in succession and select the
radio.
Press the BAND AST button to select
a waveband: FM1, FM2, FMast, AM.
Briefl y press one of the buttons to
carry out an automatic search of the
radio stations.
Press one of the buttons to carry out a
manual search of the radio stations.
Press the LIST REFRESH button to
display the list of stations received
locally (30 stations maximum).
To update this list, press for more than
two seconds.
Select ACTIVATE FREQUENCY
FOLLOWING (RDS) then press OK.
RDS appears on the display.
Select the FM WAVEBAND
PREFERENCES function then press
OK.
Select AUDIO FUNCTIONS then
press OK.
Press the MENU button.
FM WAVEBAND PREFERENCES
ACTIVATE FREQUENCY FOLLOWING (RDS)
The external environment (hills, buildings, tunnels, basement car parks) may block reception, including
in RDS mode. This is a normal effect of the way in which radio waves are transmitted and does not
indicate any failure of the audio equipment.
RDS
The RDS, if displayed, enables you to continue listening to the same
station by automatic retuning to alternative frequencies. However, in
certain conditions, coverage of an RDS station may not be assured
throughout the country as radio stations do not cover 100 % of the
territory. This explains the loss of reception of the station during a
journey.
RADIO
SELECTING A STATION
208
04
11
22
11
22
Insert circular compact discs only.
Some anti-pirating systems, on original discs or CDs
copied using a personal recorder, may cause faults
which are no refl ection on the quality of the original
player.
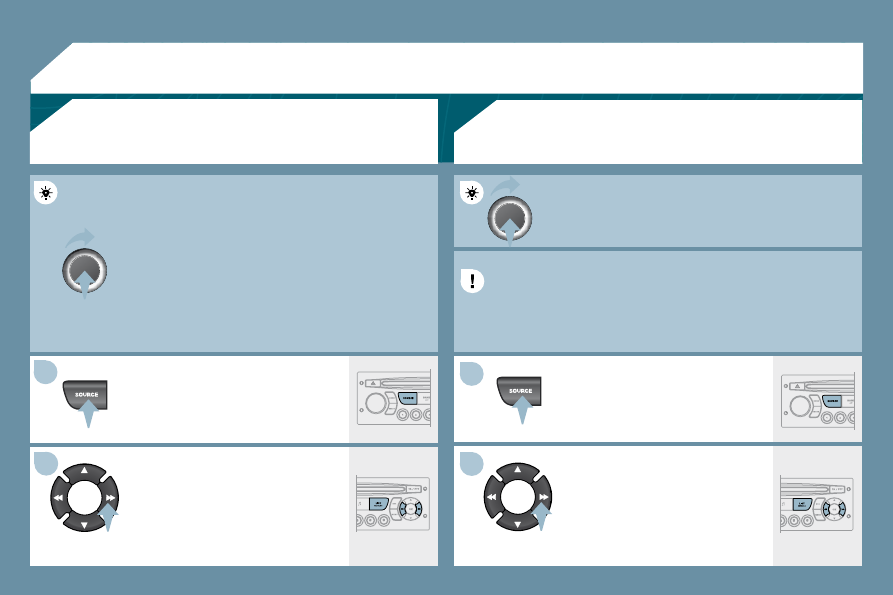
Without pressing the EJECT button, insert a CD in the
player, play begins automatically.
To play a disc which has already been
inserted, press the SOURCE button
several times in succession and
select CD.
Press one of the buttons to select a
track on the CD.
Press the LIST REFRESH button to
display the list of tracks on the CD.
Press and hold one of the buttons for
fast forward or backward.
Insert an MP3 compilation in the player.
The audio equipment searches for all of the music
tracks, which may take anything between a few
seconds and several tens of seconds, before play
begins.
On a single disc, the CD player can read up to 255 MP3 fi les spread
over 8 directory levels. However, it is advisable to keep to a limit of
two levels to reduce the access time before the CD is played.
While the CD is being played, the directory fl ow chart is not followed.
All of the fi les are displayed on a single level.
To play a disc which has already been
inserted, press the SOURCE button
several times in succession and
select CD.
Press one of the buttons to select a
track on the CD.
Press the LIST REFRESH button to
display the list of directories of the
MP3 compilation.
Press and hold one of the buttons for
fast forward or backward play.
CD
PLAYING A CD
MP3 CD
PLAYING AN MP3 COMPILATION
AUDIO

209
04
The MP3 format, an abbreviation of MPEG 1.2 & 2.5 Audio Layer
The MP3 format, an abbreviation of MPEG 1.2 & 2.5 Audio Layer
3, is an audio compression standard which permits the recording of
3, is an audio compression standard which permits the recording of
several tens of music fi les on a single disc.
In order to be able to play a recorded CDR or CDRW, when recording
In order to be able to play a recorded CDR or CDRW, when recording
it is preferable to select standards ISO 9660 level 1.2 or
1.2 or Joliet.
If the disc is recorded in another format, it may not be played
If the disc is recorded in another format, it may not be played
correctly.
It is recommended that the same recording standard is always used
It is recommended that the same recording standard is always used
for an individual disc, with as low a speed as possible (4x maximum)
for an individual disc, with as low a speed as possible (4x maximum)
for optimum sound quality.
In the particular case of a multi-session CD, the Joliet standard is
In the particular case of a multi-session CD, the Joliet standard is
recommended.
The audio equipment will only play fi les with the extension ".mp3"
The audio equipment will only play fi les with the extension ".mp3"
with a sampling rate of 22.05 KHz or 44.1 KHz. No other type of fi le
with a sampling rate of 22.05 KHz or 44.1 KHz. No other type of fi le
(.wma, .mp4, .m3u...) can be played.
It is advisable to restrict fi le names to 20 characters without using
It is advisable to restrict fi le names to 20 characters without using
special characters (e.g. " ? ; ù) to avoid any playing or d
g or displaying
problems.
MP3 CD
INFORMATION AND ADVICE
AUDIO
Empty CDs are not recognised and may damage the system.
Empty CDs are not recognised and may damage the system.
210
1
05
11
22
33
The system puts together playlists (temporary memory) created over
a period which depends on the capacity of the USB equipment.
The other sources are available during this time.
The playlists are updated each time the ignition is switched off or
each time a USB memory stick is connected.
When connecting for the fi rst time, the classifi cation suggested is by
folder. When you reconnect, the classifi cation selected previously is
retained.
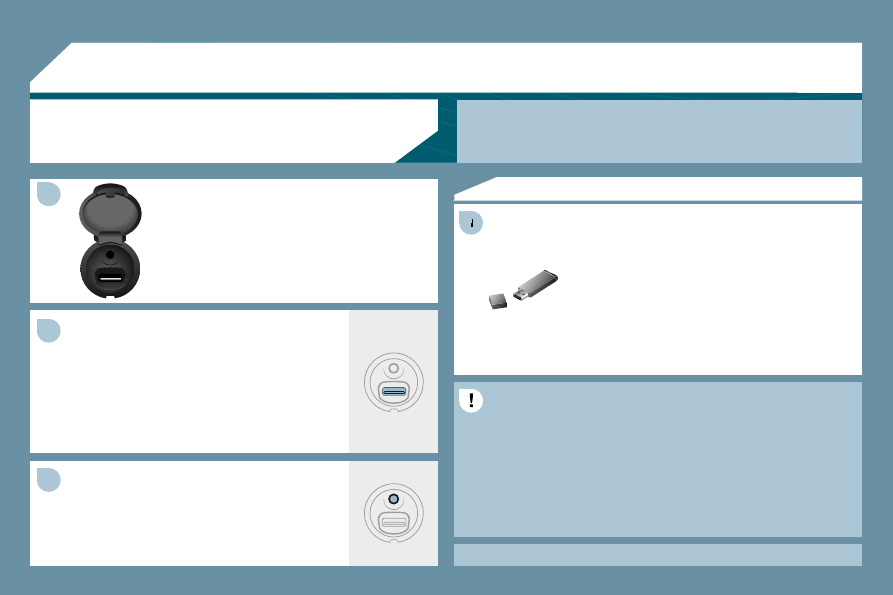
Connect the memory stick to the port, directly or
using a lead. If the audio equipment is switched
on, the USB source is detected as soon as it
is connected. Play begins automatically after a
delay which depends on the capacity of the USB
stick.
The fi le formats recognised are .mp3 (mpeg1
layer 3 only), .wma (standard 9 only, 128 kbits/
sec compression), .wav and .ogg.
The playlists types accepted are m3u, .pls, .wpl.
This unit consists of a USB port and a Jack
socket * . The audio fi les are transmitted from
portable equipment such as a digital player or
a USB memory stick to your Peugeot Connect
Sound to be listened to via the vehicle's speakers.
USB key (1.1, 1.2 and 2.0) or iPod
®
of generation
®
5 or later:
- USB memory sticks should be formatted FAT
or FAT 32 (NTFS not supported),
- the iPod
®
lead is essential,
®
- navigation through the fi le database is by
means of the steering wheel controls,
- the iPod
®
software should be regularly updated
®
for the best connection.
Other iPod
®
players of earlier generations and
®
players using the MTP protocol * :
- play via Jack-Jack lead only (not supplied),
- navigation through the fi le database is from the
portable equipment.
The list of compatible equipment and the compression rates supported are available from
PEUGEOT dealers.
USING THE PEUGEOT CONNECT USB
CONNECTING A USB MEMORY STICK
* According to vehicle.
PEUGEOT CONNECT USB
211
33
05
44
11
55
22
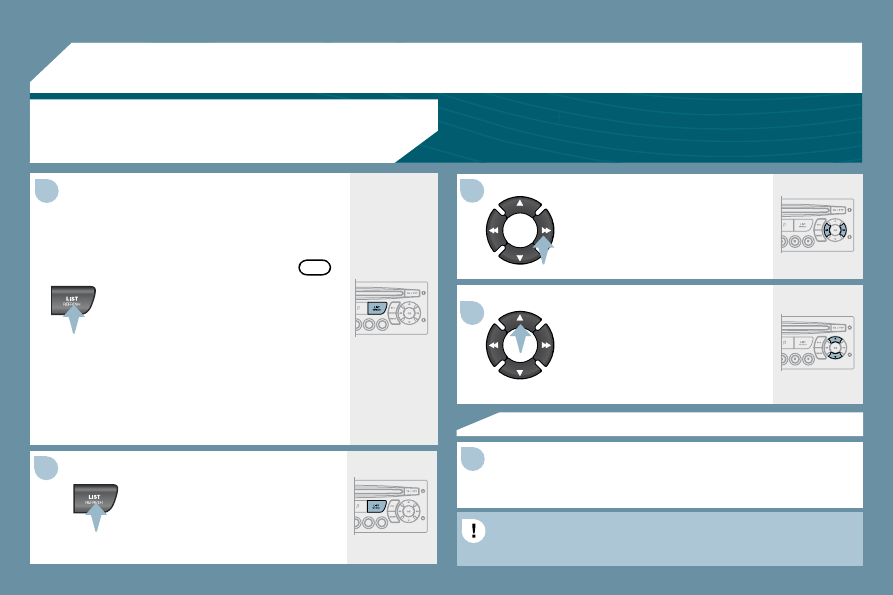
PEUGEOT CONNECT USB
USING THE PEUGEOT CONNECT USB
Press LIST briefl y to display the
previously selected classifi cation.
Navigate through the list using the
left/right and up/down buttons.
Confi rm the selection by pressing OK.
The lists available are Artist, Genre and Playlist (as defi ned on the
iPod
®
).
®
Selection and Navigation are described in steps 1 to 5 above.
Do not connect a hard disk or USB devices other than audio
equipment to the USB port. This could damage your installation.
CONNECTING AN IPOD
®
VIA THE USB PORT
®
Press one of these buttons to gain
access to the previous/next track on
the classifi cation list currently being
played.
Press and hold one of the buttons for
fast forward or backward play.
Press one of these buttons to gain
access to the previous/next Genre,
Folder, Artist or Playlist on the
classifi cation list currently being
played.
Press and hold LIST to display the
different classifi cations.
Select by Folder/Artist/Genre/Playlist,
press OK to select the classifi cation
required, then press OK again to confi rm.
- by Folder: all folders containing audio
fi les recognised on the peripheral
device, classifi ed in alphabetical order
without following the fl ow chart.
- by Artist: all of the artist names
defi ned in the ID3 Tags, classifi ed in
alphabetical order.
- by Genre: all of the genres defi ned in
the ID3 Tags.
- by Playlist: in accordance with the
playlists recorded on the USB device.
OK
212
05
11
22
22
11
The controls are displayed and managed via the
portable equipment.
First adjust the volume of your portable equipment.
Then adjust the volume of your audio
equipment.
The RCA auxiliary socket permits the connection of portable
equipment (MP3 player...).
Connect the portable equipment (MP3
player…) to the audio sockets (white
and red, RCA type) using a suitable
cable (not supplied).
Press the SOURCE button several
times in succession and select AUX.
USING THE AUXILIARY SOCKET (AUX)
RCA SOCKET
ADJUSTING THE VOLUME
OF THE AUXILIARY SOURCE
PEUGEOT CONNECT USB
213
11
66
22
77
44
99
55
10
10
33
88
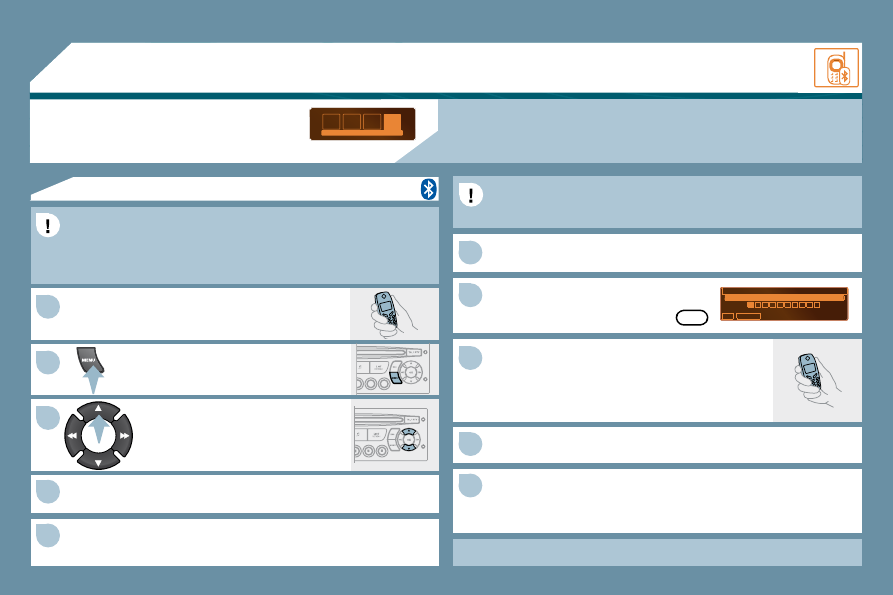
06
Saisir code authentiication
0
1
OK
Del
2 3 4 5 6 7 8 9
_
BLUETOOTH
For safety reasons and because they require prolonged attention
on the part of the driver, the operations for pairing of the Bluetooth
mobile telephone with the Bluetooth hands-free system of your audio
equipment must be carried out with the vehicle stationary and the
ignition on.
Press the MENU button.
A window is displayed with "Searching...".
Activate the telephone's Bluetooth function.
In the menu, select:
- Bluetooth telephone function - Audio
- Bluetooth confi guration
- Perform a Bluetooth search
The services offered depend on the network, the SIM card and the compatibility of the Bluetooth
equipment used.
Consult your telephone's manual and your operator to fi nd out which services are available to you.
A list of mobile telephones which offer the best range of services is available from the network. Consult
a PEUGEOT dealer.
BLUETOOTH TELEPHONE
SCREEN C
The TELEPHONE menu permits access to the following functions in
particular: Directory * , Call list, Pairing management.
The fi rst 4 telephones recognised are displayed in this window.
A virtual keypad is displayed on the screen:
enter a code with at least 4 digits.
Confi rm by pressing OK.
If pairing fails, the number of attempts is not limited.
Select the telephone to be connected from the list. Only one
telephone can be connected at a time.
A message is displayed on the screen of the
telephone chosen: to accept the pairing, enter
the same code on the telephone, then confi rm by
pressing OK.
"Pairing of Name_telephone successful" appears on the screen.
The automatic connection authorised is only active after the
telephone has been confi gured.
The directory and the call list can be accessed after the
synchronisation period.
synchronisation period.
OK
PAIRING A TELEPHONE
The pairing can also be initiated from the telephone.
* If your telephone is fully compatible.
Нет комментариевНе стесняйтесь поделиться с нами вашим ценным мнением.
Текст