Subaru Impreza 3 / Impreza WRX / Impreza WRX STI. Service manual — part 91

EX(STI)-12
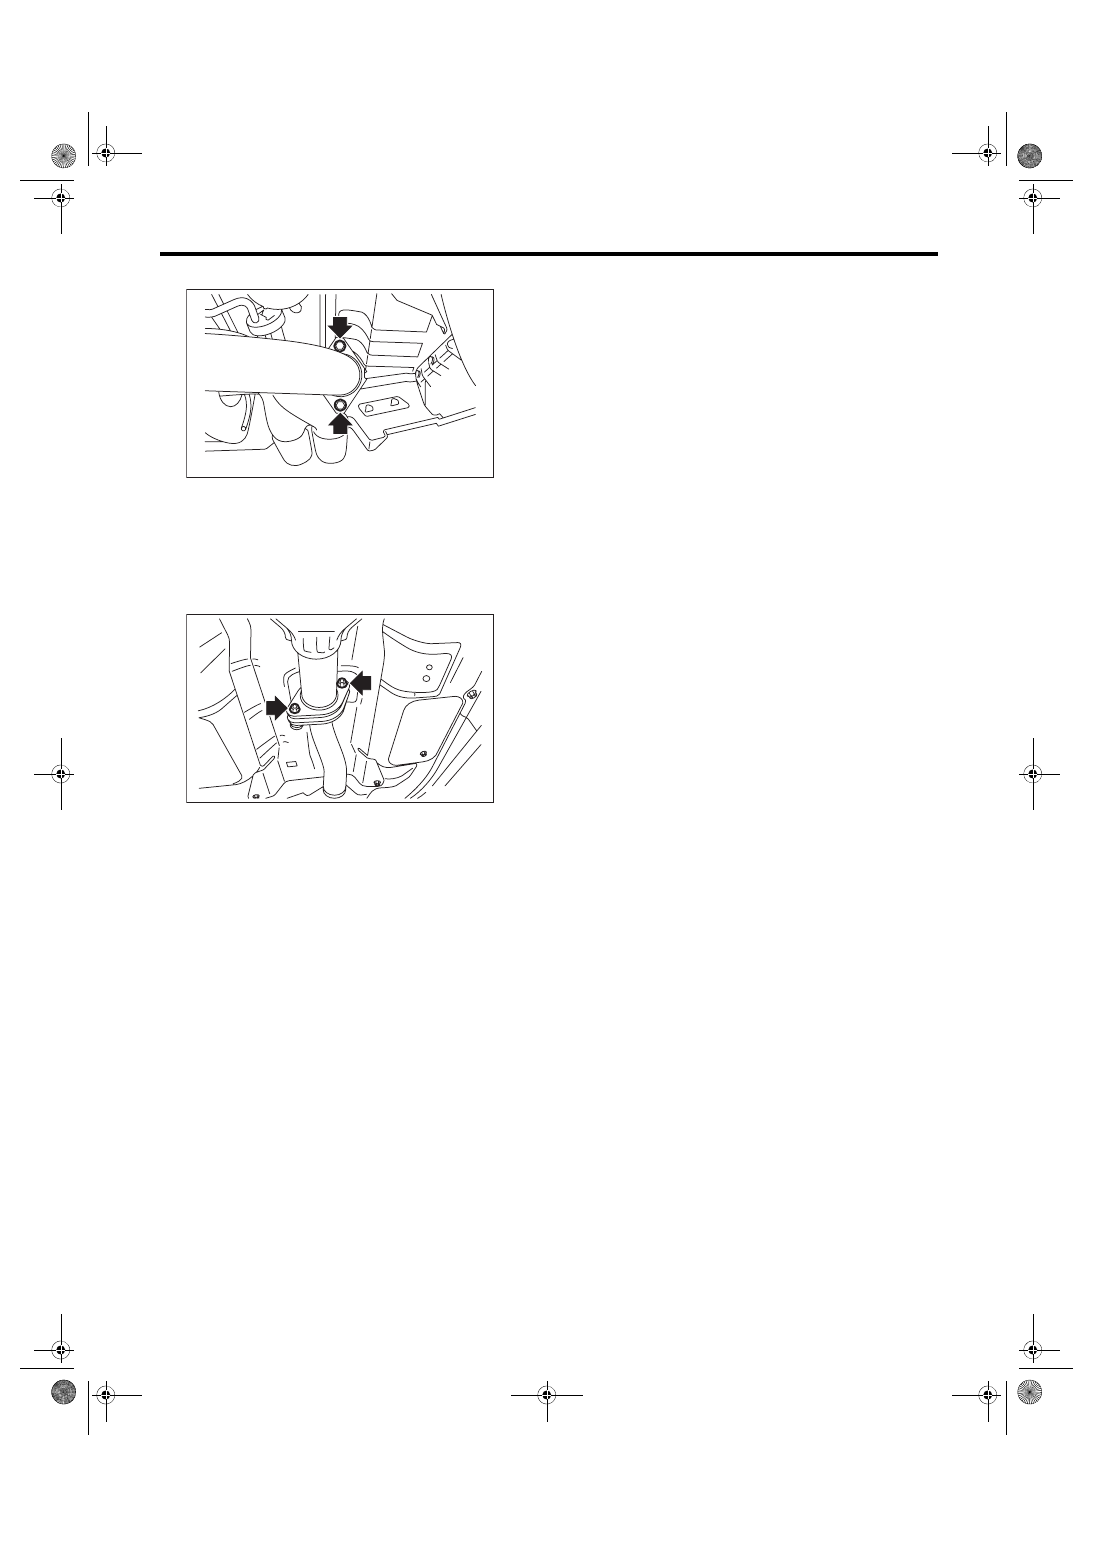
Joint Pipe
EXHAUST
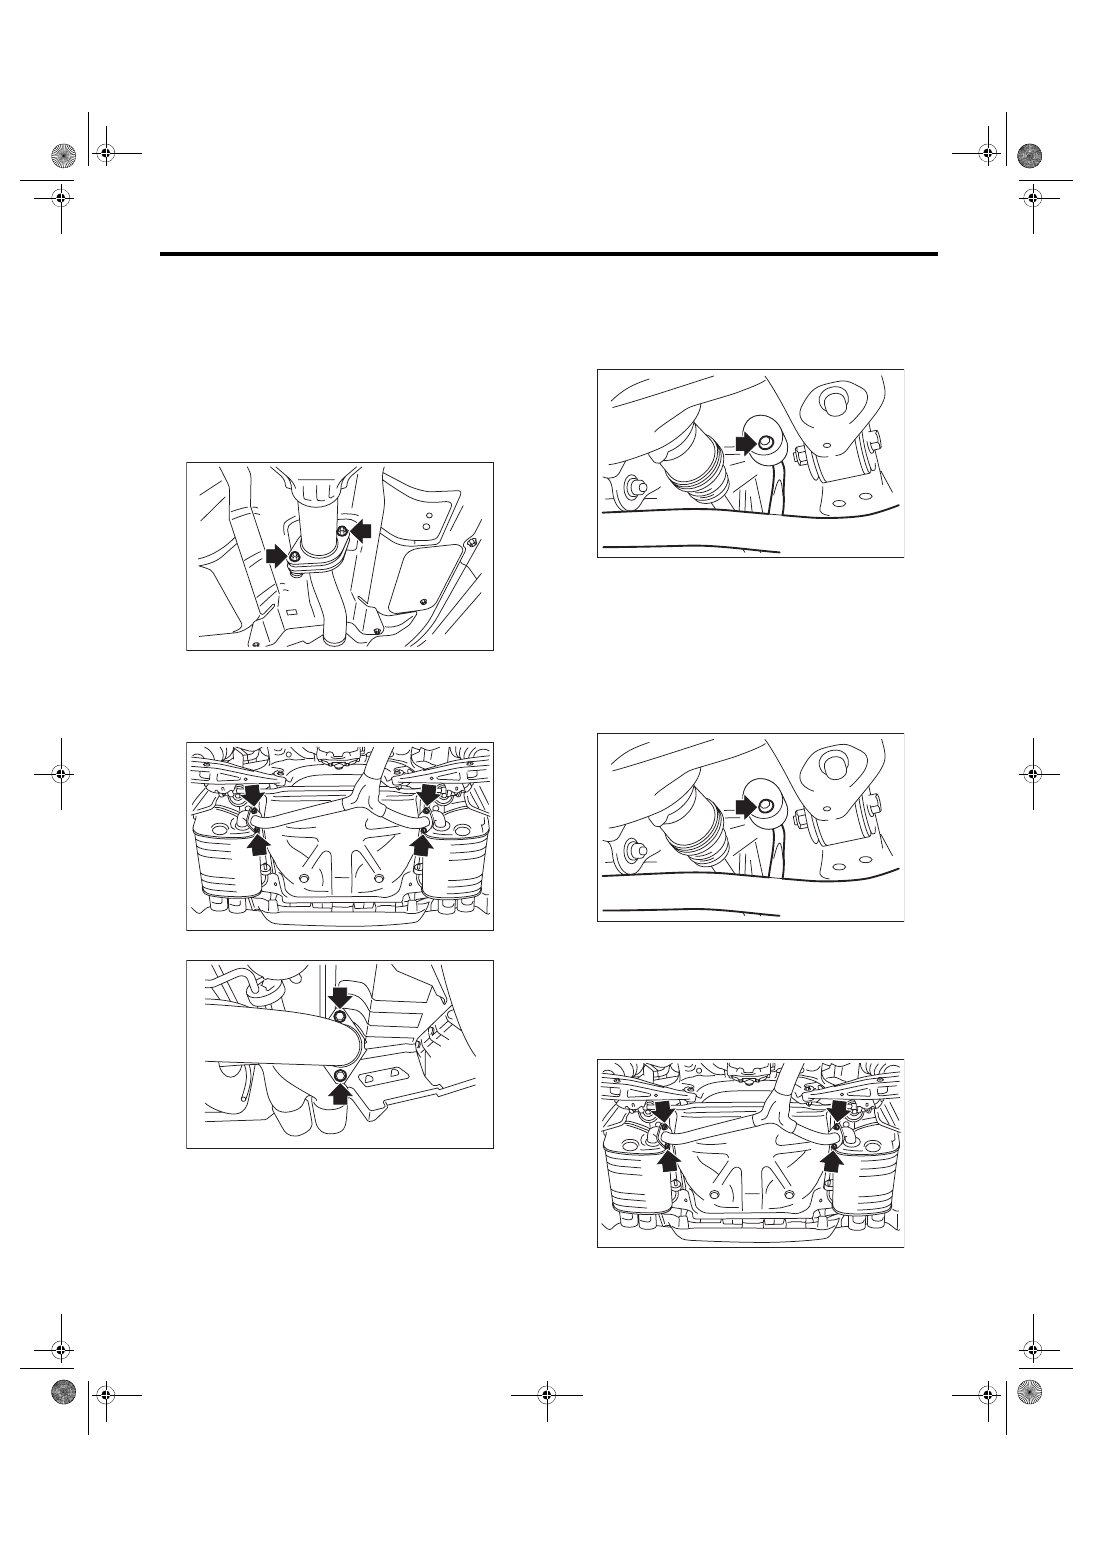
4. Joint Pipe
A: REMOVAL
CAUTION:
Vehicle components are extremely hot after
driving. Be wary of receiving burns from heated
parts.
1) Disconnect the ground cable from battery.
2) Lift up the vehicle.
3) Remove the under cover. <Ref. to EI-28, RE-
4) Remove the front oxygen (A/F) sensor. <Ref. to
FU(STI)-54, REMOVAL, Front Oxygen (A/F) Sen-
sor.> <Ref. to FU(w/o STI)-53, REMOVAL, Front
5) Remove the exhaust manifold RH lower cover.
6) Remove the bolts and nuts which hold exhaust
manifold RH onto joint pipe.
7) Remove the center exhaust pipe. <Ref. to
EX(STI)-8, REMOVAL, Center Exhaust Pipe.>
8) Remove the turbocharger. <Ref. to IN(STI)-15,
REMOVAL, Turbocharger.> <Ref. to IN(w/o STI)-
9) Take off the joint pipe in the upward direction.
B: INSTALLATION
Install in the reverse order of removal.
NOTE:
Use a new gasket.
Tightening torque:
42.5 N·m (4.3 kgf-m, 31.3 ft-lb)
Tightening torque:
19 N·m (1.9 kgf-m, 14.0 ft-lb)
C: INSPECTION
1) Check the connections and welds for exhaust
leaks.
2) Make sure there are no holes or rusting.
IN-00203
EX-02260
EX-00018
EX-00018
EX-02260
EX(STI)-13
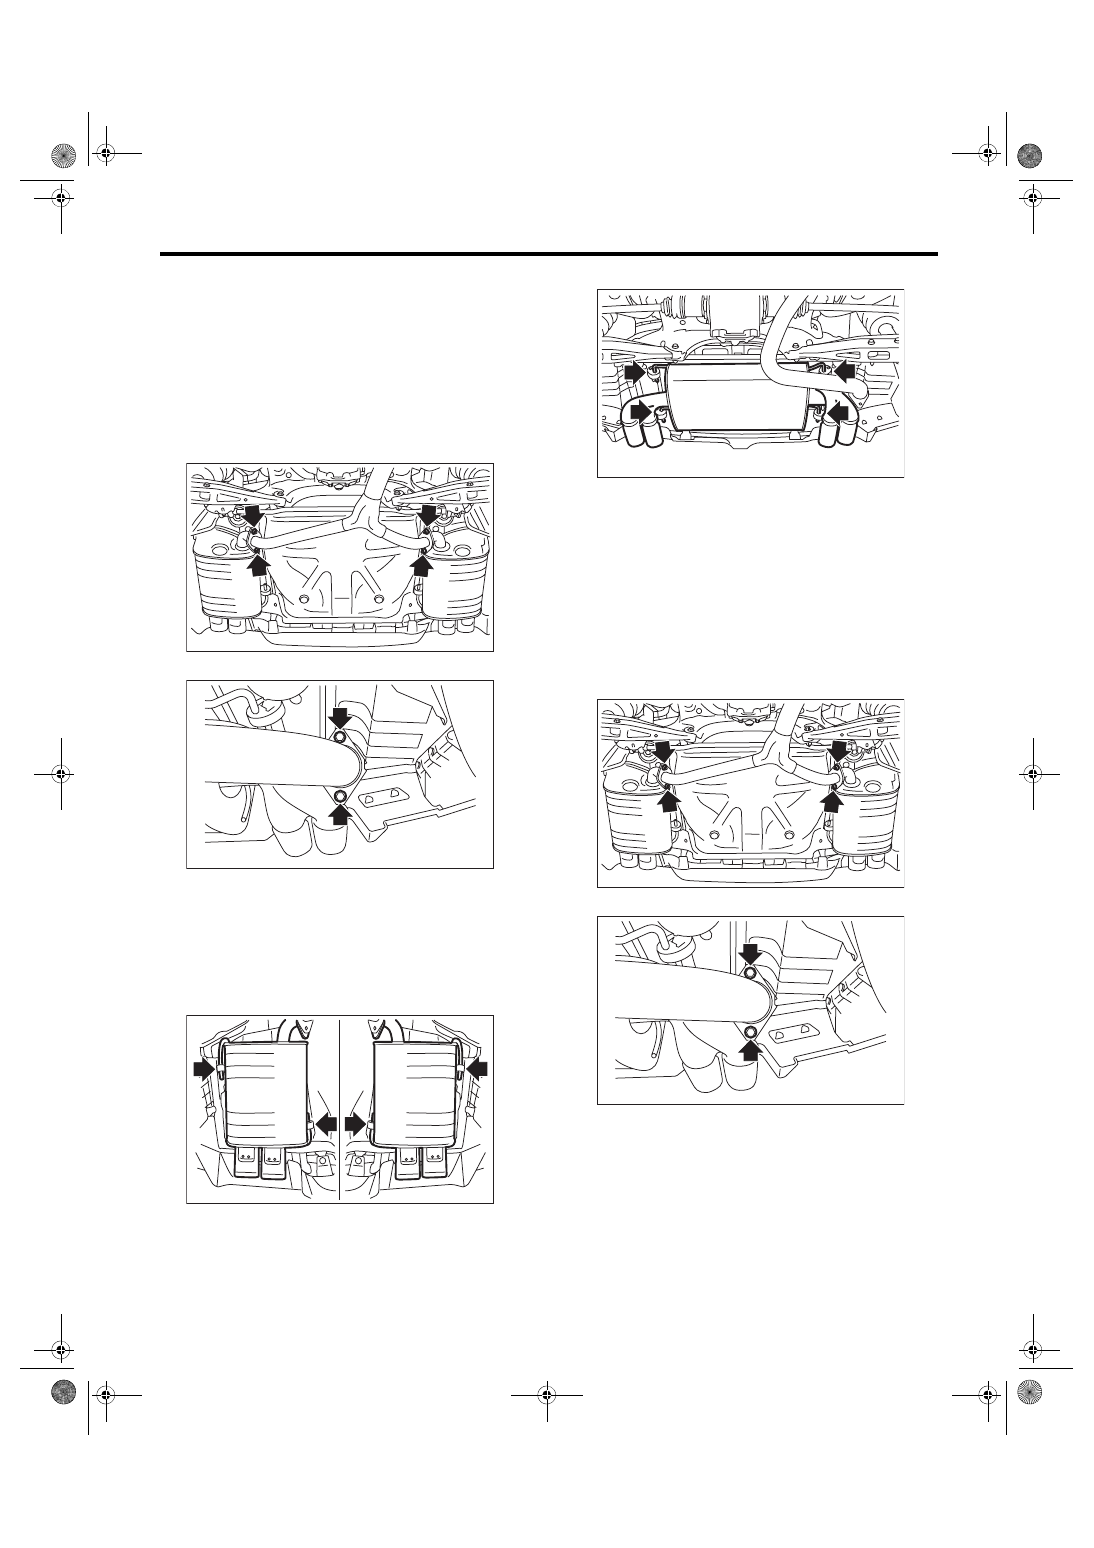
Rear Exhaust Pipe
EXHAUST
5. Rear Exhaust Pipe
A: REMOVAL
CAUTION:
Vehicle components are extremely hot after
driving. Be wary of receiving burns from heated
parts.
1) Lift up the vehicle.
2) Remove the center exhaust pipe from rear ex-
haust pipe.
3) Remove the muffler from rear exhaust pipe.
CAUTION:
Be careful not to drop the rear exhaust pipe.
• 4 door model
• 5 door model
4) Apply a coat of spray type lubricant to the mating
area of cushion rubber.
5) Remove the rear exhaust pipe from the cushion
rubber.
CAUTION:
Be careful not to let the muffler contact the rear
bumper.
B: INSTALLATION
1) Apply a coat of spray type lubricant to the mating
area of cushion rubber.
2) Install the rear exhaust pipe to cushion rubber.
NOTE:
After assembling, degrease the lubricant which
was applied to the cushion rubber while removing/
installing.
3) Install the rear exhaust pipe to the muffler.
NOTE:
Use a new gasket and self-locking nut.
Tightening torque:
48 N·m (4.9 kgf-m, 35.4 ft-lb)
• 4 door model
EX-02229
EX-02707
EX-02274
EX-02795
EX-02795
EX-02707
EX(STI)-14
Rear Exhaust Pipe
EXHAUST
• 5 door model
4) Install the center exhaust pipe to rear exhaust
pipe.
NOTE:
Use a new gasket.
Tightening torque:
18 N·m (1.8 kgf-m, 13.3 ft-lb)
5) Lower the vehicle.
C: INSPECTION
1) Check the connections and welds for exhaust
leaks.
2) Make sure there are no holes or rusting.
3) Check the cushion rubber for wear or crack.
EX-02274
EX-02229
EX(STI)-15
Muffler
EXHAUST
6. Muffler
A: REMOVAL
CAUTION:
Vehicle components are extremely hot after
driving. Be wary of receiving burns from heated
parts.
1) Lift up the vehicle.
2) Remove the rear exhaust pipe from the muffler.
• 4 door model
• 5 door model
3) Apply a coat of spray type lubricant to the mating
area of cushion rubber.
4) Remove the muffler from the cushion rubber.
CAUTION:
Be careful not to drop the muffler during remov-
al.
• 4 door model
• 5 door model
B: INSTALLATION
Install in the reverse order of removal.
NOTE:
• Use a new gasket and self-locking nut.
• After assembling, degrease the lubricant which
was applied to the cushion rubber while removing/
installing.
Tightening torque:
48 N·m (4.9 kgf-m, 35.4 ft-lb)
• 4 door model
• 5 door model
C: INSPECTION
1) Check the connections and welds for exhaust
leaks.
2) Make sure there are no holes or rusting.
3) Check the cushion rubber for wear or crack.
EX-02707
EX-02274
EX-02796
EX-02797
EX-02707
EX-02274
Нет комментариевНе стесняйтесь поделиться с нами вашим ценным мнением.
Текст