Subaru Impreza 3 / Impreza WRX / Impreza WRX STI. Service manual — part 39
FU(STI)-68
Fuel
FUEL INJECTION (FUEL SYSTEMS)
3. DRAINING FUEL (THROUGH THE FUEL
FILLER HOSE)
• 4 door model
WARNING:
Place “NO OPEN FLAMES” signs near the
working area.
CAUTION:
• Be careful not to spill fuel.
• Fuel may remain in the fuel filler pipe. Drain
the fuel from the fuel filler pipe through the fill
opening using the gasoline proof pump and the
gasoline proof hose (ø10 or less) before the op-
eration.
NOTE:
Be aware that the fuel may remain in the fuel tank
after draining the fuel.
1) Lift up the vehicle.
2) Remove the rear exhaust pipe and muffler.
<Ref. to EX(STI)-13, REMOVAL, Rear Exhaust
Pipe.> <Ref. to EX(STI)-15, REMOVAL, Muffler.>
3) Remove the rear sub frame. <Ref. to RS-17, RE-
4) Open the fuel filler lid and remove the fuel filler
cap.
5) Drain the fuel from the fuel filler pipe through the
filler opening using the gasoline proof pump and
the gasoline proof hose (ø10 or less).
6) Disconnect the fuel filler hose from the fuel filler
pipe assembly.
CAUTION:
• Be careful not to spill fuel.
• Catch the fuel from hoses using a container
or cloth.
7) Set the container under the vehicle and insert
the gasoline proof hose (ø10 or less) into the fuel
filler hose to drain the fuel.
CAUTION:
Be careful not to spill fuel.
8) Install the related parts in the reverse order after
draining the fuel.
NOTE:
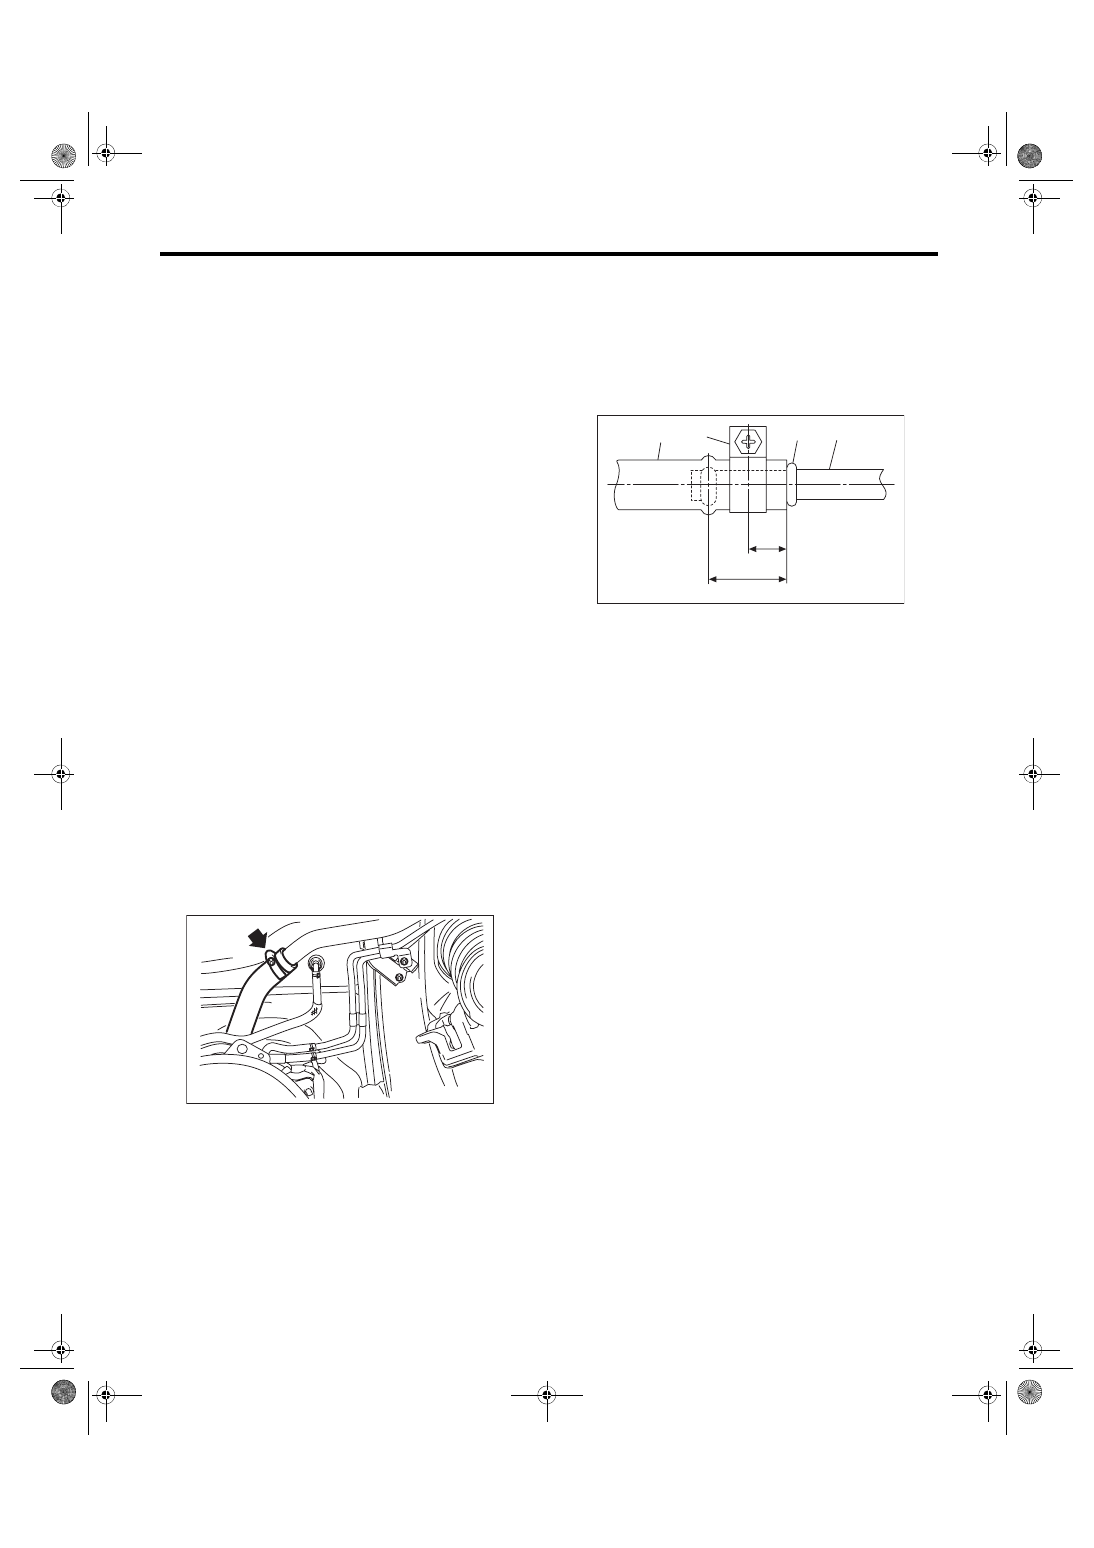
Correctly insert the fuel filler hose to the spool, and
then install the clamp as shown.
Tightening torque:
2.5 N·m (0.3 kgf-m, 1.8 ft-lb)
• 5 door model
WARNING:
Place “NO OPEN FLAMES” signs near the
working area.
CAUTION:
• Be careful not to spill fuel.
• Fuel may remain in the fuel filler pipe. Drain
the fuel from the fuel filler pipe through the fill
opening using the gasoline proof pump and the
gasoline proof hose (ø10 or less) before the op-
eration.
NOTE:
Be aware that the fuel may remain in the fuel tank
after draining the fuel.
1) Lift up the vehicle.
2) Remove the rear exhaust pipe and muffler.
<Ref. to EX(STI)-13, REMOVAL, Rear Exhaust
Pipe.> <Ref. to EX(STI)-15, REMOVAL, Muffler.>
3) Open the fuel filler lid and remove the fuel filler
cap.
4) Drain the fuel from the fuel filler pipe through the
filler opening using the gasoline proof pump and
the gasoline proof hose (ø10 or less).
FU-05836
(1) Fuel filler hose
(2) Clamp
(3) Spool
(4) Fuel filler pipe
FU-05815
(1)
(2)
(4)
L
L/2
(3)
FU(STI)-69
Fuel
FUEL INJECTION (FUEL SYSTEMS)
5) Disconnect the fuel filler hose from the fuel filler
pipe assembly.
CAUTION:
• Be careful not to spill fuel.
• Catch the fuel from hoses using a container
or cloth.
6) Set the container under the vehicle and insert
the gasoline proof hose (ø10 or less) into the fuel
filler hose to drain the fuel.
CAUTION:
Be careful not to spill fuel.
7) Install the related parts in the reverse order after
draining the fuel.
NOTE:
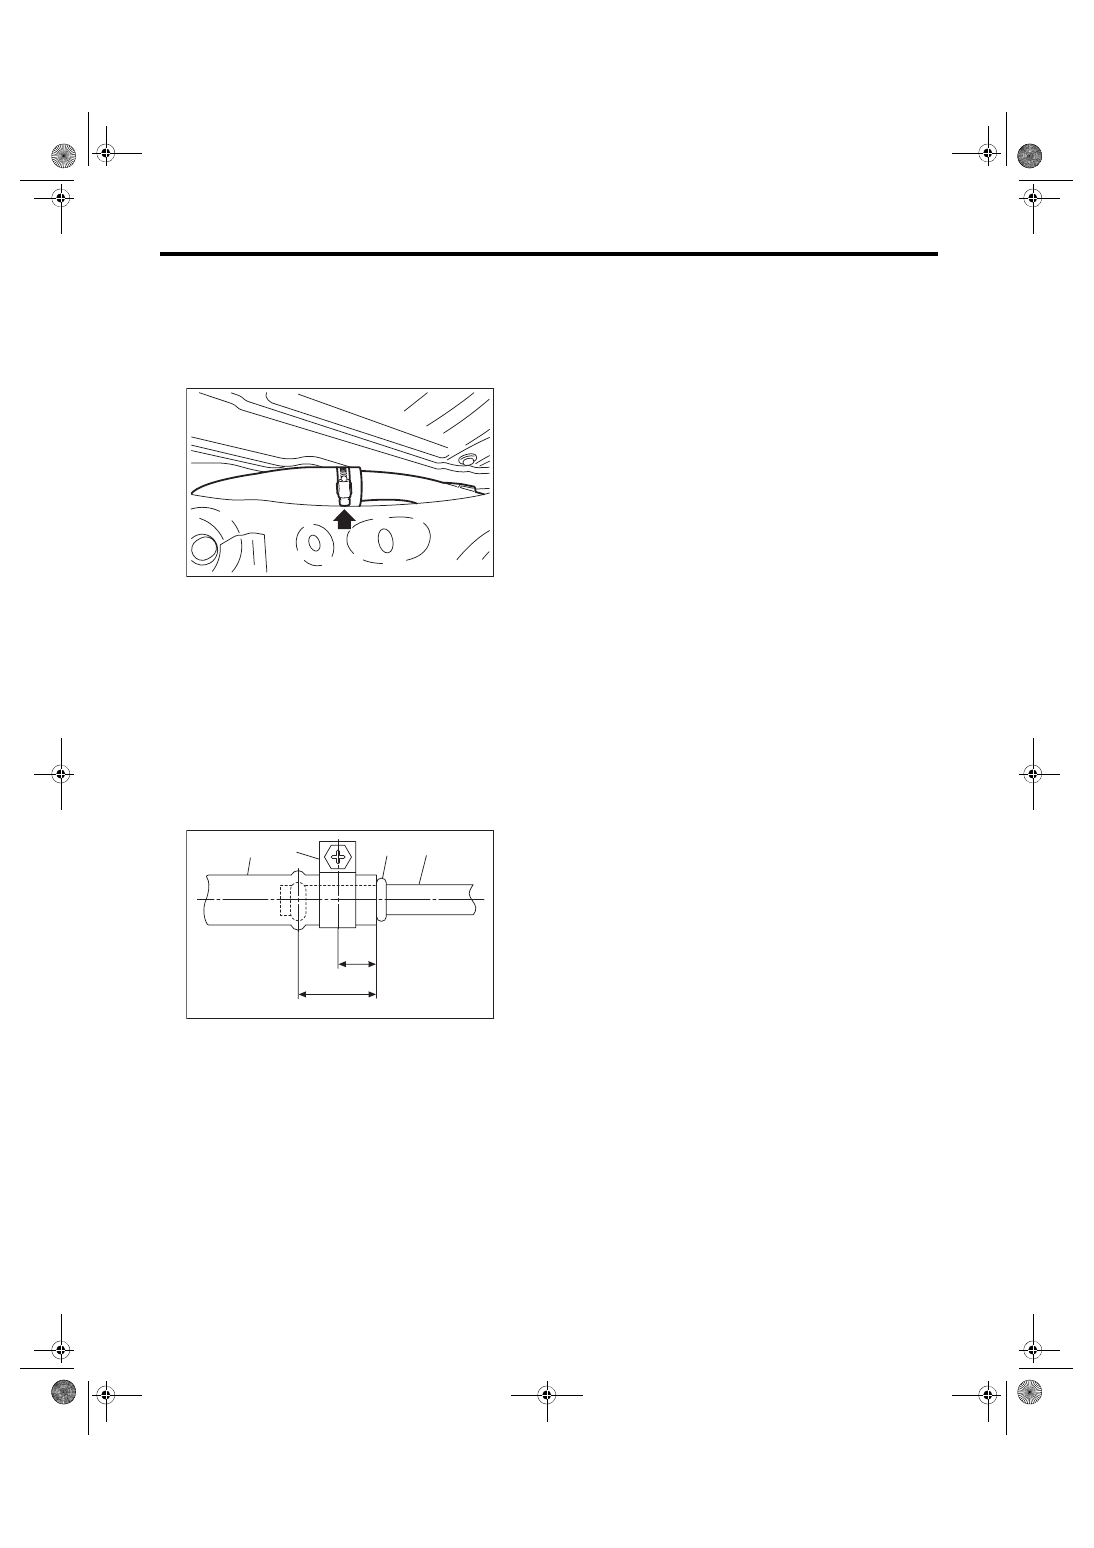
Correctly insert the fuel filler hose to the spool, and
then install the clamp as shown.
Tightening torque:
2.5 N·m (0.3 kgf-m, 1.8 ft-lb)
(1) Fuel filler hose
(2) Clamp
(3) Spool
(4) Fuel filler pipe
FU-04609
FU-05815
(1)
(2)
(4)
L
L/2
(3)
FU(STI)-70
Fuel Tank
FUEL INJECTION (FUEL SYSTEMS)
25.Fuel Tank
A: REMOVAL
WARNING:
Place “NO OPEN FLAMES” signs near the
working area.
CAUTION:
• Be careful not to spill fuel.
• Catch the fuel from the tubes using a contain-
er or cloth.
1) Release the fuel pressure. <Ref. to FU(STI)-67,
RELEASING OF FUEL PRESSURE, PROCE-
2) Drain fuel. <Ref. to FU(STI)-67, DRAINING
FUEL (WITH SUBARU SELECT MONITOR),
3) Disconnect the ground cable from battery.
4) Remove the rear seat cushion. <Ref. to SE-13,
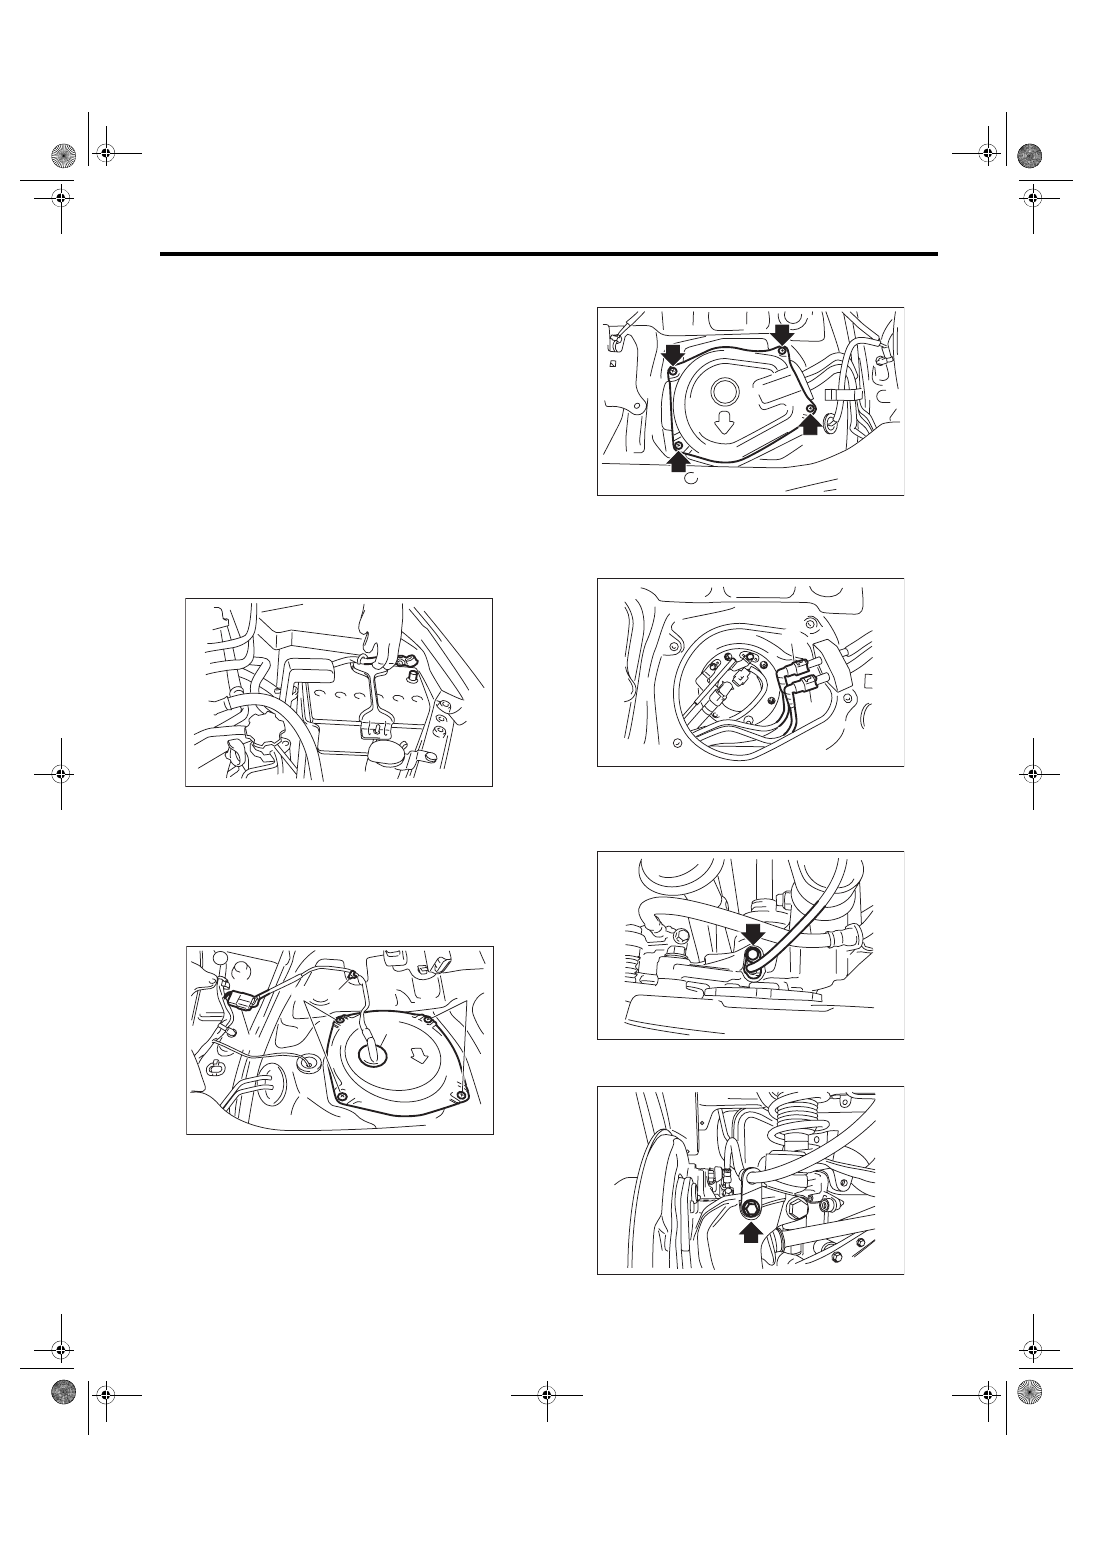
5) Remove the service hole cover of fuel pump.
(1) Disconnect fuel pump connector (A), and re-
move clip (B).
(2) Remove the screw (C).
(3) Push the grommet (D) down and remove the
service hole cover.
6) Remove the service hole cover of fuel sub level
sensor.
7) Disconnect the quick connector of fuel delivery
tube (A) and fuel return tube (B). <Ref. to FU(STI)-
93, REMOVAL, Fuel Delivery, Return and Evapo-
8) Remove the rear wheels.
9) Lift up the vehicle.
10) Remove the rear ABS wheel speed sensor
from the rear housing.
11) Remove the rear brake hose bracket from rear
housing.
IN-00203
FU-06552
(A)
(B)
(D)
(C)
(C)
FU-06553
FU-05675
(B)
(A)
FU-03357
FU-04088
FU(STI)-71
Fuel Tank
FUEL INJECTION (FUEL SYSTEMS)
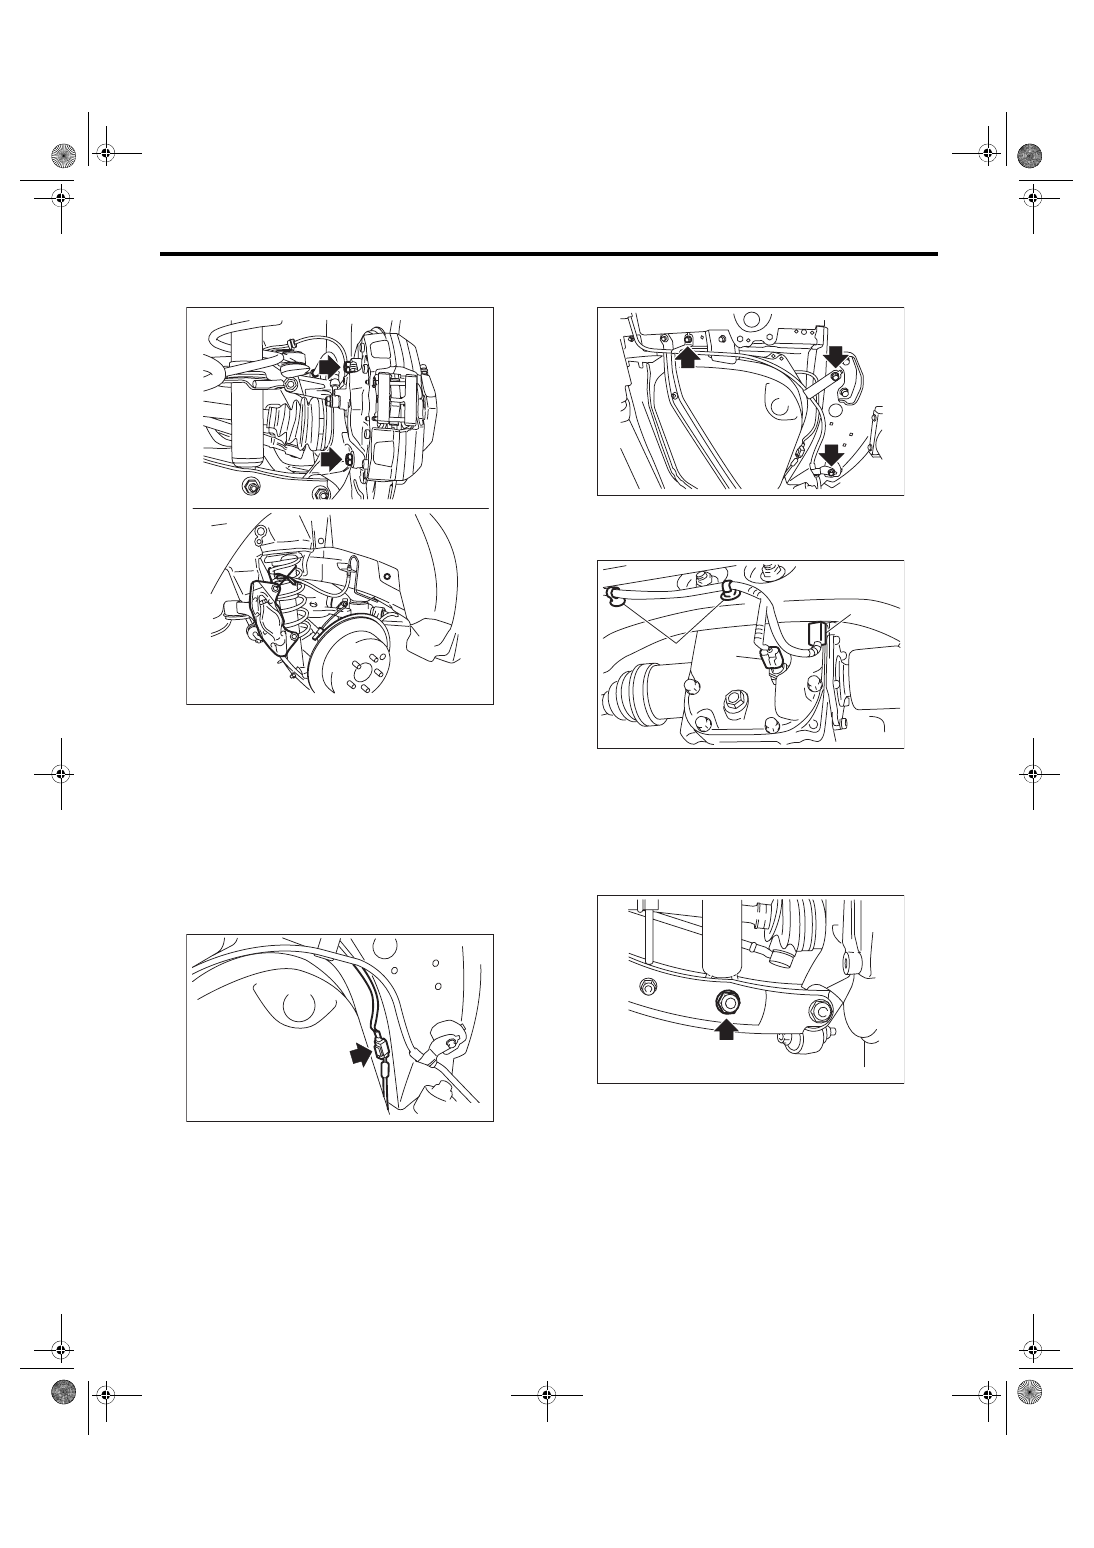
12) Remove the rear disc brake assembly and tie it
to the body side of the vehicle.
13) Remove the parking brake cable from parking
brake assembly. <Ref. to PB-6, REMOVAL, Park-
ing Brake Assembly (Rear Disc Brake).>
14) Remove the rear exhaust pipe and muffler.
<Ref. to EX(STI)-13, REMOVAL, Rear Exhaust
Pipe.> <Ref. to EX(STI)-15, REMOVAL, Muffler.>
15) Remove the propeller shaft. <Ref. to DS-11,
16) Remove the heat shield cover and fuel tank
protector.
17) Disconnect the connector from the rear ABS
wheel speed sensor.
18) Remove the parking brake cable clamp from
the body.
19) Disconnect the connectors from oil tempera-
ture switch (A) and ground (B), and remove the
clips (C) which secure the harness.
20) Remove the rear suspension assembly.
WARNING:
A helper is required to perform this work.
(1) Support the rear differential with the trans-
mission jack.
(2) Remove the bolt and nut which secure rear
shock absorber to rear suspension arm.
FU-04387
FU-03277
FU-03278
FU-04571
(A)
(B)
(C)
FU-03359
Нет комментариевНе стесняйтесь поделиться с нами вашим ценным мнением.
Текст