Subaru Impreza 3 / Impreza WRX / Impreza WRX STI. Service manual — part 613
AB-19
Curtain Airbag Module
AIRBAG SYSTEM
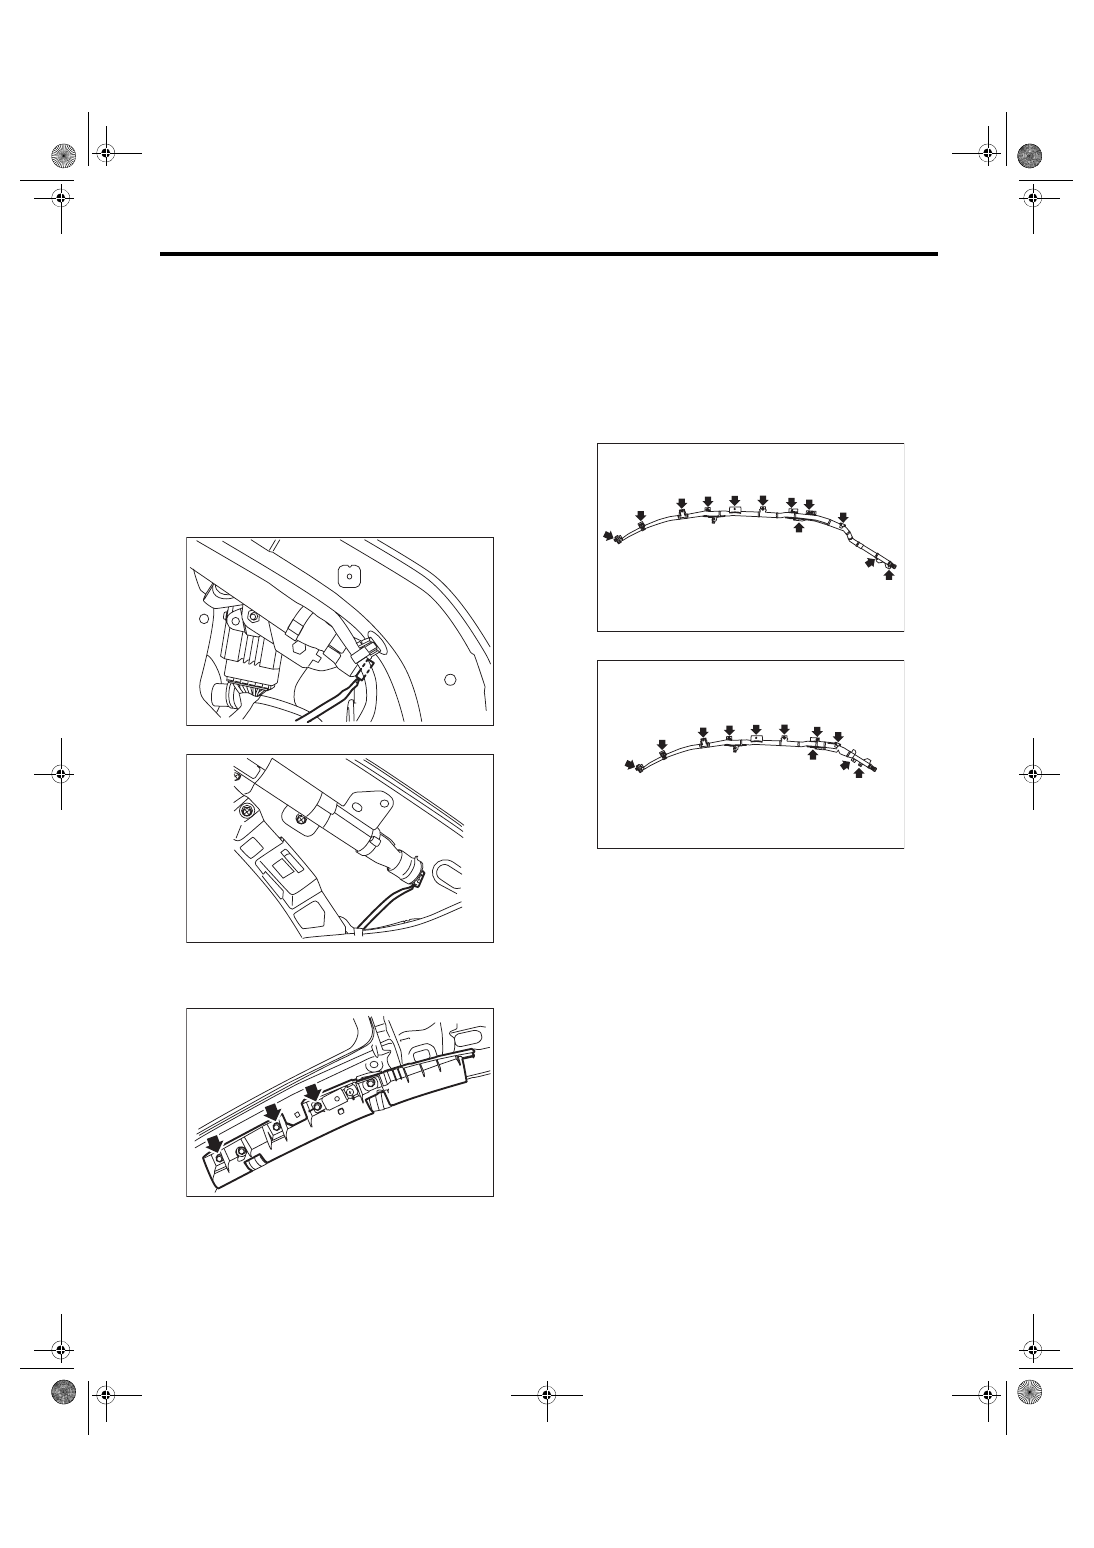
7. Curtain Airbag Module
A: REMOVAL
CAUTION:
Refer to “CAUTION” of “General Description”
before handling the airbag module. <Ref. to AB-
5, CAUTION, General Description.>
1) Turn the ignition switch to OFF.
2) Disconnect the ground cable from battery and
wait for at least 60 seconds before starting work.
3) Remove the rear quarter trim. <Ref. to EI-60,
4) Disconnect the curtain airbag module connector.
• 5 door model
• 4 door model
5) Remove the roof trim. <Ref. to EI-66, REMOV-
6) Remove the airbag guide from the front pillar.
7) Remove the bolt, and remove the curtain airbag
module.
CAUTION:
• Be careful not to damage the curtain airbag
module during removal.
• Never open the curtain airbag module before
activation. Never reuse the deployed curtain
airbag module.
• 5 door model
• 4 door model
B: INSTALLATION
CAUTION:
• Refer to “CAUTION” of “General Description”
before handling the airbag module. <Ref. to AB-
5, CAUTION, General Description.>
• When installing the curtain airbag module, in-
stall a specified part at specified place.
• Be careful not to damage the curtain airbag
module during installation.
• Never open the curtain airbag module before
activation. Never reuse the deployed curtain
airbag module.
• Make sure that there are no foreign matter on
airbag module.
Install each part in the reverse order of removal.
Tightening torque:
7.5 N·m (0.76 kgf-m, 5.5 ft-lb)
AB-01832
AB-01892
AB-01833
AB-01904
AB-01890
AB-20
Curtain Airbag Module
AIRBAG SYSTEM
C: INSPECTION
CAUTION:
Refer to “CAUTION” of “General Description”
before handling the airbag module. <Ref. to AB-
5, CAUTION, General Description.>
Check for the following, and replace the damaged
parts with new parts. <Ref. to AB-13, CURTAIN
AIRBAG MODULE, INSPECTION, Inspection Lo-
1) With side collision (when curtain airbag is acti-
vated)
• Curtain airbag module assembly
• Satellite safing sensor
• Curtain airbag sensor
• Roof trim
• Front pillar upper trim
• Center pillar upper trim
• Rear quarter pillar trim
• Airbag guide
2) When damage is found by visual check
• Assist grip
• Assist grip bracket
• Curtain airbag harness and connector on body
side.
• Satellite safing sensor cover
3) With side collision (when curtain airbag is not ac-
tivated)
Check the roof trim, pillar trim, airbag module and
sensor visually, and then replace them with new
parts if damaged or cracked.
Specially inspect the damage of airbag module
body, mounting bracket and harness connector.
4) Without side collision (dirt and damage of cover)
Replace the corresponding part with a new part.
AB-21
Airbag Control Module
AIRBAG SYSTEM
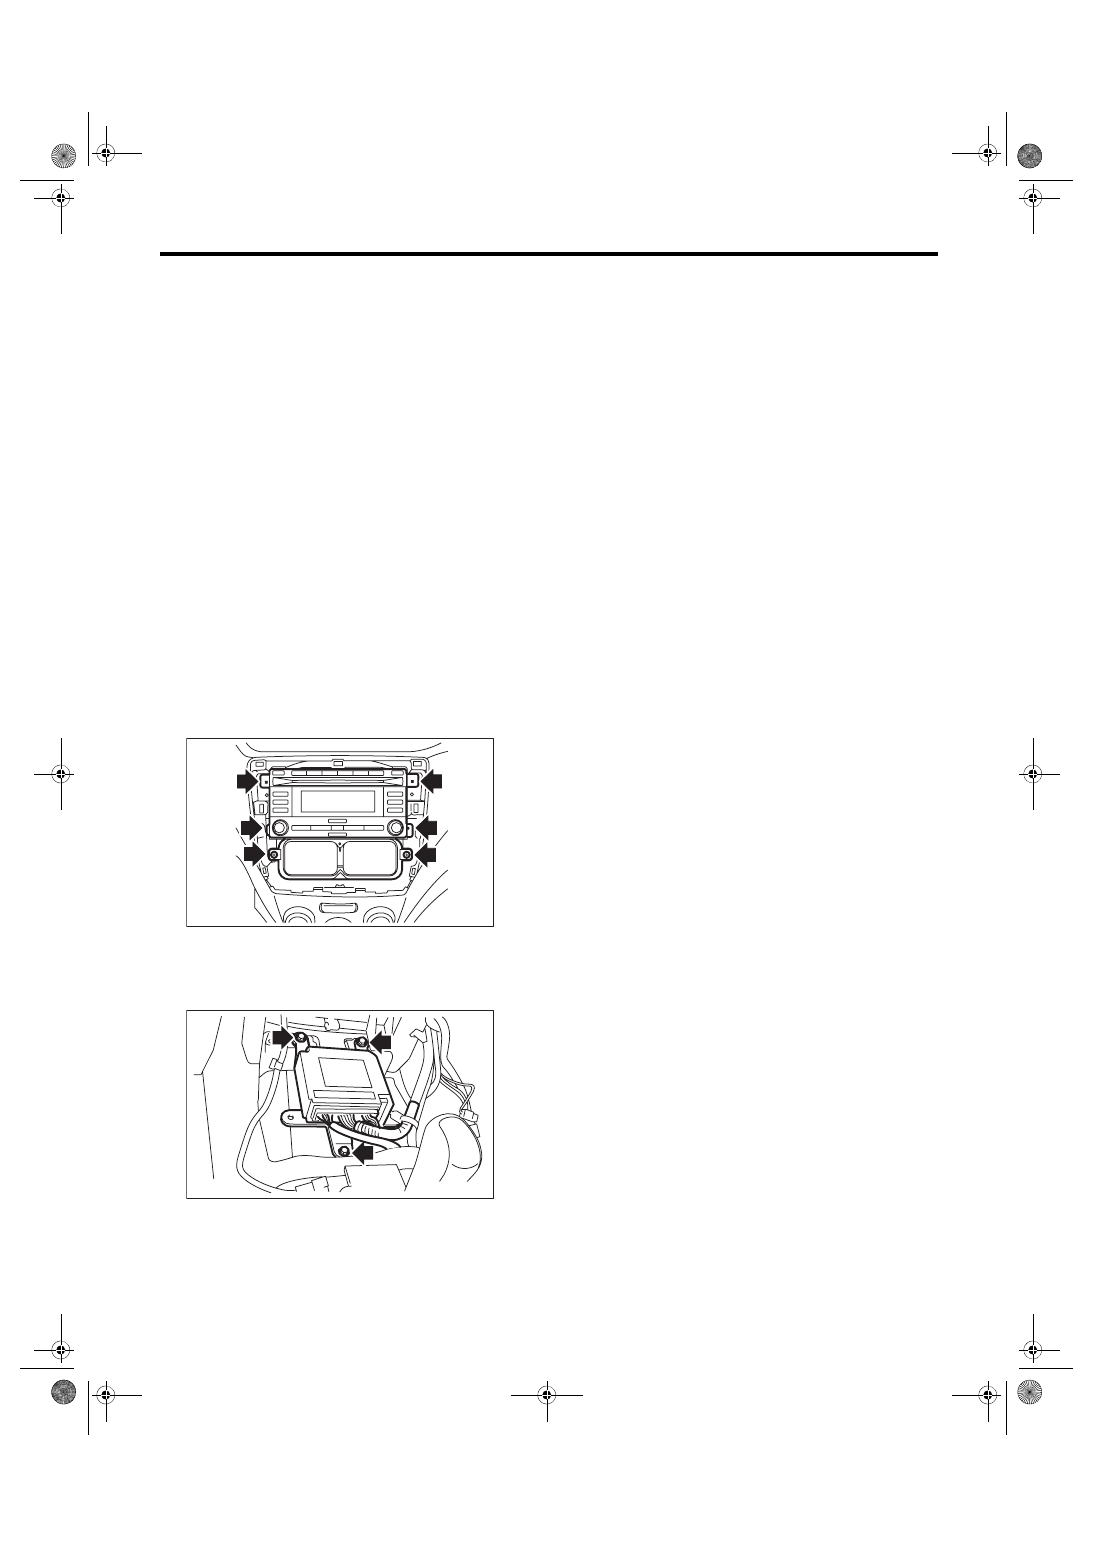
8. Airbag Control Module
A: REMOVAL
CAUTION:
• Do not disassemble the airbag control mod-
ule.
• If the airbag control module is deformed or if
the damage from water is suspected, replace
the airbag control module with a new part.
• Do not drop the airbag control module.
• After removal, keep the airbag control mod-
ule on a dry, clean surface away from moisture,
heat and dust.
1) Turn the ignition switch to OFF.
2) Disconnect the ground cable from battery and
wait for at least 60 seconds before starting work.
3) Remove the console box. <Ref. to EI-51, RE-
4) Remove the center panel. <Ref. to EI-52, CEN-
TER PANEL, REMOVAL, Center Console.>
5) Remove the console front panel. <Ref. to EI-52,
CONSOLE FRONT PANEL, REMOVAL, Center
6) Remove the audio.
7) Remove the heater duct.
8) Disconnect the connector from airbag control
module.
9) Remove the three bolts and remove airbag con-
trol module.
B: INSTALLATION
CAUTION:
• Do not reuse the bolt and nut.
Always replace with the specified new bolts
and nuts.
• Before installing the audio, make sure that
the heater duct is securely connected.
Install each part in the reverse order of removal.
Tightening torque:
25 N·m (2.55 kgf-m, 18.4 ft-lb)
C: INSPECTION
Check for the following, and replace the damaged
parts with new parts.
• Control module, connector, and mounting brack-
et are damaged.
• Airbag has been activated.
• Side airbag has been activated.
• Curtain airbag has been activated.
SL-00749
AB-02031
AB-22
Front Sub Sensor
AIRBAG SYSTEM
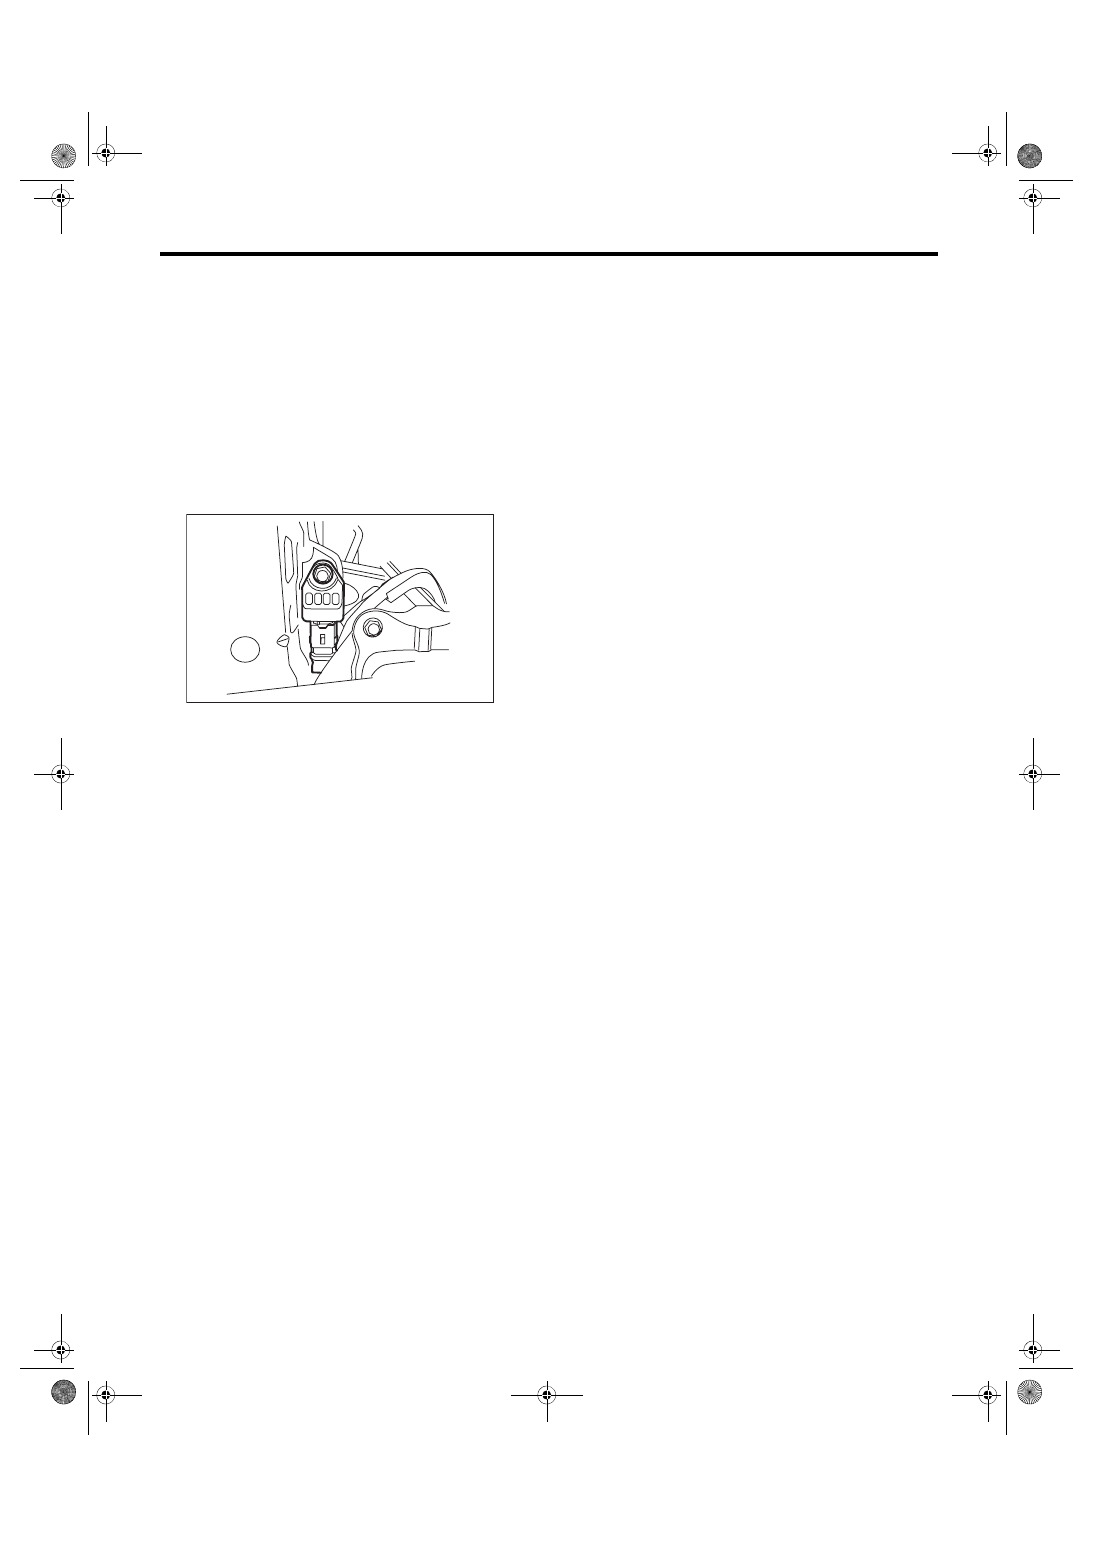
9. Front Sub Sensor
A: REMOVAL
1) Turn the ignition switch to OFF.
2) Disconnect the ground cable from battery and
wait for at least 60 seconds before starting work.
3) Remove the front bumper face. <Ref. to EI-31,
FRONT BUMPER FACE, REMOVAL, Front
4) Remove the headlight assembly. <Ref. to LI-15,
5) Remove the bolt, and then detach the front sub
sensor.
6) Disconnect the connector from front sub sensor.
B: INSTALLATION
CAUTION:
• Do not reuse the bolt and nut.
Always replace with the specified new bolts
and nuts.
• When installing the sensor, insert the set pin
on the backside of the sensor into the hole on
the body side securely.
• After the installation of headlight assembly,
be sure to perform headlight beam adjustment.
Install each part in the reverse order of removal.
Tightening torque:
13 N·m (1.33 kgf-m, 9.6 ft-lb)
C: INSPECTION
Check for the following, and replace the damaged
parts with new parts.
• Front sub sensor or connector is damaged.
• Airbag has been activated.
AB-01848
Нет комментариевНе стесняйтесь поделиться с нами вашим ценным мнением.
Текст