Subaru Legacy (2019 year). Instruction — part 2
(20,1)
北米Model "A2550BE-A" EDITED: 2018/ 5/ 9
&
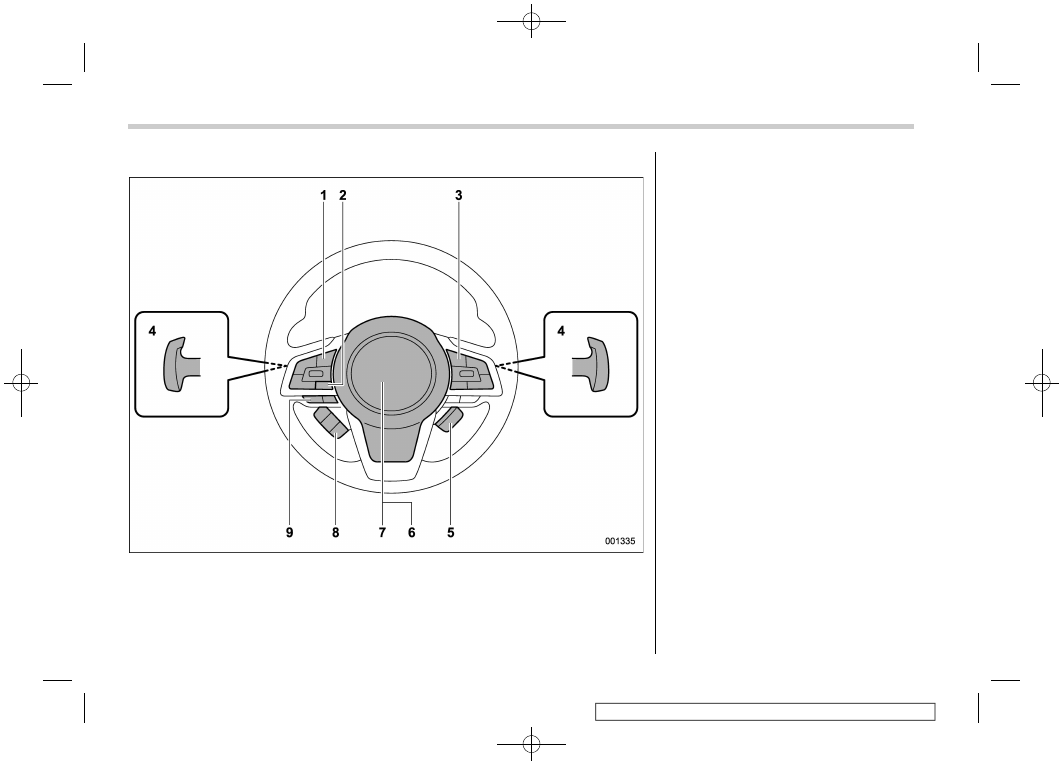
Steering wheel
1)
Audio control switches*
2)
Talk switch for voice command system*
3)
Cruise control (page 7-45)
4)
Shift paddle (page 7-27)
5)
Heated Steering Wheel switch (page 3-
86)
6)
SRS airbag (page 1-42)
7)
Horn (page 3-85)
8)
Control switches for combination meter
display (page 3-37)
9)
Hands-free phone switches*
*: For details about how to use the
switches, refer to the separate naviga-
tion/audio Owner’s Instruction.
18
(21,1)
北米Model "A2550BE-A" EDITED: 2018/ 5/ 9
&
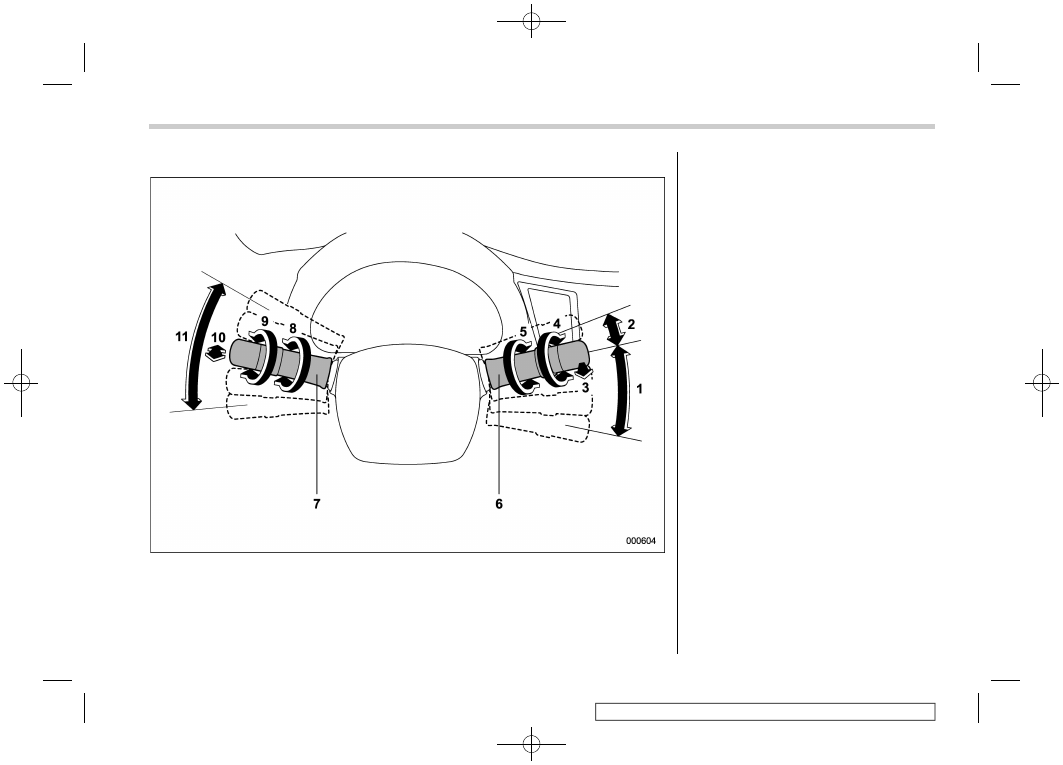
Light control and wiper control levers/switches
1)
Windshield wiper (page 3-60)
2)
Mist (page 3-61)
3)
Windshield washer (page 3-62)
4)
Rear window wiper and washer switch
(page 3-63)
5)
Wiper intermittent time control switch
(page 3-62)
6)
Wiper control lever (page 3-61)
7)
Light control switch (page 3-48)
8)
Front fog light switch (page 3-59)
9)
Headlight ON/OFF/AUTO (page 3-49)
10) Headlight flasher High/Low beam change
(page 3-51)
11) Turn signal lever (page 3-58)
– CONTINUED –
19
0
(22,1)
北米Model "A2550BE-A" EDITED: 2018/ 5/ 9
&
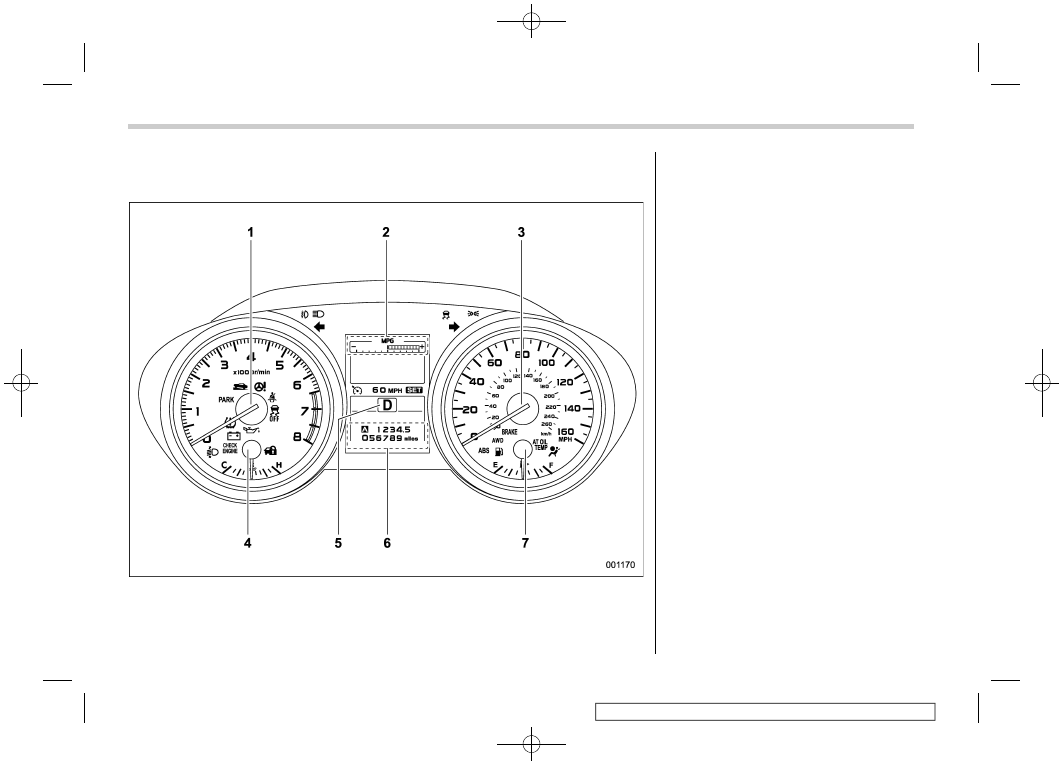
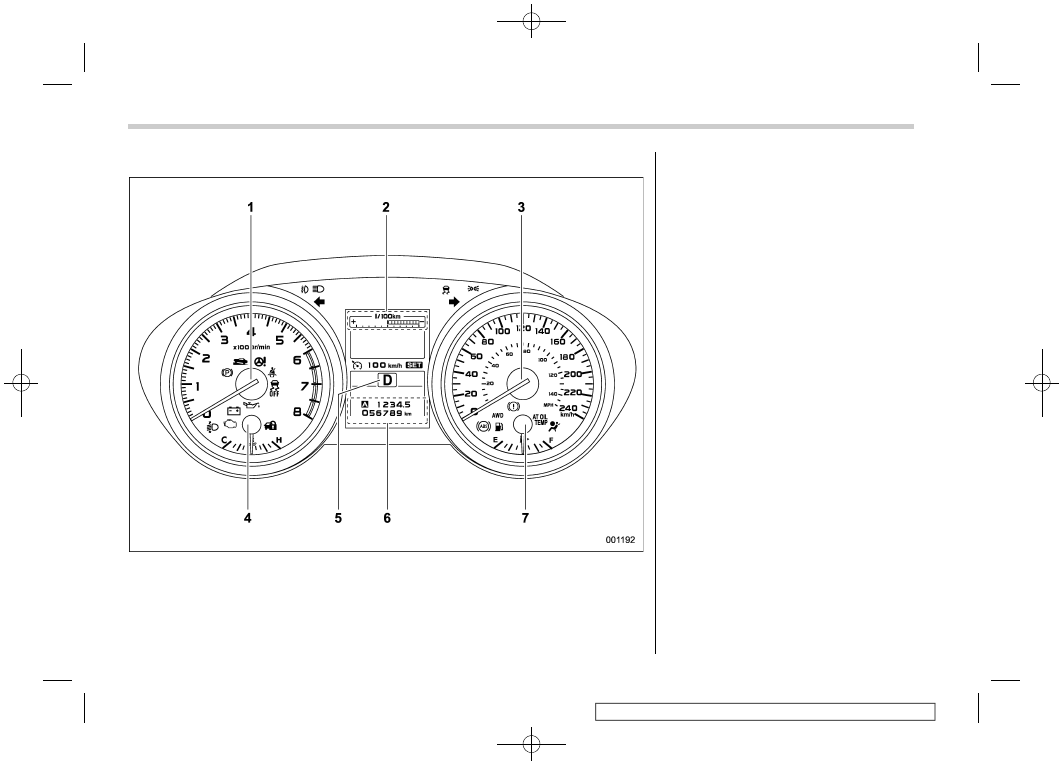
Combination meter
!
U.S. spec. models (type A)
1)
Tachometer (page 3-10)
2)
ECO gauge (page 3-12)
3)
Speedometer (page 3-9)
4)
Temperature gauge (page 3-11)
5)
Select lever/gear position indicator (page
3-30)
6)
Trip meter and odometer (page 3-9)
7)
Fuel gauge (page 3-11)
20
(23,1)
北米Model "A2550BE-A" EDITED: 2018/ 5/ 9
!
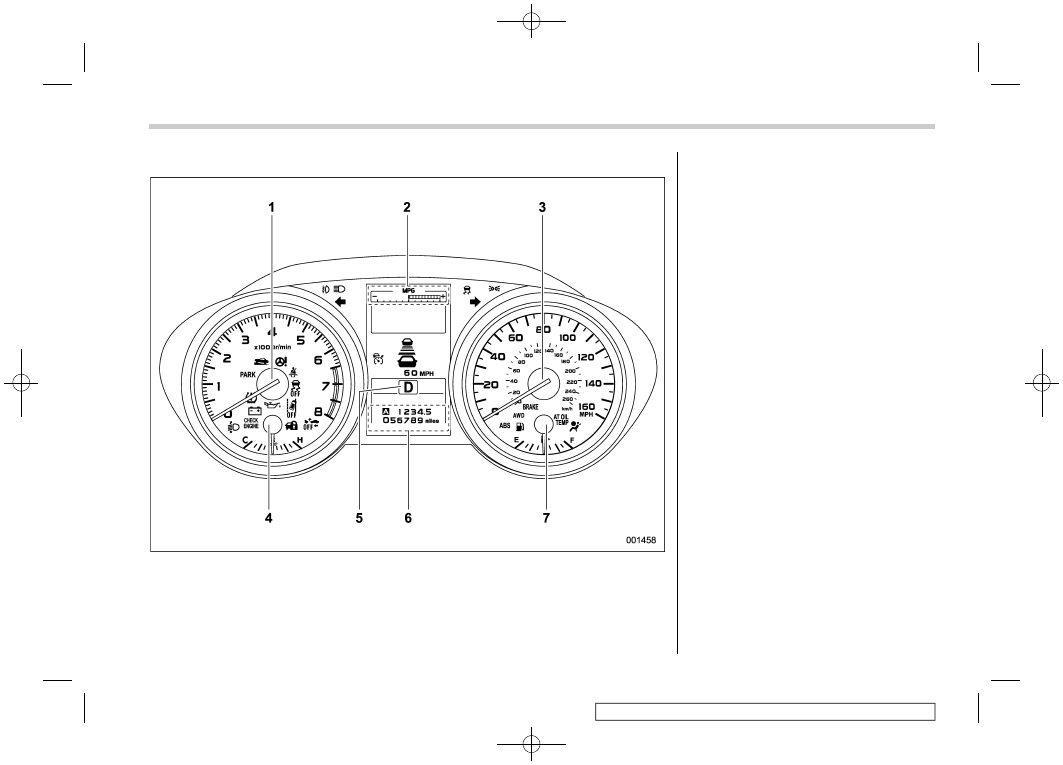
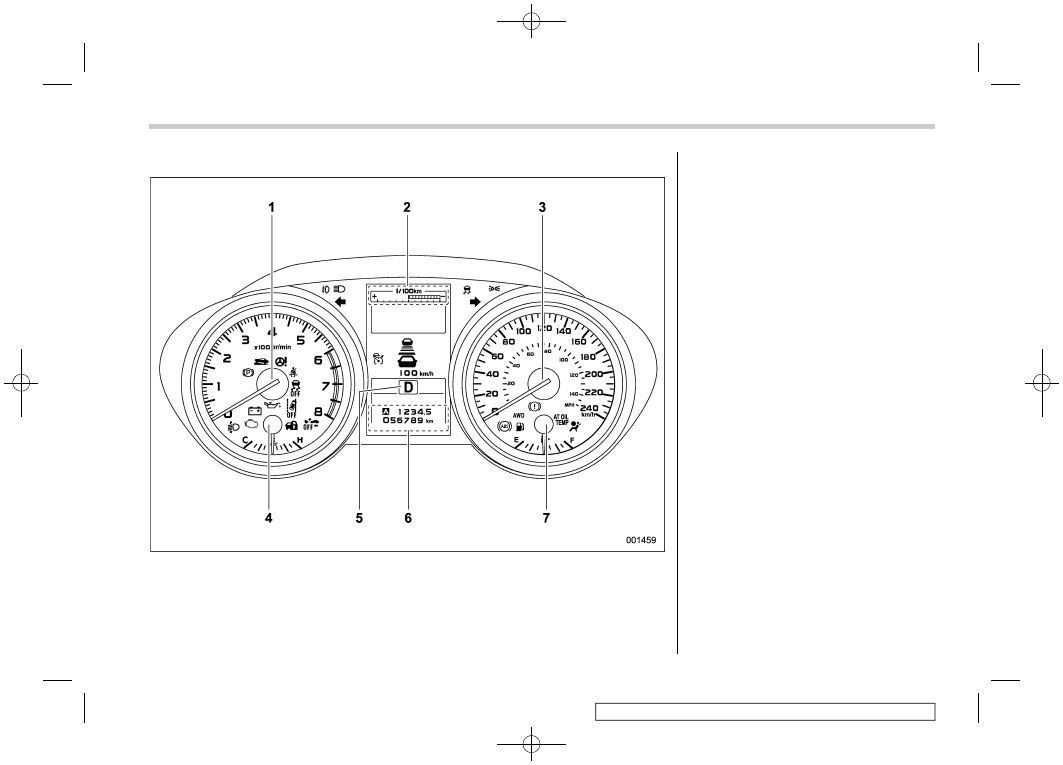
U.S. spec. models (type B)
1)
Tachometer (page 3-10)
2)
ECO gauge (page 3-12)
3)
Speedometer (page 3-9)
4)
Temperature gauge (page 3-11)
5)
Select lever/gear position indicator (page
3-30)
6)
Trip meter and odometer (page 3-9)
7)
Fuel gauge (page 3-11)
– CONTINUED –
21
0
(24,1)
北米Model "A2550BE-A" EDITED: 2018/ 5/ 9
!
Except U.S. spec. models (type A)
1)
Tachometer (page 3-10)
2)
ECO gauge (page 3-12)
3)
Speedometer (page 3-9)
4)
Temperature gauge (page 3-11)
5)
Select lever/gear position indicator (page
3-30)
6)
Trip meter and odometer (page 3-9)
7)
Fuel gauge (page 3-11)
22
(25,1)
北米Model "A2550BE-A" EDITED: 2018/ 5/ 9
!
Except U.S. spec. models (type B)
1)
Tachometer (page 3-10)
2)
ECO gauge (page 3-12)
3)
Speedometer (page 3-9)
4)
Temperature gauge (page 3-11)
5)
Select lever/gear position indicator (page
3-30)
6)
Trip meter and odometer (page 3-9)
7)
Fuel gauge (page 3-11)
– CONTINUED –
23
0
(26,1)
北米Model "A2550BE-A" EDITED: 2018/ 5/ 9
&
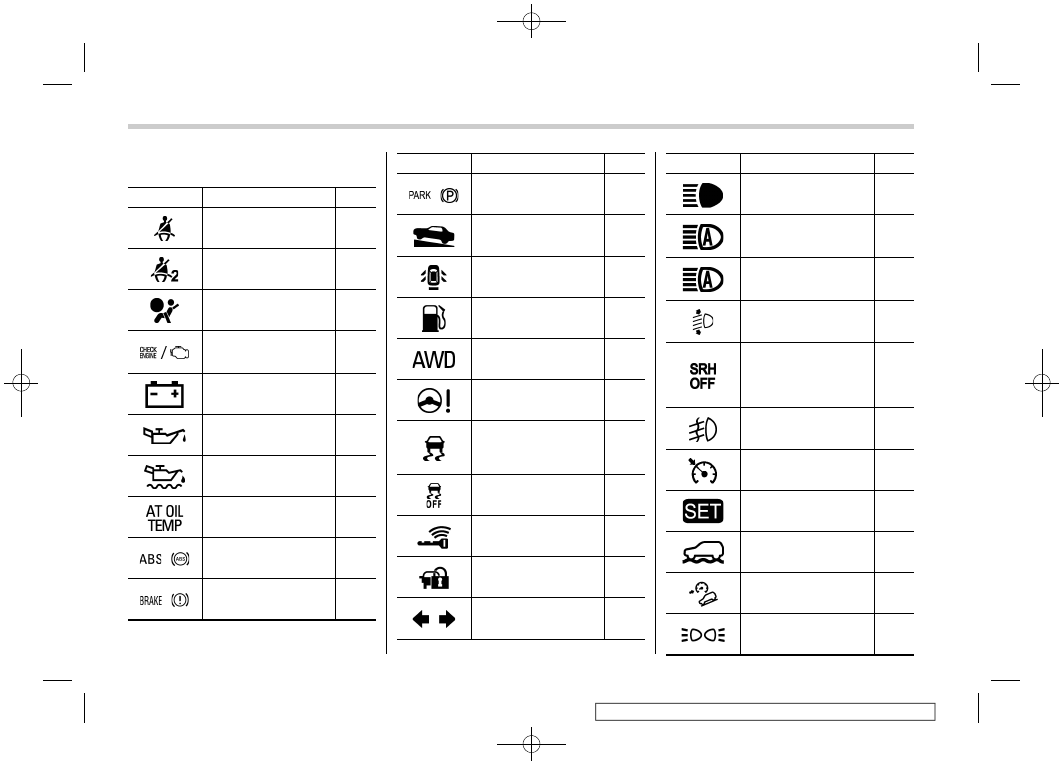
Warning and indicator lights
Mark
Name
Page
Seatbelt warning light
Front passenger’s
seatbelt warning light
SRS airbag system
warning light
CHECK ENGINE warn-
ing light/Malfunction in-
dicator light
Charge warning light
Oil pressure warning
light
Engine low oil level
warning indicator
AT OIL TEMP warning
light
/
ABS warning light
/
Brake system warning
light
Mark
Name
Page
/
Electronic parking
brake indicator light
Hill Holder indicator
light
Door open indicator
Low fuel warning light
All-Wheel Drive warn-
ing light
Power steering warning
light
Vehicle Dynamics Con-
trol warning light/Vehi-
cle Dynamics Control
operation indicator light
Vehicle Dynamics Con-
trol OFF indicator light
Access key warning in-
dicator (if equipped)
Security indicator light
Turn signal indicator
lights
Mark
Name
Page
High beam indicator
light
High beam assist indi-
cator (green) (if
equipped)
High beam assist warn-
ing indicator (yellow)
(if equipped)
Automatic headlight
beam leveler warning
light (if equipped)
Steering Responsive
Headlight warning light/
Steering Responsive
Headlight OFF indicator
light (if equipped)
Front fog light indicator
light (if equipped)
Cruise control indicator
Cruise control set indi-
cator
X-MODE indicator (if
equipped)
Hill descent control in-
dicator (if equipped)
Headlight indicator light
24
(27,1)
北米Model "A2550BE-A" EDITED: 2018/ 5/ 9
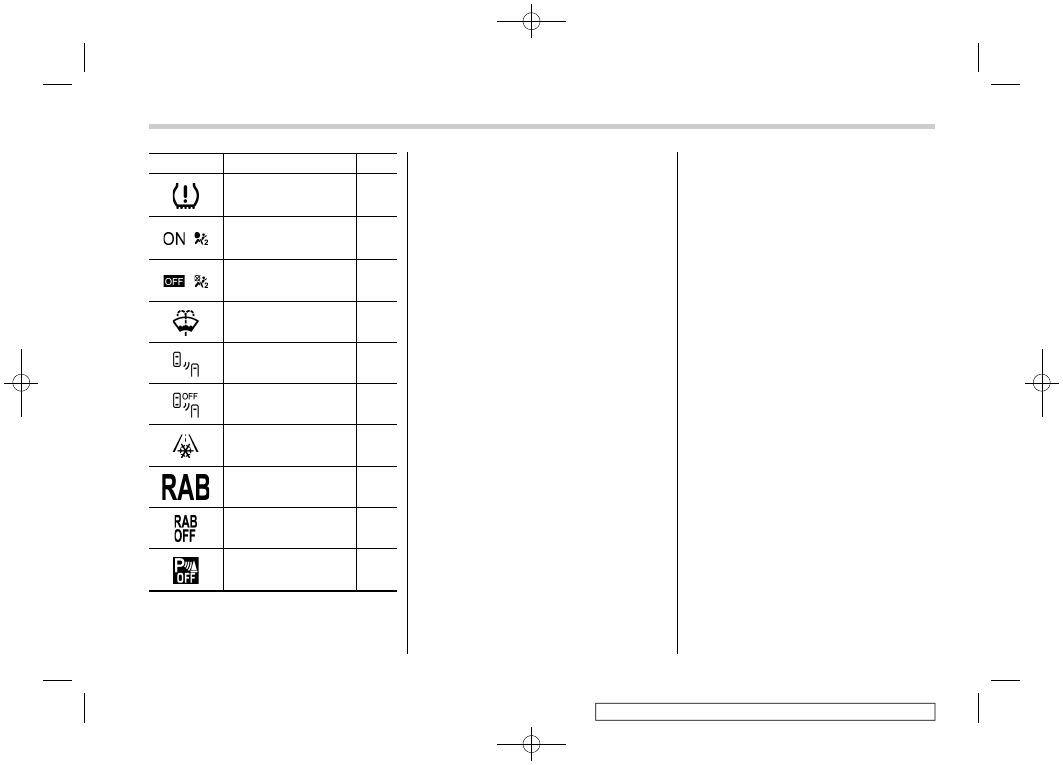
Mark
Name
Page
Low tire pressure warn-
ing light (U.S. spec.
models)
/
Front passenger’s fron-
tal airbag ON indicator
light
/
Front passenger’s fron-
tal airbag OFF indicator
light
Windshield washer fluid
warning light
BSD/RCTA warning in-
dicator (if equipped)
BSD/RCTA OFF indi-
cator (if equipped)
Icy road surface warn-
ing indicator
RAB warning indicator
(if equipped)
RAB OFF indicator (if
equipped)
Sonar audible alarm
OFF indicator (if
equipped)
25
0
(28,1)
北米Model "A2550BE-A" EDITED: 2018/ 5/ 9
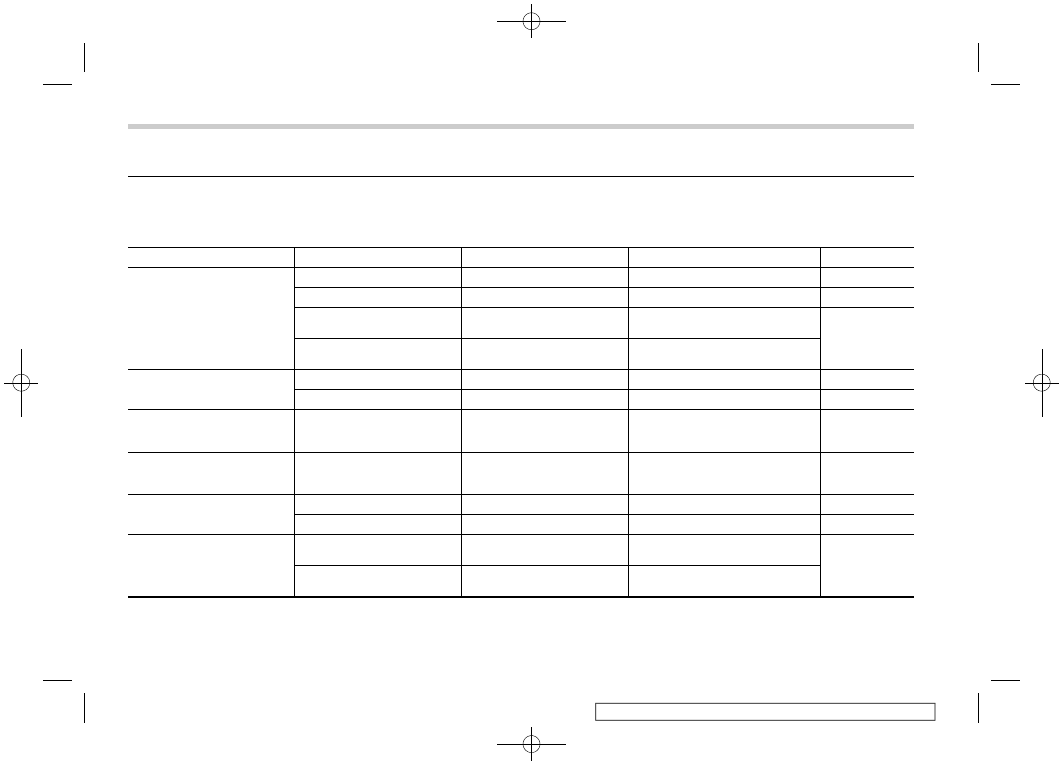
Function settings
&
Function settings and adjustments on the combination meter display
Setting adjustments to the following items can be instructionly changed within the combination meter display to meet your personal
requirements.
Item
Function
Available settings
Factory default setting
Page
Keyless Access (if equipped)
Audible signal*
1
On/Off
On
Hazard warning flasher
On/Off
On
Door unlock selection function
(driver’s door unlock)
Driver’s door only/All doors
Driver’s door only
Door unlock selection function
(rear gate unlock)
Rear gate only/All doors
Rear gate only
Remote keyless entry system
Audible signal*
1
On/Off
On
Hazard warning flasher
On/Off
On
Defogger and deicer system
Rear window defogger, out-
side mirror defogger and
windshield wiper deicer
Operation for 15 minutes/
Continuous operation
Operation for 15 minutes
Map light/Dome light/Cargo
area light
Operation of map light/dome
light/cargo area light Off delay
timer
Off/10 seconds/20 seconds/
30 seconds
30 seconds
Auto Headlights
Light Sensitivity
Max/Mid/Low/Min
Mid
Wiper Link
On/Off
On
Welcome lighting function
Approaching Time Set
Off/30 seconds/60 seconds/
90 seconds
30 seconds
Leaving Time Set
Off/30 seconds/60 seconds/
90 seconds
30 seconds
26
(29,1)
北米Model "A2550BE-A" EDITED: 2018/ 5/ 9
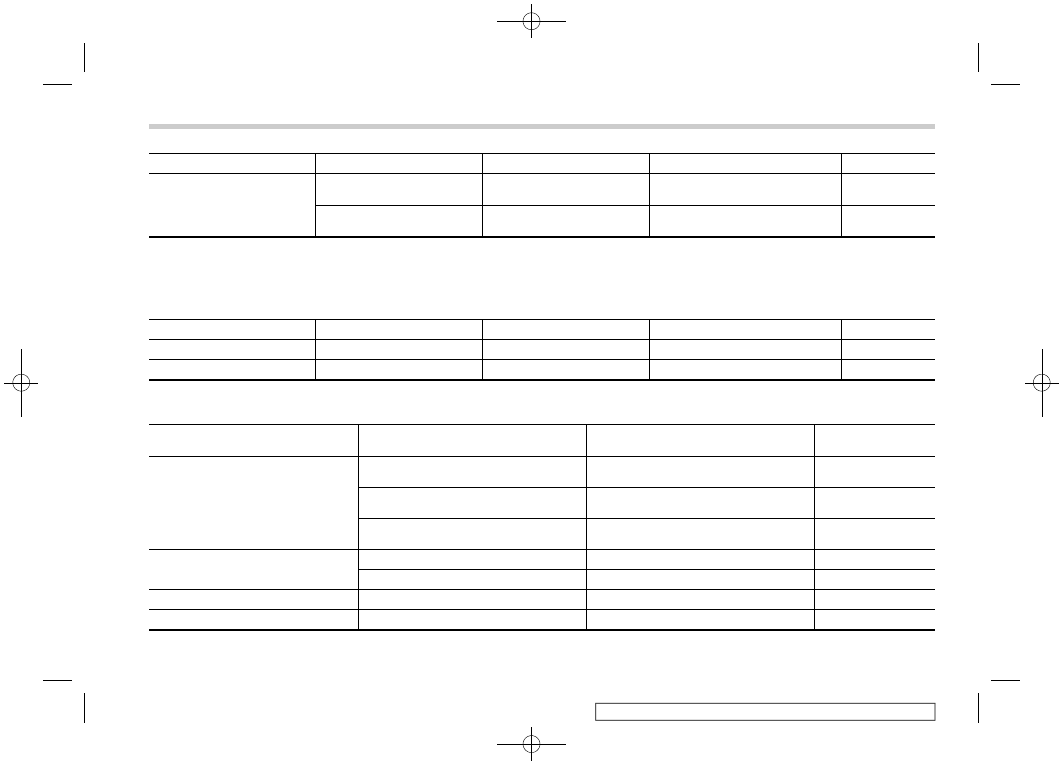
Item
Function
Available settings
Factory default setting
Page
Auto door lock and unlock
Automatic door lock function
Vehicle speed/Shift to P posi-
tion/off
Vehicle Speed
Automatic door unlock func-
tion
Shift Out of PARK/Ignition Off/
Driver Door Open/Off
Driver Door Open
*1: This setting also works as the On/Off setting of the power rear gate buzzer for starting operation.
However, you cannot change the warning buzzer setting for a detecting jam, etc.
&
Individual settings and adjustments excluding combination meter display
For setting adjustments to the following items, refer to the appropriate page for details.
Item
Function
Available settings
Factory default setting
Page
Alarm system
Alarm system
Operation/Non-operation
Operation
Remote keyless entry system
Audible signal
Operation/Non-operation
Operation
&
Function settings and adjustments performed by a dealer
Item
Function
Available settings
Factory default
setting
Alarm system
Monitoring start delay time (after closing
doors)
0 seconds/30 seconds
30 seconds
Impact sensor operation (only models with
shock sensors (dealer option))
Operation/Non-operation
Non-operation
Map light/Dome light/Cargo area light
illumination
ON/OFF
OFF
Keyless access with pushbutton
Audible signal volume*
2
Level 1 to 7
Level 5
Trunk open without key (Legacy)
ON/OFF
ON
Remote keyless entry system
Audible signal volume*
2
Level 1 to 7
Level 5
One-touch lane changer
Operation of the one-touch lane changer
ON/OFF
ON
– CONTINUED –
27
0
(30,1)
北米Model "A2550BE-A" EDITED: 2018/ 5/ 9
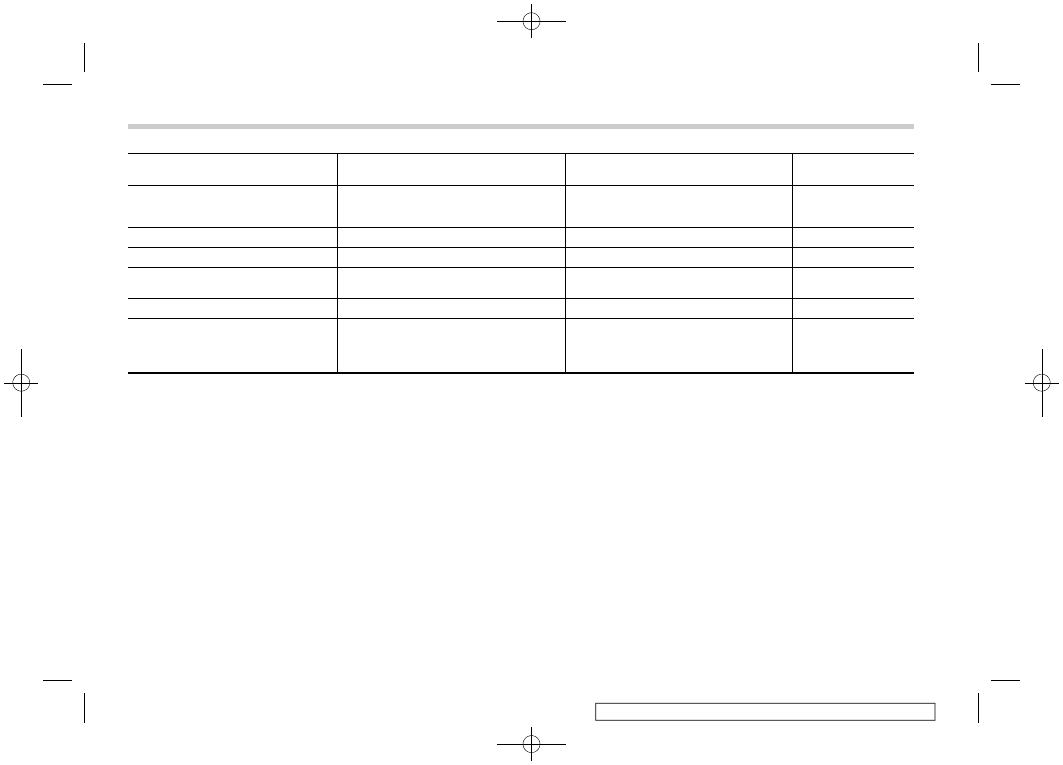
Item
Function
Available settings
Factory default
setting
Remote trunk open/power rear gate
open function
*1
Activation of trunk opening/power rear
gate opening by remote transmitter/ac-
cess key fob
Operation/Non-operation
Operation
Key lock-in prevention
Key lock-in prevention
Operation/Non-operation
Operation
Battery drainage prevention function
Battery drainage prevention function
Operation/Non-operation
Operation
Auto dimmer cancel
Sensitivity of the operation of the auto
dimmer cancel
OFF/Min/Low/Mid/Hi/Max
Mid
High beam assist function*
1
High beam assist function
Operation/Non-operation
Operation
Reverse gear interlocked rear wiper
Reverse gear interlocked rear wiper op-
eration
Operation/Non-operation
U.S.-spec. models:
Non-operation
Other models: Op-
eration
*1: If equipped
*2: The audible signal volume cannot be set under level 5 for the warning chime.
28
(33,1)
北米Model "A2550BE-A" EDITED: 2018/ 5/ 9
Front seats . . . . . . . . . . . . . . . .. 1-2
Instruction seat (if equipped) . . . . . . . . . ... 1-4
Power seat (if equipped) . . . . . . . . . . 1-5
Head restraint adjustment . . . . . . . . . .. 1-8
Seat heater (if equipped) . . . . . . . . . . 1-9
Front seat heater . . . . . . . . . . . . .. 1-10
Rear seat heater (if equipped) . . . . . . . ... 1-10
Rear seats. . . . . . . . . . . . . . . .. 1-11
Reclining the seatback (Outback) . . . . . . .. 1-11
Folding down the rear seatback . . . . . . . 1-12
Head restraint adjustment . . . . . . . . . . 1-14
Armrest . . . . . . . . . . . . . . . . 1-15
Seatbelts . . . . . . . . . . . . . . . . 1-16
Seatbelt safety tips . . . . . . . . . . . ... 1-16
Emergency Locking Retractor (ELR). . . . . .. 1-17
Automatic Locking Retractor/Emergency Locking
Retractor (ALR/ELR). . . . . . . . . . . 1-17
Seatbelt warning light and chime . . . . . . .. 1-17
Fastening the seatbelt. . . . . . . . . . ... 1-17
Seatbelt maintenance . . . . . . . . . . . 1-24
Front seatbelt pretensioners. . . . . . . . 1-25
System monitors. . . . . . . . . . . . ... 1-26
System servicing . . . . . . . . . . . . .. 1-26
Precautions against vehicle modification . . . .. 1-27
Child restraint systems . . . . . . . . . . 1-27
Where to place a child restraint system . . . . 1-29
Choosing a child restraint system. . . . . . . 1-30
Installing child restraint systems with ALR/ELR
seatbelt . . . . . . . . . . . . . . . . 1-31
Installing a booster seat . . . . . . . . . ... 1-35
Installation of child restraint systems by use of
lower and tether anchorages (LATCH) . . . . 1-36
Top tether anchorages . . . . . . . . . . .. 1-39
SRS airbag (Supplemental Restraint System
airbag) . . . . . . . . . . . . . . . . 1-42
General precautions regarding SRS airbag
system . . . . . . . . . . . . . . . .. 1-42
Components . . . . . . . . . . . . . . . 1-49
SUBARU advanced frontal airbag system, SRS
seat cushion airbag, SRS side airbag and SRS
curtain airbag . . . . . . . . . . . . . 1-52
System operation . . . . . . . . . . . . . 1-57
SRS airbag system monitors. . . . . . . . . 1-69
SRS airbag system servicing . . . . . . . . 1-70
Precautions against vehicle modification . . . .. 1-71
Seat, seatbelt and SRS airbags
1
(34,1)
北米Model "A2550BE-A" EDITED: 2018/ 5/ 9
Front seats
WARNING
.
Never adjust the seat while driv-
ing to avoid loss of vehicle con-
trol and personal injury.
.
Before adjusting the seat, make
sure the hands and feet of rear
seat passengers or cargo are
clear of the adjusting mechan-
ism.
.
After adjusting the seat, move it
back and forth to make sure it is
securely locked. If the seat is not
securely locked, it may move or
the seatbelt may not operate
properly.
.
Do not put objects under the front
seats. They may interfere with
front seat locking and cause an
accident.
.
Seatbelts provide maximum re-
straint when the occupant sits
well back and upright in the seat.
To reduce the risk of sliding
under the seatbelt in a collision,
the front seatbacks should be
always used in the upright posi-
tion while the vehicle is running.
If the front seatbacks are not
used in the upright position in a
collision, the risk of sliding under
the lap belt and of the lap belt
sliding up over the abdomen will
increase, and both can result in
serious internal injury or death.
.
The SRS airbags deploy with
considerable speed and force.
Occupants who are not in the
proper position when the SRS
airbag deploys could suffer very
serious injuries. Because the
SRS airbag needs enough space
for deployment, the driver should
always sit upright and well back
in the seat as far from the steer-
ing wheel as practical while still
maintaining full vehicle control
and the front passenger should
move the seat as far back as
possible and sit upright and well
back in the seat.
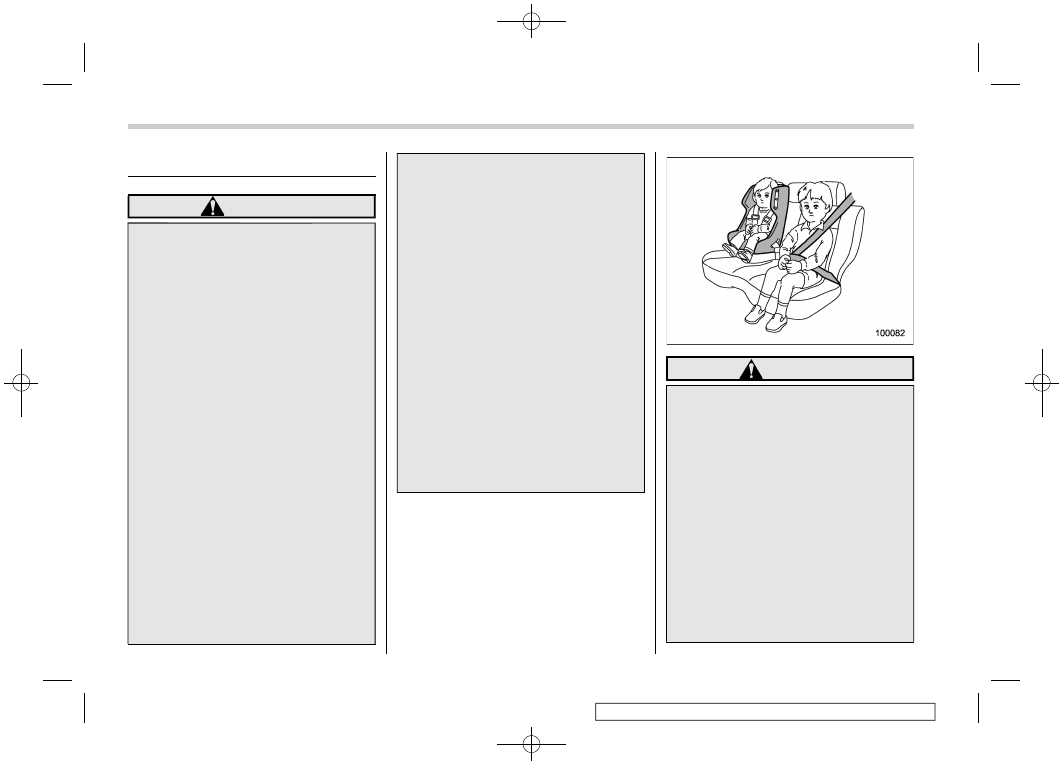
WARNING
Put children in the rear seat properly
restrained at all times. The SRS
airbag deploys with considerable
speed and force and can injure or
even kill children, especially if they
are not restrained or improperly
restrained. Because children are
lighter and weaker than adults, their
risk of being injured from deploy-
ment is greater. Consequently, we
strongly recommend that ALL chil-
dren (including those in child seats
and those that have outgrown child
restraint devices) sit in the REAR
seat properly restrained at all times
in a child restraint device or in a
seatbelt, whichever is appropriate
Seat, seatbelt and SRS airbags/Front seats
1-2
(35,1)
北米Model "A2550BE-A" EDITED: 2018/ 5/ 9
for the child’s age, height and
weight.
Secure ALL types of child restraint
devices (including forward facing
child seats) in the REAR seats at all
times.
NEVER INSTALL A REARWARD FA-
CING CHILD SEAT IN THE FRONT
SEAT. DOING SO RISKS SERIOUS
INJURY OR DEATH TO THE CHILD
BY PLACING THE CHILD’S HEAD
TOO CLOSE TO THE SRS AIRBAG.
According to accident statistics,
children are safer when properly
restrained in the rear seating posi-
tions than in the front seating posi-
tions. For instructions and precau-
tions concerning child restraint sys-
tems, refer to “Child restraint sys-
tems” F1-27.
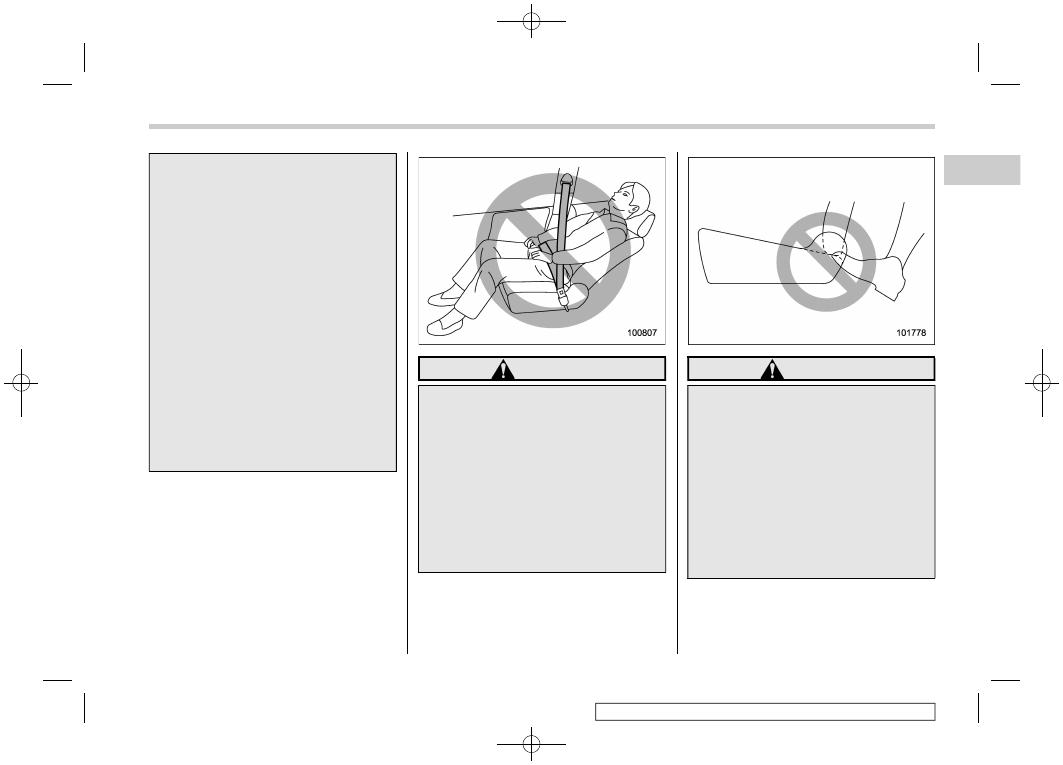
WARNING
To prevent the passenger from slid-
ing under the seatbelt in the event of
a collision, always put the seatback
in the upright position while the
vehicle is in motion. Also, do not
place objects such as cushions
between the passenger and the seat-
back. If you do so, the risk of sliding
under the lap belt and of the lap belt
sliding up over the abdomen will
increase, and both can result in
serious internal injury or death.
WARNING
Do not let rear passengers rest their
feet between the front seatback and
seat cushion. Doing so may lead to
improper operation of the following
systems and could result in serious
injury.
.
Occupant detection system
.
SRS side airbag
.
SRS seat cushion airbag
.
Front seat heater (if equipped)
.
Power seat (if equipped)
– CONTINUED –
Seat, seatbelt and SRS airbags/Front seats
1-3
1
(36,1)
北米Model "A2550BE-A" EDITED: 2018/ 5/ 9
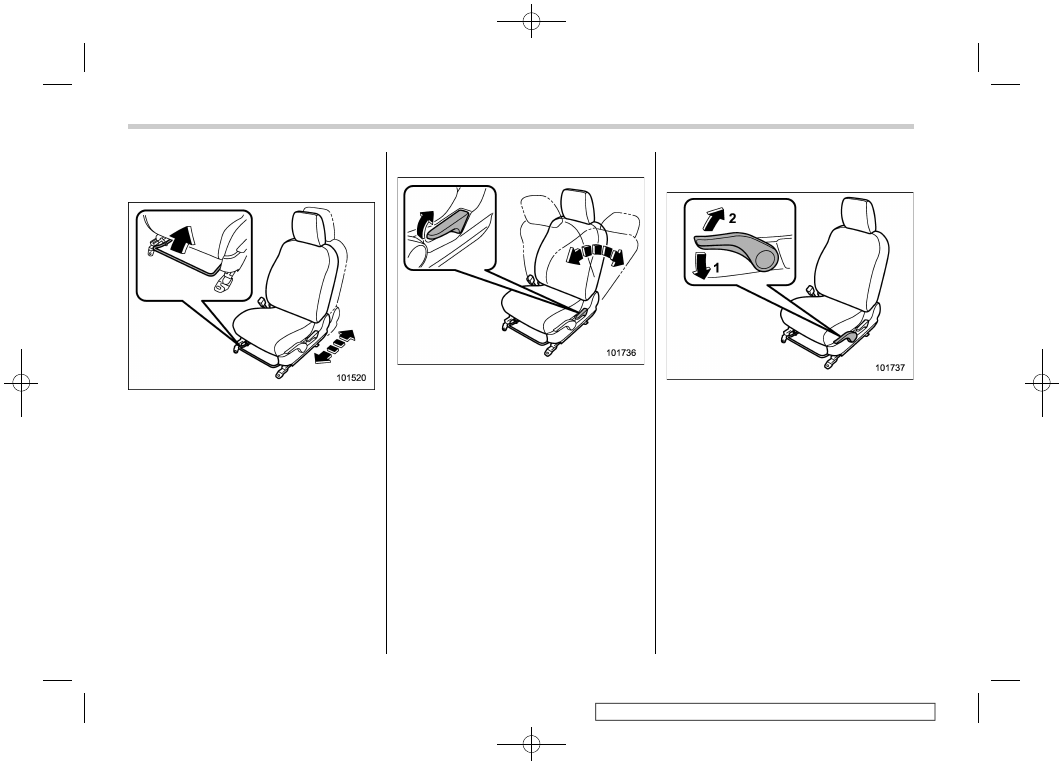
&
Instruction seat (if equipped)
!
Forward and backward adjustment
1. Sit in the seat to adjust.
2. Pull the lever upward, slide the seat to
the desired position, and then release the
lever.
3. Try to move the seat back and forth to
make sure that it is securely locked into
place.
!
Reclining the seatback
1. Pull up the reclining lever, adjust the
seatback to the desired position, and then
release the lever.
2. Make sure the seatback is securely
locked into place.
The seatback placed in a reclined position
can spring back upward with force when
pulling up the lever. While operating the
lever to return the seatback, hold the
seatback lightly so that it may be raised
back gradually.
!
Seat cushion height adjustment
(driver’s seat)
1)
Push the lever down to lower the seat.
2)
Pull the lever up to raise the seat.
You can adjust the height of the seat by
moving the seat cushion adjustment lever
up or down.
Seat, seatbelt and SRS airbags/Front seats
1-4

(37,1)
北米Model "A2550BE-A" EDITED: 2018/ 5/ 9
&
Power seat (if equipped)
!
Driver’s seat
1)
Seat position forward/backward con-
trol switch
To adjust the seat forward or backward,
move the control switch forward or
backward. During forward/backward ad-
justment of the seat, you cannot adjust
the seat cushion angle or seat cushion
height.
2)
Seat cushion angle control switch
To adjust the seat cushion angle, pull up
or push down the front end of the control
switch.
3)
Seat height control switch
To adjust the seat height, pull up or push
down the rear end of the control switch.
4)
Seatback angle (reclining) control
switch
To adjust the angle of the seatback, move
the control switch.
5)
Lumbar support control switch
To increase lower back support, push the
front side of the switch. To decrease
lower back support, push the rear side of
the switch.
!
Front passenger’s seat (if equipped)
1)
Seat position forward/backward con-
trol switch
To adjust the seat forward or backward,
move the control switch forward or
backward.
2)
Seatback angle (reclining) control
switch
To adjust the angle of the seatback, move
the control switch.
– CONTINUED –
Seat, seatbelt and SRS airbags/Front seats
1-5
1
Нет комментариевНе стесняйтесь поделиться с нами вашим ценным мнением.
Текст