Subaru Legacy IV (2008 year). Service manual — part 872
DI-37
Rear Differential (T-type)
DIFFERENTIALS
18) When replacing the bearings, hit out the front
bearing cup and rear bearing cup in this order using
a brass bar.
D: ASSEMBLY
1. EXCEPT FOR GT SPEC. B 6MT MODEL
NOTE:
• Assemble in the reverse order of disassembly.
• Check and adjust each part during assembly.
• Keep the shims and washers in order, so that
they are not improperly installed.
• Thoroughly clean the surfaces on which the
shims, washers and bearings are to be installed.
• Apply differential gear oil when installing the
bearings and thrust washers.
• Be careful not to mix up the RH and LH bearing
races.
• Use a new O-ring and gasket.
• Replace the oil seal with a new part at every dis-
assembly.
• Apply differential gear oil to the oil seal lips.
• Be careful not to mix up the differential oil seal
RH and LH.
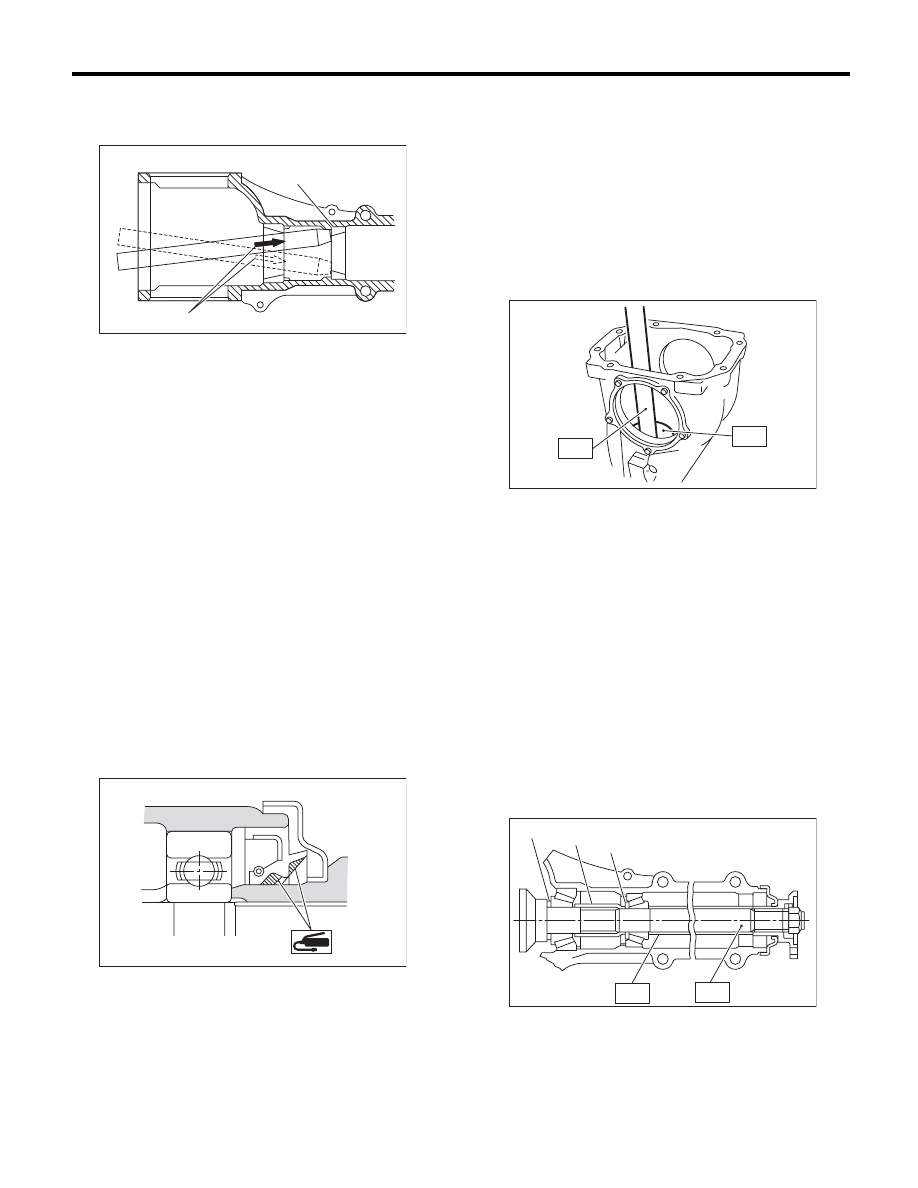
1) Adjusting preload for front and rear bearings
NOTE:
Adjust the bearing preload between front and rear
bearings with spacer and washer. Pinion height ad-
justing washer is not affected by this adjustment.
The adjustment must not be carried out with oil seal
inserted.
(1) Install the rear bearing race (rear) into the
differential carrier using ST1 and ST2.
ST1
398477701
HANDLE
ST2
398477703
DRIFT 2
(2) Install the rear bearing race (front) into the
differential carrier using ST1 and ST2.
ST1
398477701
HANDLE
ST2
398477702
DRIFT
(3) Insert the ST1 into carrier with the pinion
height adjusting washer and rear bearing cone
fitted onto it.
NOTE:
• If tooth contact is normal in the inspection before
disassembling, verify that the washer is not de-
formed, and then re-use the used washer.
• Use new rear bearing cone.
(4) Install the preload adjusting spacer and
washer, front bearing cone, ST2, companion
flange, washer and self-locking nut.
ST1
398507702
DUMMY SHAFT
ST2
398507703
DUMMY COLLAR
(A) 2 cutout portions along diagonal lines
(B) Tap alternately with a brass bar.
(B)
(A)
DI-00077
DI-00078
(A) Pinion height adjusting washer
(B) Preload adjusting spacer
(C) Preload adjusting washer
ST2
ST1
DI-00079
(B)
(A)
(C)
ST2
ST1
DI-00080
DI-38
Rear Differential (T-type)
DIFFERENTIALS
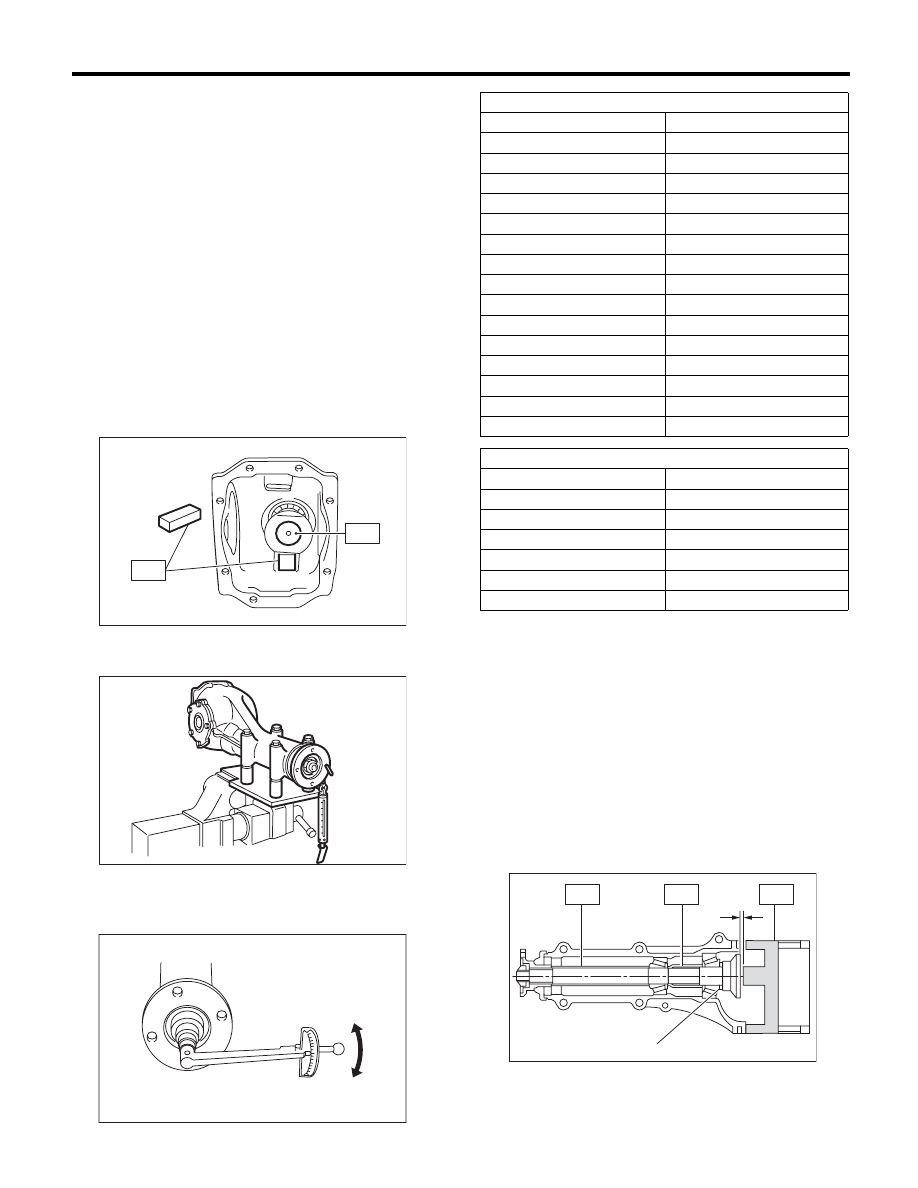
(5) Turn the ST1 by hand to smooth the bear-
ing, and tighten the self-locking nut while mea-
suring the initial load or initial torque with a
spring scale or torque wrench. Select the pre-
load adjusting washer and spacer so that the
specified preload is obtained when nut is tight-
ened to the specified torque.
NOTE:
• Use a new self-locking nut.
• Measure the preload in direction of tangent to the
flange.
• Be careful not to give excessive preload.
• When tightening the self-locking nut, lock ST1
with ST2 as shown in the figure.
ST1
398507702
DUMMY SHAFT
ST2
398507704
BLOCK
Tightening torque:
181.5 N·m (18.5 kgf-m, 133.9 ft-lb)
Initial load:
17.7 — 38.8 N (1.8 — 4.0 kgf, 4.0 — 8.7 lb)
Initial torque:
0.67 — 1.47 N·m
(0.07 — 0.15 kgf-m, 0.49 — 1.08 ft-lb)
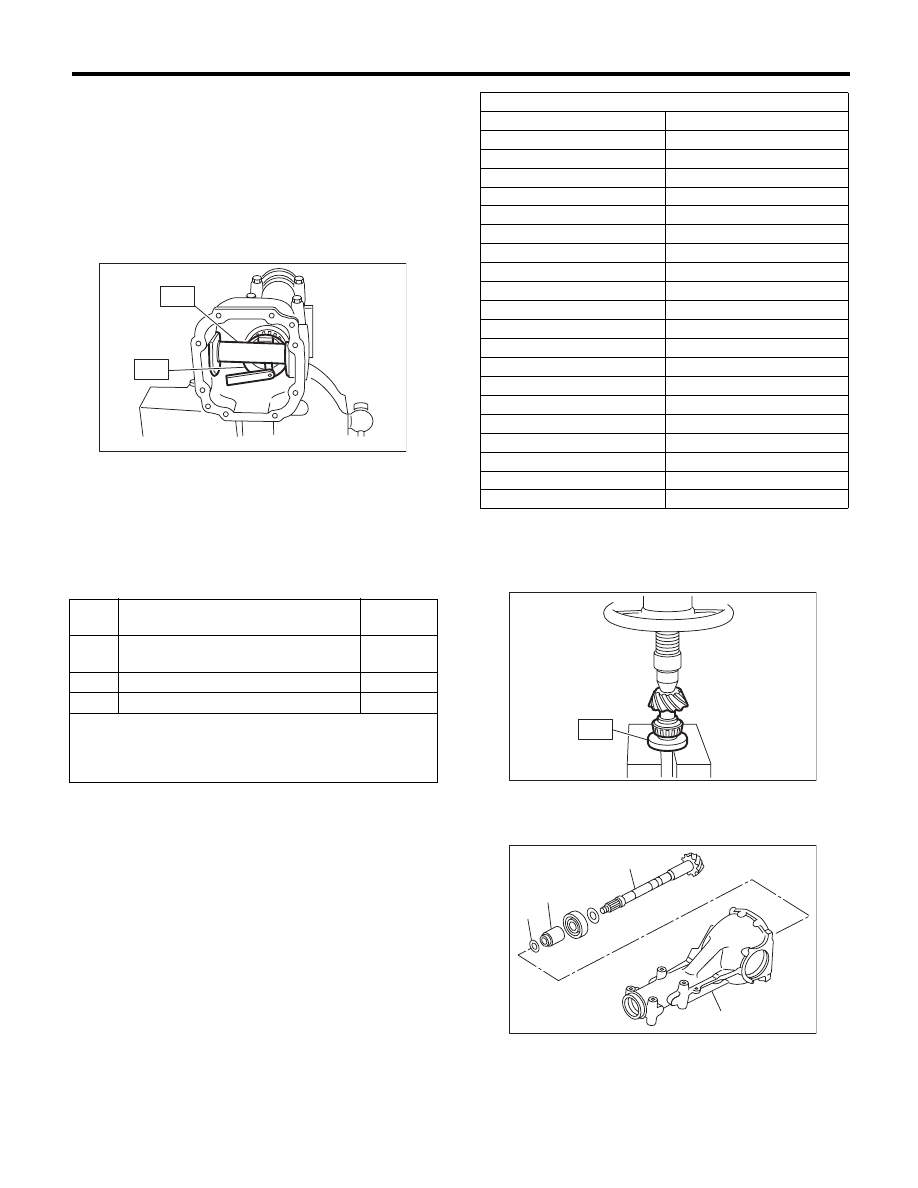
2) Adjusting drive pinion height:
Adjust the drive pinion height with washer installed
between the rear bearing cone and the back of pin-
ion gear.
(1) Attach ST2.
NOTE:
At this time, install a provisionally selected or previ-
ously used pinion height adjusting washer. Mea-
sure and record the thickness.
ST1
398507702
DUMMY SHAFT
ST2
398507701
DIFFERENTIAL CARRIER
GAUGE
ST3
398507703
DUMMY COLLAR
ST1
ST2
DI-00081
DI-00117
DI-00481
Preload adjusting washer
Part No.
Thickness mm (in)
383705200
2.59 (0.1020)
383715200
2.57 (0.1012)
383725200
2.55 (0.1004)
383735200
2.53 (0.0996)
383745200
2.51 (0.0988)
383755200
2.49 (0.0980)
383765200
2.47 (0.0972)
383775200
2.45 (0.0965)
383785200
2.43 (0.0957)
383795200
2.41 (0.0949)
383805200
2.39 (0.0941)
383815200
2.37 (0.0933)
383825200
2.35 (0.0925)
383835200
2.33 (0.0917)
383845200
2.31 (0.0909)
Preload adjusting spacer
Part No.
Length mm (in)
383695201
56.2 (2.213)
383695202
56.4 (2.220)
383695203
56.6 (2.228)
383695204
56.8 (2.236)
383695205
57.0 (2.244)
383695206
57.2 (2.252)
N Measured value
(A) Pinion height adjusting washer
RH
LH
N
(A)
ST2
ST3
ST1
DI-00083
DI-39
Rear Differential (T-type)
DIFFERENTIALS
(2) Measure the clearance “N” between the end
of ST2 and the end surface of ST1 by using a
thickness gauge.
NOTE:
Make sure there is no clearance between the case
and ST2.
ST1
398507702
DUMMY SHAFT
ST2
398507701
DIFFERENTIAL CARRIER
GAUGE
(3) Obtain the thickness of pinion height adjust-
ing washer to be inserted from the following for-
mula, and replace the temporarily installed
washer with this one.
T = To + N – (H × 0.01) – 0.20 mm (0.008 in)
NOTE:
Use copies of this page.
(Example of calculation)
To = 2.20 mm (0.0866 in) + 1.20 mm (0.0472 in)
= 3.40 mm (0.1339 in)
N = 0.23 mm (0.0091 in)
H = + 1
T = 3.40 mm (0.1339 in) + 0.23 mm (0.0091 in)
– 0.01 mm (0.0004 in) – 0.20 mm (0.0079 in) =
3.42 mm (0.1346 in)
Result: Thickness = 3.42 mm (0.1346 in)
Therefore use washer 383605200.
3) Install the selected pinion height adjusting wash-
er on drive pinion, and press the rear bearing cone
into position with ST.
ST
398177700
INSTALLER
4) Insert the drive pinion into the differential carrier,
and install the preselected bearing preload adjust-
ing spacer and washer.
T
Thickness of pinion height adjusting
washer mm (in)
To
Thickness of washer temporarily
inserted mm (in)
N
Clearance of thickness gauge mm (in)
H
Figure marked on drive pinion head
Memo:
ST2
ST1
DI-00084
Pinion height adjusting washer
Part No.
Thickness mm (in)
383495200
3.09 (0.1217)
383505200
3.12 (0.1228)
383515200
3.15 (0.1240)
383525200
3.18 (0.1252)
383535200
3.21 (0.1264)
383545200
3.24 (0.1276)
383555200
3.27 (0.1287)
383565200
3.30 (0.1299)
383575200
3.33 (0.1311)
383585200
3.36 (0.1323)
383595200
3.39 (0.1335)
383605200
3.42 (0.1346)
383615200
3.45 (0.1358)
383625200
3.48 (0.1370)
383635200
3.51 (0.1382)
383645200
3.54 (0.1394)
383655200
3.57 (0.1406)
383665200
3.60 (0.1417)
383675200
3.63 (0.1429)
383685200
3.66 (0.1441)
(A) Drive pinion
(B) Bearing preload adjusting spacer
(C) Bearing preload adjusting washer
(D) Differential carrier
ST
DI-00085
(A)
(B)
(C)
(D)
DI-00086
DI-40
Rear Differential (T-type)
DIFFERENTIALS
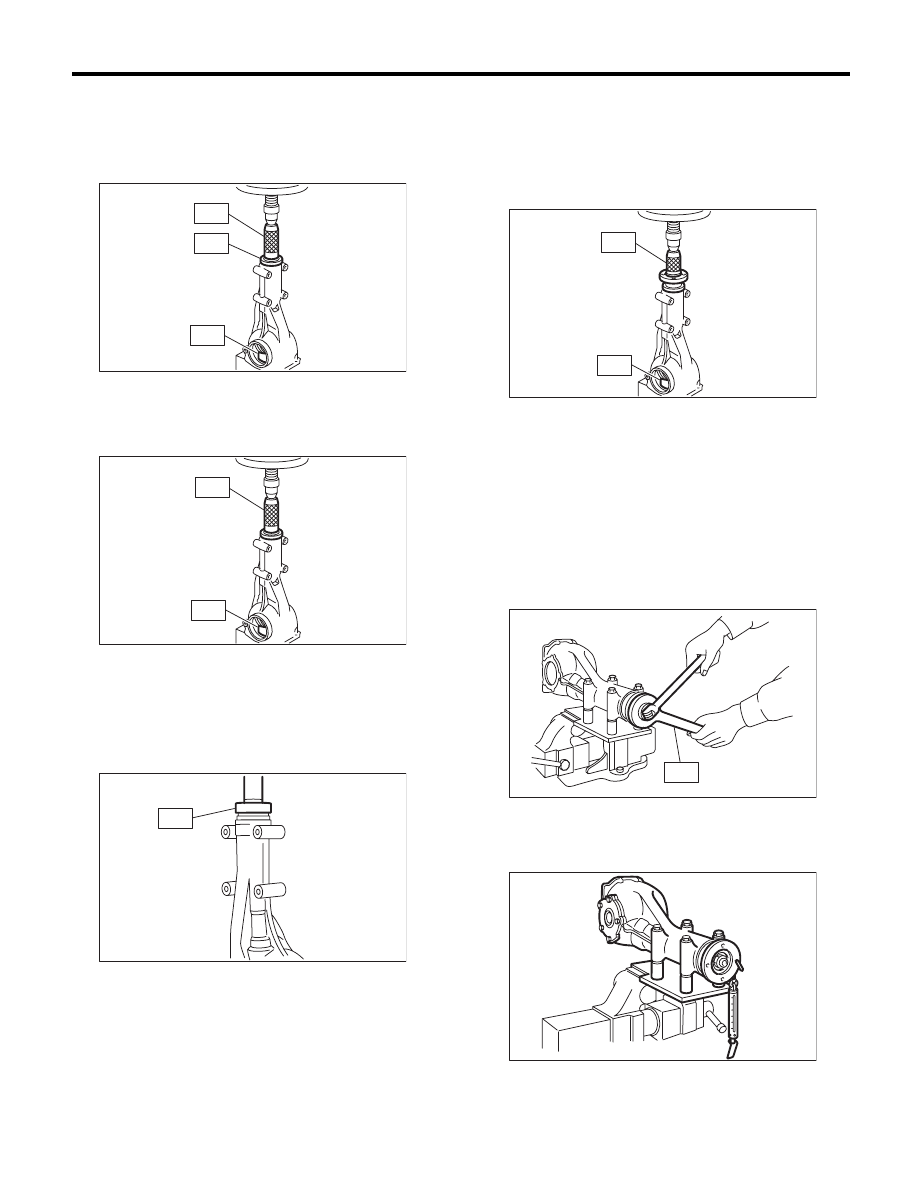
5) Press-fit the front bearing cone into case with
ST1, ST2 and ST3.
ST1
398507703
DUMMY COLLAR
ST2
399780104
WEIGHT
ST3
899580100
INSTALLER
6) Insert the spacer, then press-fit the pilot bearing
with ST1 and ST2.
ST1
399780104
WEIGHT
ST2
899580100
INSTALLER
7) Fit a new oil seal with ST.
NOTE:
• Press-fit until the oil seal end comes 1 mm (0.04
in) inward from end of carrier.
• Apply the differential gear oil to the oil seal lips.
ST
498447120
INSTALLER
8) Press-fit the companion flange with ST1 and
ST2.
NOTE:
Be careful not to damage the bearing.
ST1
899874100
INSTALLER
ST2
399780104
WEIGHT
9) Apply seal material on the drive pinion shaft
thread and new self-locking nut seat.
Seal material:
THREE BOND 1324 (Part No. 004403042) or
equivalent
10) Attach a new self-locking nut and tighten using
the ST.
ST
498427200
FLANGE WRENCH
Tightening torque:
181.5 N·m (18.5 kgf-m, 133.9 ft-lb)
11) Check the initial torque and initial load.
Initial load:
17.7 — 38.8 N (1.8 — 4.0 kgf, 4.0 — 8.7 lb)
ST3
ST1
ST2
DI-00087
ST2
ST1
DI-00088
ST
DI-00089
ST1
ST2
DI-00090
ST
DI-00091
DI-00117
Нет комментариевНе стесняйтесь поделиться с нами вашим ценным мнением.
Текст