Subaru Legacy IV (2008 year). Service manual — part 282
EX(H4DOTC)-3
General Description
EXHAUST
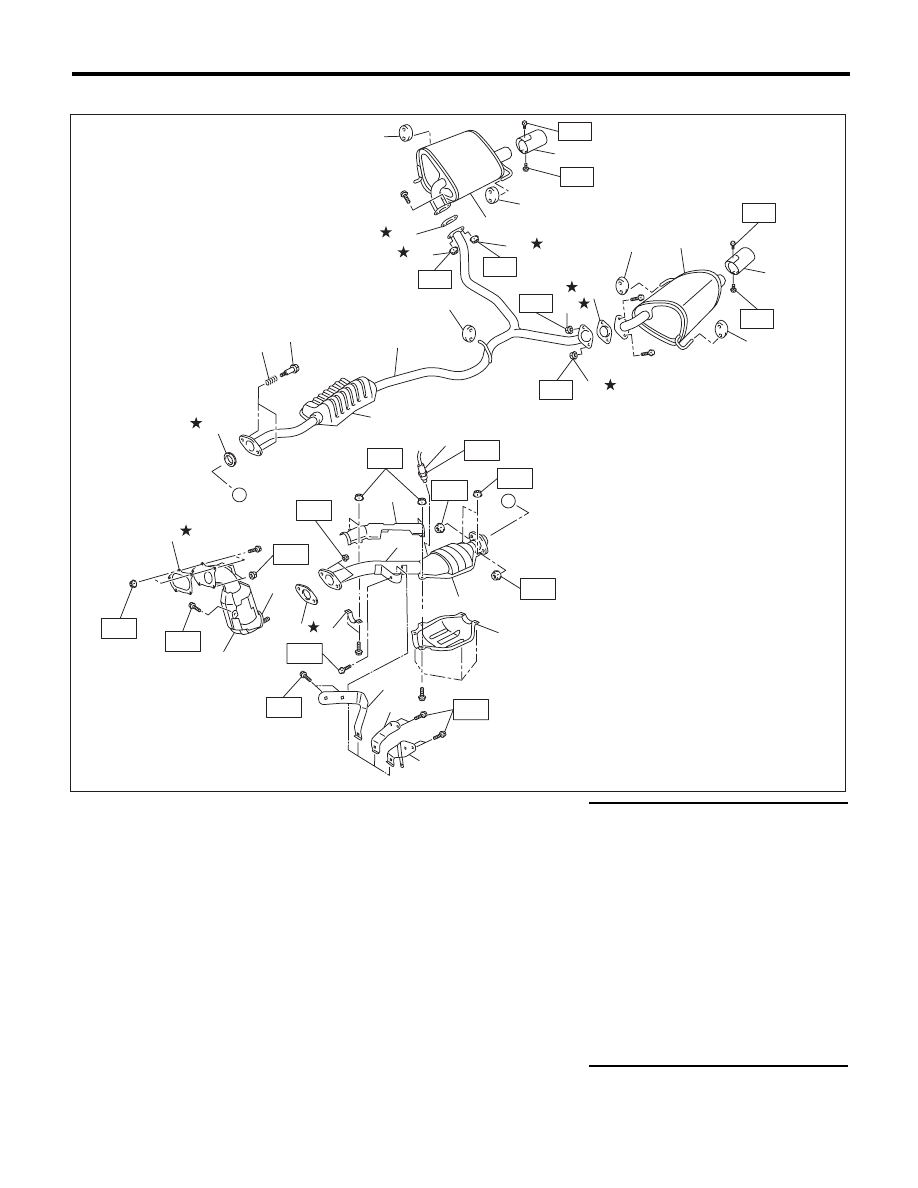
2. CENTER AND REAR EXHAUST PIPE, AND MUFFLER
(1)
Gasket
(13)
Chamber
Tightening torque:N·m (kgf-m, ft-lb)
(2)
Front catalytic converter
(14)
Cushion rubber
T1: 7.5 (0.8, 5.5)
(3)
Center exhaust pipe (Front)
(15)
Spring
T2: 13 (1.3, 9.6)
(4)
Center exhaust pipe (Rear)
(16)
Bolt
T3: 18 (1.8, 13.3)
(5)
Gasket
(17)
Gasket
T4: 23 (2.3, 17.0)
(6)
Center pipe upper cover (Rear)
(18)
Self-locking nut
T5: 30 (3.1, 22.1)
(7)
Clamp
(19)
Muffler LH
T6: 35 (3.6, 25.8)
(8)
Rear catalytic converter lower
cover
(20)
Muffler RH
T7: 40 (4.1, 29.5)
(21)
Hanger bracket (AT model)
T8: 42.5 (4.3, 31.3)
(9)
Rear oxygen sensor
(22)
Hanger bracket (5MT model)
T9: 48 (4.9, 35.4)
(10)
Rear catalytic converter
(23)
Hanger bracket (6MT model)
T10: <Ref. to FU(H4DOTC)-48,
INSTALLATION, Rear Oxygen
Sensor.>
(11)
Gasket
(24)
Muffler cutter
(12)
Rear exhaust pipe
EX-02369
(11)
A
(12)
(13)
(16)
(15)
(14)
(14)
(17)
(14)
(17)
(19)
(20)
(14)
(14)
(18)
T9
(18)
T9
(18)
T9
(18)
T9
A
(10)
T8
T3
T10
(6)
(4)
(9)
(8)
(5)
(7)
T5
T8
T8
(1)
(2)
(3)
T3
T2
T2
T6
T1
T1
T1
T1
(24)
(24)
(21)
(22)
T4
(23)
T7
EX(H4DOTC)-4
General Description
EXHAUST
B: CAUTION
• Wear appropriate work clothing, including a cap,
protective goggles and protective shoes when per-
forming any work.
• Remove contamination including dirt and corro-
sion before removal, installation or disassembly.
• Keep the disassembled parts in order and pro-
tect them from dust and dirt.
• Before removal, installation or disassembly, be
sure to clarify the failure. Avoid unnecessary re-
moval, installation, disassembly and replacement.
• Vehicle components are extremely hot after driv-
ing. Be wary of receiving burns from heated parts.
• Be sure to tighten fasteners including bolts and
nuts to the specified torque.
• Place shop jacks or rigid racks at the specified
points.
• Before disconnecting connectors of sensors or
units, be sure to disconnect the ground cable from
the battery.
• If any fat adheres to the exhaust pipe, wipe it off.
Otherwise a fire may happen.
EX(H4DOTC)-5
Front Exhaust Pipe
EXHAUST
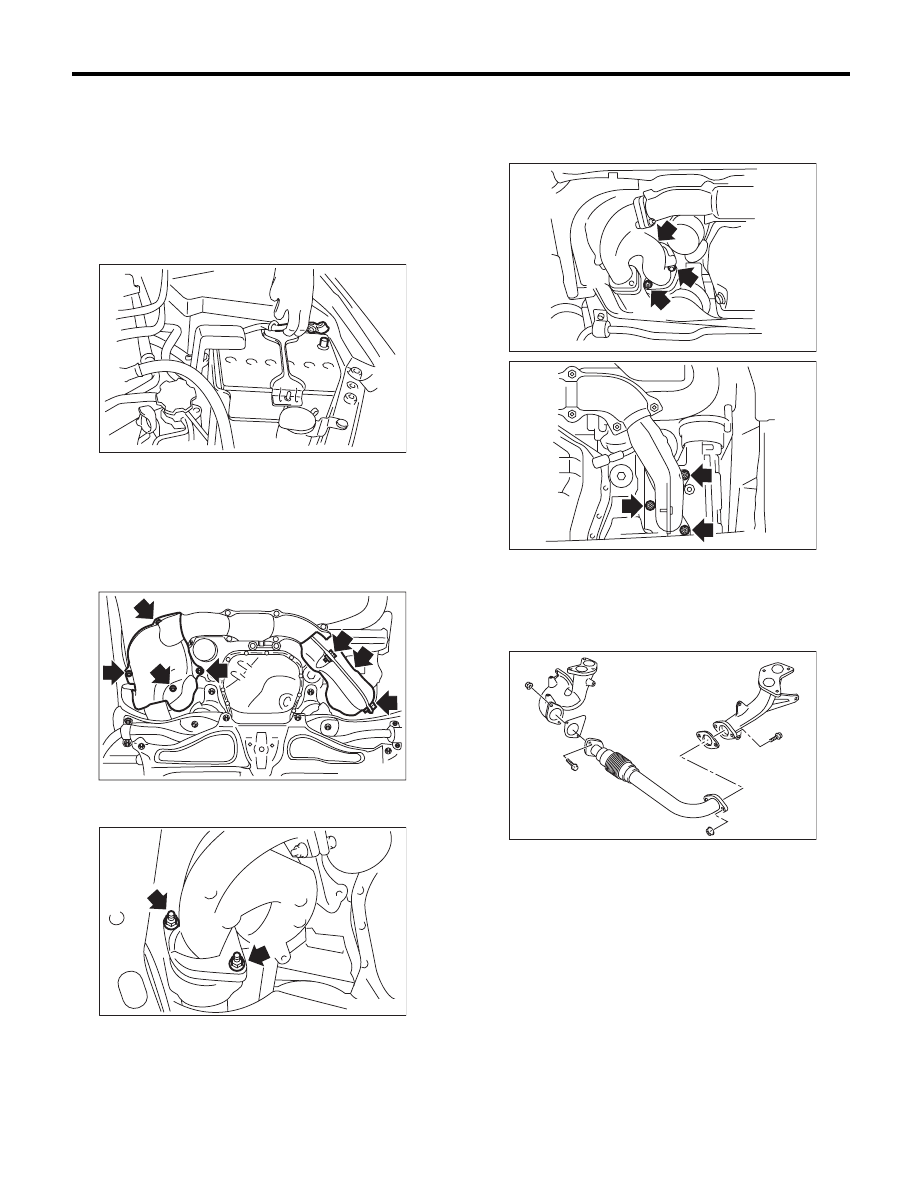
2. Front Exhaust Pipe
A: REMOVAL
CAUTION:
Vehicle components are extremely hot after
driving. Be wary of receiving burns from heated
parts.
1) Set the vehicle on a lift.
2) Disconnect the ground cable from battery.
3) Lift up the vehicle.
4) Remove the under cover.
5) Remove the front oxygen (A/F) sensor. <Ref. to
FU(H4DOTC)-46, REMOVAL, Front Oxygen (A/F)
Sensor.>
6) Remove the exhaust manifold RH lower cover
and exhaust manifold LH cover.
7) Remove the bolts and nuts which hold front ex-
haust pipe assembly onto turbocharger joint pipe.
8) While holding the front exhaust pipe assembly
with one hand, remove the nuts which hold the front
exhaust pipe assembly to cylinder head exhaust
port.
9) Remove the front exhaust pipe assembly.
10) Remove the exhaust manifold RH upper cover
and the front exhaust pipe cover.
11) Separate the front exhaust pipe from exhaust
manifolds.
IN-00203
EX-02336
EX-00018
EX-02254
EX-00005
EX-02328
EX(H4DOTC)-6
Front Exhaust Pipe
EXHAUST
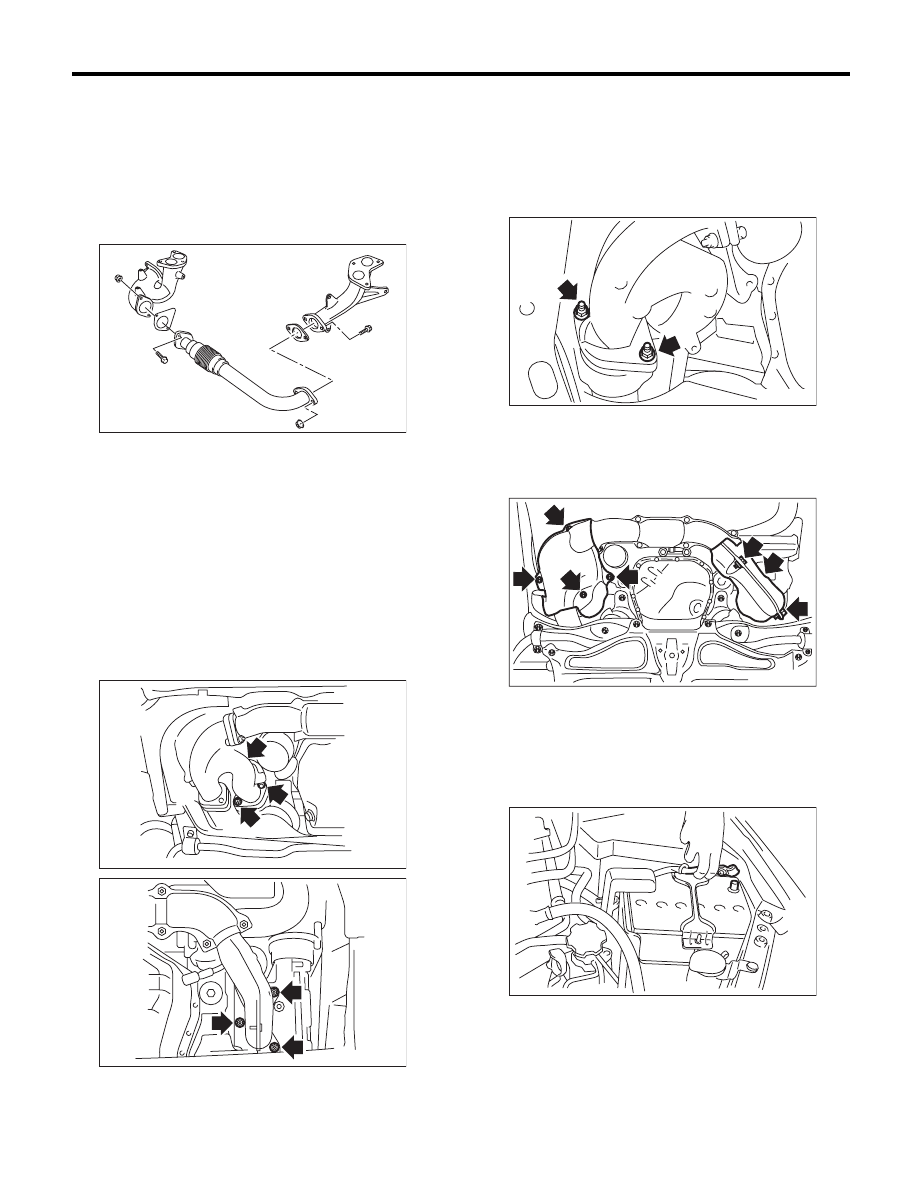
B: INSTALLATION
1) Install the front exhaust pipe and the exhaust
manifold.
NOTE:
Use a new gasket.
Tightening torque:
42.5 N·m (4.3 kgf-m, 31.3 ft-lb)
2) Install the front exhaust pipe cover.
Tightening torque:
25 N·m (2.5 kgf-m, 18.4 ft-lb)
3) Install the exhaust manifold RH upper cover.
Tightening torque:
19 N·m (1.9 kgf-m, 14.0 ft-lb)
4) Install the front exhaust pipe assembly.
NOTE:
Use a new gasket.
Tightening torque:
40 N·m (4.1 kgf-m, 29.5 ft-lb)
5) Connect the exhaust manifold RH to the turbo-
charger joint pipe.
NOTE:
Use a new gasket.
Tightening torque:
42.5 N·m (4.3 kgf-m, 31.3 ft-lb)
6) Install the exhaust manifold RH lower cover and
exhaust manifold LH cover.
Tightening torque:
19 N·m (1.9 kgf-m, 14.0 ft-lb)
7) Install the front oxygen (A/F) sensor. <Ref. to
FU(H4DOTC)-46, INSTALLATION, Front Oxygen
(A/F) Sensor.>
8) Install the under cover.
9) Lower the vehicle.
10) Connect the ground cable to battery.
C: INSPECTION
1) Check the connections and welds for exhaust
leaks.
2) Make sure there are no holes or rusting.
EX-02328
EX-02254
EX-00005
EX-00018
EX-02336
IN-00203
Нет комментариевНе стесняйтесь поделиться с нами вашим ценным мнением.
Текст