Subaru Legacy III (2000-2003 year). Service manual — part 287

LU(H6DO)-8
LUBRICATION
OIL PRESSURE SYSTEM
B: INSPECTION
Step
Value
Yes
No
1
CHECK COMBINATION METER.
1) Turn ignition switch to ON. (engine OFF)
2) Check other warning lights.
Do the warning lights go on?
Lights up.
Repair or replace
the combination
meter. <Ref. to
IDI-4, INSPEC-
TION, Combina-
tion Meter
System.>
2
CHECK HARNESS CONNECTOR BETWEEN
COMBINATION METER AND OIL PRES-
SURE SWITCH.
1) Turn ignition switch to OFF.
2) Disconnect connector from the oil pressure
switch.
3) Turn ignition switch ON.
4) Measure the voltage of harness between
the combination meter connector and chas-
sis ground.
Connector & terminal
(E11) No. 1 — Chassis ground:
Is the measured value exceed the specified
value?
10 V
Replace oil pres-
sure switch.
3
CHECK COMBINATION METER.
1) Turn ignition switch to OFF.
2) Remove the combination meter.
3) Measure the resistance of the combination
meter.
Terminals
LHD
(i12) No. 10 — (i11) No. 5:
(i12) No. 10 — (i10) No. 8:
RHD
(i11) No. 8 — (i11) No. 5:
(i11) No. 8 — (i10) No. 8:
Is the measured value less than the speci-
fied value?
10
Ω
Replace the har-
ness connector
between combina-
tion meter and oil
pressure switch.
Repair or replace
the combination
meter and the oil
pressure switch
warning light bulb.

LU(H6DO)-9
LUBRICATION
ENGINE OIL
3. Engine Oil
A: INSPECTION
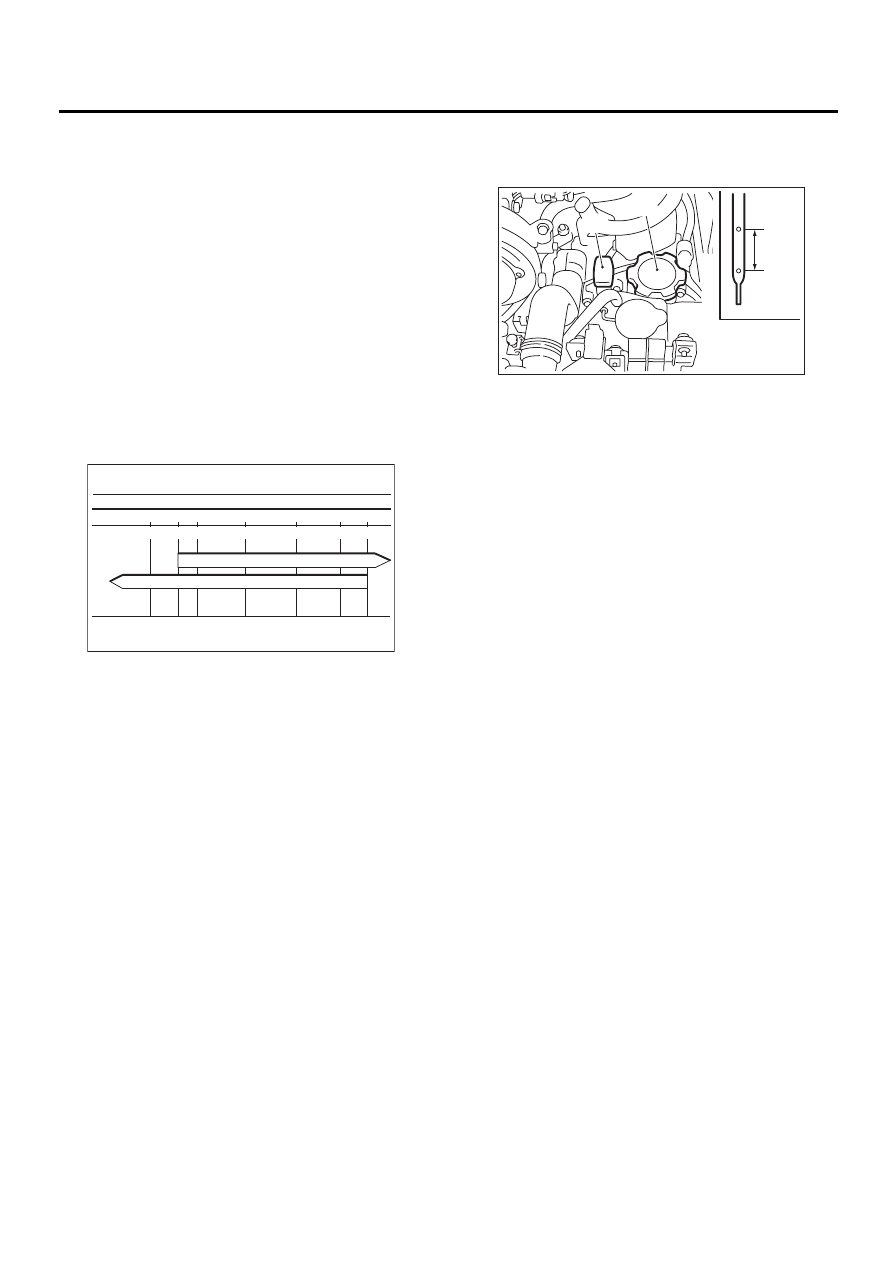
1) Park vehicle on a level surface.
2) Remove oil level gauge and wipe it clean.
3) Reinsert the level gauge all the way. Be sure that
the level gauge is correctly inserted and in the
proper orientation.
4) Remove it again and note the reading. If the en-
gine oil level is below the “L” line, add oil to bring
the level up to the “F” line.
5) After turning off the engine, wait a few minutes
for the oil to drain back into the oil pan before
checking the level.
6) To prevent overfilling the engine oil, do not add
oil above the “F” line when the engine is cold.
NOTE:
Just after driving or during warm-up, engine oil lev-
el may rise above the “F” mark.
B: REPLACEMENT
1) Drain engine oil by loosening engine oil drain
plug.
2) Open engine oil filler cap for quick draining of the
engine oil.
3) Replace drain plug gasket.
4) Tighten engine oil drain plug after draining en-
gine oil.
Tightening torque:
44 N·m (4.5 kgf-m, 33 ft-lb)
(A) Oil level gauge
(B) Engine oil filler cap
(C) Upper level
(D) Lower level
LU-00111
L
F
( A )
( B )
( C )
( D )
(A) Oil level gauge
(B) Engine oil filler cap
(C) Upper level
(D) Lower level
LU-00112
LU-00111
L
F
( A )
( B )
( C )
( D )
LU-00112
LU(H6DO)-10
LUBRICATION
ENGINE OIL
5) Fill engine oil through filler pipe up to upper point
on level gauge. Make sure that vehicle is placed
level when checking oil level. Use engine oil of
proper quality and viscosity, selected in accor-
dance with the table in figure.
Recommended oil
• API certification SL or SJ with the words
“ENERGY CONSERVING” (if you cannot
obtain the oil with SL or SJ grade, you may
use SH grade)
• ACEA specification A1, A2 or A3
• CCMC specification G4 or G5
• New API certification mark (Star burst
mark) label is on the container.
Engine oil amount for preparation (with replac-
ing engine oil):
Approx. 5.6 L (5.9 US qt, 4.9 Imp qt)
The proper viscosity helps vehicle get good cold
and hot starting by reducing viscous friction and
thus increasing cranking speed.
CAUTION:
When replenishing oil, it does not matter if the
oil to be added is a different brand from that in
the engine; however, use oil having the API
classification and SAE viscosity No. designat-
ed by SUBARU.
NOTE:
If vehicle is used in desert areas with very high tem-
peratures or for other heavy duty applications, the
following viscosity oils may be used: API classifica-
tion: SL or SJ
SAE Viscosity No.: 30, 40, 10W-50, 20W-40, 20W-
50.
6) Close engine oil filler cap.
7) Start engine and warm it up for a time.
8) After engine stops, recheck the oil level. If nec-
essary, add engine oil up to upper level on level
gauge.
LU-00113
SAE Viscosity No. and Applicable Temperature
(˚F)
0
40
30
15
–15
–20
–30
(˚C)
32
104
86
59
5
–4
–22
10W-30, 10W-40
5W-30 PREFERRED
(A) Oil level gauge
(B) Engine oil filler cap
LU-00111
L
F
( A )
( B )
( C )
( D )
LU(H6DO)-11
LUBRICATION
OIL PUMP
4. Oil Pump
A: REMOVAL
1) Disconnect battery ground cable.
2) Lift-up the vehicle.
3) Remove under cover. <Ref. to EI-13, REMOV-
AL, Front Under Cover.>
4) Drain coolant. <Ref. to CO(H6DO)-22, DRAIN-
ING OF ENGINE COOLANT, REPLACEMENT,
Engine Coolant.>
5) Lower the vehicle.
6) Remove radiator. <Ref. to CO(H6DO)-27, RE-
MOVAL, Radiator.>
7) Remove V-belt. <Ref. to ME(H6DO)-28, RE-
MOVAL, V-belt.>
8) Remove front chain cover. <Ref. to ME(H6DO)-
39, REMOVAL, Front Chain Cover.>
9) Remove timing chain. <Ref. to ME(H6DO)-41,
REMOVAL, Timing Chain Assembly.>
10) Remove oil pump cover and crankshaft sprock-
et.
11) Remove inner rotor and outer rotor.
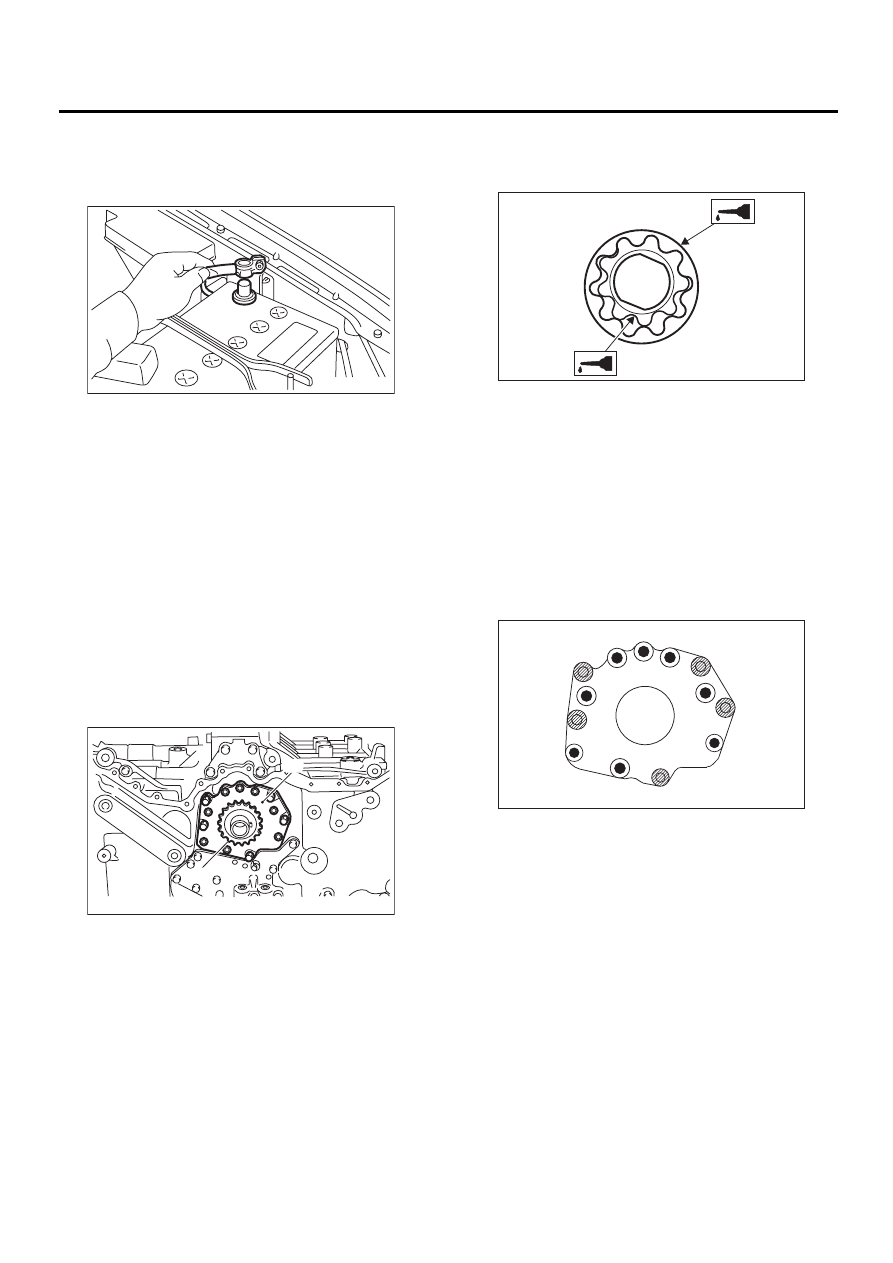
B: INSTALLATION
1) Apply engine oil to the entire surface area of
both inner and outer rotor.
2) Install the inner rotor by fitting it into the groove
on the crankshaft, and then assemble the outer ro-
tor.
3) Install oil pump cover.
4) Tighten the bolts in the numerical sequence
shown in the figure.
CAUTION:
Make sure that bolt mounting position is cor-
rect.
Tightening torque:
6.4 N·m (0.65 kgf-m, 4.7 ft-lb)
5) Install crank sprocket.
6) Install timing chain. <Ref. to ME(H6DO)-42, IN-
STALLATION, Timing Chain Assembly.>
7) Install front chain cover. <Ref. to ME(H6DO)-39,
INSTALLATION, Front Chain Cover.>
8) Install V-belt. <Ref. to ME(H6DO)-28, INSTAL-
LATION, V-belt.>
9) Install radiator. <Ref. to CO(H6DO)-28, INSTAL-
LATION, Radiator.>
10) Install under cover. <Ref. to EI-13, INSTALLA-
TION, Front Under Cover.>
11) Fill coolant. <Ref. to CO(H6DO)-22, FILLING
OF ENGINE COOLANT, REPLACEMENT, Engine
Coolant.>
(A) Oil pump cover
(B) Crankshaft sprocket
IN-00068
LU-00114
( A )
( B )
LU-00115
LU-00116
13
8
1
3
10
5
12
7
9
2
4
11
6
Нет комментариевНе стесняйтесь поделиться с нами вашим ценным мнением.
Текст