Subaru Legacy III (2000-2003 year). Service manual — part 405
IN(H4DOSTC)-8
INTAKE (INDUCTION)
GENERAL DESCRIPTION
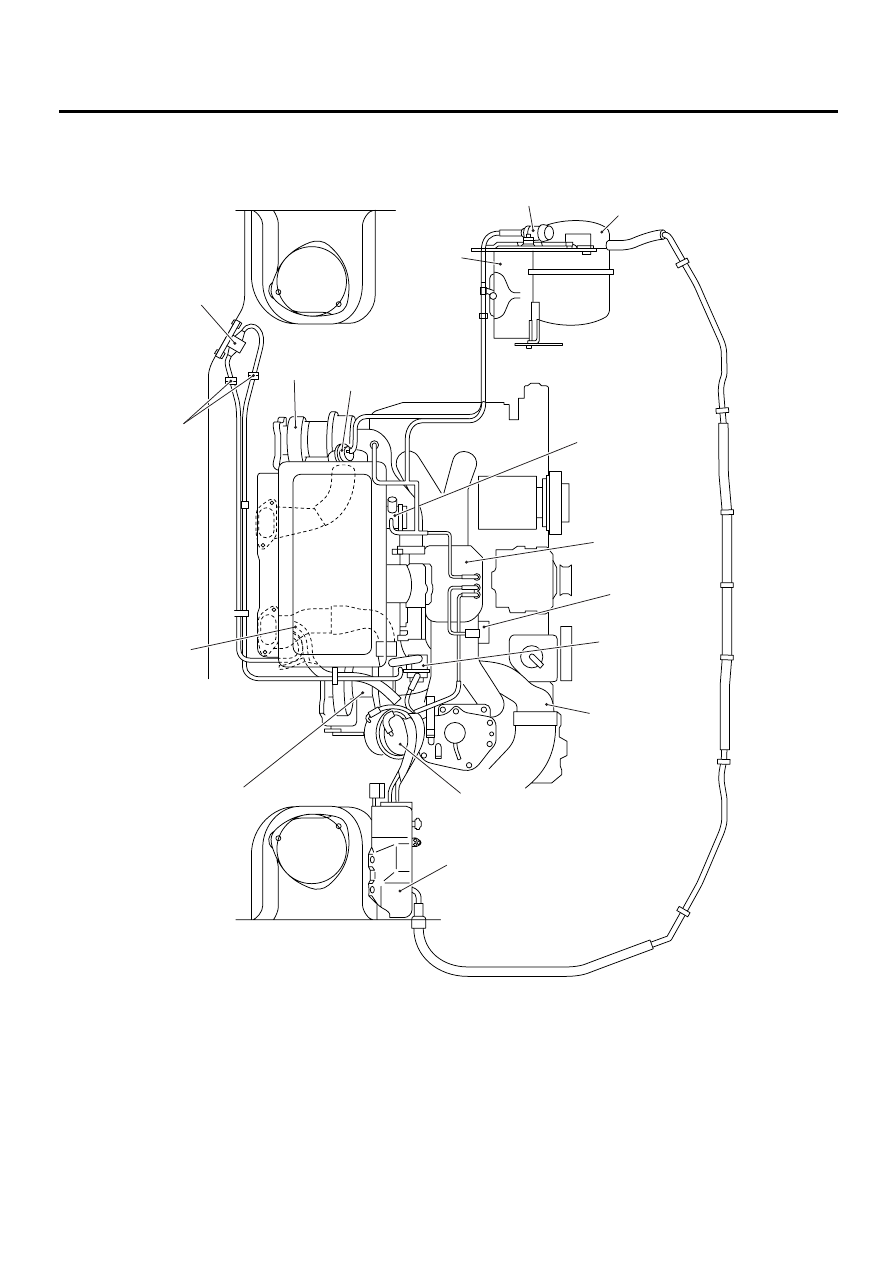
5. TURBOCHARGER SYSTEM
(1) Secondary turbocharger
(6) Intake manifold
(12) Wastegate valve
(2) Solenoid box ASSY
(7) Purge control solenoid valve
(13) Primary turbocharger
(3) Exhaust gas control valve
(8) Air by-pass valve
(14) Differential pressure sensor
(4) Intake duct
(9) Surge tank
(15) Filter
(5) Tubocharging pressure relief
valve
(10) Wastegate control solenoid valve
(16) Intake air control valve
(11) Battery
IN-00081
( 1 )
( 2 )
( 3 )
( 4 )
( 5 )
( 6 )
( 7 )
( 8 )
( 9 )
(10)
(11)
(12)
(13)
(14)
(15)
(16)
(17)
IN(H4DOSTC)-9
INTAKE (INDUCTION)
GENERAL DESCRIPTION
B: CAUTION
• Wear working clothing, including a cap, protec-
tive goggles, and protective shoes during opera-
tion.
• Remove contamination including dirt and corro-
sion before removal, installation or disassembly.
• Keep the disassembled parts in order and pro-
tect them from dust or dirt.
• Before removal, installation or disassembly, be
sure to clarify the failure. Avoid unnecessary re-
moval, installation, disassembly, and replacement.
• Be careful not to burn your hands, because each
part on the vehicle is hot after running.
• Be sure to tighten fasteners including bolts and
nuts to the specified torque.
• Place shop jacks or safety stands at the specified
points.
• Before disconnecting electrical connectors of
sensor or units, be sure to disconnect the ground
cable from battery.
IN(H4DOSTC)-10
INTAKE (INDUCTION)
AIR CLEANER
2. Air Cleaner
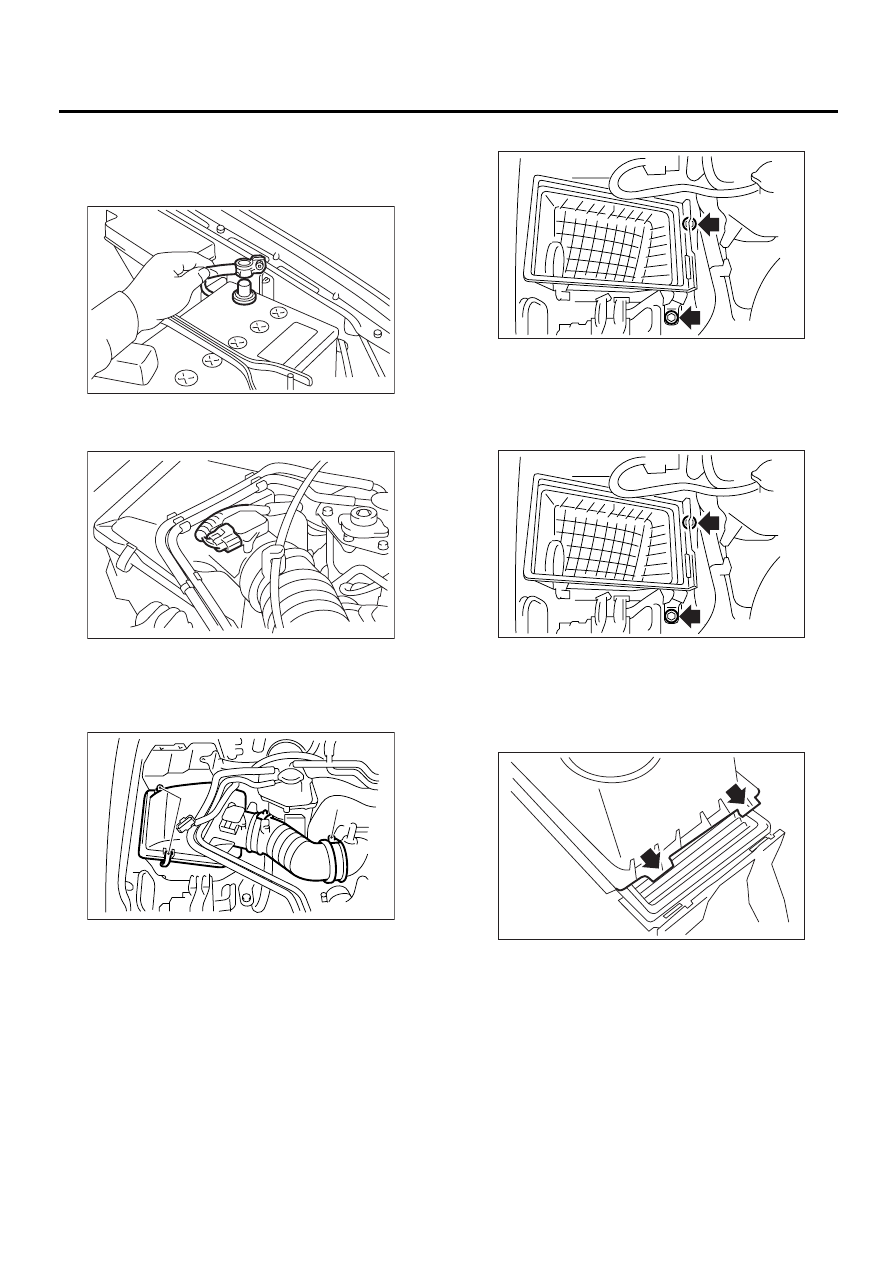
A: REMOVAL
1) Disconnect the ground cable from battery.
2) Disconnect the connector from mass air flow
sensor.
3) Loosen the clamp (A) which connects air intake
boot to intake duct.
4) Remove the two clips (B) from air cleaner upper
cover.
5) Remove the air cleaner upper cover.
6) Remove the air cleaner element.
7) Remove the air cleaner lower case.
B: INSTALLATION
Install in the reverse order of removal.
Tightening torque:
33 N·m (3.4 kgf-m, 24.3 ft-lb)
CAUTION:
Before installing the air cleaner upper cover,
align the holes with protruding portions of air
cleaner lower case, then secure the upper cov-
er to lower case.
C: INSPECTION
Replace if excessively damaged or dirty.
FU-00009
IN-00005
(B)
(A)
IN-00006
IN-00082
IN-00082
IN-00008

IN(H4DOSTC)-11
INTAKE (INDUCTION)
AIR INTAKE DUCT
3. Air Intake Duct
A: REMOVAL
1) Remove the bolts which installs air intake duct
on front side of body.
B: INSTALLATION
Install in the reverse order of removal.
Tightening torque:
7.5 N·m (0.76 kgf-m, 24.3 ft-lb)
C: INSPECTION
1) Inspect for cracks and loose connections.
2) Inspect that no foreign objects are mixed in the
air intake duct.
IN-00083
Нет комментариевНе стесняйтесь поделиться с нами вашим ценным мнением.
Текст