Subaru Legacy III (2000-2003 year). Service manual — part 12
PI-10
PRE-DELIVERY INSPECTION
PRE-DELIVERY INSPECTION
26. STARTING CONDITION
Start the engine and check that the engine starts
smoothly. If any battery voltage problems are
found, recharge or replace the battery. If any ab-
normal noises are observed, immediately stop the
engine and check and repair the necessary compo-
nents.
27. EXHAUST SYSTEM
Listen to the exhaust noise to see if no abnormal
noises are observed.
28. INDICATOR LIGHT
Check that all the indicator lights are off.
29. CLOCK
Check the clock for normal operations and enough
accuracy.
30. RADIO
Check the radio for full functionality and normal
noise level. Also check the CD unit operations.
31. CIGARETTE LIGHTER
Check that the cigarette lighter operations.
32. LIGHTING SYSTEM
• Check the headlight operations.
• Check the brake light operations.
• Check the other lights for normal operations.
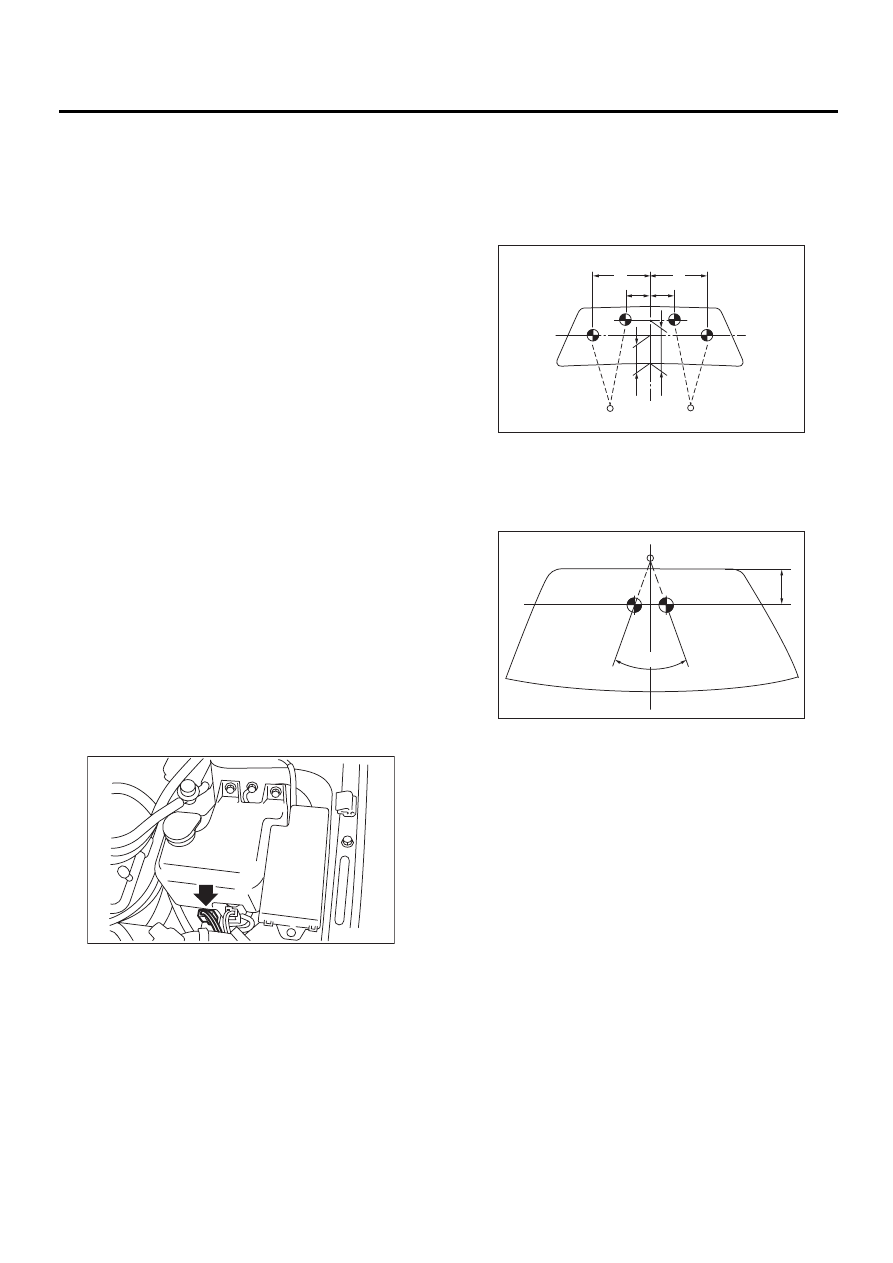
33. WINDOW WASHER
• Before inspection of the window washer system,
connect the washer connector to the washer motor.
• Check that the window washer system injects
washer fluid to the specified area of the windshield
shown in the figure.
NOTE:
If the washer fluid does not cover the specified ar-
ea, clean the nozzle.
Front
Injection position:
A: 350 mm (13.78 in)
B: 150 mm (5.91 in)
C: 300 mm (11.81 in)
D: 600 mm (23.62 in)
Rear
Injection position:
A: 60 mm (2.36 in)
B: 42
°°°°
34. WIPER
Check the front and rear wipers for normal opera-
tions.
35. POWER WINDOW OPERATION CHECK
Manipulate the power window switches one by one
to check that each of the power windows goes up
and down with no abnormal noises.
36. BRAKE TEST
Check the foot brake for normal operations.
37. PARKING BRAKE
Check the parking brake for normal operations.
PI-00102
PI-00121
A
B
C
D
B
A
PI-00104
A
B
PI-11
PRE-DELIVERY INSPECTION
PRE-DELIVERY INSPECTION
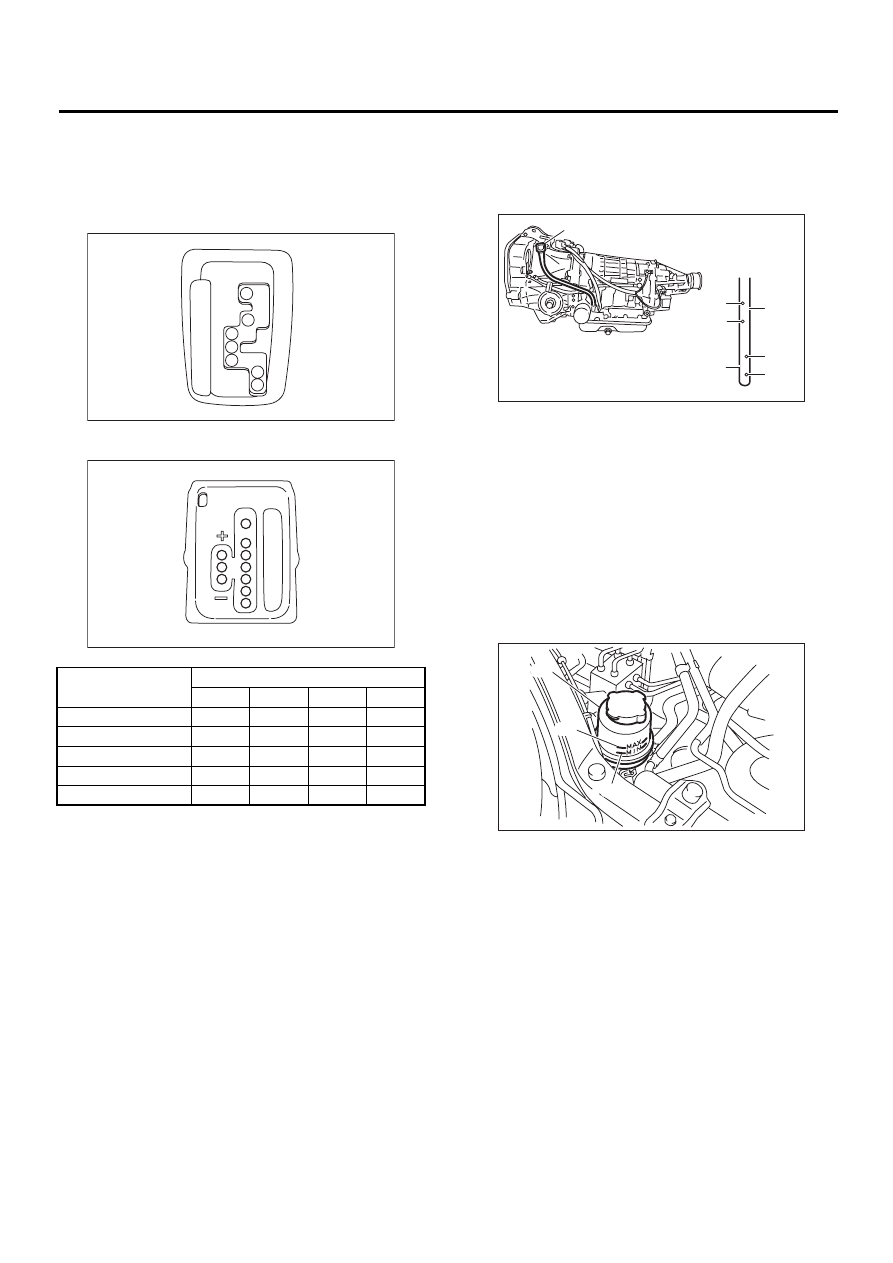
38. AT SHIFT CONTROL
Set the AT select lever to each gear position while
checking that the demanded gear position is cor-
rectly attained.
• Except SPORT shift
• SPORT shift
39. HEATER & VENTILATION
Operate the heater and ventilation system to check
for normal airflow and heating capacity.
40. AIR CONDITIONER
Operate the air conditioner. Check that the A/C
compressor operates normally and enough cooling
is provided.
41. CRUISE CONTROL
Operate the cruise control system. Check that the
system is activated and deactivated correctly.
42. ATF LEVEL
Check that the ATF level is normal. If insufficient,
check that no leaks are found. Then add the neces-
sary amount of the specified ATF.
43. POWER STEERING FLUID LEVEL
Check that the power steering fluid level is normal.
If insufficient, check that no leaks are found. Then
add the necessary amount of the specified power
steering fluid.
44. FLUID LEAK CHECK
Check the entire areas of the vehicle for any trace
of coolant/oil/fluid leaks.
Selector Position
Gear Position
1st
2nd
3rd
4th
D
Yes
Yes
Yes
Yes
3
Yes
Yes
Yes
2
Yes
1
Yes
SPORT shift
Yes
Yes
Yes
Yes
AT-00413
P
R
N
D
3
2
1
AT-00761
1
2
P
R
N
D
3
(A) Level gauge
(B) “HOT” side
(C) Upper level
(D) Lower level
(E) “COLD” side
(A) Reservoir tank
(B) MIN level
(C) MAX level
PI-00105
COLD
LF
HOT
LF
( A )
( C )
( D )
( C )
( D )
( E )
( B )
PI-00070
( A )
( B )
( C )
PI-12
PRE-DELIVERY INSPECTION
PRE-DELIVERY INSPECTION
45. WATER LEAK TEST
Spray the vehicle with water and check that no wa-
ter enters the passenger compartment.
• Before performing the water leakage test, re-
move anything that may obstruct the operation or
which must be kept dry.
• Close all of the windows completely, and then
close all of the doors tightly. Close the hood and
trunk lid before starting the test.
• Connect a hose to a tap, and spray water on the
vehicle. The rate of water discharge must be ap-
prox. 20 to 25 liters (5.3 to 6.6 US gal, 4.4 to 5.5
Imp gal) per minute.
When spraying water on areas adjacent to the floor
and wheel house, increase the pressure. When di-
recting water on areas other than the floor portion
and wheel house, decrease the pressure. But the
force of water must be made strong occasionally by
pressing the end of the hose.
NOTE:
Be sure to keep the hose at least 10 cm (3.9 in)
from the vehicle.
• Check the following areas:
• Front window and body framework mating
portion
• Door mating portions
• Glass mating portions
• Rear quarter window mating portions
• Rear window and body framework mating
portion
• Around roof drips
• If any dampness in the compartments is discov-
ered after the water has been applied, carefully
check all areas that may have possibly contributed
to the leak.
46. APPEARANCE CHECK 2
1) Check the paint after removing the paint protec-
tive coating and washing the vehicle.
NOTE:
Before removing the protective coating, be sure to
wash the vehicle, because the painted surface may
be scratched if the surface is rubbed with sand or
other hard particles which may be attached to the
protective coating.
2) Check the whole vehicle body for stains, flaking,
damage caused by transportation, rust, dirt, cracks,
or blistering.
NOTE:
• It is better to determine an inspection pattern in
order to avoid missing an area, since the total in-
spection area is wide.
• It is desirable not to make corrections to the body
paint unless absolutely needed. However, if any
corrections are required to remove scratches or
rust, the area to be corrected must be limited as
much as possible. Re-painting and spray painting
must be avoided whenever possible.
3) Carefully check each window glass for scratch-
es. Slight damage may be removed by polishing
with cerium oxide. (Half-fill a cup with cerium oxide,
and add warm water to it. Then agitate the content
until it turns to wax. Apply this wax to a soft cloth,
and polish the glass.)
4) Check each portion of the vehicle body and un-
derside components for the formation of rust. If rust
is discovered, remove it with #80 — #180 emery
paper, and treat the surface with rust preventive.
After this treatment is completed, flush the portion
thoroughly, and prepare the surface for repair
painting.
5) Check each portion of the body and all of the
chrome parts for deformation or distortion. Also
check each lamp lens for cracks.

PERIODIC MAINTENANCE SERVICES
PM
Page
General Description . . . . . . . . . . . . . . . . . . . . . 2
Schedule . . . . . . . . . . . . . . . . . . . . . . . . . .3
Engine Oil. . . . . . . . . . . . . . . . . . . . . . . . . 7
Engine Oil Filter. . . . . . . . . . . . . . . . . . . . . . ...9
Spark Plugs . . . . . . . . . . . . . . . . . . . . . . . ...10
Drive Belt(s) . . . . . . . . . . . . . . . . . . . . . . . ..12
Camshaft Drive Belt . . . . . . . . . . . . . . . . . . . . ..15
Fuel Line . . . . . . . . . . . . . . . . . . . . . . . . ...18
Fuel Filter . . . . . . . . . . . . . . . . . . . . . . . . ..19
Air Cleaner Element . . . . . . . . . . . . . . . . . . . . ..20
Cooling System . . . . . . . . . . . . . . . . . . . . . . .21
Coolant. . . . . . . . . . . . . . . . . . . . . . . . . ..22
Clutch System . . . . . . . . . . . . . . . . . . . . . . ...24
Hill-holder System . . . . . . . . . . . . . . . . . . . . . .25
Idle Mixture. . . . . . . . . . . . . . . . . . . . . . . . 26
Transmission Oil . . . . . . . . . . . . . . . . . . . . . ...27
ATF . . . . . . . . . . . . . . . . . . . . . . . . . . ...28
Front & Rear Differential Oil . . . . . . . . . . . . . . . . . ..30
Brake Line . . . . . . . . . . . . . . . . . . . . . . . . .32
Brake Fluid . . . . . . . . . . . . . . . . . . . . . . . . 34
Disc Brake Pads and Discs . . . . . . . . . . . . . . . . . ...35
Parking Brake. . . . . . . . . . . . . . . . . . . . . . . 36
Suspension . . . . . . . . . . . . . . . . . . . . . . . ...38
Wheel Bearing. . . . . . . . . . . . . . . . . . . . . . ...40
Axle Boots & Joints . . . . . . . . . . . . . . . . . . . . ...41
Tire Rotation. . . . . . . . . . . . . . . . . . . . . . . ..42
Steering System (Power Steering) . . . . . . . . . . . . . . . 43
Нет комментариевНе стесняйтесь поделиться с нами вашим ценным мнением.
Текст