Subaru Legacy III (2000-2003 year). Service manual — part 824
BR-54
BRAKE
BRAKE PEDAL
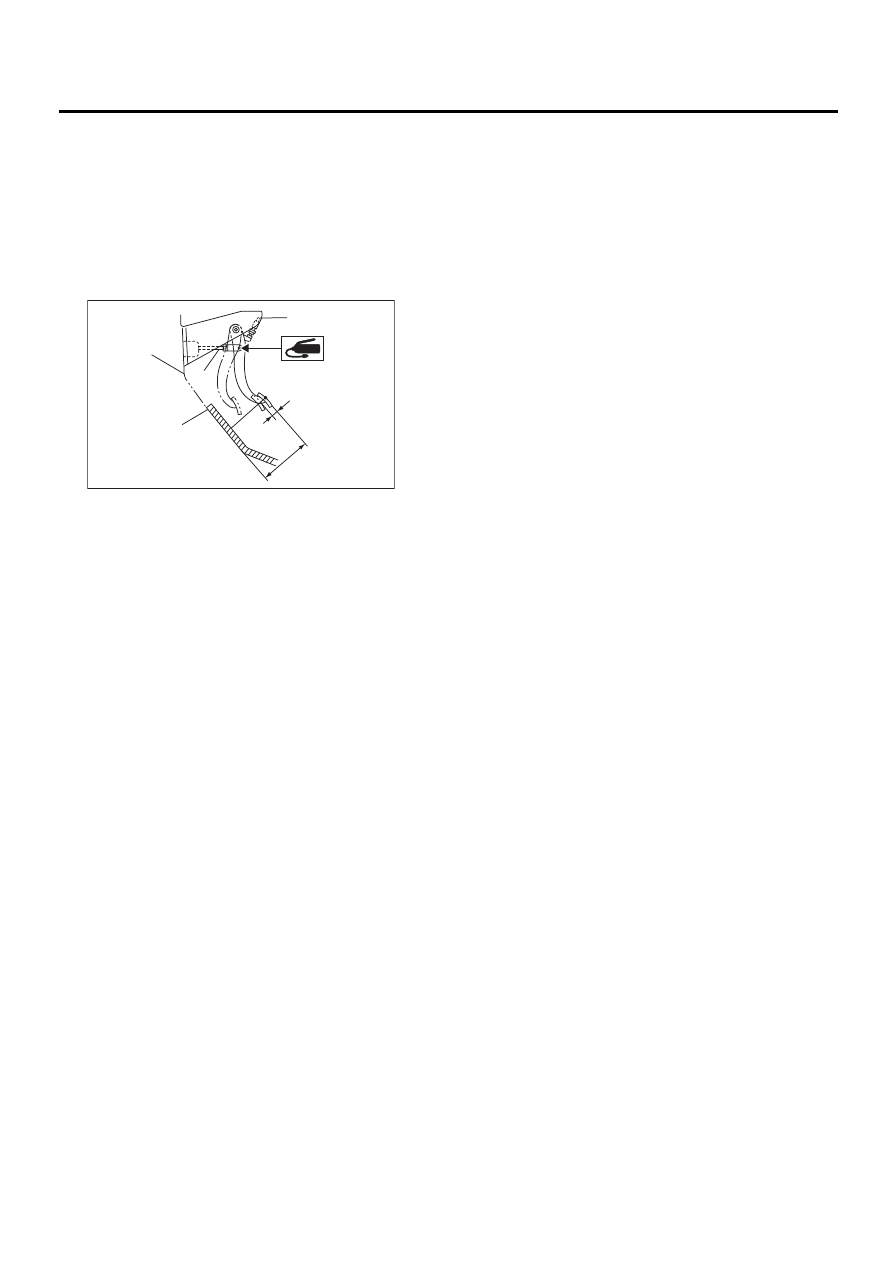
2) Check position of pedal pad.
Pedal height: L
AT: 158 mm (6.22 in)
MT: 153 mm (6.02 in)
Brake pedal free play: A
1 — 3 mm (0.04 — 0.12 in) [Depress brake
pedal pad with a force of less than 10 N (1
kgf, 2 lb).]
3) If it is not in specified value, adjust it by adjusting
brake booster operating rod length.
(1) Stop light switch
(2) Mat
(3) Toe board
(4) Brake booster operating rod
BR-00106
A
L
( 1 )
( 2 )
( 3 )
( 4 )
BR-55
BRAKE
STOP LIGHT SWITCH
17.Stop Light Switch
A: REMOVAL
1) Disconnect battery ground cable.
2) Disconnect stop light switch connector.
3) Loosen nuts, and unscrew stop light switch to re-
move.
B: INSTALLATION
1) Screw the stop light switch onto a bracket and
secure it temporarily with a nut.
2) Adjust stop light switch position, and then tighten
the nut.
<Ref. to BR-56, ADJUSTMENT, Stop Light
Switch.>
Tightening torque:
8 N·m (0.8 kgf-m, 5.8 ft-lb)
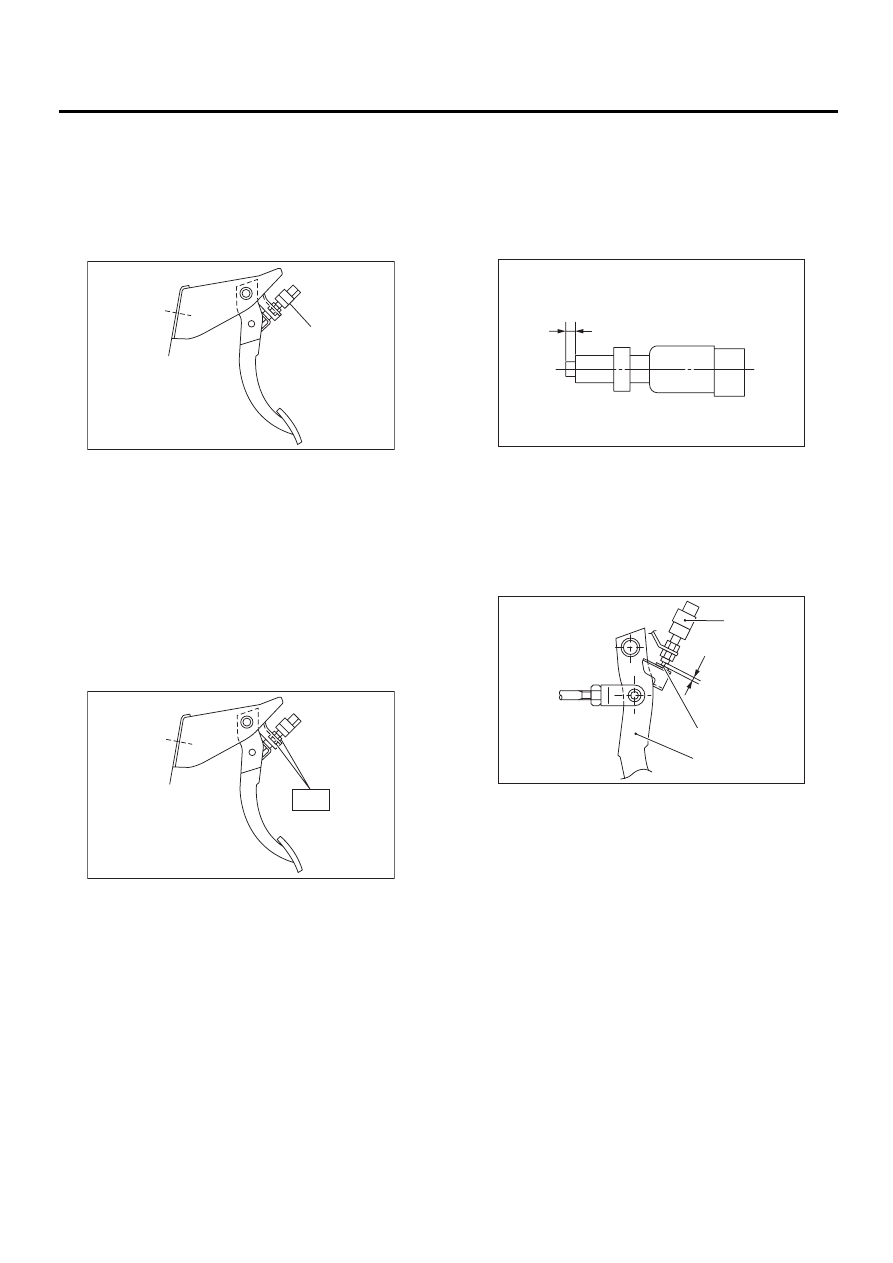
C: INSPECTION
1) If stop light switch does not operate properly (or
if it does not stop at the specified position), replace
with a new one.
Specified position: L
2
+1.5
/
0
mm (0.079
+0.059
/
0
in)
2) Measure the clearance between threaded end of
stop light switch and stopper.
CAUTION:
Be careful not to rotate stop light switch.
Stop light switch clearance: A
0.3 mm (0.012 in)
3) If it is not in specified value, adjust it by adjusting
position of stop light switch.
CAUTION:
Be careful not to rotate stop light switch.
(1) Stop light switch
BR-00182
( 1 )
BR-00183
T
(1) Stop light switch
(2) Stopper
(3) Brake pedal
BR-00109
L
BR-00110
A
( 1 )
( 2 )
( 3 )
BR-56
BRAKE
STOP LIGHT SWITCH
D: ADJUSTMENT
Loosen the lock nut, and adjust stop light switch po-
sition until the clearance (A) between threaded end
of the stop light switch and the stopper becomes
0.3 mm (0.012 in). Then, tighten the lock nut.
(1) Stop light switch
(2) Stopper
(3) Brake pedal
BR-00110
A
( 1 )
( 2 )
( 3 )
BR-57
BRAKE
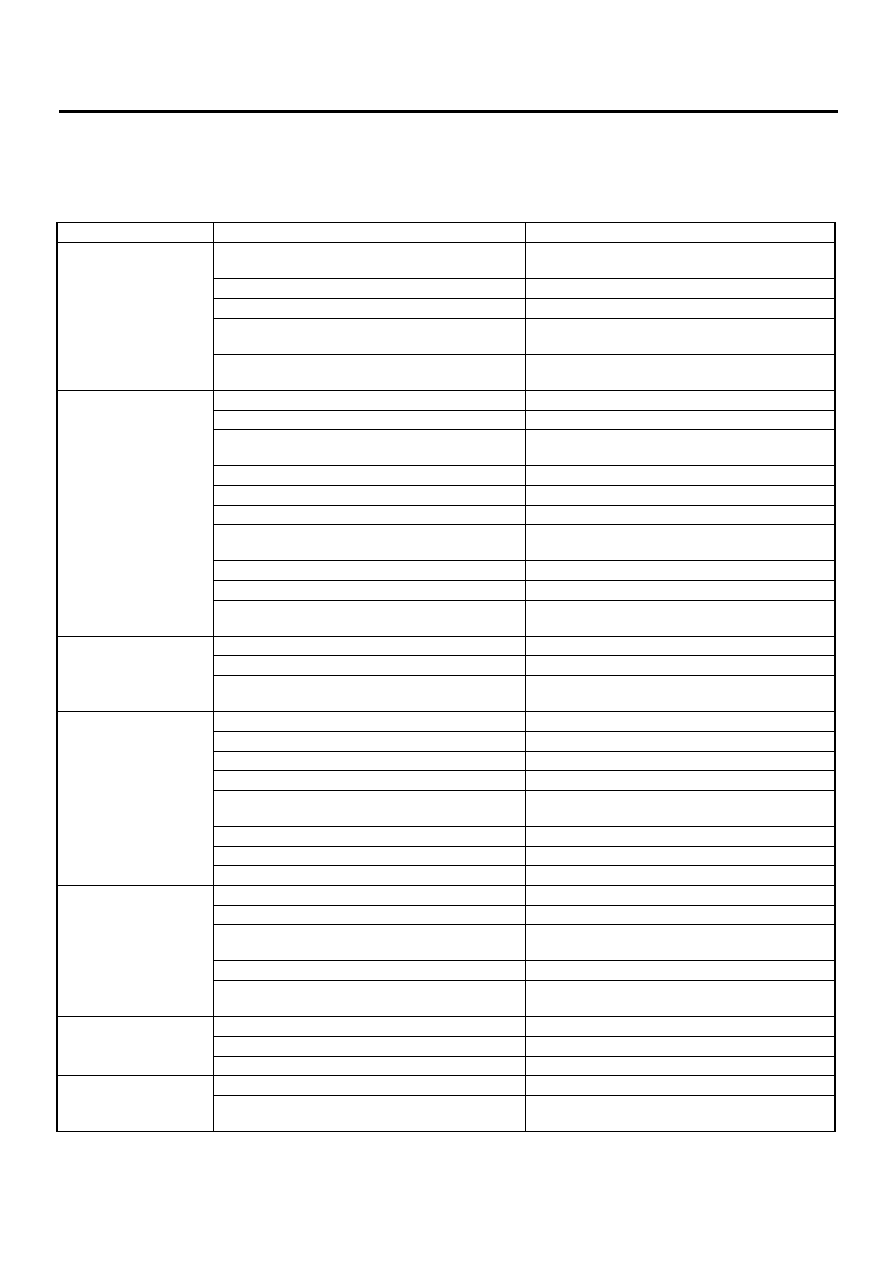
GENERAL DIAGNOSTICS
18.General Diagnostics
A: INSPECTION
1. BRAKE SYSTEM
Trouble and possible cause
Corrective action
1. Insufficient braking
(1) Fluid leakage from the hydraulic mechanism
Repair or replace (cup, piston seal, piston boot,
master cylinder piston kit, pipe or hose).
(2) Entry of air into the hydraulic mechanism
Bleed the air.
(3) Excessively wide shoe clearance
Adjust the clearance.
(4) Wear, deteriorated surface material, adhering
water or fluid on the lining
Replace, grind or clean.
(5) Improper operation of master cylinder, disc cal-
iper, brake booster or check valve
Correct or replace.
2. Unstable or uneven
braking
(1) Fluid on the lining or rotor
Eliminate cause of fluid leakage, clean, or replace.
(2) Rotor eccentricity
Correct or replace the rotor.
(3) Improper lining contact, deteriorated surface
material, improper inferior material, or wear
Correct by grinding, or replace.
(4) Deformed back plate
Correct or replace.
(5) Improper tire inflation
Inflate to correct pressure.
(6) Disordered wheel alignment
Adjust alignment.
(7) Loosened back plate or the support installing
bolts
Retighten.
(8) Loosened wheel bearing
Retighten to normal tightening torque or replace.
(9) Trouble in the hydraulic system
Replace the cylinder, brake pipe or hose.
(10) Uneven effect of the parking brake
Check, adjust, or replace the rear brake and cable
system.
3. Excessive pedal
stroke
(1) Entry of air into the hydraulic mechanism
Bleed the air.
(2) Excessive play in the master cylinder push rod
Adjust.
(3) Fluid leakage from the hydraulic mechanism
Repair or replace (cup, piston seal, piston boot,
master cylinder piston kit, pipe or hose).
4. Brake dragging or
improper brake return
(1) Insufficient pedal play
Adjust play.
(2) Improper master cylinder return
Clean or replace the cylinder.
(3) Clogged hydraulic system
Replace.
(4) Improper return or adjustment of parking brake
Correct or adjust.
(5) Weakened spring tension or breakage of shoe
return spring
Replace the spring.
(6) Excessively narrow shoe clearance
Adjust the clearance.
(7) Improper disc caliper operation
Correct or replace.
(8) Improper adjusted wheel bearing
Adjust or replace.
5. Brake noise (1)
(creak sound)
(1) Hardened or deteriorated lining
Replace the shoe assembly or pad.
(2) Worn lining
Replace the shoe assembly or pad.
(3) Loosened back plate or the support installing
bolts
Retighten.
(4) Loose wheel bearing
Retighten to normal tightening torque.
(5) Dirty rotor
Clean the rotor, or clean and replace the brake
assembly.
6. Brake noise (2)
(hissing sound)
(1) Worn lining
Replace the shoe assembly or pad.
(2) Improper installed shoe or pad
Correct or replace the shoe assembly or pad.
(3) Loose or bent rotor
Retighten or replace.
7. Brake noise (3)
(click sound)
(1) Excessively worn pad or the support
Replace the pad or the support.
(2) Lack of oil on the shoe ridge surface and
anchor
Add more grease.
Нет комментариевНе стесняйтесь поделиться с нами вашим ценным мнением.
Текст