Subaru Tribeca (2014 year). Manual — part 13
buttons (10) to store the channel. If the
button is pressed briefly, the preceding
selection will remain in memory.
NOTE
If the connection between the radio and
battery is broken for any reason such
as vehicle maintenance or radio re-
moval, all channels stored in the preset
buttons are cleared. If this occurs, it is
necessary to reset the preset buttons.
! Display selection
Press the “AUDIO” button (5) while receiv-
ing satellite radio to change the display as
follows.
! Rear seat entertainment
If your vehicle is equipped with a Rear
Seat Entertainment System, you can
enjoy audio outputs from the system
through the vehicle’s speakers by press-
ing the “RSE AUX” button (3). Press the
button again to return to the audio set
sound.
NOTE
If your vehicle is equipped with a Rear
Seat Entertainment System, refer to the
Owner’s Manual supplement for the
Rear Seat Entertainment System for
further details.
Audio
5-9
– CONTINUED –
5-10
Audio
& Compact disc player operation
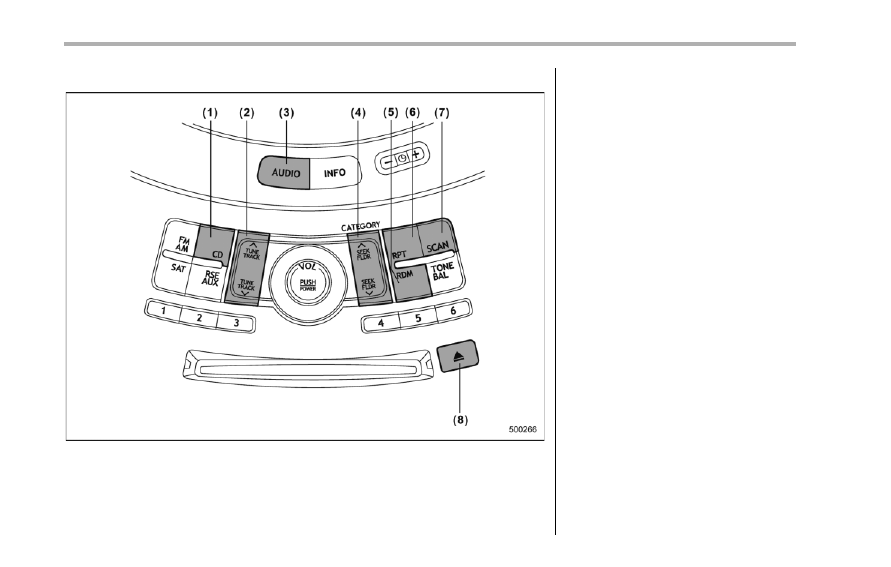
(1) CD button
(2) Track button
(3) AUDIO button
(4) Seek and Folder button
(5) Random button
(6) Repeat button
(7) Scan button
(8) Eject button
! To playback a compact disc
! When CD is not in the player
Hold a disc with a finger in the center hole
while gripping the edge of the disc, then
insert it in to the slot (with the label side
up) and the player will automatically pull
the disc into position.
NOTE
. DO NOT INSERT TWO DISCS INTO
THE DISC INSERTION SLOT AT THE
SAME TIME.
. Be sure to insert a disc with the label
side up. If you insert the disc the label
side down, “CHECK DISC” will appear
on the display and the player will not
play anything.
. After the last song finishes, the
player will automatically return to track
1 (the first song on the disc).
. If you insert a disc that cannot be
played by the player, “CHECK DISC”
will appear on the display and the
player will revert to the previously
selected mode.
. The player is designed to be able to
play music CD-Rs and music CD-RWs,
but it may not be able to play certain
ones.
. CDs (i.e., 8 cm/3 inch CDs) are not
supported, and if inserted, they will be
immediately ejected.
! When CD is in the player
When the “CD” button (1) is pressed, the
player will start playback.
NOTE
After the last song finishes, the player
will automatically return to track 1 (the
first song on the disc).
! To stop playback of a CD
When the “PUSH POWER” button is
pressed during playback of a CD, the CD
stops playing temporarily. To let the CD
resume playing, press the button again.
! To select a song from its beginning
! Forward direction
Briefly press the “ ” side of the “TUNE
TRACK” button (2) to skip to the beginning
of the next track. Each time this side of the
button is pressed, the indicated track
number will increase.
NOTE
In an MP3 folder, skipping past the last
track will take you back to the first track
in the folder.
! Backward direction
Briefly press the “ ” side of the “TUNE
TRACK” button (2) to skip to the beginning
of the current track. Each time this side of
the button is pressed, the indicated track
number will decrease.
NOTE
In an MP3 folder, skipping past the last
track will take you back to the first track
in the folder.
! Fast-forwarding and rewinding
! Fast-forwarding
Press and hold the “ ” side of the “TUNE
TRACK” button (2) to fast-forward the
track.
Release the button to stop fast-forwarding.
NOTE
If you fast-forward past the last track
on the disc, the player will select the
first track on the disc and start playing
it.
! Rewinding
Press and hold the “ ” side of the “TUNE
TRACK” button (2) to rewind the track.
Release the button to stop rewinding.
NOTE
If you rewind to the beginning of the
first track on the disc, the rewinding
will stop and the player will start
playing the first track on the disc.
! Folder selection (MP3 disc)
Press the “ ” side of the “SEEK FLDR”
button (4) briefly to select the next folder.
Pressing the “ ” side of the same button
the first time makes the player go back to
the beginning of the currently selected
track; pressing it a second time makes it
go back to the previously selected track.
NOTE
Only MP3 folders are recognized when
an attempt to select the next or pre-
vious folder is made. If no appropriate
folder exists on the disc, pressing the
“ ” or “ ” side of the “SEEK FLDR”
button has no effect.
Audio
5-11
– CONTINUED –
5-12
Audio
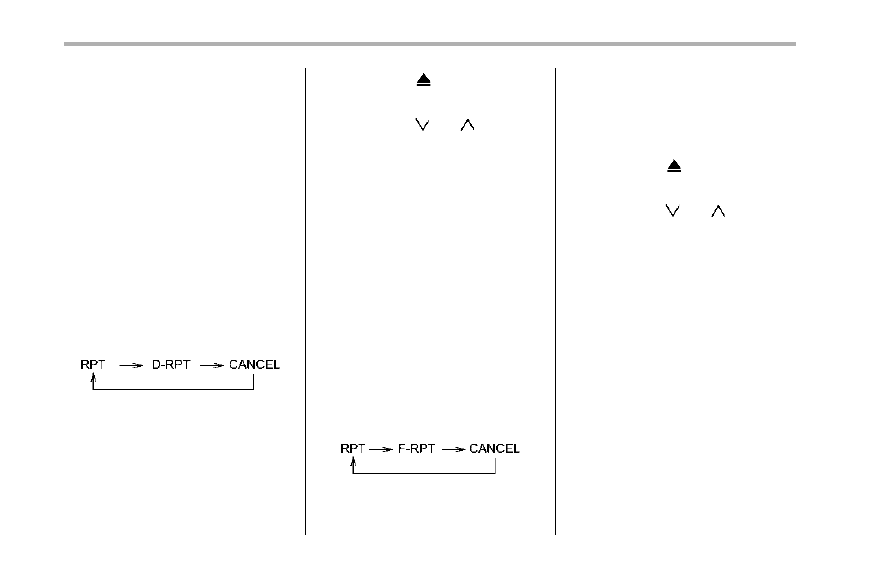
! Repeating
! To repeat the currently playing
track
To repeat a track, briefly press the “RPT”
button (6) while the track is playing. The
display will show “RPT”, and the track will
be repeated.
To cancel the track repeat-play mode:
Press the “RPT” button once (non-MP3
disc)
Press the “RPT” button twice (MP3 disc)
The “RPT” indication will turn off, and the
normal playback mode will be resumed.
NOTE
. With an MP3 disc inserted, each
time you briefly press the button, the
mode will change to the next one in the
following sequence.
If you accidentally press the button and
cancel the track repeat-play mode,
press it again to reselect the repeat-
play mode.
. The repeat-play mode will be can-
celed if you perform any of the follow-
ing steps.
– Press the “RDM” button.
– Press the “SCAN” button.
– Press the “ ” button.
– Select the radio mode.
– Press the “RSE AUX” button.
– Press the “ ” or “ ” side of the
“SEEK FLDR” button (MP3 disc).
– Turn off the power of the audio
equipment.
– Turn the ignition switch to the
“LOCK” position.
! To repeat the currently playing
folder (MP3 disc)
To repeat the currently playing folder,
press the “RPT” button (6) twice while a
track is playing. The display will show “F-
RPT”, and the folder will be played
repeatedly.
To cancel the folder repeat-play mode,
press the “RPT” button once more. The
“F-RPT” indication will turn off, and the
normal playback mode will be resumed.
NOTE
. Each time you briefly press the
button, the mode will change to the
next one in the following sequence.
If you accidentally press the button and
cancel the folder repeat-play mode,
press it again to reselect the folder
repeat-play mode.
. The folder repeat-play mode will be
cancelled if you perform any of the
following steps.
– Press the “RDM” button.
– Press the “SCAN” button.
– Press the “ ” button.
– Select the radio mode.
– Press the “RSE AUX” button.
– Press the “ ” or “ ” side of the
“SEEK FLDR” button (MP3 disc).
– Turn off the power of the audio
equipment.
– Turn the ignition switch to the
“LOCK” position.
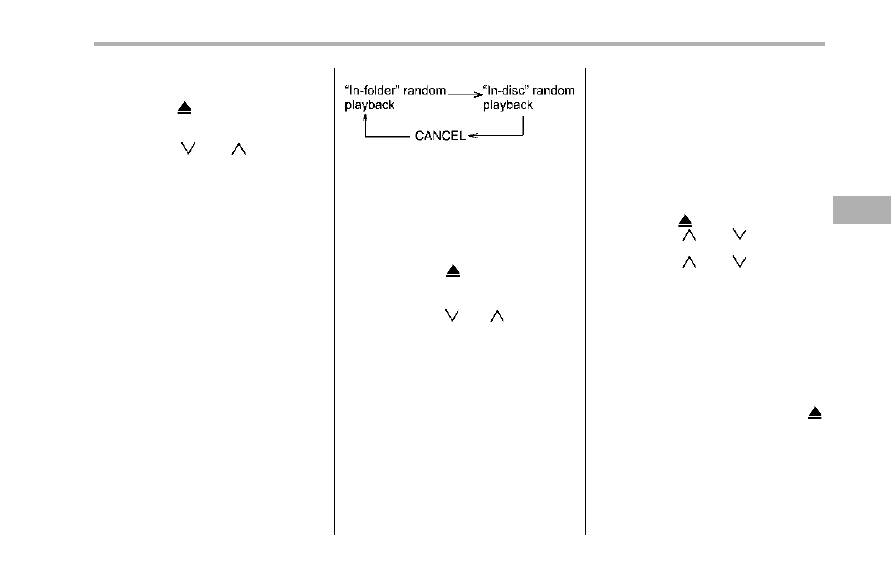
! Random playback
! Non-MP3 disc
Press the “RDM” button (5) briefly during
disc playback to play all of the tracks on
the disc in a random order. The display will
show “RDM”, and all of the tracks on the
disc will be played in a random order.
To cancel random mode, press the button
again. The “RDM” indication will turn off,
and the normal playback mode will be
resumed.
NOTE
Random playback will be cancelled if
you perform any of the following steps.
. Press the “RPT” button.
. Press the “SCAN” button.
. Press the “ ” button.
. Select the radio mode.
. Press the “RSE AUX” button.
. Press the “ ” or “ ” side of the
“SEEK FLDR” button.
. Turn off the power of the audio
equipment.
. Turn the ignition switch to the
“LOCK” position.
! MP3 disc
Press the “RDM” button (5) during disc
playback to play all of the tracks in the
folder currently being played in random
order. Press the “RDM” button again to
play all of the tracks on the disc in random
order. The display will show “RDM” during
the random mode.
To cancel the random mode, press the
“RDM” button during “in-disc” random
playback. The “RDM” indication will turn
off, and the normal playback mode will be
resumed.
NOTE
. Each time you briefly press the
button, the mode will change to the
next one in the following sequence.
If you accidentally press the button and
cancel the random mode, press it again
to reselect the random mode.
. Random playback will be cancelled
if you perform any of the following
steps.
– Press the “RPT” button.
– Press the “SCAN” button.
– Press the “ ” button.
– Select the radio mode.
– Press the “RSE AUX” button.
– Press the “ ” or “ ” side of the
“SEEK FLDR” button.
– Turn off the power of the audio
equipment.
– Turn the ignition switch to the
“LOCK” position.
! Scan
The scan mode lets you listen to the first
10 seconds of each track on the disc/
folder in succession. Press the “SCAN”
button (7) to start scanning through all
tracks upward beginning with the track
following the currently selected one. After
all tracks on the disc/folder has been
scanned, normal playback mode is re-
stored.
To cancel a scan, press the button again.
NOTE
The scan mode will be cancelled if you
perform any of the following opera-
tions.
. Press the “RPT” button.
. Press the “RDM” button.
. Press the “ ” button.
. Press the “ ” or “ ” side of the
“TUNE TRACK” button.
. Press the “ ” or “ ” side of the
“SEEK FLDR” button (MP3 disc).
. Select the radio mode.
. Press the “RSE AUX” button.
. Turn off the power of the audio
equipment.
. Turn the ignition switch to the
“LOCK” position.
! To eject a disc from the player
When a disc is being played back or when
a disc is in the player, press the “ ”
button (8). The disc will be ejected.
NOTE
. Avoid driving the vehicle with a CD
sticking out, because vibration might
make it fall out.
. If the disc is left ejected for more
Audio
5-13
– CONTINUED –
5-14
Audio
than approximately 15 seconds after
the ignition switch is turned to the
“LOCK” position, a disc protection
function will operate, automatically
reloading the disc. In this case, the
disc is not played.
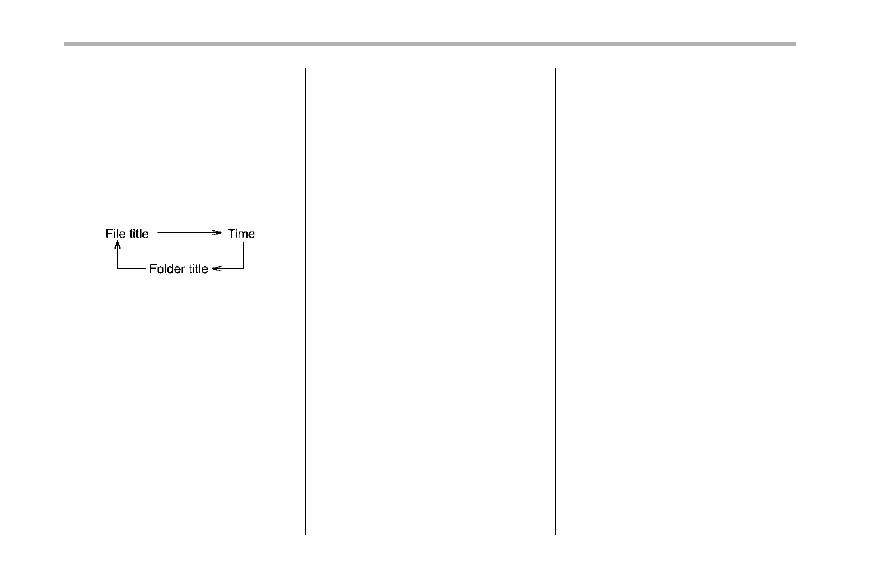
! Display selection (MP3 disc)
If you press the “AUDIO” button (3) during
playback, the indication will change to the
next one in the following sequence.
! Page (track/folder title) scroll (MP3
disc)
If, having pressed the “AUDIO” button (3)
to select track title or folder title display,
you press the “AUDIO” button again for
less than 0.5 second, the title will be
scrolled so you can see all of it. You will
see eight characters at a time.
NOTE
The display is designed to show titles
for up to three pages (64 characters in
total).
Type B audio set (if equipped)
The audio set will operate only when the ignition switch is in the “Acc” or “ON” positions.
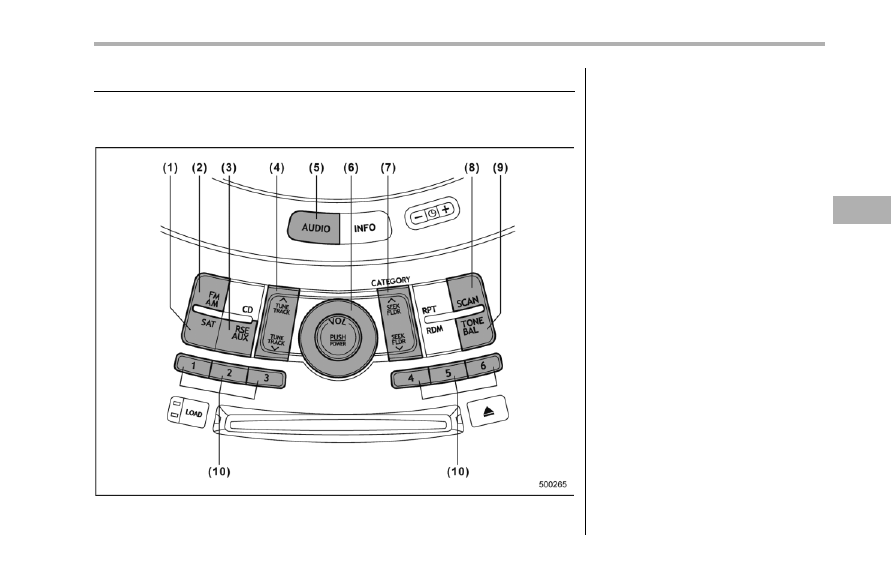
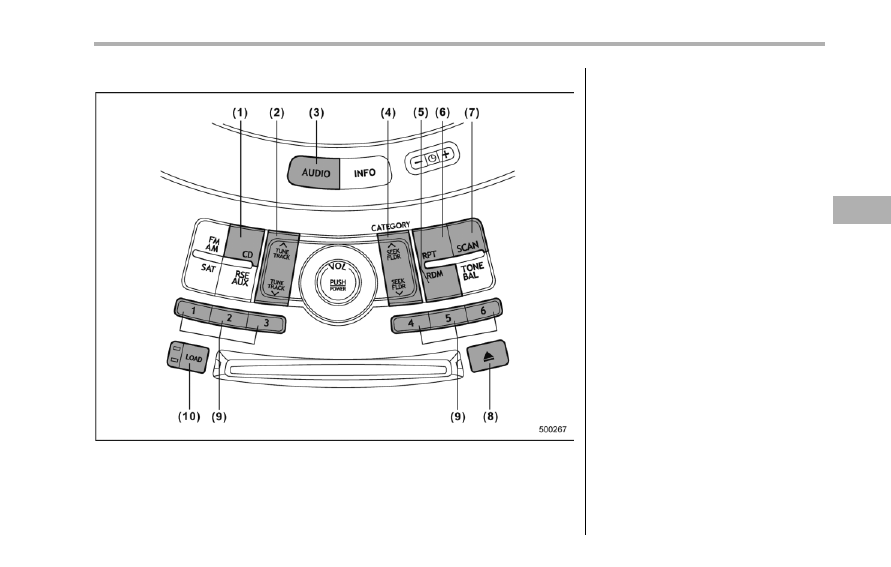
& Radio operation
(1) Satellite radio mode button
(2) FM AM mode button
(3) Auxiliary audio unit and Rear seat
entertainment selection button
(4) Tuning button
(5) AUDIO button
(6) Power switch, volume control dial
(7) Seek button
(8) Scan button
(9) Tone and Balance button
(10) Preset button
! Power switch and volume control
The dial (6) is used for both power (ON/
OFF) and volume control. The radio is
turned ON and OFF by pushing the dial
and the volume is controlled by turning the
dial. The dial can also be used for tone
and balance adjustment.
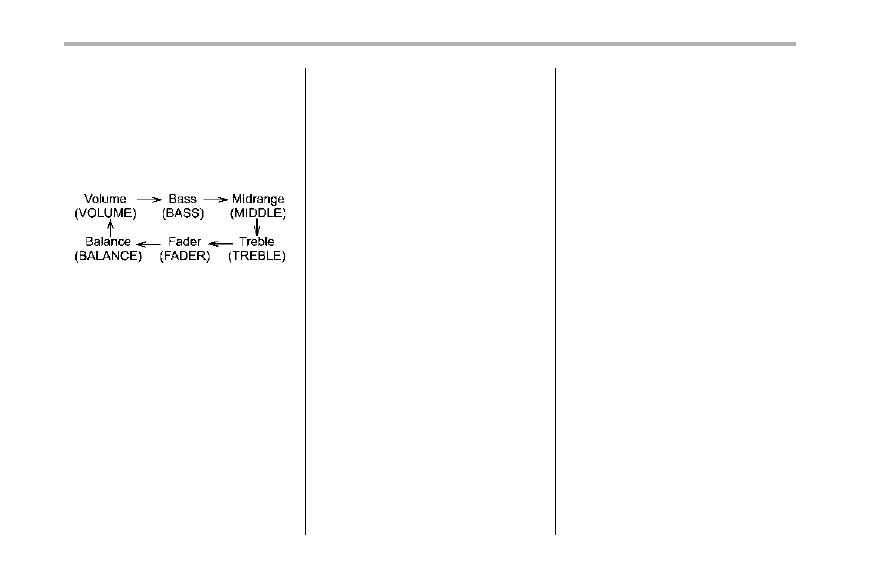
! Tone and balance control
The volume control dial (6) normally
functions as a volume control. This dial
becomes a control for Bass, Midrange,
Treble, Fader or Balance when you select
the appropriate tone and balance control
mode.
Choose desired volume level for each
mode by turning the volume control dial.
The control function returns to volume
control mode after approximately 5 sec-
onds.
Audio
5-15
– CONTINUED –
5-16
Audio
! To change tone and balance
control modes
Each brief press of the “TONE BAL”
button (9) changes control modes in the
following sequence starting from volume
control mode. (When the radio is first
turned on, the control mode is in the
volume control.)
The “TONE BAL” button is used for
selecting the following control modes.
Control mode (Range of le-
vels)
Turn counterclockwise
Turn clockwise
Bass control (−6 to +6)
For less bass sound
For more bass sound
Midrange control (−6 to +6)
For less midrange sound
For more midrange sound
Treble control (−6 to +6)
For less treble sound
For more treble sound
Fader control (R9 to F9)
To increase rear speaker vo-
lume and decrease front
speaker volume
To increase front speaker vo-
lume and decrease rear speaker
volume
Balance control (L9 to R9)
To increase left speaker volume
and decrease right speaker vo-
lume
To increase right speaker vo-
lume and decrease left speaker
volume
Volume control (0 to 40)
For less volume
For more volume
AUX volume control* (0 to
40)
For less volume
For more volume
*: Only when an AUX audio product is connected.
! FM/AM radio
! FM/AM selection button
Push the “FM AM” button (2) when the
radio is off to turn on the radio.
Push the “FM AM” button when the radio
is on to select FM1, FM2 or AM reception.
! Stereo indicator
The stereo indicator “ST” will illuminate
when an FM stereo broadcast is received.
! Manual tuning
Press the “ ” side of the “TUNE TRACK”
button (4) to increase the tuning frequency
and press the tuning button marked “ ” to
decrease it.
Each time the button is pressed, the
frequency interval can be changed be-
tween 10 kHz in the AM mode and 0.2
MHz in the FM mode.
If you hold down the “ ” side of the
button, the tuning frequency will increase
continuously, and if you hold down the “ ”
side of the button, the tuning frequency
will decrease continuously. Release the
button when your desired frequency is
reached.
Audio
5-17
– CONTINUED –
5-18
Audio
NOTE
While you are holding down either side
of the TUNE/TRACK button, the tuning
frequency will not stop changing even
if the frequency of a receivable station
is reached.
! Seek tuning (SEEK)
If you press the “ ” or “ ” side of the
“SEEK FLDR” button (7), the radio will
automatically search for a receivable
station and stop at the first one it finds.
This function may not be available, how-
ever, when radio signals are weak. In such
a situation, perform manual tuning to
select the desired station.
! Scan tuning (SCAN)
Press the “SCAN” button (8) to change the
radio to the SCAN mode. In this mode, the
radio scans through the radio band until a
station is found. The radio will stop at the
station for 5 seconds while displaying the
frequency, after which scanning will con-
tinue until the entire band has been
scanned from the low end to the high
end. Press the “SCAN” button again to
cancel the SCAN mode and to stop on any
displayed frequency.
Press the “ ” or “ ” side of the “SEEK
FLDR” button (7) again to cancel the scan
mode and to stop on any displayed
frequency.
When the “SCAN” button is pressed for
automatic tuning, stations are scanned in
the direction of low frequencies to high
frequencies only.
Automatic tuning may not function prop-
erly if the station reception is weakened by
distance from the station or proximity to
tall buildings and hills.
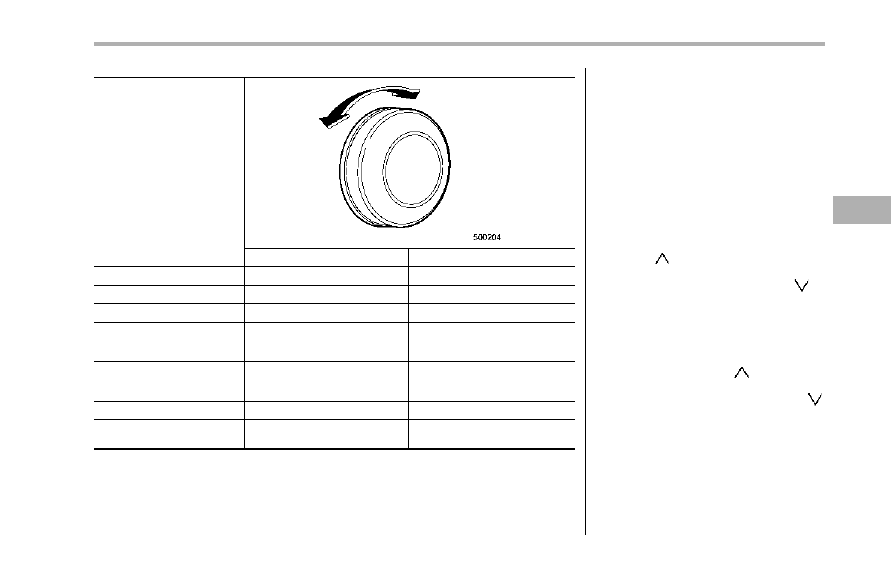
! Selecting preset stations
Presetting a station with a preset button
allows you to select that station in a single
operation. Up to six AM, FM1 and FM2
stations each may be preset.
! How to preset stations
1. Press the “FM AM” button (2) to select
FM1, FM2 or AM reception.
2. Press the “SCAN” button (8) or tune
the radio manually until the desired station
frequency is displayed.
3. Press and hold one of the preset
buttons to store the frequency. If the
button is pressed briefly, the preceding
selection will remain in memory.
NOTE
. If the connection between the radio
and battery is broken for any reason
such as vehicle maintenance or radio
removal, all stations stored in the
preset buttons are cleared. If this
occurs, it is necessary to reset the
preset buttons.
. If a cell phone is placed near the
radio, it may cause the radio to emit
noise when it receives calls. This noise
does not indicate a radio malfunction.
! Satellite radio mode (if equipped)
To receive satellite radio, it is necessary to
install the SUBARU genuine satellite
receiver (optional part) and to enter into
a contract with a satellite radio network
service such as “Sirius XM
TM
satellite
radio” (for U.S.A. only) or “Sirius satellite
radio” (for Canada only). For details,
please contact your SUBARU dealer.
! Sirius satellite radio (for Canada
only)
Refer to “Sirius satellite radio (for Canada
only)” F5-7.
! Sirius XM
TM
Satellite Radio Acti-
vation (for U.S.A. only)
Refer to “Sirius XM
TM
Satellite Radio
Activation (for U.S.A. only)” F5-8.
! Satellite radio reception
Refer to “Satellite radio reception” F5-8.
! Displaying satellite radio ID of
tuner
When you activate satellite radio, you
should have your satellite radio tuner ID
ready because each tuner is identified by
its unique satellite radio tuner ID.
The satellite radio ID will be needed when
you activate satellite radio and receive
satellite radio customer support.
The satellite radio ID can be found on the
audio display by tuning the channel to “0”.
Turn the “TUNE/TRACK” button (4) to
select the satellite radio channel.
! Band selection button
Push the “SAT” button (1) when the radio
is off to turn on the radio.
Push the “SAT” button when the radio is
on to select SAT1, SAT2 or SAT3 recep-
tion.
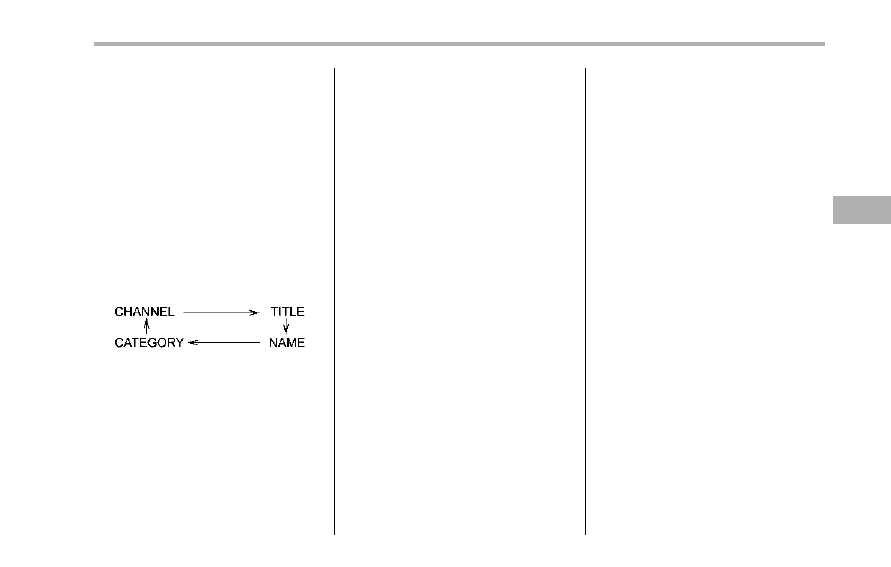
! Channel selection
Press “ ” of the “TUNE TRACK” button
(4) to select the next channel and press
“
” of the button to select the previous
channel.
Keep pressing “ ” of the button to
change to the next channel continuously
and keep pressing “ ” of the button to
change to the previous channel continu-
ously.
! Category selection
Press “ ” or “ ” of the “SEEK FLDR”
button (7) to display the current category.
Press “ ” again to select the next
category, and press “ ” again to select
the previous category.
! Channel scan
Press the “SCAN” button (8) to change the
radio to the SCAN mode. In this mode, the
radio scans through the channels until a
station is found. The radio will stop at the
station for 5 seconds while displaying the
channel number, after which scanning will
continue until the entire channel has been
scanned from the low end to the high end.
Also during the category selection, chan-
nel scan can be performed in that cate-
gory.
Press the “SCAN” button again to cancel
the SCAN mode and to stop on any
displayed channel.
! Selecting preset channels
Presetting a channel with a preset button
(10) allows you to select that channel in a
single operation. Up to six, SAT1, SAT2
and SAT3 channels each may be preset.
! How to preset channels
1. Press the “SAT” button (1) to select
SAT1, SAT2 and SAT3 reception.
2. Press the “SCAN” button (8) or the
“TUNE TRACK” button (4) to select the
channel.
3. Press and hold one of the preset
buttons (10) to store the channel. If the
button is pressed briefly, the preceding
selection will remain in memory.
NOTE
If the connection between the radio and
battery is broken for any reason such
as vehicle maintenance or radio re-
moval, all channels stored in the preset
buttons are cleared. If this occurs, it is
necessary to reset the preset buttons.
! Display selection
Press the “AUDIO” button (5) while receiv-
ing satellite radio to change the display as
follows.
! Rear seat entertainment
If your vehicle is equipped with a Rear
Seat Entertainment System, you can
enjoy audio outputs from the system
through the vehicle’s speakers by press-
ing the “RSE AUX” button (3). Press the
button again to return to the audio set
Audio
5-19
– CONTINUED –
5-20
Audio
sound.
NOTE
If your vehicle is equipped with a Rear
Seat Entertainment System, refer to the
Owner’s Manual supplement for the
Rear Seat Entertainment System for
further details.
& Built in CD changer operation
(1) CD button
(2) Track button
(3) AUDIO button
(4) Seek and Folder button
(5) Random button
(6) Repeat button
(7) Scan button
(8) Eject button
(9) Disc select button
(10) Load button
NOTE
. Be sure to insert a disc with the label
side up. If you insert the disc the label
side down, “CHECK DISC” will appear
on the display and the player will not
play anything.
. If a disc is inserted during a radio
broadcast, the disc will interrupt the
broadcast.
. The player is designed to be able to
play music CD-Rs and music CD-RWs,
but it may not be able to play certain
ones.
. CDs (i.e., 8 cm/3 inch CDs) are not
supported, and if inserted, they will be
immediately ejected.
. Insert discs slowly, one at a time.
Inserting discs one over another could
result in malfunction of the CD chan-
ger.
Audio
5-21
– CONTINUED –
5-22
Audio
! How to insert a CD(s)
! Inserting a CD
1. Briefly press the “LOAD” button (10). If
the magazine in the player has an idle
position where you can insert a disc, the
disc number indicator associated with the
idle position will blink.
If no indicator blinks, it means that there is
no idle position in the magazine.
2. After the disc number indicator has
started to flash, insert the disc when
“LOAD” flashes on the display. The disc
will then be automatically drawn in, and
the player will begin to play back the first
track of the disc.
. To insert more discs in succession,
repeat Steps 1 and 2. The magazine will
be loaded with discs in the ascending
order of position number.
If you do not insert any disc in 15 seconds
after you have pressed the “LOAD” button,
the player will begin to play back the first
track of the last disc you have inserted.
. The disc indicator steadily lights up if a
disc is already inserted in the correspond-
ing position of the magazine.
. While the player is in the loading mode,
if you press “FM AM” button, the player will
enter the standby mode. Press the “CD”
button (1) to start playback.
! Inserting a disc in a desired
position
1. Briefly press the “LOAD” button (10). If
the magazine in the player has an idle
position where you can insert a disc, the
disc number indicator associated with the
idle position will blink.
The positions in the magazine the indica-
tor of which steadily lights up are already
loaded with discs.
2. Press the disc select button (9) at the
position where you want to insert a disc.
3. Insert the disc when “LOAD” flashes
on the display. The disc will then be
automatically drawn in, and the player will
begin to play the first track on the disc.
. If you wish to insert another disc,
repeat the procedure beginning with step
1.
If you do not insert any disc in 15 seconds
after you have pressed the “LOAD” button,
the player will begin to play back the first
track of the last disc you have inserted.
. While the player is in the loading mode,
if you press “FM AM” button, the player will
enter standby mode. Press the “CD”
button (1) to start playback.
! Loading all the magazine (full
disc loading mode)
1. If you press and hold the “LOAD”
button (10), the player will produce a beep
sound and will enter the full disc loading
mode.
2. A “disc number” indicator will blink,
and “ALL LOAD” will be on display for a
period of 15 seconds. If a disc is success-
fully loaded during this period, the disc
number indicator will stop blinking and will
steadily light.
3. When the loading of a disc is com-
plete, the next disc number indicator will
blink. Then repeat Step 2.
4. When the magazine is filled with discs
by repeating Steps 2 and 3, the player will
start playback of the discs, beginning with
the one inserted first.
If you fail to insert any disc during each 15
seconds interval, the full disc loading
mode will be canceled, and the player will
start playback of the disc inserted first.
! How to play back a CD or make a
pause
! When there is no CD inserted:
Properly insert a CD. Refer to “How to
insert a CD(s)” F5-22.
When a CD is loaded, the player will start
playback of the CD, beginning with the
first track.
! When there are CDs loaded:
Press the preferred disc select button (9),
the disc number indicator of which is
constantly illuminated. The player will then
start playback of the selected CD, begin-
ning with the first track.
If a disc that the player cannot read has
been loaded, “CHECK DISC” will appear
on the display and the player will not play
anything.
! To select a song from its beginning
! Forward direction
Briefly press the “ ” side of the “TUNE
TRACK” button (2) to skip to the beginning
of the next track. Each time the button is
pressed, the indicated track number will
increase.
NOTE
In an MP3 folder, skipping past the last
track will take you back to the first track
in the folder.
! Backward direction
Briefly press the “ ” side of the “TUNE
TRACK” button (2) to skip to the beginning
of the current track. Each time the button
is pressed, the indicated track number will
decrease.
NOTE
In an MP3 folder, skipping past the first
track will take you to the last track in
the folder.
! Fast-forwarding and rewinding
! Fast-forwarding
Press and hold the “ ” side of the “TUNE
TRACK” button (2) to fast-forward the
track.
Release the button to stop fast-forwarding.
NOTE
If you fast-forward to the end of the last
track, fast-forwarding will stop and the
player will start playback beginning
with the first track.
! Rewinding
Press and hold the “ ” side of the “TUNE
TRACK” button (2) to rewind the track.
Release the button to stop rewinding.
NOTE
If you rewind to the beginning of the
first track, the rewinding will stop and
the player will start playback.
! Repeating
! To repeat the currently playing
track
To repeat a track, briefly press the “RPT”
button (6) while the track is playing. The
display will show “RPT”, and the track will
be repeated.
To cancel the track repeat-play mode,
briefly press the “RPT” button twice. The
“RPT” indication will turn off, and the
normal playback mode will be resumed.
NOTE
. Each time you briefly press the
button, the mode will change to the
next one in the following sequence.
If you accidentally press the button and
cancel the track repeat-play mode,
press it again to reselect the repeat-
play mode.
. The repeat-play mode will be can-
celled if you perform any of the follow-
ing steps.
– Press the “RDM” button.
– Press the “SCAN” button.
– Press the “ ” button.
– Press the disc select button.
– Select the radio mode.
Audio
5-23
– CONTINUED –
5-24
Audio
– Press the “RSE AUX” button.
– Press the “ ” or “ ” side of the
“SEEK FLDR” button (MP3 disc).
– Turn off the power of the audio
equipment.
– Turn the ignition switch to the
“LOCK” position.
! To repeat the currently playing
disc/folder
To repeat the currently playing disc/folder,
press the “RPT” button (6) twice while a
track is playing. The display will show “D-
RPT”, and the disc/folder will be played
repeatedly.
To cancel the disc/folder repeat-play
mode, press the “RPT” button once more.
The “D-RPT” indication will turn off, and
the normal playback mode will be re-
sumed.
NOTE
. Each time you briefly press the
button, the mode will change to the
next one in the following sequence.
If you accidentally press the button and
cancel the disc/folder repeat-play
mode, press it again to reselect the
disc/folder repeat-play mode.
. The disc/folder repeat-play mode
will be cancelled if you perform any of
the following steps.
– Press the “RDM” button.
– Press the “SCAN” button.
– Press the “ ” button.
– Press the disc select button.
– Select the radio mode.
– Press the “RSE AUX” button.
– Press the “ ” or “ ” side of the
“SEEK FLDR” button (MP3 disc).
– Turn off the power of the audio
equipment.
– Turn the ignition switch to the
“LOCK” position.
! Random playback
! Non-MP3 disc
Press the “RDM” button (5) briefly during
disc playback to play all of the tracks on
the disc in a random order. The display will
show “RDM”, and all of the tracks on the
disc will be played in a random order.
To cancel random mode, press the button
again. The “RDM” indication will turn off,
and the normal playback mode will be
resumed.
NOTE
Random playback will be cancelled if
you perform any of the following steps.
. Press the “RPT” button.
. Press the “SCAN” button.
. Press the “ ” button.
. Select the radio mode.
. Press the “RSE AUX” button.
. Press the “ ” or “ ” side of the
“SEEK FLDR” button.
. Turn off the power of the audio
equipment.
. Turn the ignition switch to the
“LOCK” position.
! MP3 disc
Press the “RDM” button (5) during disc
playback to play all of the tracks in the
folder currently being played in random
order. Press the “RDM” button again to
play all of the tracks on the disc in random
order. The display will show “RDM” during
the random mode.
To cancel the random mode, press the
“RDM” button during “in-disc” random
playback. The “RDM” indication will turn
off, and the normal playback mode will be
resumed.
NOTE
. Each time you briefly press the
button, the mode will change to the
next one in the following sequence.
Нет комментариевНе стесняйтесь поделиться с нами вашим ценным мнением.
Текст