Subaru Outback (2019 year). Instruction — part 15
(234,1)
北米Model "A2550BE-A" EDITED: 2018/ 5/ 9
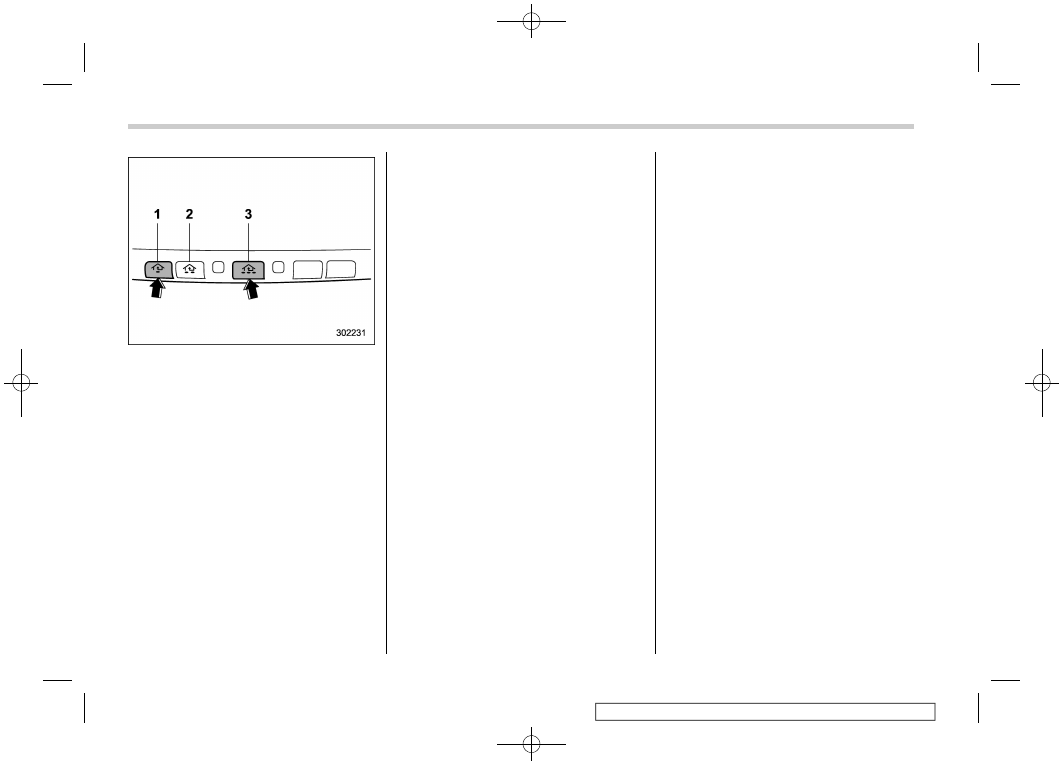
1)
HomeLink
®
button 1
2)
HomeLink
®
button 2
3)
HomeLink
®
button 3
2. Press and hold the two outer
HomeLink
®
buttons (button 1 and button
3) until the HomeLink
®
indicator light
begins to flash (after approximately 20
seconds). Then release both buttons.
3. Hold the end of the entrance gate’s/
garage door opener’s hand-held transmit-
ter between 1 and 3 inches (25 and 76
mm) away from the HomeLink
®
button you
wish to program.
4. Press and hold the desired HomeLink
®
button.
5. Press and release (“cycle”) the hand-
held transmitter button every 2 seconds
until step 6 is complete.
6. When the indicator light flashes slowly
and then rapidly after several seconds,
release both buttons.
7. Plug the motor of the entrance gate/
garage door opener to the outlet.
8. Test your entrance gate/garage door
opener by pressing the programmed
HomeLink
®
button.
!
Operating the HomeLink
®
Wire-
less Control System
Once programmed, the HomeLink
®
Wire-
less Control System can be used to
remote-control the devices to which its
buttons are programmed. To activate a
device, simply press the appropriate but-
ton. The indicator light illuminates, indicat-
ing that the signal is being transmitted.
!
Programming other devices
To program other devices such as door
locks, home lighting and security systems,
contact HomeLink
®
at www.homelink.com
or call 1-800-355-3515.
!
R e p r o g r a m m i n g a s i n g l e
HomeLink
®
button
1. Press and hold the HomeLink
®
button
you wish to reprogram. DO NOT release
the button until step 4 has been completed.
2. When the HomeLink
®
indicator light
begins to flash slowly (after approximately
20 seconds), position the hand-held trans-
mitter of the device between 1 to 3 inches
(25 to 76 mm) away from the HomeLink
®
button you wish to program.
3. Press and hold the hand-held trans-
mitter button. The HomeLink
®
indicator
light will flash, first slowly and then rapidly.
4. When the indicator light begins to flash
rapidly, release both buttons.
The programming for the previous device
is now erased and the new device can be
operated by pressing the HomeLink
®
button.
!
Erasing HomeLink
®
button mem-
ory
NOTE
.
Performing this procedure erases
the memory of all the preprogrammed
buttons simultaneously. The memory
of individual buttons cannot be erased.
.
It is recommended that upon the sale
of the vehicle, the memory of all
programmed HomeLink
®
buttons be
erased for security purposes.
Instruments and controls/Mirrors
3-76
(235,1)
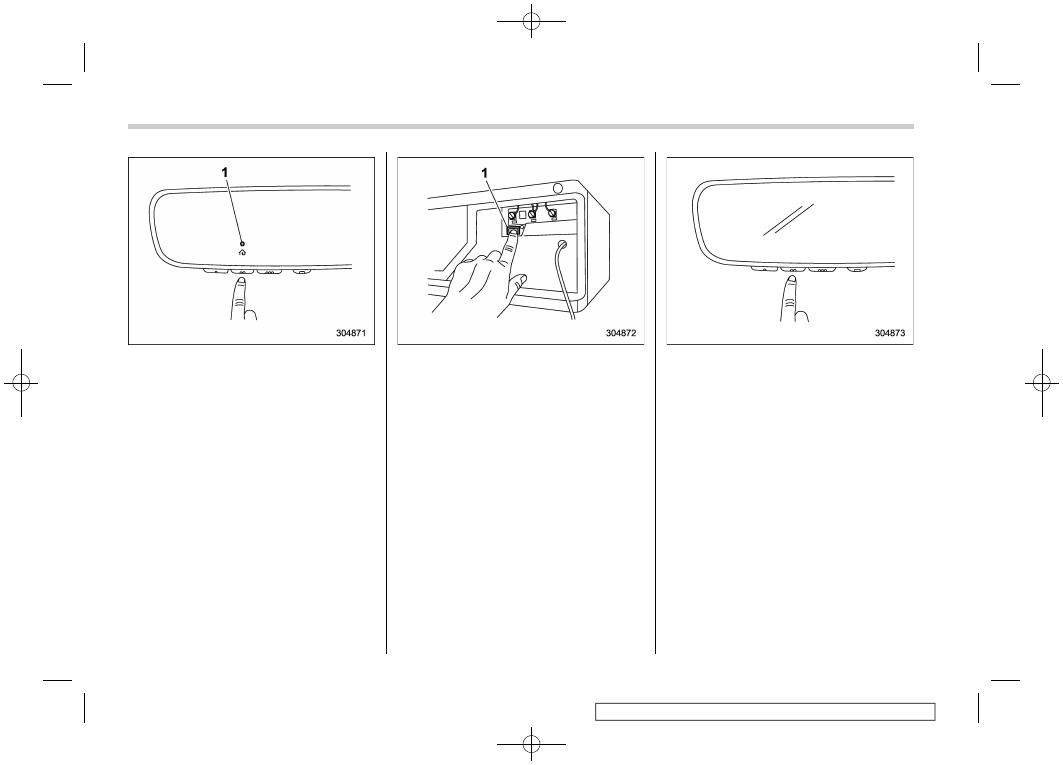
北米Model "A2550BE-A" EDITED: 2018/ 5/ 9
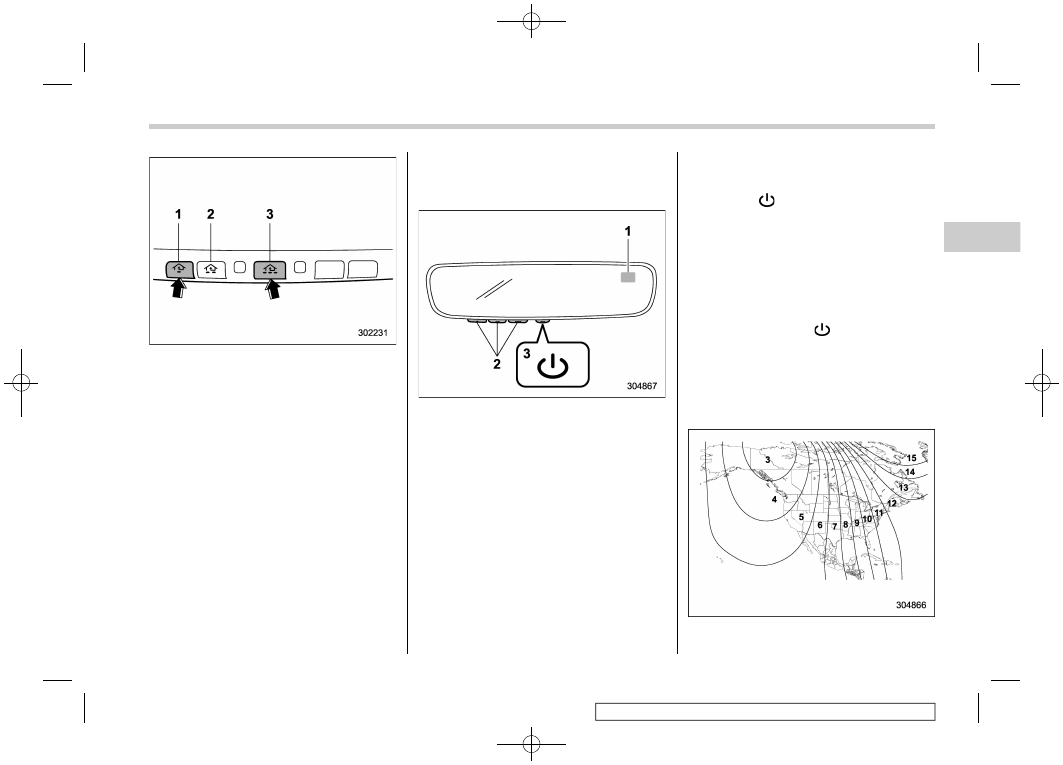
1)
HomeLink
®
button 1
2)
HomeLink
®
button 2
3)
HomeLink
®
button 3
1. Press and hold the two outer buttons
(button 1 and button 3) until the indicator
light begins to flash (after approximately
20 seconds).
2. Release both buttons.
!
In case a problem occurs
If you cannot activate a device using
the corresponding HomeLink
®
button
after programming, contact HomeLink
®
at www.homelink.com or call 1-800-355-
3515 for assistance.
&
Auto-dimming mirror/com-
pass with HomeLink
®
(models
with EyeSight system)
1)
Display
2)
HomeLink
®
buttons
3)
Switch
During nighttime driving, the auto-dimming
feature senses distracting glare from
vehicle headlights behind you and auto-
matically dims to eliminate the glare and
help preserve your vision.
!
To Operate the Auto-Dimming Fea-
ture
Press the “
” switch to turn the auto-
dimming feature on/off. The auto-dimming
feature is enabled when the switch’s green
LED indicator is on. The auto-dimming
feature will default to on with each ignition
cycle.
!
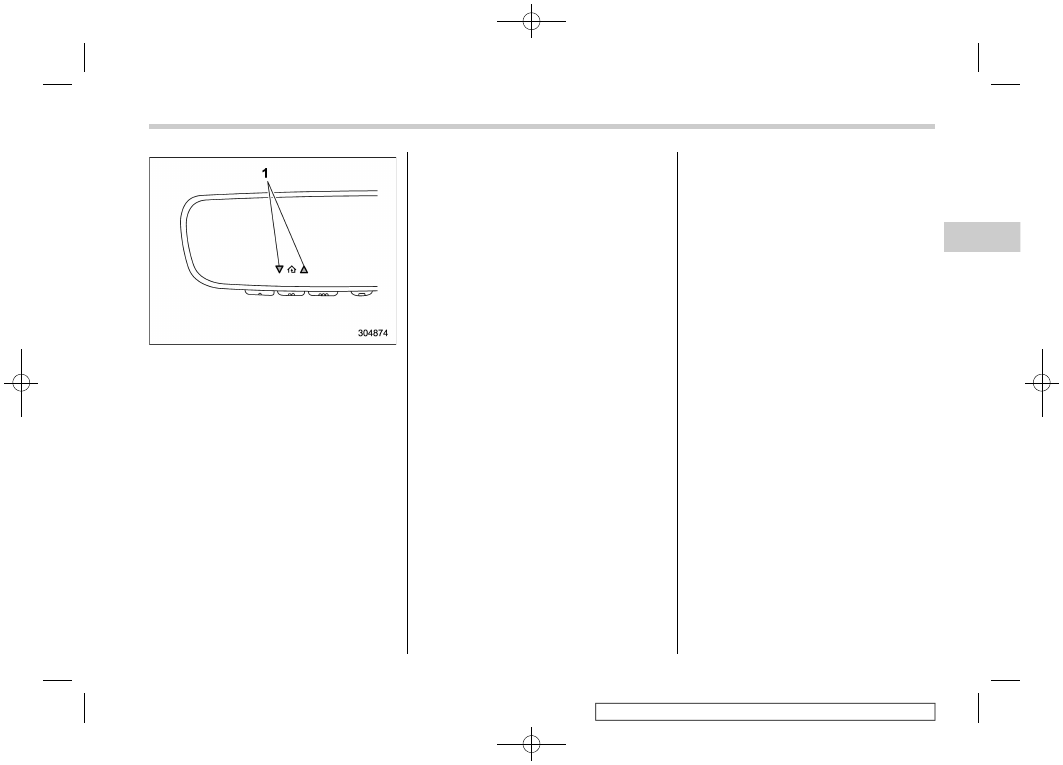
To Operate the Compass Feature
1. To turn the compass feature on/off,
press and hold the “
” switch for more
than 3 seconds or until the display turns
on/off. The compass feature will default to
on with each ignition cycle.
2. If the display reads “C”, slowly drive the
vehicle in circles until compass is cali-
brated.
Compass calibration zones
– CONTINUED –
Instruments and controls/Mirrors
3-77
3
(236,1)
北米Model "A2550BE-A" EDITED: 2018/ 5/ 9
3. To adjust for compass zone variance:
(1) Find your current location and
zone number on the map.
(2) Press and hold the “
” switch for
more than 6 seconds or until a zone
number appears in the display.
(3) Once the zone number appears in
the display, toggle the “
” switch
again until your current location zone
number appears. After you stop press-
ing the switch, your new zone number
will be saved. Within a few seconds,
the display will show a compass direc-
tion.
4. If the vehicle’s magnetics have chan-
ged or if the compass appears inaccurate,
recalibrate the compass. Press and hold
the “
” switch for more than 9 seconds or
until a “C” appears in the display. Once a
“C” appears in the display, slowly drive the
vehicle in circles until compass is cali-
brated.
!
HomeLink
®
Wireless Control Sys-
tem
The HomeLink
®
Wireless Control System
provides a convenient way to replace up to
three hand-held radiofrequency remotes
used to activate devices such as gate
operators, garage door openers, entry
door locks, security systems, even home
lighting. The below steps are generic
programming instructions; for Genie and
Sommer garage door openers please go
directly to the HomeLink
®
website. Addi-
tional information and programming vi-
deos can be found at
www.HomeLink.com and
www.youtube.com/HomeLinkGentex.
CAUTION
.
Before programming HomeLink
®
to a garage door opener or gate
operator, make sure that people
and objects are out of the way of
the device to prevent potential
harm or damage.
.
When programming a garage
door opener, it is advised to park
outside of the garage.
.
Do not use HomeLink
®
with any
garage door opener that lacks
safety stop and reverse features
as required by U.S. federal safety
standards (this includes any gar-
age door opener model manufac-
tured before April 1, 1982). A
garage door that cannot detect
an object signaling the door to
stop and reverse does not meet
current U.S. federal safety stan-
dards.
.
It is also recommended that a new
battery be placed in the hand-
held remote (garage door opener
remote) of the device for quicker
and more accurate training.
.
Turn the ignition switch to the
“ON” or “ACC” position before
programming and/or operating
HomeLink
®
.
.
Keep the hand-held remote (gar-
age door opener remote) of the
device you are programming for
use in other vehicles as well as
for future HomeLink
®
program-
ming. It is also suggested that
upon the sale of the vehicle, the
programmed HomeLink
®
buttons
be erased for security purposes.
Refer to “Erasing HomeLink
Instruments and controls/Mirrors
3-78
(237,1)
北米Model "A2550BE-A" EDITED: 2018/ 5/ 9
!
Programming a New HomeLink
®
button
1)
Indicator Light
2)
HomeLink
®
buttons
1. Press and release the HomeLink
®
button that you would like to program.
The HomeLink
®
indicator light will flash
orange slowly (if not, refer to “Erasing
HomeLink
1)
Garage door opener remote
2. Position the hand-held remote (garage
door opener remote) 1 to 3 inches (2 to 8
cm) away from the HomeLink
®
button that
you would like to program.
NOTE
Some hand-held remotes (garage door
opener remotes) may actually train
better at a distance of 6 to 12 inches
(15 to 30 cm). Keep this in mind if you
have difficulty with the programming
process.
3. While the HomeLink
®
indicator light is
flashing orange, press and hold the hand-
held remote button. Continue pressing the
hand-held remote button until the
HomeLink
®
indicator light changes from
orange to green. You may now release the
hand-held remote button.
NOTE
Some devices may require you to re-
place this “Programming a New
HomeLink
®
button” step 3 with proce-
dures noted in the “Gate Operator /
Canadian Programming” section. Refer
to “Gate Operator / Canadian Program-
ming” F3-81.
– CONTINUED –
Instruments and controls/Mirrors
3-79
3
(238,1)
北米Model "A2550BE-A" EDITED: 2018/ 5/ 9
1)
Indicator Light
4. Press the HomeLink
®
button that you
would like to program and observe the
indicator light.
.
If the indicator light remains constant
green, your device should operate
when the HomeLink
®
button is
pressed. At this point, if your device
operates, programming is complete.
.
If the indicator light rapidly flashes
green, firmly press, hold for two sec-
onds and release the HomeLink
®
but-
ton up to three times to complete the
programming process. At this point if
your device operates, programming is
complete. If the device does not
operate, continue with the next step
of the programming instructions.
1)
“Learn” button
5. At the garage door opener motor,
(security gate motor, etc...) locate the
“Learn”, “Smart”, or “Program” button. This
can usually be found where the hanging
antenna wire is attached to the motor-head
unit (see the device’s instruction to identify
this button). The name and color of the
button may vary by manufacturer.
NOTE
A ladder and/or second person may
simplify the following steps.
6. Firmly press and release the “Learn”,
“Smart”, or “Program” button. You now
have 30 seconds in which to complete step
7.
7. Return to the vehicle and firmly press,
hold for 2 seconds and release the
HomeLink
®
button up to three times. At
this point programming is complete and
your device should operate when the
HomeLink
®
button is pressed and re-
leased.
Instruments and controls/Mirrors
3-80
(239,1)
北米Model "A2550BE-A" EDITED: 2018/ 5/ 9
1)
Status Indicators
8. If status indicator arrows appear next
to the indicator light, please refer to
“Garage Door Two-Way Communication”
F3-82.
In the event that there are still program-
ming difficulties or questions, additional
HomeLink
®
information and programming
videos can be found at
www.HomeLink.com and
www.youtube.com/HomeLinkGentex. For
Genie and Sommer garage door openers
please go directly to the HomeLink
®
website.
!
Gate Operator / Canadian Pro-
gramming
Canadian radio-frequency laws require
transmitter remote signals to “time-out”
(or quit) after several seconds of transmis-
sion, which may not be long enough for
HomeLink
®
to pick up the signal during
programming. Similar to this Canadian
law, some U.S. gate operators are de-
signed to “time-out” in the same manner.
The indicator LED on the hand-held
remote will go off when the device times
out, indicating that it has finished transmit-
ting.
If you live in Canada or you are having
difficulties programming a gate operator or
garage door opener by using the program-
ming procedures, replace “Programming a
New HomeLink
®
button” step 3 with the
following:
While the HomeLink
®
indicator light is
flashing orange, press and release (“cy-
cle”) your device’s hand-held remote every
two seconds until the HomeLink
®
indicator
light changes from orange to green. You
may now release the hand-held remote
button.
NOTE
If programming a garage door opener
or gate operator, it is advised to unplug
the device during the “cycling” process
to prevent possible overheating.
Proceed with “Programming a New
HomeLink
®
button” step 4 to complete.
!
Using HomeLink
®
To operate, simply press and release the
programmed HomeLink
®
button. Activa-
tion will now occur for the trained device
(i.e. garage door opener, gate operator,
security system, entry door lock, home/
office lighting, etc.). For convenience, the
hand-held remote of the device may also
be used at any time.
!
Erasing HomeLink
®
buttons
To erase programming from the three
buttons (individual buttons cannot be
erased but can be “reprogrammed” as
outlined below), follow the step noted:
Press and hold the two outer HomeLink
®
buttons for at least 10 seconds. The LED
indicator will change from continuously lit
to rapidly flashing. Release both buttons.
Do not hold for longer than 20 seconds.
HomeLink
®
is now ready to be pro-
grammed at any time beginning with
“Programming a New HomeLink
®
button”
- step 1.
– CONTINUED –
Instruments and controls/Mirrors
3-81
3
(240,1)
北米Model "A2550BE-A" EDITED: 2018/ 5/ 9
!
R e p r o g r a m m i n g a S i n g l e
HomeLink
®
button
To program a previously trained button,
follow these steps:
1. Press and hold the desired HomeLink
®
button. DO NOT release the button.
2. The indicator light will begin to slowly
flash orange after 20 seconds. The
HomeLink
®
button can be released at this
point. Proceed with “Programming a New
HomeLink
®
button” - step 3.
3. If you do not complete the program-
ming of a new device to the button, it will
revert to the previously stored program-
ming.
!
Garage Door Two-Way Commu-
nication
HomeLink
®
has the capability of commu-
nicating with your garage door opener.
HomeLink
®
can receive and display “clos-
ing” or “opening” status messages from
compatible garage door opener systems.
At any time, HomeLink
®
can also recall and
display the last recorded status commu-
nicated by the garage door opener to
indicate your garage door being “closed”
or “opened”.
HomeLink
®
has the capability of receiving
this communication from the garage door
opener at a range up to 820 feet (250 m).
Range may be reduced by obstacles such
as houses or trees. You may have to slow
your vehicle speed to successfully receive
the garage door opener communication.
!
Programming Two-Way Commu-
nication
1)
Status Indicators
Within 5 seconds after programming a new
HomeLink
®
button, both of HomeLink’s
garage door status indicators will flash
rapidly green indicating that the garage
door two-way communication has been
enabled. If your garage door status in-
dicators flashed, two-way communication
programming is complete.
If the garage door status indicators do not
flash, additional HomeLink
®
information
and programming videos can be found
online at www.HomeLink.com and
www.youtube.com/HomeLinkGentex.
!
Using Two-Way Communication
1)
Status Indicator
Recall and display (at any time) the last
recorded garage door status message
communicated to HomeLink
®
by simulta-
neously pressing HomeLink
®
buttons 1
and 2 for 2 seconds. HomeLink
®
will
display the last recorded status for 3
seconds.
Instruments and controls/Mirrors
3-82
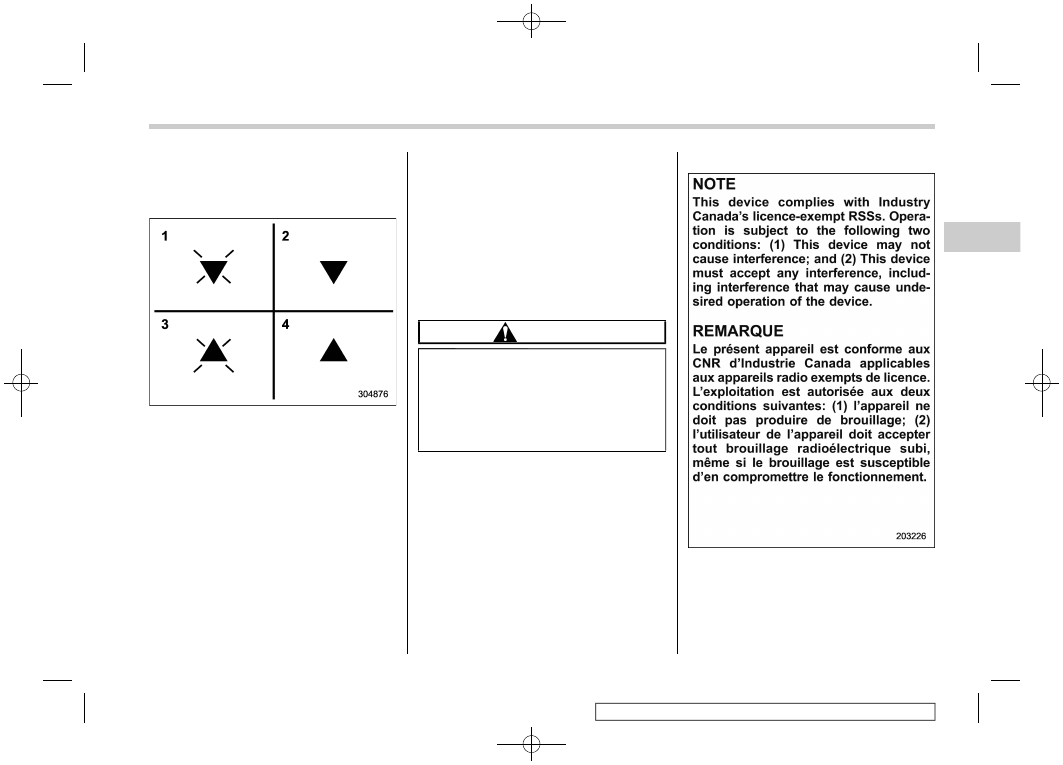
(241,1)
北米Model "A2550BE-A" EDITED: 2018/ 5/ 9
If two-way communication programming is
successful, HomeLink
®
will display the
status of your garage door opener with
arrow indicators (see below).
1)
Garage Door Opener CLOSING (Blinking
Orange)
2)
Garage Door Opener CLOSED (Solid
Green)
3)
Garage Door Opener OPENING (Blink-
ing Orange)
4)
Garage Door Opener OPENED (Solid
Green)
!
Certification
In the event that there are still program-
ming difficulties or questions, additional
HomeLink
®
information and programming
videos can be found at
www.HomeLink.com,
www.youtube.com/HomeLinkGentex, or
by calling the toll-free HomeLink-hotline
at 1-800-355-3515.
.
U.S.-spec. models
CAUTION
FCC WARNING
Changes or modifications not ex-
pressly approved by the party re-
sponsible for compliance could void
the user’s authority to operate the
equipment.
This device complies with part 15 of the
FCC Rules. Operation is subject to the
following two conditions: (1) This de-
vice may not cause harmful interfer-
ence, and (2) this device must accept
any interference received, including
interference that may cause undesired
operation.
.
Canada-spec. models
HomeLink
®
and the HomeLink
®
house are
registered trademarks of Gentex Corpora-
tion.
– CONTINUED –
Instruments and controls/Mirrors
3-83
3
(242,1)
北米Model "A2550BE-A" EDITED: 2018/ 5/ 9
WARNING
.
W h e n
p r o g r a m m i n g
t h e
HomeLink
®
Wireless Control Sys-
tem, you may be operating a
garage door opener or other
device. Make sure that people
and objects are out of the way of
the garage door or other device
to prevent potential harm or da-
mage.
.
Do not use the HomeLink
®
Wire-
less Control System with a gar-
age door opener that lacks the
safety stop and reverse feature
as required by applicable safety
standards. A garage door opener
which cannot detect an object,
signaling the door to stop and
reverse, does not meet these
safety standards. Using a garage
door opener without these fea-
tures increases risk of serious
injury or death. For more infor-
mation, consult the HomeLink
®
website at www.homelink.com or
call 1-800-355-3515.
&
Outside mirrors
!
Convex mirror (passenger side)
WARNING
Objects look smaller in a convex
mirror and farther away than when
viewed in a flat mirror. Do not use the
convex mirror to judge the distance
of vehicles behind you when chan-
ging lanes. Use the inside mirror (or
glance backwards) to determine the
actual size and distance of objects
that you view in convex mirror.
CAUTION
Make sure to adjust the mirrors
before driving.
!
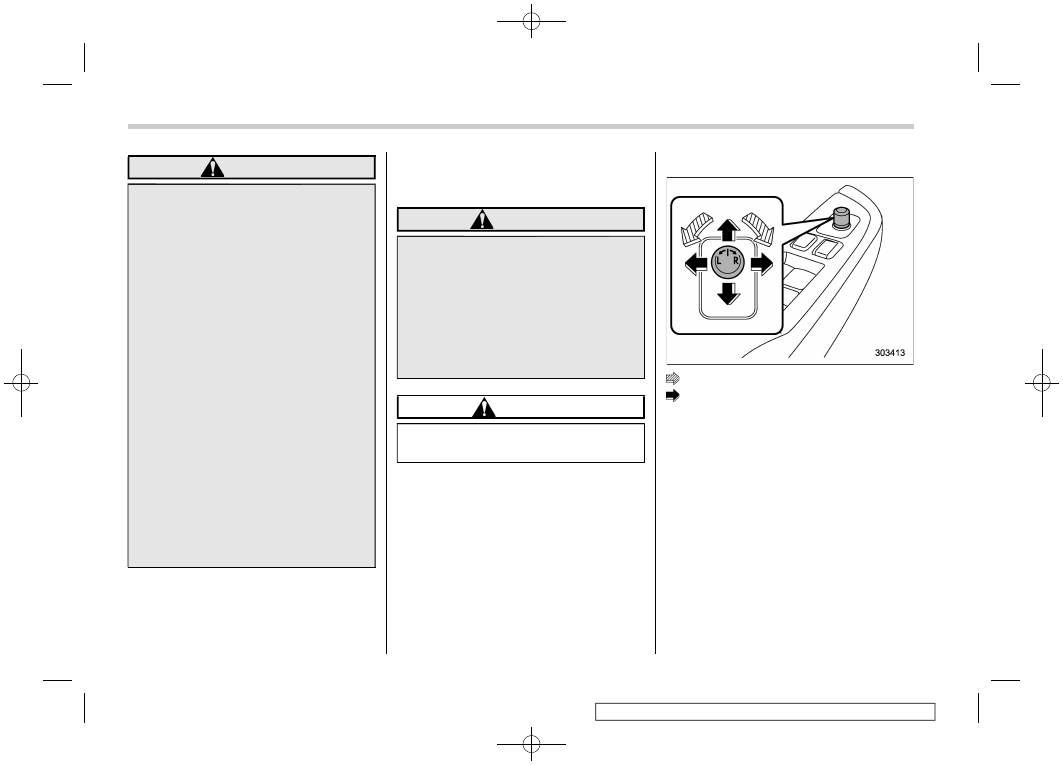
Remote control mirror switch
: Select side to adjust
: Direction control
The remote control mirrors operate only
when the ignition switch is in the “ON” or
“ACC” position.
1. Turn the control switch to the side that
you want to adjust. “L” is for the left mirror,
“R” is for the right mirror.
2. Move the control switch in the direction
you want to move the mirror.
3. Return the control switch to the neutral
position to prevent unintentional opera-
tion.
The mirrors can also be adjusted manu-
ally.
Instruments and controls/Mirrors
3-84
(243,1)
北米Model "A2550BE-A" EDITED: 2018/ 5/ 9
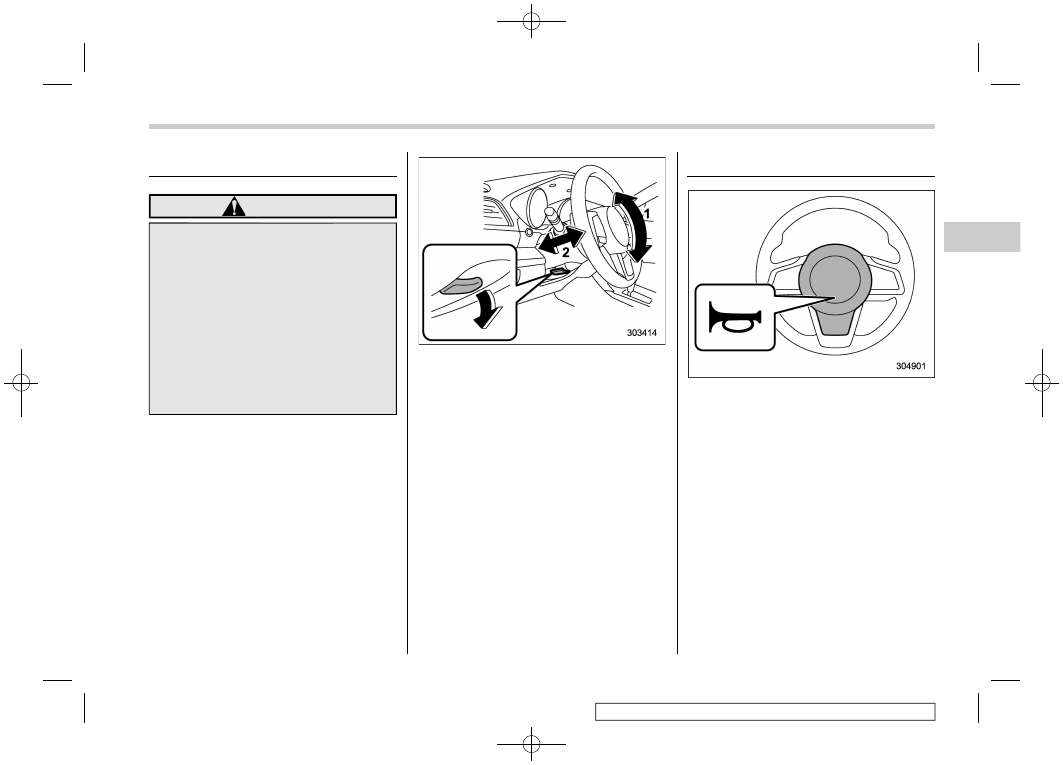
Tilt/telescopic steering wheel
WARNING
.
Do not adjust the steering wheel
tilt/telescopic position while driv-
ing. This may cause loss of
vehicle control and result in per-
sonal injury.
.
If the lever cannot be raised to the
fixed position, adjust the steering
wheel again. It is dangerous to
drive without locking the steering
wheel. This may cause loss of
vehicle control and result in per-
sonal injury.
1)
Tilt adjustment
2)
Telescopic adjustment
1. Adjust the seat position. Refer to “Front
seats” F1-2.
2. Pull the tilt/telescopic lock lever down.
3. Move the steering wheel to the desired
level.
4. Pull the lever up to lock the steering
wheel in place.
5. Make sure that the steering wheel is
securely locked by moving it up and down,
and forward and backward.
Horn
To sound the horn, push the horn pad.
Instruments and controls/Tilt/telescopic steering wheel
3-85
3
(244,1)
北米Model "A2550BE-A" EDITED: 2018/ 5/ 9
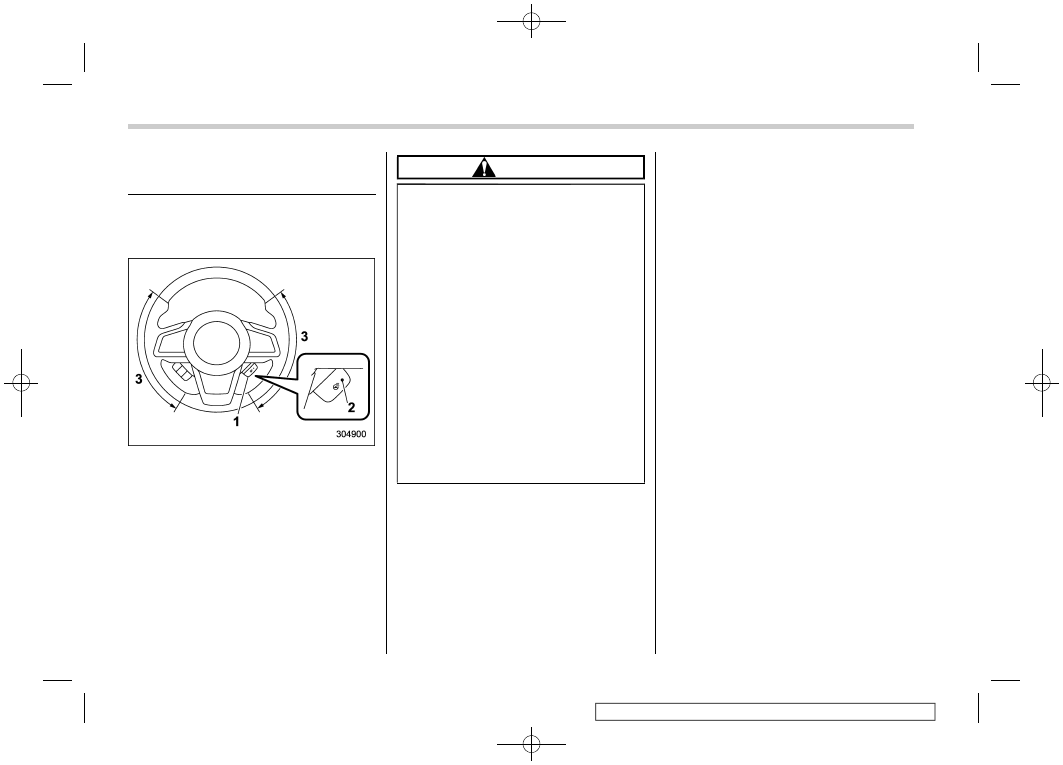
Heated Steering Wheel sys-
tem (if equipped)
The Heated Steering Wheel system
warms the steering wheel at a constant
temperature.
1)
Heated Steering Wheel switch
2)
Indicator light
3)
Heated area
To turn on the Heated Steering Wheel
system, pull the Heated Steering Wheel
switch when the ignition switch is in the
“ON” position. Then the steering wheel will
be warmed and the indicator light on the
switch will illuminate. To turn off the Heated
Steering Wheel system, pull the switch
again. Then the indicator light will turn off.
CAUTION
.
Use the Heated Steering Wheel
system with the engine running.
Otherwise, the battery voltage
may drop below the permissible
level and it may not be possible to
start the engine.
.
People with delicate skin may
suffer slight burns even at low
temperatures if they use the
Heated Steering Wheel for a long
period of time. When using the
Heated Steering Wheel, always
be sure to warn the persons
concerned.
.
Do not cover the Heated Steering
Wheel with an object such as a
steering wheel cover. Doing so
may cause the Heated Steering
Wheel to overheat.
NOTE
.
If the surface temperature of the
steering wheel is approximately above
1048F (408C) when the Heated Steering
Wheel system is turned on, the system
will not heat the steering wheel. Then,
the indicator light will continue to
illuminate.
.
The Heated Steering Wheel system
will automatically turn off approxi-
mately 30 minutes after the system
has been turned on.
Instruments and controls/Heated Steering Wheel system
3-86
(247,1)
北米Model "A2550BE-A" EDITED: 2018/ 5/ 9
Ventilator control . . . . . . . . . . . . . 4-2
Center ventilators . . . . . . . . . . . . .. 4-2
Side ventilators. . . . . . . . . . . . . .. 4-2
Rear ventilators (if equipped) . . . . . . . . . 4-2
Climate control panel . . . . . . . . . . . . 4-3
Type A . . . . . . . . . . . . . . . . ... 4-3
Type B . . . . . . . . . . . . . . . . ... 4-4
Automatic climate control system (type B) . . .. 4-5
Sensors . . . . . . . . . . . . . . . . . 4-5
Manual climate control . . . . . . . . . . ... 4-6
Airflow mode selection. . . . . . . . . . ... 4-6
Temperature control . . . . . . . . . . . ... 4-7
Fan speed control . . . . . . . . . . . . .. 4-8
Air conditioner control . . . . . . . . . . ... 4-8
Air inlet selection. . . . . . . . . . . . ... 4-8
Defrosting. . . . . . . . . . . . . . . . 4-9
Operating tips for heater and air conditioner . .. 4-9
Cleaning ventilator grille . . . . . . . . . . .4-9
Efficient cooling after parking in direct sunlight . ..4-9
Lubrication oil circulation in the refrigerant
circuit. . . . . . . . . . . . . . . . ..4-9
Checking air conditioning system before summer
season . . . . . . . . . . . . . . . . 4-9
Cooling and dehumidifying in high humidity and
low temperature weather condition . . . . . 4-10
Air conditioner compressor shut-off when engine
is heavily loaded. . . . . . . . . . . . 4-10
Refrigerant for your climate control system . . .. 4-10
Air filtration system. . . . . . . . . . . .. 4-10
Replacing the cabin air filter . . . . . . . . . 4-11
Climate control
4
(248,1)
北米Model "A2550BE-A" EDITED: 2018/ 5/ 9
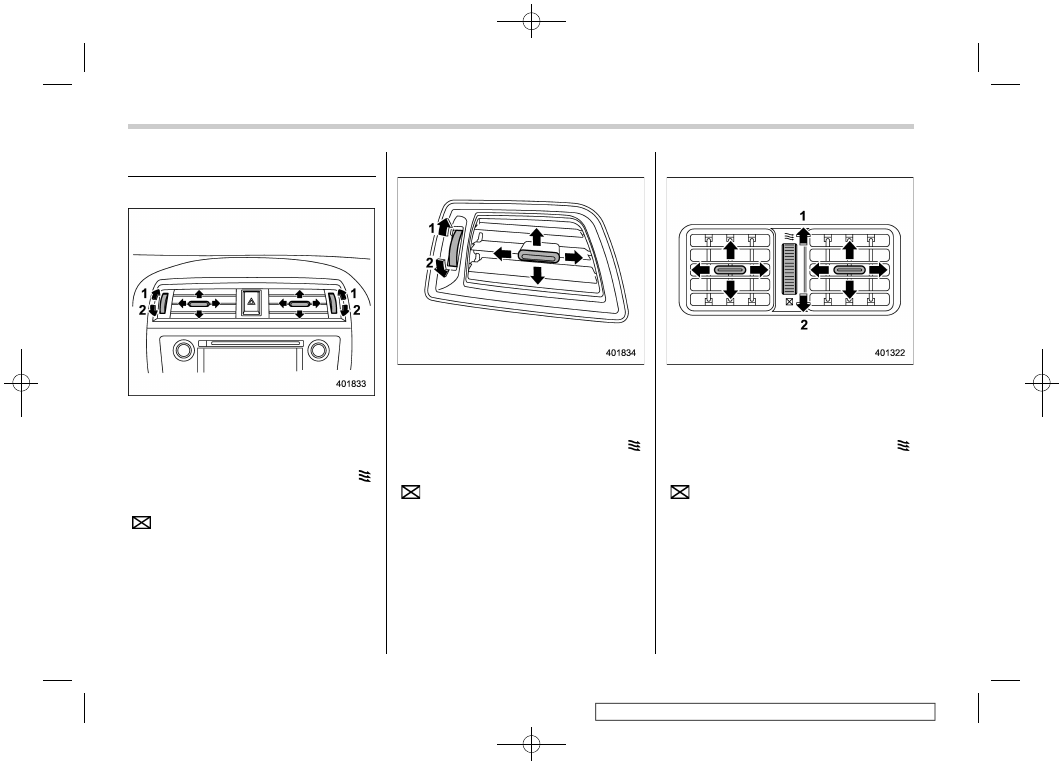
Ventilator control
&
Center ventilators
1)
Open
2)
Close
Move the tab to adjust the flow direction.
To open the ventilator, turn the center grille
open/close wheel upward to the “ ”
position.
To close it, turn the wheel downward to the
“
” position.
&
Side ventilators
1)
Open
2)
Close
Move the tab to adjust the flow direction.
To open the ventilator, turn the side grille
open/close wheel upward to the “ ”
position.
To close it, turn the wheel downward to the
“
” position.
&
Rear ventilators (if equipped)
1)
Open
2)
Close
Move the tab to adjust the flow direction.
To open the ventilator, turn the rear grille
open/close wheel upward to the “ ”
position.
To close it, turn the wheel downward to the
“
” position.
Climate control/Ventilator control
4-2
(249,1)
北米Model "A2550BE-A" EDITED: 2018/ 5/ 9
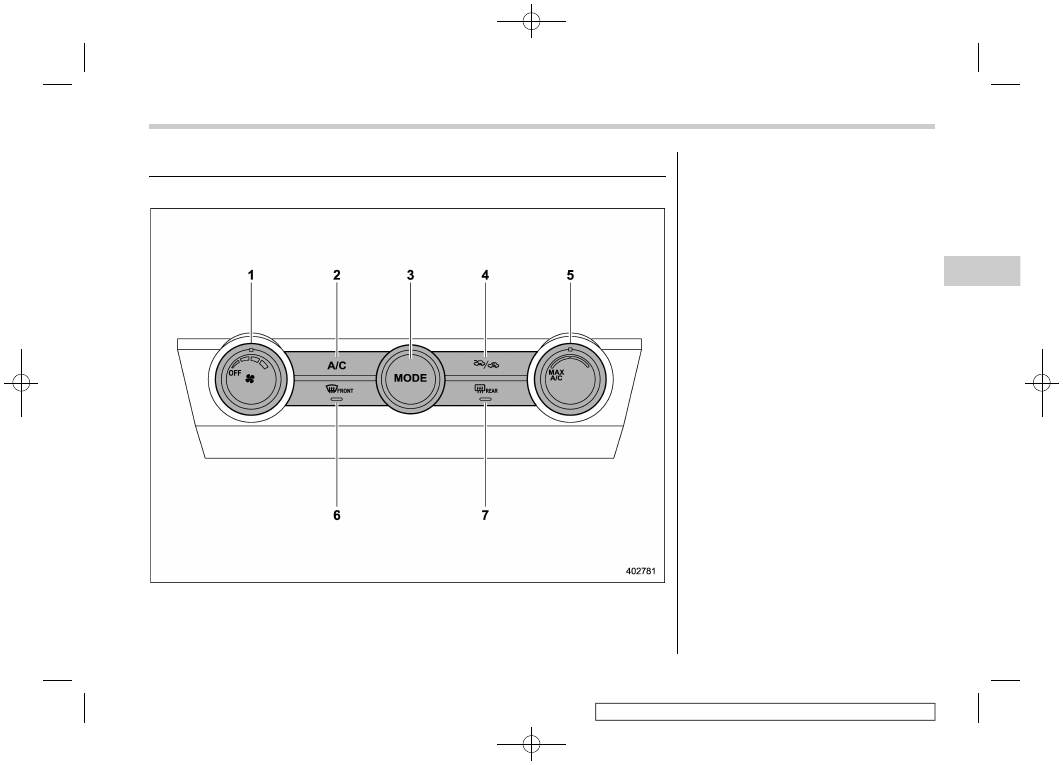
Climate control panel
&
Type A
1)
Fan speed control dial (Refer to “Fan
speed control” F4-8.)
2)
“A/C” button (Refer to “Air conditioner
control” F4-8.)
3)
Airflow mode selection button (Refer to
“Airflow mode selection” F4-6.)
4)
Air inlet selection button (Refer to “Air
inlet selection” F4-8.)
5)
Temperature control dial (Refer to “Tem-
perature control” F4-7 and “MAX A/C
mode” F4-7.)
6)
Defroster button (Refer to “Airflow mode
selection” F4-6 and “Defrosting” F4-9.)
7)
Rear window defogger button (Refer to
“Defogger and deicer” F3-64.)
– CONTINUED –
Climate control/Climate control panel
4-3
4
(250,1)
北米Model "A2550BE-A" EDITED: 2018/ 5/ 9
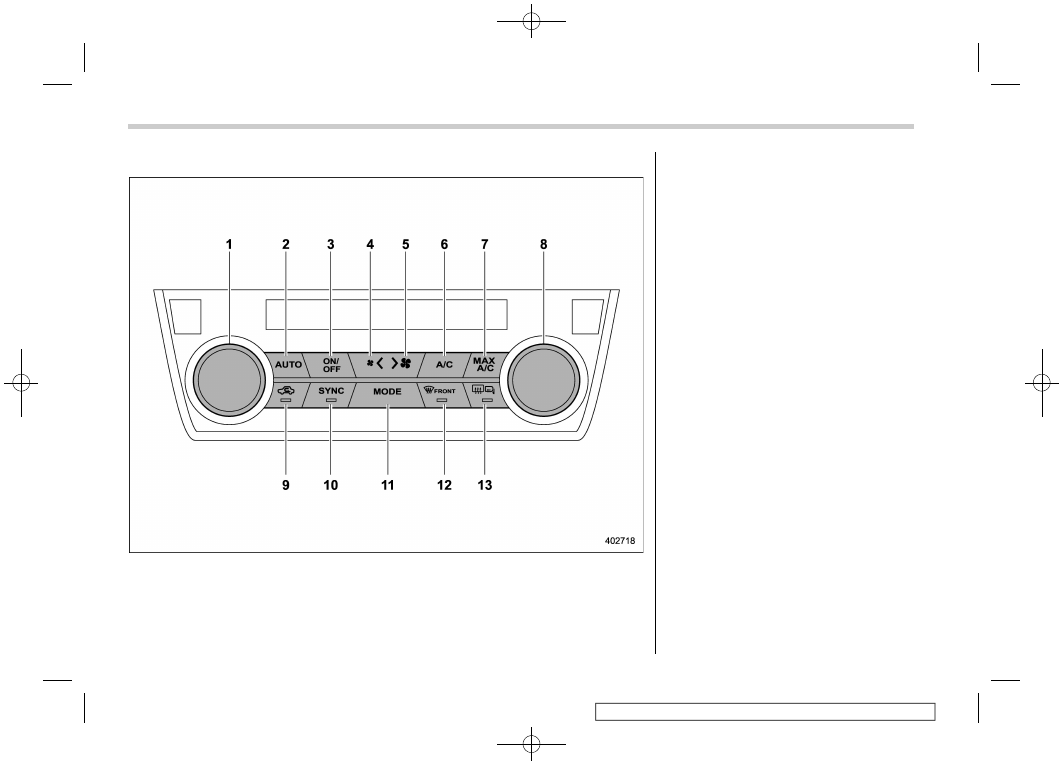
&
Type B
1)
Temperature control dial (Refer to “Tem-
perature control” F4-7.)
2)
“AUTO” button (Refer to “Automatic
climate control system (type B)” F4-5.)
3)
“ON/OFF” button (Refer to “Automatic
climate control system (type B)” F4-5.)
4)
Fan speed control button (for decreasing
the fan speed) (Refer to “Fan speed
control” F4-8.)
5)
Fan speed control button (for increasing
the fan speed) (Refer to “Fan speed
control” F4-8.)
6)
“A/C” button (Refer to “Air conditioner
control” F4-8.)
7)
“MAX A/C” button (Refer to “MAX A/C
mode” F4-7.)
8)
Temperature control dial (Refer to “Tem-
perature control” F4-7.)
9)
Air inlet selection button (Refer to “Air
inlet selection” F4-8.)
10) “SYNC” button (Refer to “SYNC mode
11) Airflow mode selection button (Refer to
“Airflow mode selection” F4-6.)
12) Defroster button (Refer to “Airflow mode
selection” F4-6 and “Defrosting” F4-9.)
13) Rear window and outside mirror defogger
button (Refer to “Defogger and deicer”
F3-64.)
Climate control/Climate control panel
4-4
(251,1)
北米Model "A2550BE-A" EDITED: 2018/ 5/ 9
Automatic climate control
system (type B)
NOTE
.
Operate the automatic climate con-
trol system when the engine is running.
.
The blower fan rotates at a low speed
when the engine coolant temperature is
low.
.
For efficient defogging or dehumidi-
fying in cold weather, press the “A/C”
button.
When the automatic climate control mode
is selected, the following items are auto-
matically controlled.
.
Outlet air temperature
.
Fan speed
.
Airflow distribution
.
Air inlet control
.
Air conditioner compressor operation
To activate this mode, perform the follow-
ing procedure.
1. Set the preferred temperature using
the temperature control dials.
2. Press the “AUTO” button. The FULL
AUTO mode is selected and the “FULL
AUTO” indicator light on the display
illuminates.
NOTE
.
If you operate any of the buttons on
the control panel other than the “ON/
OFF” button, rear window and outside
mirror defogger button or temperature
control dials during FULL AUTO mode
operation, the “FULL” indicator light on
the control panel will turn off and the
“AUTO” indicator light will remain
illuminated. You can then manually
control the system as desired. To
change the system back to the FULL
AUTO mode, press the “AUTO” button.
.
During FULL AUTO mode operation,
a small amount of air may flow from the
foot outlets when ventilation mode is
displayed.
To turn off the climate control system,
press the “ON/OFF” button. The air inlet
selection is then automatically switched to
the outside air mode.
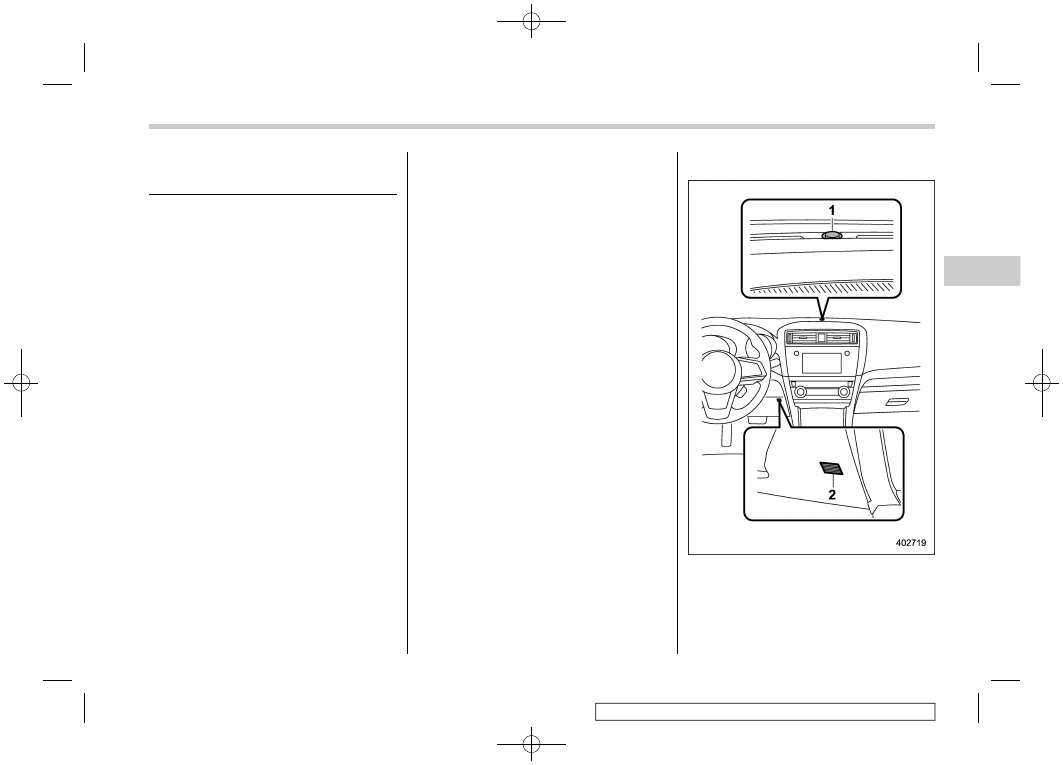
&
Sensors
1)
Solar sensor
2)
Interior air temperature sensor
The automatic climate control system
employs several sensors. These sensors
are delicate. If they are treated incorrectly
– CONTINUED –
Climate control/Automatic climate control system (type B)
4-5
4
Нет комментариевНе стесняйтесь поделиться с нами вашим ценным мнением.
Текст