Subaru Baja (2006 year). Manual — part 23
11-3
Maintenance and service
– CONTINUED –
Maintenance and service
Maintenance schedule
Maintenance
Schedule
The scheduled maintenance items required to be ser-
viced at regular intervals are shown in the “Warranty
and Maintenance Booklet”.
For details of your maintenance schedule, read the
separate “Warranty and Maintenance Booklet”.
Maintenance precautions
Maintenance
Precautions
When maintenance and service are required, it is rec-
ommended that all work be done by an authorized
SUBARU dealer.
If you perform maintenance and service by yourself,
you should familiarize yourself with the information
provided in this section on general maintenance and
service for your SUBARU.
Incorrect or incomplete service could cause improper
or unsafe vehicle operation. Any problems caused by
improper maintenance and service performed by you
are not eligible for warranty coverage.
y Testing of an All-Wheel Drive vehicle must
NEVER be performed on a single two-wheel dy-
namometer or similar apparatus. Attempting to
do so will result in transmission damage and in
uncontrolled vehicle movement and may cause
an accident or injuries to persons nearby.
y Always select a safe area when performing
maintenance on your vehicle.
y Always be very careful to avoid injury when
working on the vehicle. Remember that some of
11-4
Maintenance and service
the materials in the vehicle may be hazardous if
improperly used or handled, for example, bat-
tery acid.
y Your vehicle should only be serviced by per-
sons fully competent to do so. Serious person-
al injury may result to persons not experienced
in servicing vehicles.
y Always use the proper tools and make certain
that they are well maintained.
y Never get under the vehicle supported only
by a jack. Always use a safety stands to sup-
port the vehicle.
y Never keep the engine running in a poorly
ventilated area, such as a garage or other
closed areas.
y Do not smoke or allow open flames around
the fuel or battery. This will cause a fire.
y Because the fuel system is under pressure,
replacement of the fuel filter should be per-
formed only by your SUBARU dealer.
y Wear adequate eye protection to guard
against getting oil or fluids in your eyes. If
something does get in your eyes, thoroughly
wash them out with clean water.
y Do not tamper with the wiring of the SRS air-
bag system or seatbelt pretensioner system, or
attempt to take its connectors apart, as that
may activate the system or it can render it inop-
erative. The wiring and connectors of these
systems are yellow for easy identification. NEV-
ER use a circuit tester for these wiring.
If your SRS airbag or seatbelt pretensioner
needs service, consult your nearest SUBARU
dealer.
Before checking or servicing in the en-
gine compartment
y Always stop the engine and set the parking
brake firmly to prevent the vehicle from mov-
ing.
y Always let the engine cool down. Engine
parts become very hot when the engine is run-
ning and remain hot for some time after the en-
gine is stopped.
y Do not spill engine oil, engine coolant, brake
fluid or any other fluid on hot engine compo-
nents. This may cause a fire.
y Always remove the key from the ignition
switch. When the ignition switch is in the “ON”
position, the cooling fan may operate suddenly
11-5
Maintenance and service
– CONTINUED –
even when the engine is stopped.
When you do checking or servicing in
the engine compartment while the en-
gine is running
A running engine can be dangerous. Keep your
fingers, hands, clothing, hair and tools away
from the cooling fan, belts and any other mov-
ing engine parts. Removing rings, watches and
ties is advisable.
Engine hood
Engine
Hood
0
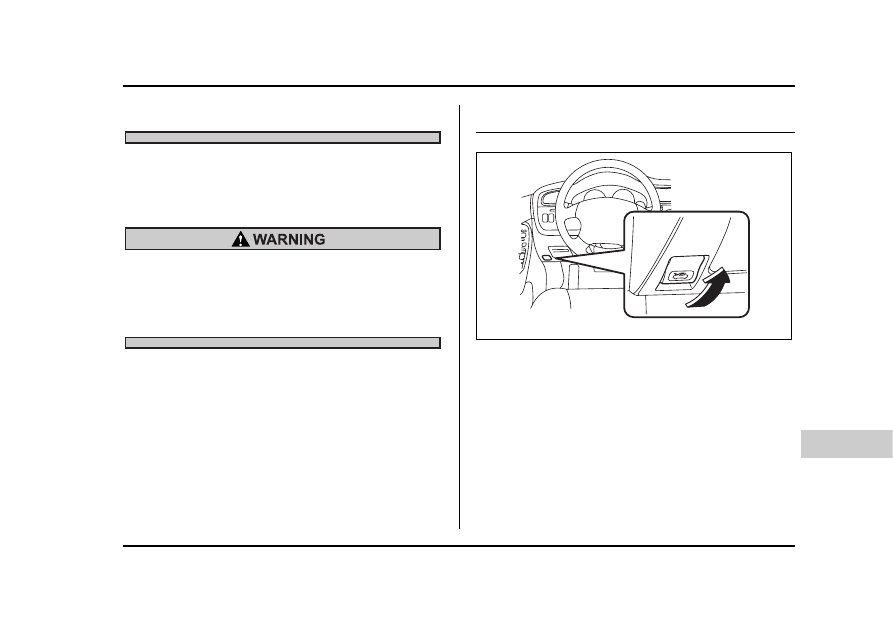
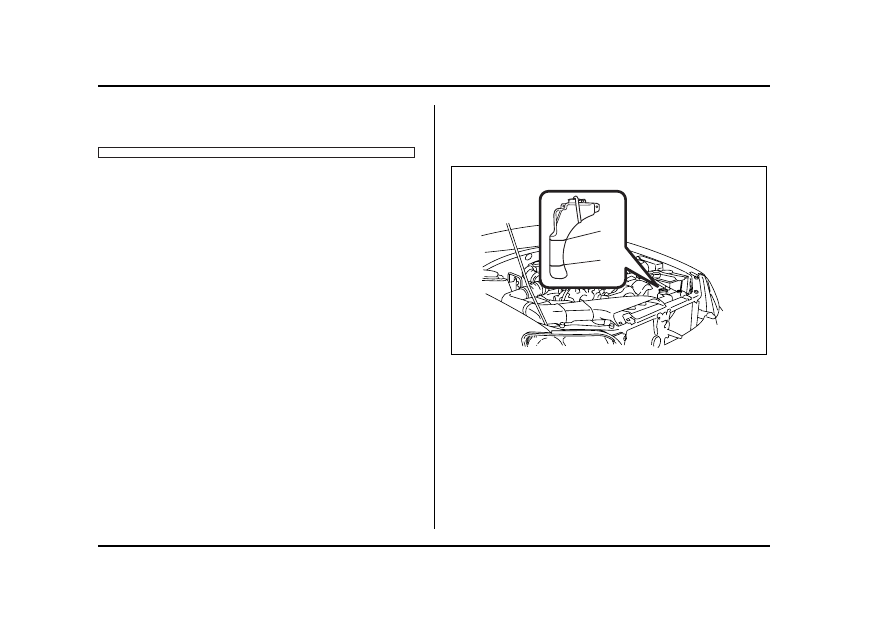
To open the hood:
1. If the wiper blades are lifted off the windshield, re-
turn them to their original positions.
2. Pull the hood release knob under the instrument
panel.
UBB008EA
11-6
Maintenance and service
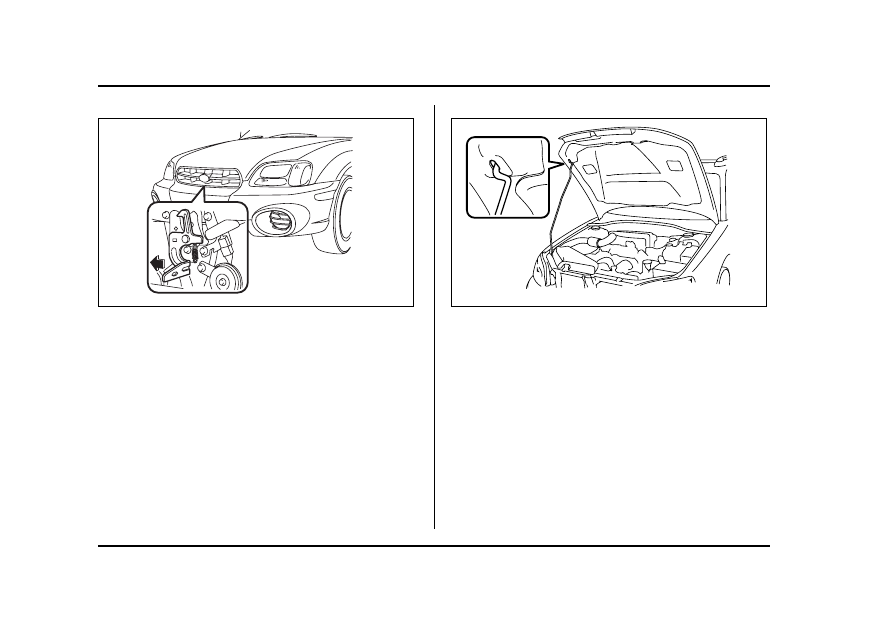
3. Release the secondary hood release located under
the front grille by moving the lever toward the left.
4. Lift up the hood, release the hood prop from its re-
tainer and put the end of the hood prop into the slot in
the hood.
To close the hood:
1. Lift the hood slightly and remove the hood prop
from the slot in the hood and return the prop to its re-
tainer.
2. Lower the hood until it approaches approximately 6
in (15 cm) from the closed position and let it drop.
3. After closing the hood, be sure the hood is securely
locked.
If this does not close the hood, release it from a slightly
higher position. Do not push the hood forcibly to close
UBB094BA
UBB003BA
11-7
Maintenance and service
– CONTINUED –
it. It could deform the metal.
Always check that the hood is properly locked
before you start driving. If it is not, it might fly
open while the vehicle is moving and block
your view, which may cause an accident and
serious bodily injury.
11-8
Maintenance and service
Engine compartment overview
Engine
Compartment overview
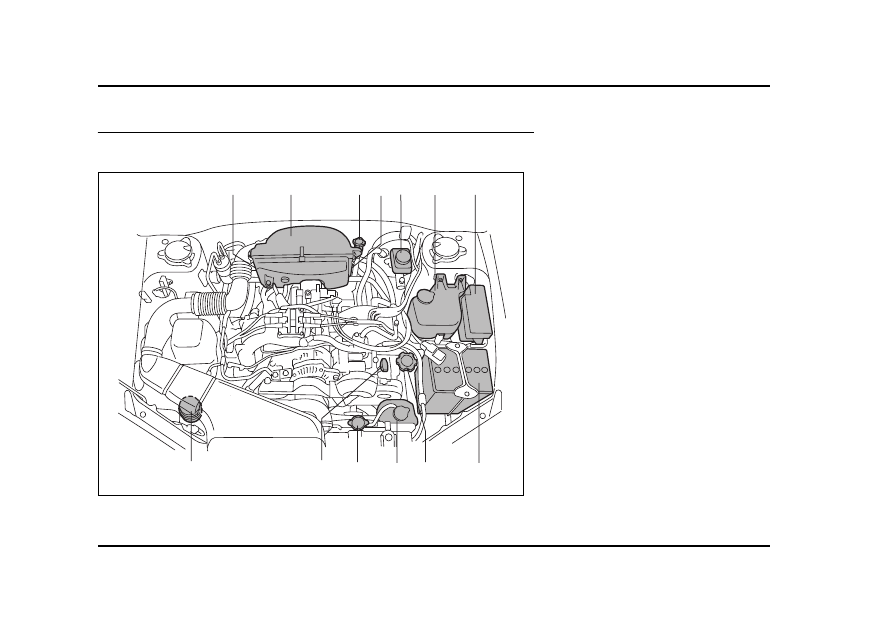
Non-turbo models
1
2
3
4
5
6
7
8
9
10
11
12
13
UBB106BB
1)
Manual transmission oil level
gauge (MT) (page 11-27) or Dif-
ferential gear oil level gauge
(AT) (page 11-32)
2)
Air cleaner element (page 11-
23)
3)
Clutch fluid reservoir (page 11-
40)
4)
Automatic transmission fluid lev-
el gauge (page 11-29)
5)
Brake fluid reservoir (page 11-
38)
6)
Windshield washer tank (page
11-53)
7)
8)
9)
Engine oil filler cap (page 11-10)
10) Engine coolant reservoir (page
11) Radiator cap (page 11-18)
12) Engine oil level gauge (page 11-
13) Power steering fluid reservoir

11-9
Maintenance and service
– CONTINUED –
Turbo models
1
11 10 9
8
12
13
2
3
4
5
6
7
UBB098CB
1)
Air cleaner element (page 11-
23)
2)
Manual transmission oil level
gauge (MT) (page 11-27) or Dif-
ferential gear oil level gauge
(AT) (page 11-32)
3)
Clutch fluid reservoir (page 11-
40)
4)
Automatic transmission fluid lev-
el gauge (page 11-29)
5)
Brake fluid reservoir (page 11-
38)
6)
Windshield washer tank (page
11-53)
7)
Fuse box (page 11-59)
8)
9)
Engine oil filler cap (page 11-10)
10) Engine coolant reservoir (page
11) Engine oil level gauge (page 11-
12) Radiator cap (page 11-18)
13) Power steering fluid reservoir
11-10
Maintenance and service
Engine oil
Engine
Oil
Oil level
Engine
Checking the oil level
Checking
Engine oil level
Check the engine oil level at each fuel stop.
1. Park the vehicle on a level surface and stop the en-
gine.
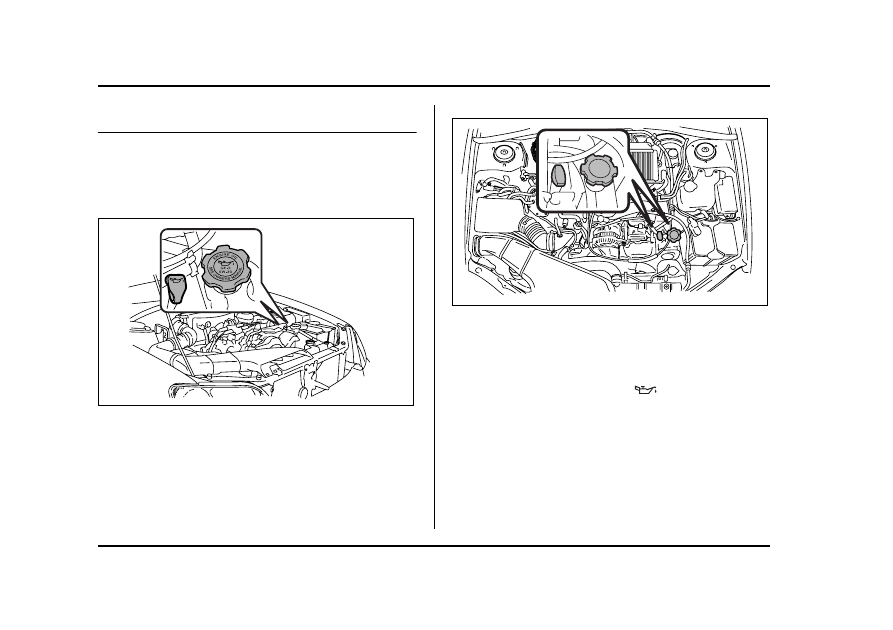
Non-turbo models
Turbo models
2. Pull out the dipstick, wipe it clean, and insert it
again.
3. Be sure the dipstick is correctly inserted until it
stops with the graphic symbol
on its top appear-
ing as shown in the illustration.
UBB004MA
HGB056BA
11-11
Maintenance and service
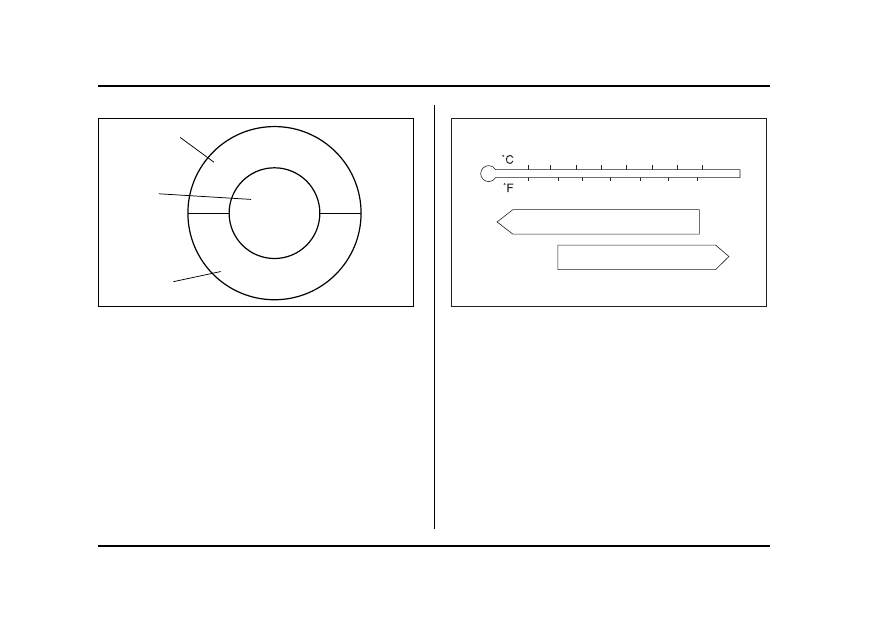
– CONTINUED –
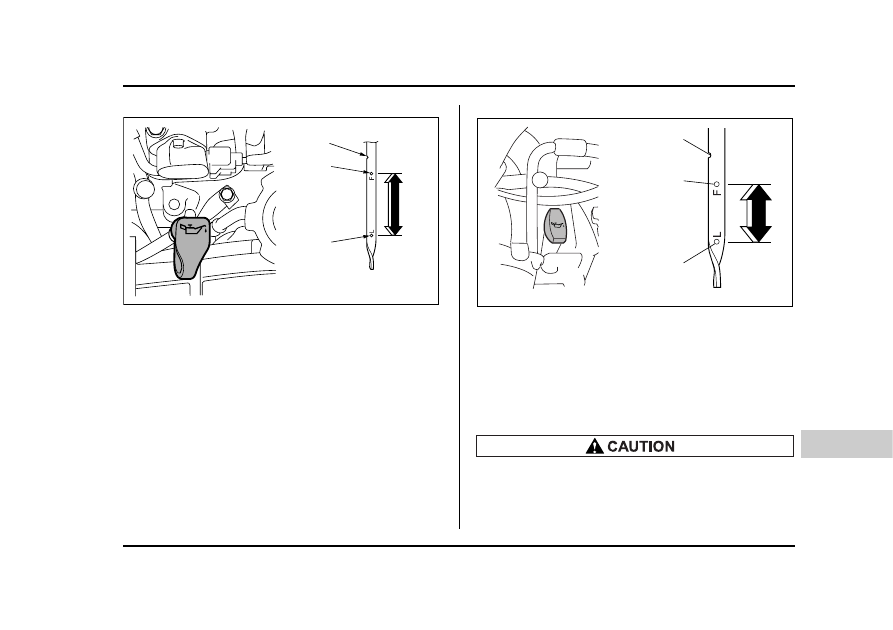
Non-turbo models
1) Notch
2) Upper level
3) Lower level
Turbo models
1) Notch
2) Upper level
3) Lower level
4. Pull out the dipstick again and check the oil level on
it. If it is below the lower level, add oil to bring the level
up to the upper level.
y Use only engine oil with the recommended
grade and viscosity.
y Be careful not to spill engine oil when adding
it. If oil touches the exhaust pipe, it may cause
1
2
3
UGB081BB
1
2
3
UGB082BB
11-12
Maintenance and service
a bad smell, smoke, and/or a fire. If engine oil
gets on the exhaust pipe, be sure to wipe it off.
If you check the oil level just after stopping the engine,
wait a few minutes for the oil to drain back into the oil
pan before checking the level.
To prevent overfilling the engine oil, do not add any
additional oil above the upper level when the engine is
cold.
The dipstick has a notch above the upper level.
Just after driving or while the engine is warm, the en-
gine oil level reading may be in a range between the
upper level and the notch mark. This is caused by ther-
mal expansion of the engine oil.
Changing the oil and oil filter
Changing
Oil and oil filter
Change the oil and oil filter according to the mainte-
nance schedule in the “Warranty and Maintenance
Booklet”.
The engine oil and oil filter must be changed more fre-
quently than listed in the maintenance schedule when
driving on dusty roads, when short trips are frequently
made, or when driving in extremely cold whether.
1. Warm up the engine by letting the engine idle for
approximately 10 minutes to ease draining the engine
oil.
2. Park the vehicle on a level surface and stop the en-
gine.
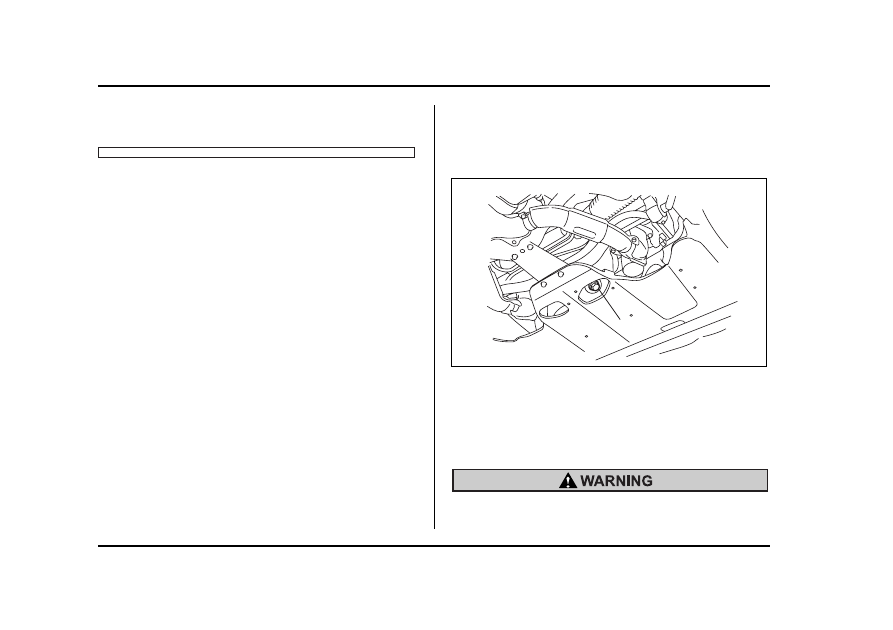
3. Remove the oil filler cap.
1) Drain plug
4. Drain out the engine oil by removing the drain plug
while the engine is still warm. The used oil should be
drained into an appropriate container and disposed of
properly.
Be careful not to burn yourself with hot engine
1
UBB005BB
11-13
Maintenance and service
– CONTINUED –
oil.
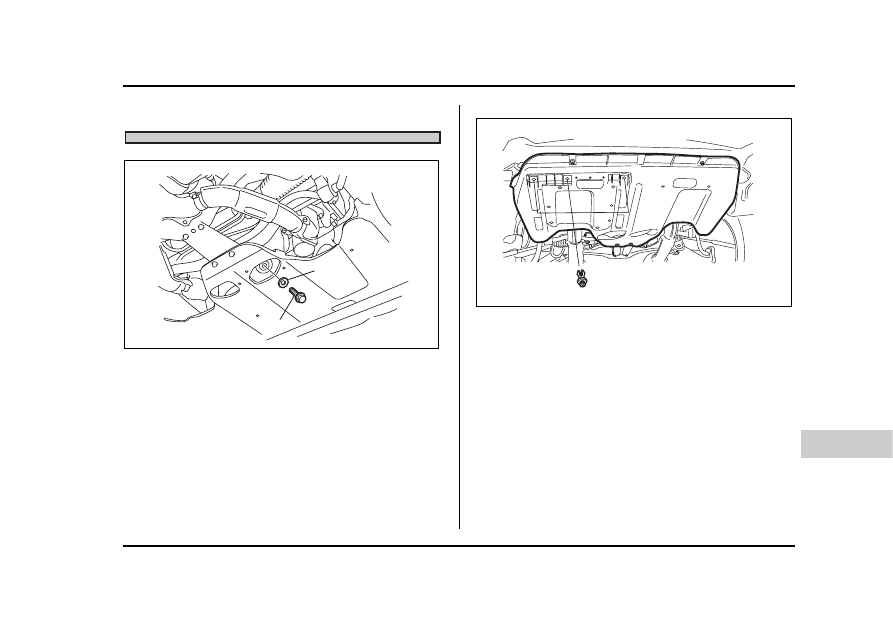
1) Sealing washer
2) Drain plug
5. Wipe the seating surface of the drain plug with a
clean cloth and tighten it securely with a new sealing
washer after the oil has completely drained out.
6. Remove three clips at the front of the cover under
the oil filter.
1
2
UBB051BB
UBB054BA

11-14
Maintenance and service
7. Slide the cover toward the vehicle front to remove
it.
8. Remove the oil filter with an oil filter wrench.
9. Before installing a new oil filter, apply a thin coat of
engine oil to the seal.
10.Clean the rubber seal seating area of the bottom of
engine and install the oil filter by hand turning. Be
careful not to twist or damage the seal.
11.Tighten the oil filter by the amount indicated in the
following table after the seal makes contact with the
bottom of engine.
y Never over tighten the oil filter because that
can result in an oil leak.
y Thoroughly wipe off any engine oil that has
spilled over the exhaust pipe and/or under-cov-
er. If left unremoved, the oil could catch fire.
12.Reinstall the cover under the oil filter.
13.Pour engine oil through the filler neck.
UBB055BA
Model
Oil filter color
Part number
Amount of
rotation
Non-turbo
models
Black
15208AA100
1 rotation
White
15208AA09A
2/3 – 3/4 ro-
tation
15208AA060
Turbo mod-
els
Black
15208AA100
1 rotation
White
15208AA09A
2/3 – 3/4 ro-
tation
11-15
Maintenance and service
– CONTINUED –
Oil capacity (Guideline):
4.2 US qt (4.0 liters, 3.5 Imp qt)
The oil quantity indicated above is only a guideline.
The necessary quantity of oil depends on the quantity
of oil that has been drained. The quantity of drained oil
differs slightly depending on the temperature of the oil
and the time the oil is left flowing out. After refilling the
engine with oil, therefore, you must use the dipstick to
confirm that the level is correct.
14.Start the engine and make sure that no oil leaks ap-
pear around the filter’s rubber seal and drain plug.
15.Run the engine until it reaches the normal operat-
ing temperature. Then stop the engine and wait a few
minutes to allow the oil drain back. Check the oil level
again and if necessary, add more engine oil.
Recommended grade and viscosity
Recommended
Oil grade and viscosity
Use only engine oil with the recommended
grade and viscosity.
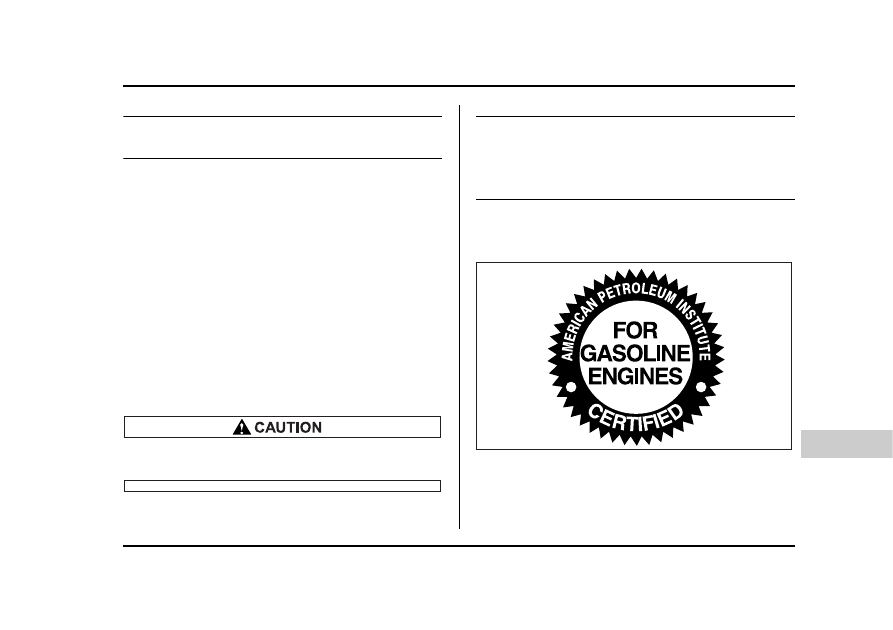
Oil grade:
ILSAC GF-4, which can be identified with the IL-
SAC certification mark (Starburst mark)
or API classification SM with the words “ENERGY
CONSERVING”
These recommended oil grades can be identified by
looking for either or both of the following marks dis-
played on the oil container.
ILSAC Certification Mark (Starburst Mark)
HSB023AA
11-16
Maintenance and service
API Service label
1) Indicates the oil quality by API designations
2) Indicates the SAE oil viscosity grade
3) Indicates that the oil has fuel saving capabilities
In choosing an oil, you want the proper quality and vis-
cosity, as well as one that will add to fuel economy.
The following table lists the recommended viscosities
and applicable temperatures.
When adding oil, different brands may be used togeth-
er as long as they are the same API classification and
SAE viscosity as those recommended by SUBARU.
SAE viscosity No. and applicable temperature
*: 5W-30 is preferred.
Engine oil viscosity (thickness) affects fuel economy.
Oils of lower viscosity provide better fuel economy.
However, in hot weather, oil of higher viscosity is re-
quired to properly lubricate the engine.
Recommended grade and viscosity
under severe driving conditions
Recommended
Oil grade and viscosity
If the vehicle is used in desert areas, in areas with very
high temperatures, or used for heavy-duty applica-
tions such as towing a trailer, use of oil with the follow-
ing grade and viscosities is recommended.
A
PI
SER
VICE
SM
E
N
E
R
GY
CONSE
R
V
IN
G
SAE
5W-30
1
2
3
B00446
5W-30*
10W-30, 10W-40
-30 -20 -10
0
10
20
30
40
-20
0
60
20
80
100
40
HSB024BA
11-17
Maintenance and service
– CONTINUED –
API classification SM (or SL):
SAE viscosity No.:
30, 40, 10W-50, 20W-40, 20W-50
Cooling system
Cooling system
Never attempt to remove the radiator cap until
the engine has been shut off and has cooled
down completely. Since the coolant is under
pressure, you may suffer serious burns from a
spray of boiling hot coolant when the cap is re-
moved.
y The cooling system has been filled at the fac-
tory with a high quality, corrosion-inhibiting,
year-around coolant which provides protection
against freezing down to –33°F (–36°C). For
adding, use genuine SUBARU coolant or an
equivalent: a mixture of 50% soft water and 50%
ethylene-glycol basis coolant. Use of improper
coolants may result in corrosion in the cooling
system. It is important to maintain protection
against freezing and corrosion, even if freezing
temperatures are not expected. Never mix dif-
ferent kinds of coolant.
y Do not splash the engine coolant over paint-
11-18
Maintenance and service
ed parts. The alcohol contained in the engine
coolant may damage the paint surface.
Hose and connections
Hose and connections
Your vehicle employs an electric cooling fan which is
thermostatically controlled to operate when the engine
coolant reaches a specific temperature.
If the radiator cooling fan does not operate even when
the engine coolant temperature gauge exceeds the
normal operating range, the cooling fan circuit may be
defective. Check the fuse and replace it if necessary.
If the fuse is not blown, have the cooling system
checked by your SUBARU dealer.
If frequent addition of coolant is necessary, there may
be a leak in the engine cooling system. It is recom-
mended that the cooling system and connections be
checked for leaks, damage, or looseness.
Engine coolant
Engine
Coolant
T Checking the coolant level
1) “FULL” level mark
2) “LOW” level mark
Check the coolant level at each fuel stop.
1. Check the coolant level on the outside of the reser-
voir while the engine is cool.
2. If the level is close to or lower than the “LOW” level
mark, add coolant up to the “FULL” level mark. If the
reserve tank is empty, remove the radiator cap and re-
fill as required.
FULL
LOW
1
2
UBB004FB
Нет комментариевНе стесняйтесь поделиться с нами вашим ценным мнением.
Текст