Subaru XV Crosstrek Hybrid (2016 year). Instruction — part 13
Instruments and controls/Multi function display
“ ” switch, and confirm the setting by
pushing the
button.
6. The system will notify you that the
setting is complete.
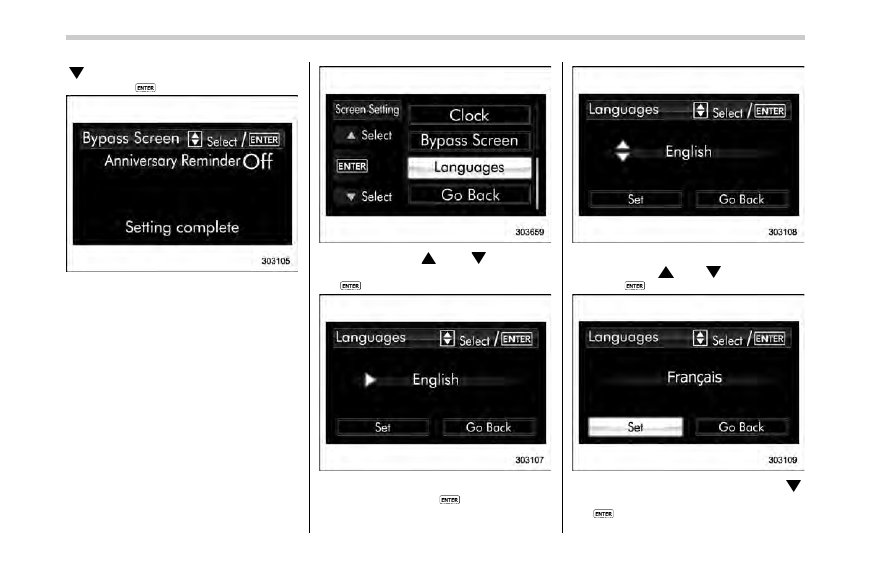
! Language setting
1. Perform the preparation steps accord-
ing to
“Preparation for screen settings”
F3-53.
2. Operate the
“ ” or “ ” switch to
select the
“Languages” item. Then push
the
button.
3. The current language setting will be
displayed. Push the
button to enter
the language selection mode.
4. Select the preferred language by
operating the
“ ” or “ ” switch. Then
push the
button.
5. Select
“Set” by operating the “ ”
switch and confirm the setting by pushing
the
button.
3-60
6. The system will notify you that the
setting is complete.
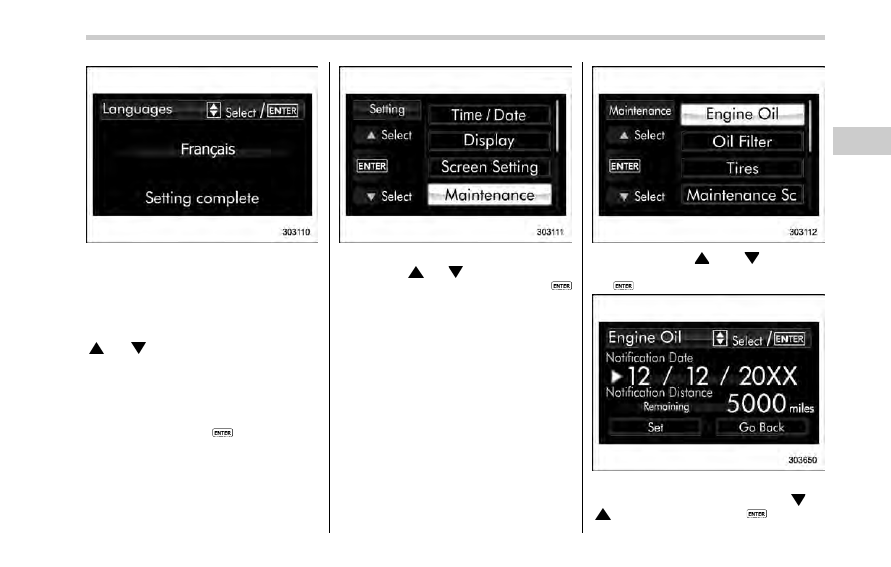
& Maintenance settings
The items in the maintenance settings can
be set. To change the items, operate the
“ ” or “ ” switch.
! Preparation for maintenance set-
tings
1. Turn the ignition switch to the
“ON”
position.
2. Push and hold the
button to show
the selection screen.
3. After the selection screen is displayed,
operate the
“ ” or “ ” switch to show the
“Maintenance” item. Then, push the
button.
! Engine oil setting
1. Perform the preparation steps accord-
ing to
“Preparation for maintenance set-
tings
” F3-61.
2. Operate the
“ ” or “ ” switch to
select the
“Engine Oil” item. Then push
the
button.
3. Select the setting location (month, day,
year or distance) by operating the
“ ” or
“ ” switch. Then push the
button.
Instruments and controls/Multi function display
– CONTINUED –
3-61
Instruments and controls/Multi function display
4. Select a number by operating the
“ ”
or
“ ” switch. Then push the
button.
If you also want to change the setting for
another location, repeat steps 3 and 4.
5. Select
“Set” by operating the “ ” or
“ ” switch and confirm the setting by
pushing the
button.
6. The system will notify you that the
setting is complete.
NOTE
. The notification will be displayed
with information of both date and
distance or either date or distance in
accordance with the setting.
. When “_ _” is selected for either the
“Month”, “Day”, “Year” or “Distance”
item instead of numbers, the set noti-
fication will be deactivated.
. If the notification continues for 15
days or more, the system will display
“_ _” on the screen.
. When the distance announcement
reaches 0 km, the display will show
“0000” for the next 311 miles (500 km).
After exceeding 311 miles (500 km),
“_
_ _ _
” will be displayed.
! Oil filter setting
The setting procedure is the same as
“Engine oil setting” F3-61, but select the
“Oil Filter” item in step 2.
! Tires setting
The setting procedure is the same as
“Engine oil setting” F3-61, but select the
“Tires” item in step 2.
! Maintenance schedule setting
The setting procedure is the same as
“Engine oil setting” F3-61, but select the
“Maintenance Schedule” item in step 2.
! On/Off setting
1. Perform the preparation steps accord-
ing to
“Preparation for maintenance set-
tings
” F3-61.
3-62
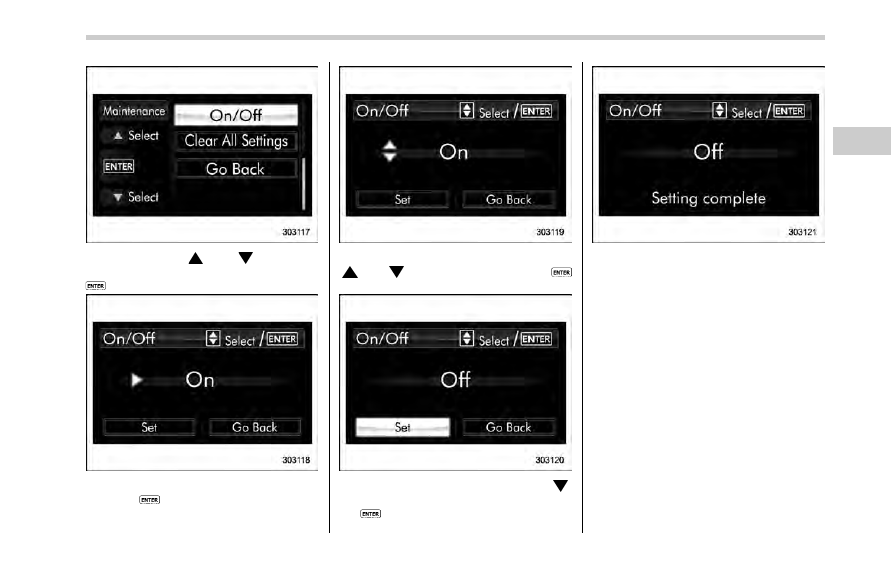
2. Operate the
“ ” or “ ” switch to
select the
“On/Off” item. Then push the
button.
3. The current setting will be displayed.
Push the
button to enter the selection
mode.
4. Select
“On” or “Off” by operating the
“ ” or “ ” switch. Then push the
button.
5. Select
“Set” by operating the “ ”
switch, and confirm the setting by pushing
the
button.
6. The system will notify you that the
setting is complete.
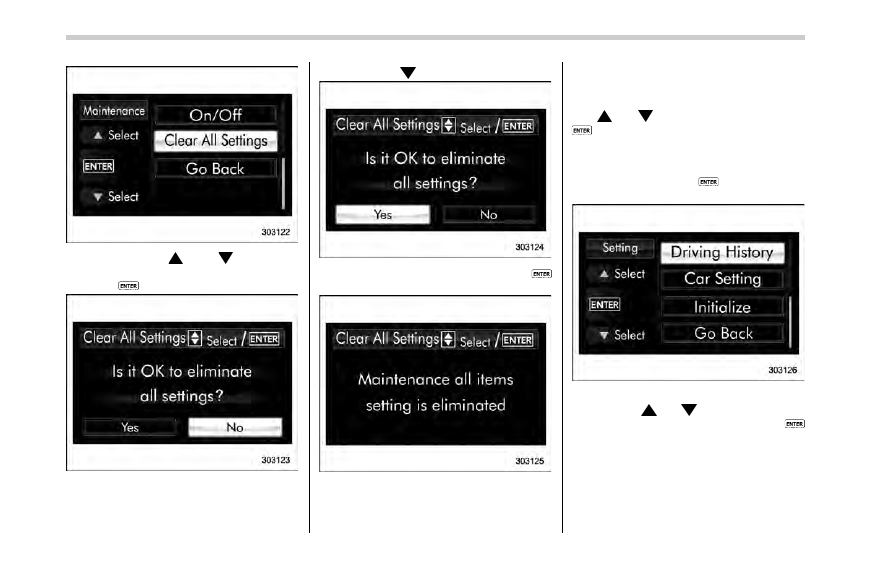
! Clear setting
1. Perform the preparation steps accord-
ing to
“Preparation for maintenance set-
tings
” F3-61.
Instruments and controls/Multi function display
– CONTINUED –
3-63
Instruments and controls/Multi function display
2. Operate the
“ ” or “ ” switch to
select the
“Clear All Settings” item. Then
push the
button.
3. The system will prompt a Yes/No
dialogue (
“No” is selected first). To clear
all maintenance settings, select
“Yes” by
operating the
“ ” switch.
4. Confirm the setting by pushing the
button.
5. The system will notify you that the
setting is complete.
& Driving history registration
The items in the driving history can be
registered. To change the items, operate
the
“ ” or “ ” switch, and then push the
button.
1. Turn the ignition switch to the
“ON”
position.
2. Push and hold the
button to show
the selection screen.
3. After the selection screen is displayed,
operate the
“ ” or “ ” switch to show the
“Driving History” item. Then, push the
button.
3-64
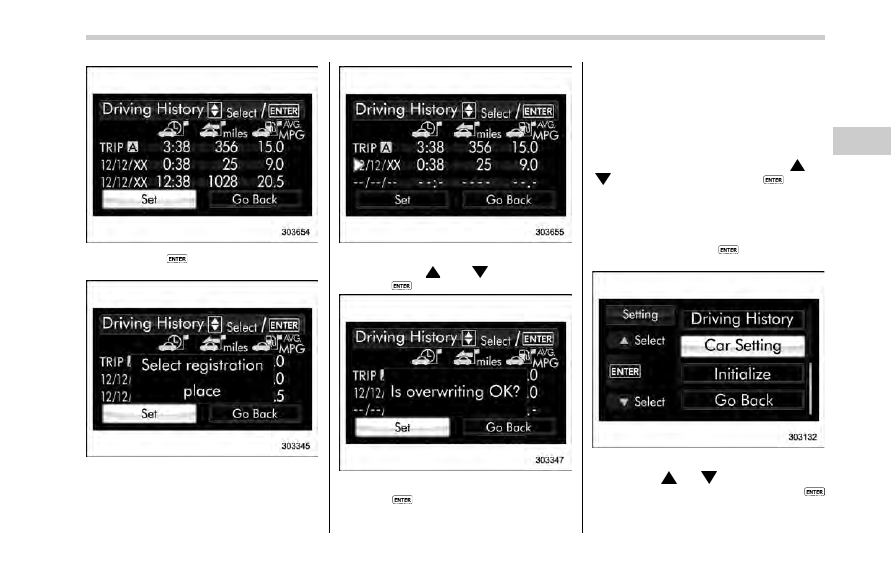
4. Push the
button once more to
enter the setting mode.
5. The system will notify you of the place
to be selected for approximately 2 sec-
onds.
6. Select one of the registration lines by
operating the
“ ” or “ ” switch. Then
push the
button.
7. To overwrite the previous registration,
push the
button. When registration is
performed the first time, it is registered
directly without a notification.
8. The system will notify you that the
registration is complete.
& Car settings
The items in the car settings can be set.
To change the items, operate the
“ ” or
“ ” switch, and then push the
button.
! Preparation for car settings
1. Turn the ignition switch to the
“ON”
position.
2. Push and hold the
button to show
the selection screen.
3. After the selection screen is displayed,
operate the
“ ” or “ ” switch to show the
“Car Setting” item. Then, push the
button.
Instruments and controls/Multi function display
– CONTINUED –
3-65
Instruments and controls/Multi function display
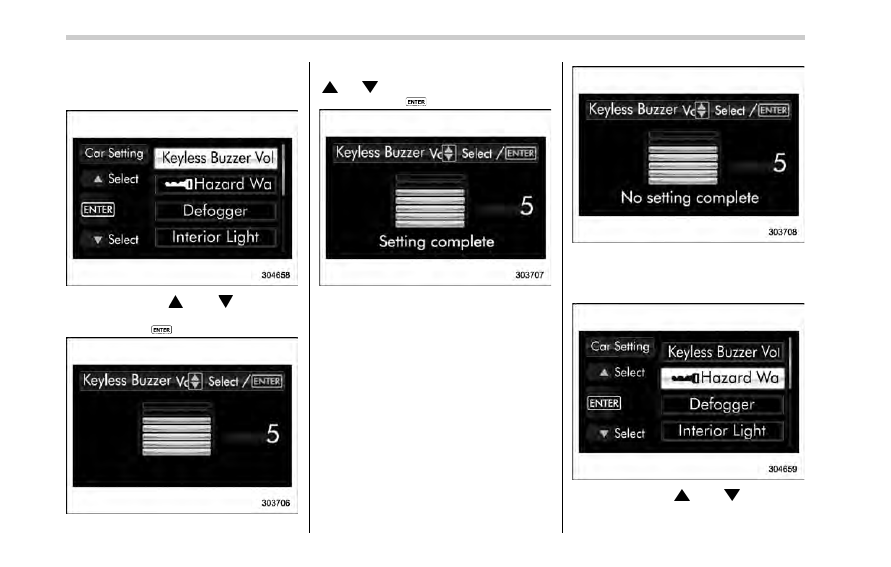
! Keyless buzzer volume setting
1. Perform the preparation steps accord-
ing to
“Preparation for car settings” F3-65.
2. Operate the
“ ” or “ ” switch to
select the
“Keyless Buzzer Volume” item.
Then push the
button.
3. Select a volume level by operating the
“ ” or “ ” switch, and confirm the setting
by pushing the
button.
4. The system will notify you that the
setting is complete.
If the setting is not available, the following
notification will be displayed. In this case,
perform the setting procedure again.
! Hazard warning flasher setting
1. Perform the preparation steps accord-
ing to
“Preparation for car settings” F3-65.
2. Operate the
“ ” or “ ” switch to
select the
“Hazard Warning Flasher” item.
3-66
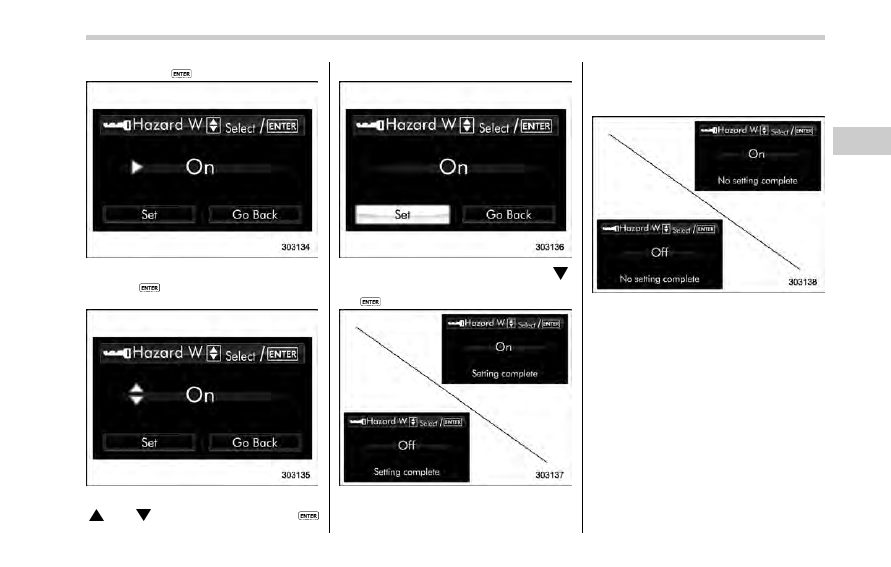
Then push the
button.
3. The current setting will be displayed.
Push the
button to enter the selection
mode.
4. Select
“On” or “Off” by operating the
“ ” or “ ” switch. Then push the
button.
5. Select
“Set” by operating the “ ”
switch, and confirm the setting by pushing
the
button.
6. The system will notify you that the
setting is complete.
If the setting is not available, the following
notification will be displayed. In this case,
perform the setting procedure again.
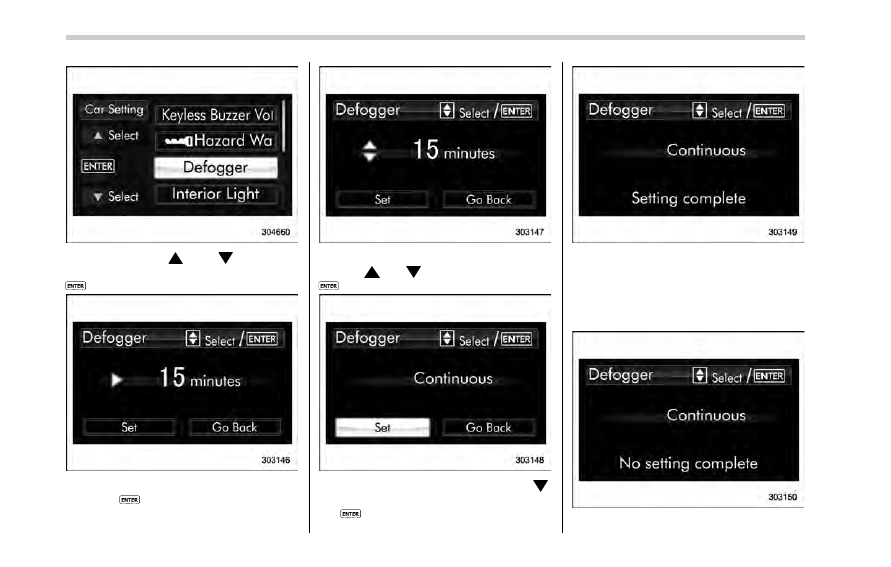
! Defogger setting
1. Perform the preparation steps accord-
ing to
“Preparation for car settings” F3-65.
Instruments and controls/Multi function display
– CONTINUED –
3-67
Instruments and controls/Multi function display
2. Operate the
“ ” or “ ” switch to
select the
“Defogger” item. Then push the
button.
3. The current setting will be displayed.
Push the
button to enter the selection
mode.
4. Select the preferred setting by operat-
ing the
“ ” or “ ” switch. Then push the
button.
5. Select
“Set” by operating the “ ”
switch, and confirm the setting by pushing
the
button.
6. The system will notify you that the
setting is complete.
If the setting is not available, the following
notification will be displayed. In this case,
perform the setting procedure again.
3-68
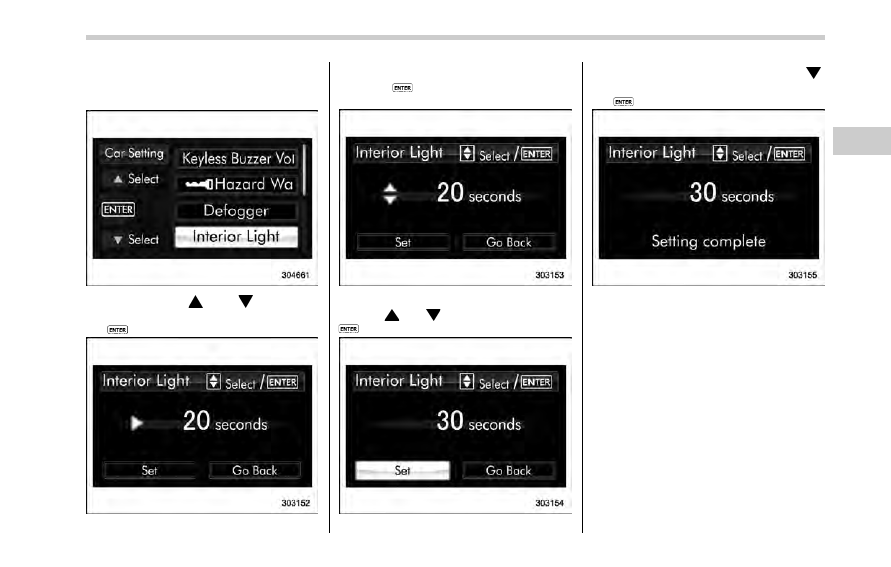
! Interior light off delay timer setting
1. Perform the preparation steps accord-
ing to
“Preparation for car settings” F3-65.
2. Operate the
“ ” or “ ” switch to
select the
“Interior Light” item. Then push
the
button.
3. The current setting will be displayed.
Push the
button to enter the selection
mode.
4. Select the preferred setting by operat-
ing the
“ ” or “ ” switch. Then push the
button.
5. Select
“Set” by operating the “ ”
switch, and confirm the setting by pushing
the
button.
6. The system will notify you that the
setting is complete.
If the setting is not available, the following
notification will be displayed. In this case,
perform the setting procedure again.
Instruments and controls/Multi function display
– CONTINUED –
3-69
Instruments and controls/Multi function display
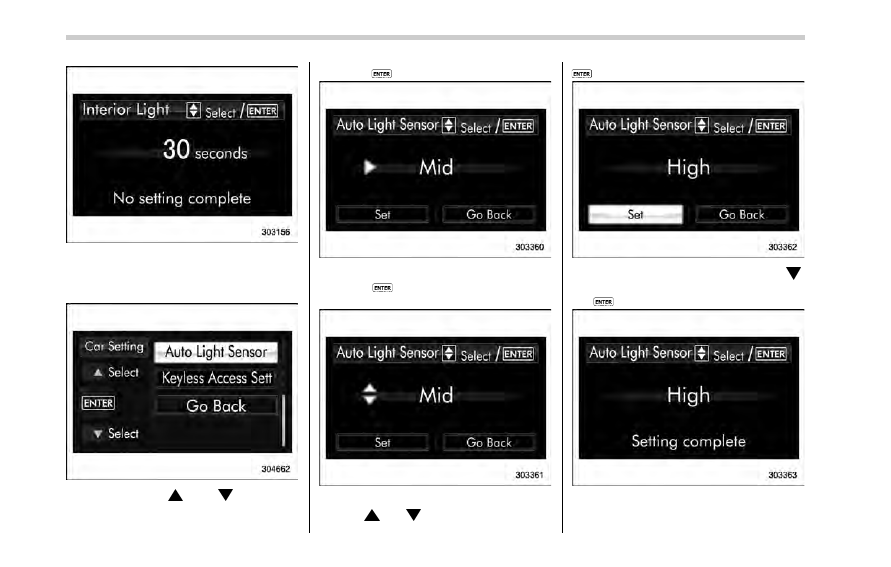
! Auto light sensor sensitivity setting
1. Perform the preparation steps accord-
ing to
“Preparation for car settings” F3-65.
2. Operate the
“ ” or “ ” switch to
select the
“Auto Light Sensor” item. Then
push the
button.
3. The current setting will be displayed.
Push the
button to enter the selection
mode.
4. Select the preferred setting by operat-
ing the
“ ” or “ ” switch. Then push the
button.
5. Select
“Set” by operating the “ ”
switch, and confirm the setting by pushing
the
button.
6. The system will notify you that the
setting is complete.
3-70
If the setting is not available, the following
notification will be displayed. In this case,
perform the setting procedure again.
! Keyless access setting
! Preparation for keyless access
settings
1. Perform the preparation steps accord-
ing to
“Preparation for car settings” F3-65.
2. Operate the
“ ” or “ ” switch to
select the
“Keyless Access Setting” item.
Then push the
button.
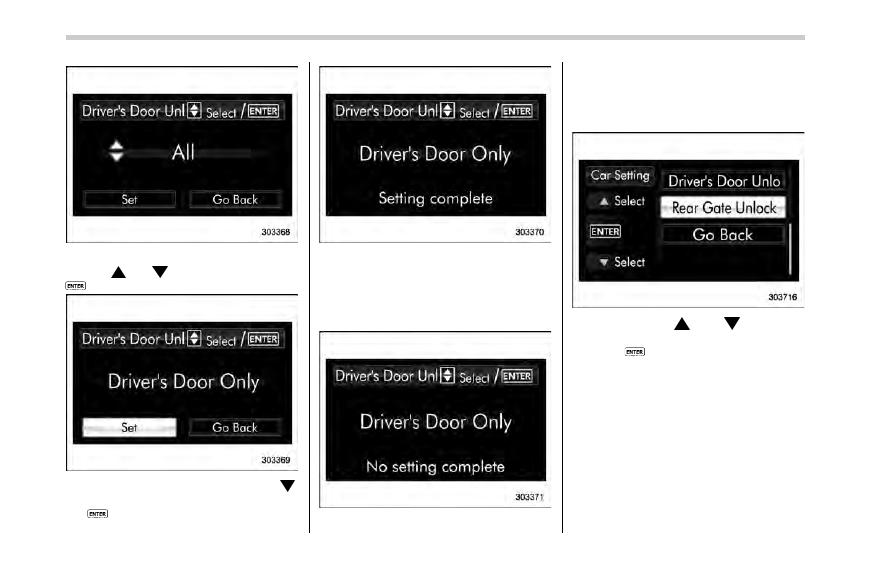
! Driver’s door unlock setting
1. Perform the preparation steps accord-
ing to
“Preparation for keyless access
settings
” F3-71.
2. Operate the
“ ” or “ ” switch to
select the
“Driver’s Door Unlock” item.
Then push the
button.
3. The current setting will be displayed.
Push the
button to enter the selection
mode.
Instruments and controls/Multi function display
– CONTINUED –
3-71
Instruments and controls/Multi function display
4. Select the preferred setting by operat-
ing the
“ ” or “ ” switch. Then push the
button.
5. Select
“Set” by operating the “ ”
switch, and confirm the setting by pushing
the
button.
6. The system will notify you that the
setting is complete.
If the setting is not available, the following
notification will be displayed. In this case,
perform the setting procedure again.
! Rear gate unlock setting
1. Perform the preparation steps accord-
ing to
“Preparation for keyless access
settings
” F3-71.
2. Operate the
“ ” or “ ” switch to
select the
“Rear Gate Unlock” item. Then
push the
button.
3-72
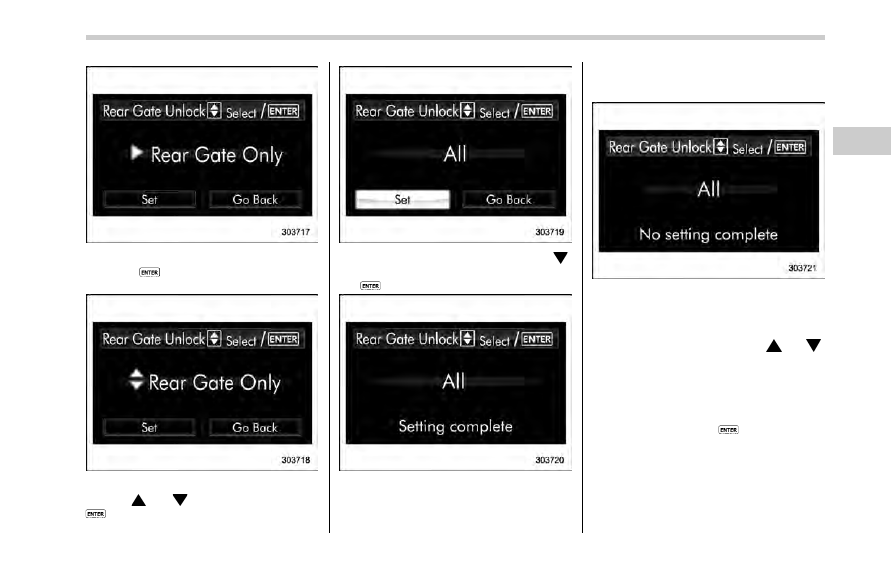
3. The current setting will be displayed.
Push the
button to enter the selection
mode.
4. Select the preferred setting by operat-
ing the
“ ” or “ ” switch. Then push the
button.
5. Select
“Set” by operating the “ ”
switch, and confirm the setting by pushing
the
button.
6. The system will notify you that the
setting is complete.
If the setting is not available, the following
notification will be displayed. In this case,
perform the setting procedure again.
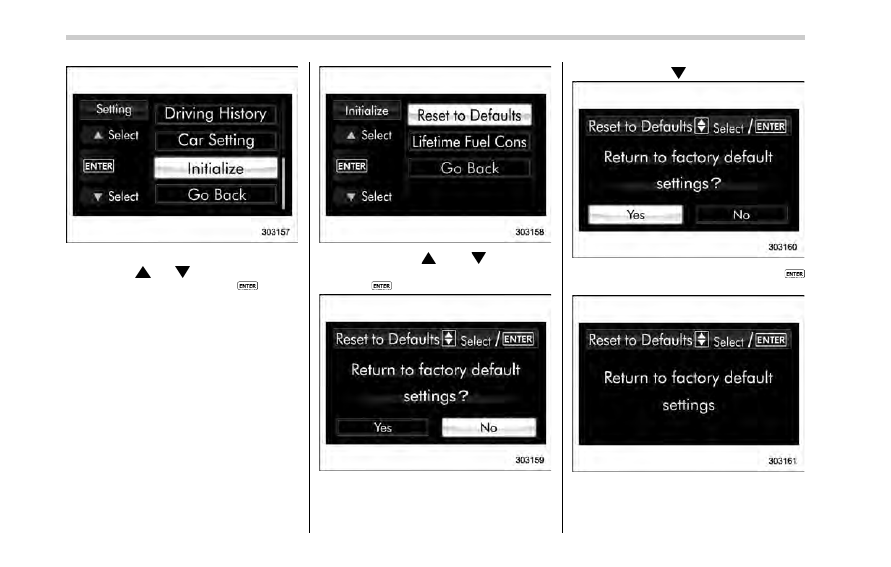
& Initialize
Items that have been set to your pre-
ference can be initialized. To select an
initialization menu, operate the
“ ” or “ ”
switch as follows.
! Preparation for initialization
1. Turn the ignition switch to the
“ON”
position.
2. Push and hold the
button to show
the selection screen.
Instruments and controls/Multi function display
– CONTINUED –
3-73
Instruments and controls/Multi function display
3. After the selection screen is displayed,
operate the
“ ” or “ ” switch to show the
“Initialize” item. Then, push the
button.
! Reset to factory default settings
1. Perform the preparation steps accord-
ing to
“Preparation for initialization” F3-
73.
2. Operate the
“ ” or “ ” switch to
select the
“Reset to Defaults” item. Then
push the
button.
3. The system will prompt a Yes/No
dialogue (
“No” is selected first). To return
to the factory default settings, select
“Yes”
by operating the
“ ” switch.
4. Confirm the setting by pushing the
button.
5. The system will notify you that the
setting is complete.
3-74
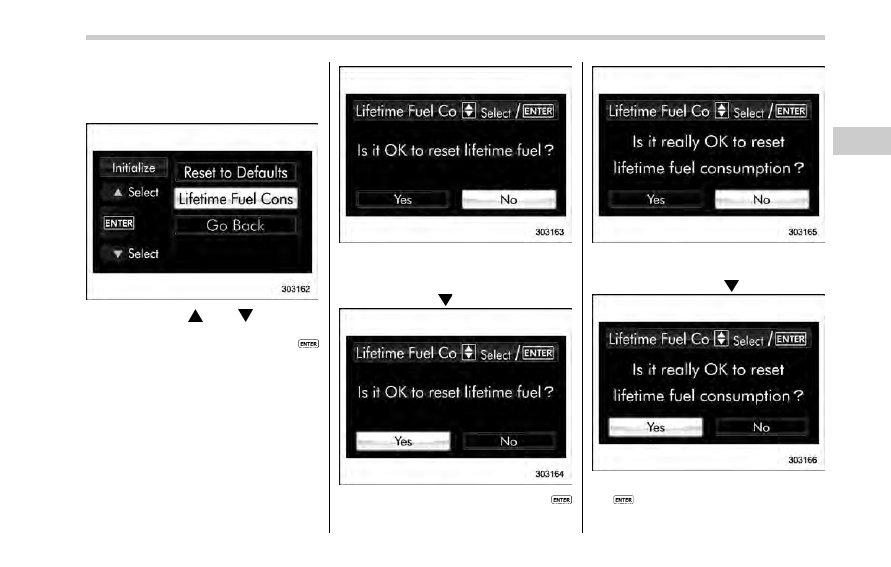
! Lifetime fuel consumption resetting
1. Perform the preparation steps accord-
ing to
“Preparation for initialization” F3-
73.
2. Operate the
“ ” or “ ” switch to
select the
“Lifetime Fuel Consumption
Resetting
” item. Then push the
button.
3. The system will prompt a Yes/No
dialogue (
“No” is selected first). To reset
the lifetime fuel consumption, select
“Yes”
by operating the
“ ” switch.
4. Confirm the setting by pushing the
button.
5. Reconfirmation will be displayed. If
you are sure you want to proceed, select
“Yes” by operating the “ ” switch.
6. Confirm the setting again by pushing
the
button.
Instruments and controls/Multi function display
– CONTINUED –
3-75
Нет комментариевНе стесняйтесь поделиться с нами вашим ценным мнением.
Текст