Subaru BRZ (2019 year). Instruction — part 25
390
4-3. Do-it-yourself maintenance
BRZ_U
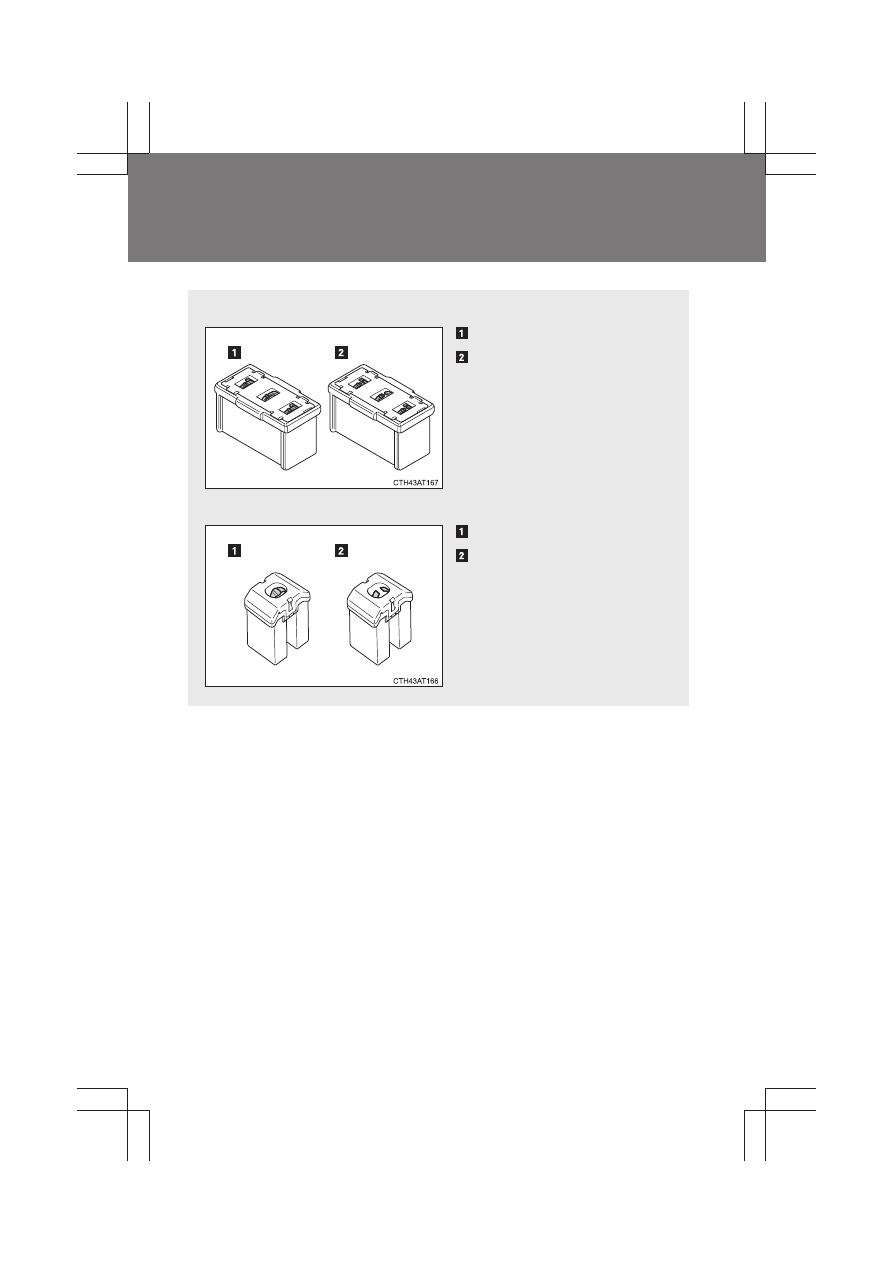
■
Use a CR2016 (vehicles without a keyless access with push button
start system) or CR2032 (vehicles with a keyless access with push but-
ton start system) lithium battery
●
Batteries can be purchased at your SUBARU dealer, local electrical
appliance shops or camera stores.
●
Replace only with the same or equivalent type recommended by the
manufacturer.
●
Dispose of used batteries according to local laws.
■
If the key battery is depleted
The following symptoms may occur:
●
The keyless access with push button start system (if equipped) and
remote keyless entry system will not function properly.
●
The operational range will be reduced.
■
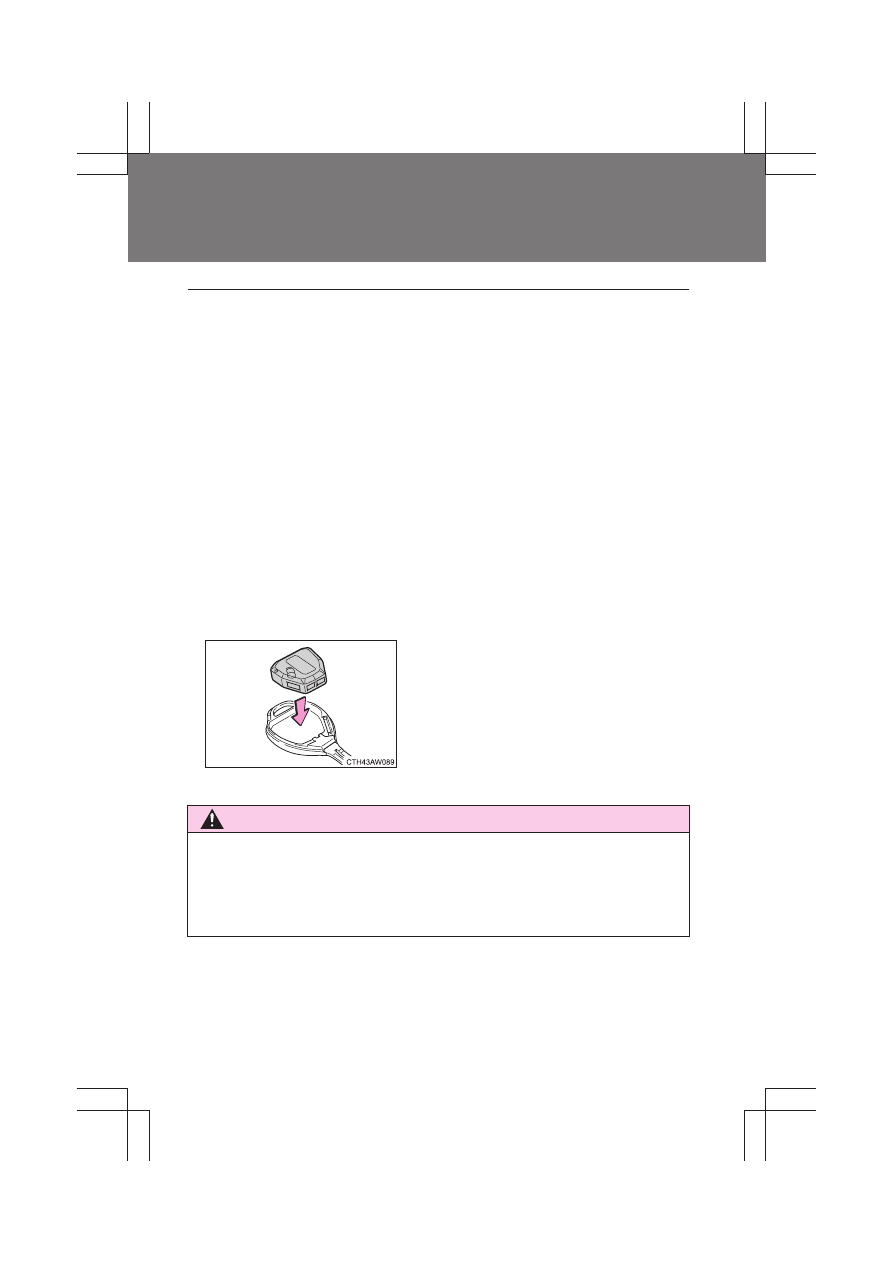
When putting the module back (vehicles without a keyless access with
push button start system)
WARNING
■
Removed battery and other parts
Keep away from children. These parts are small and if swallowed by a child,
they can cause choking. Failure to do so could result in death or serious
injury.
Insert the module from directly above.
Inserting it on an angle may prevent the
key buttons from operating properly.
391
4-3. Do-it-yourself maintenance
4
M
ain
ten
anc
e a
nd
ca
re
BRZ_U
CAUTION
■
For normal operation after replacing the battery
Observe the following precautions to prevent accidents:
●
Always work with dry hands.
Moisture may cause the battery to rust.
●
Do not touch or move any other component inside the remote control.
●
Do not bend either of the battery terminals.
■
Precaution before replacing the battery
Before replacing the battery, touch a metallic object to remove any static
electricity from your body.
392
4-3. Do-it-yourself maintenance
BRZ_U
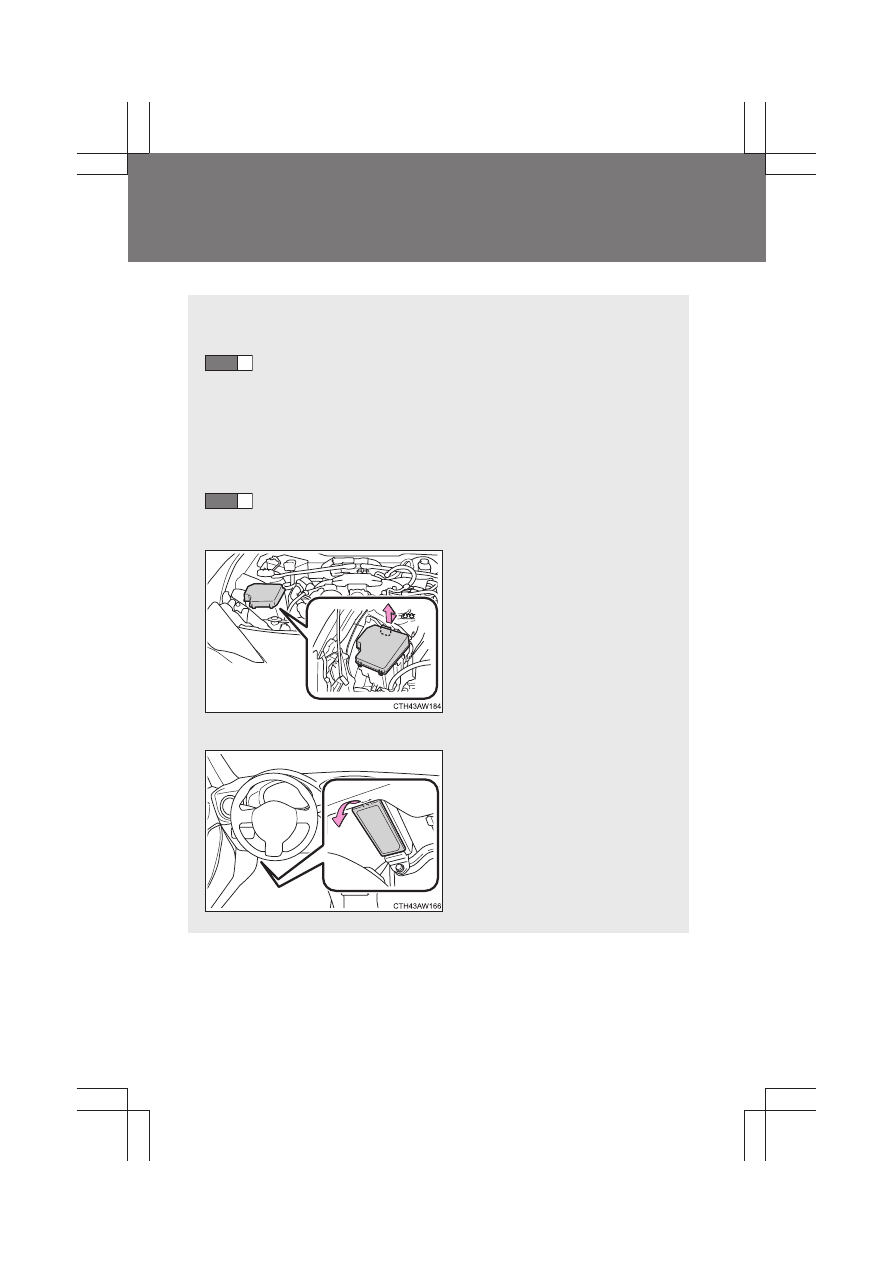
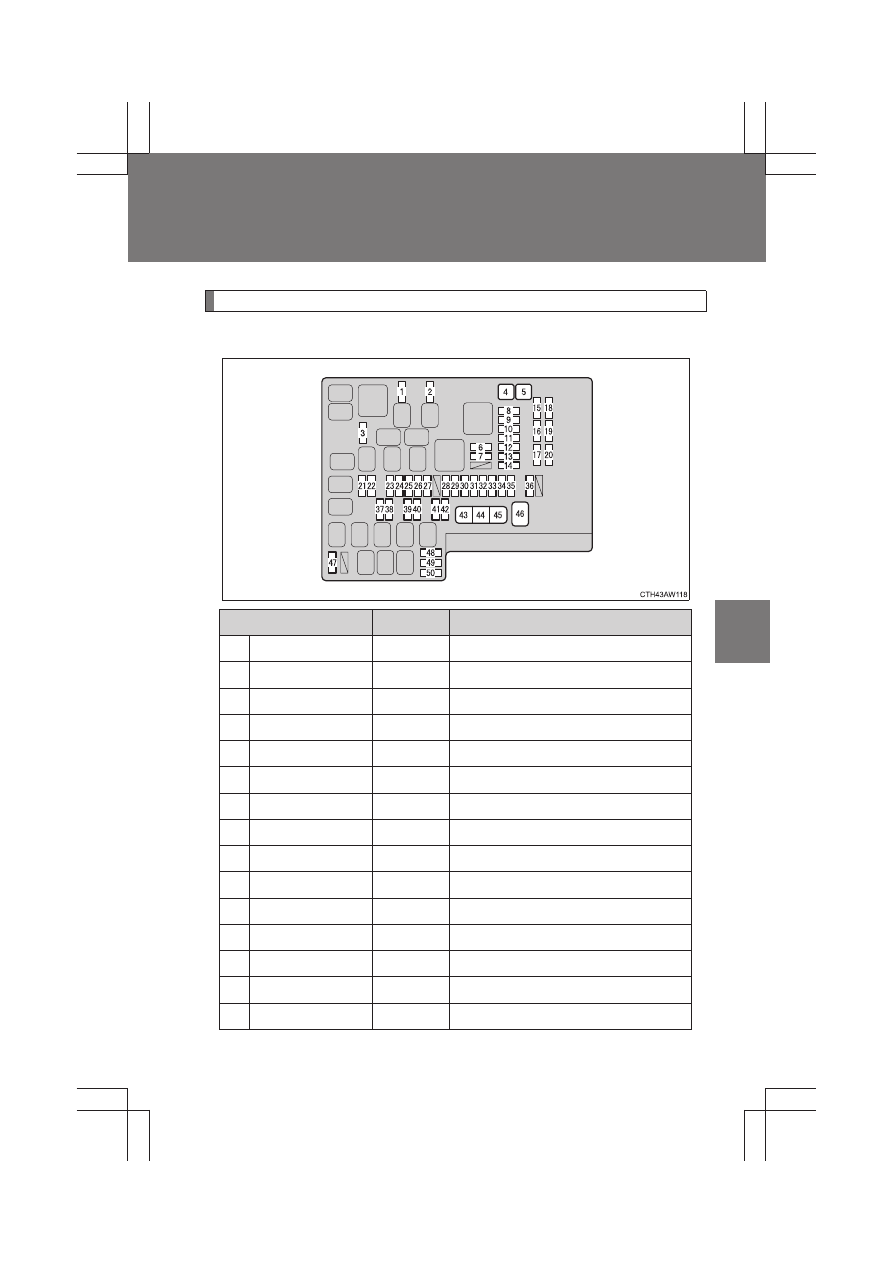
Checking and replacing fuses
If any of the electrical components do not operate, a fuse may have
blown. If this happens, check and replace the fuses as necessary.
Vehicles without a keyless access with push button
start system
Turn the engine switch off.
Vehicles with a keyless access with push button start
system
Turn the push-button ignition switch off.
Open the fuse box cover.
Engine compartment
Push the tabs in and lift the lid
off.
Instrument panel
Remove the lid.
STEP
1
STEP
2
393
4-3. Do-it-yourself maintenance
4
M
ain
ten
anc
e a
nd
ca
re
BRZ_U
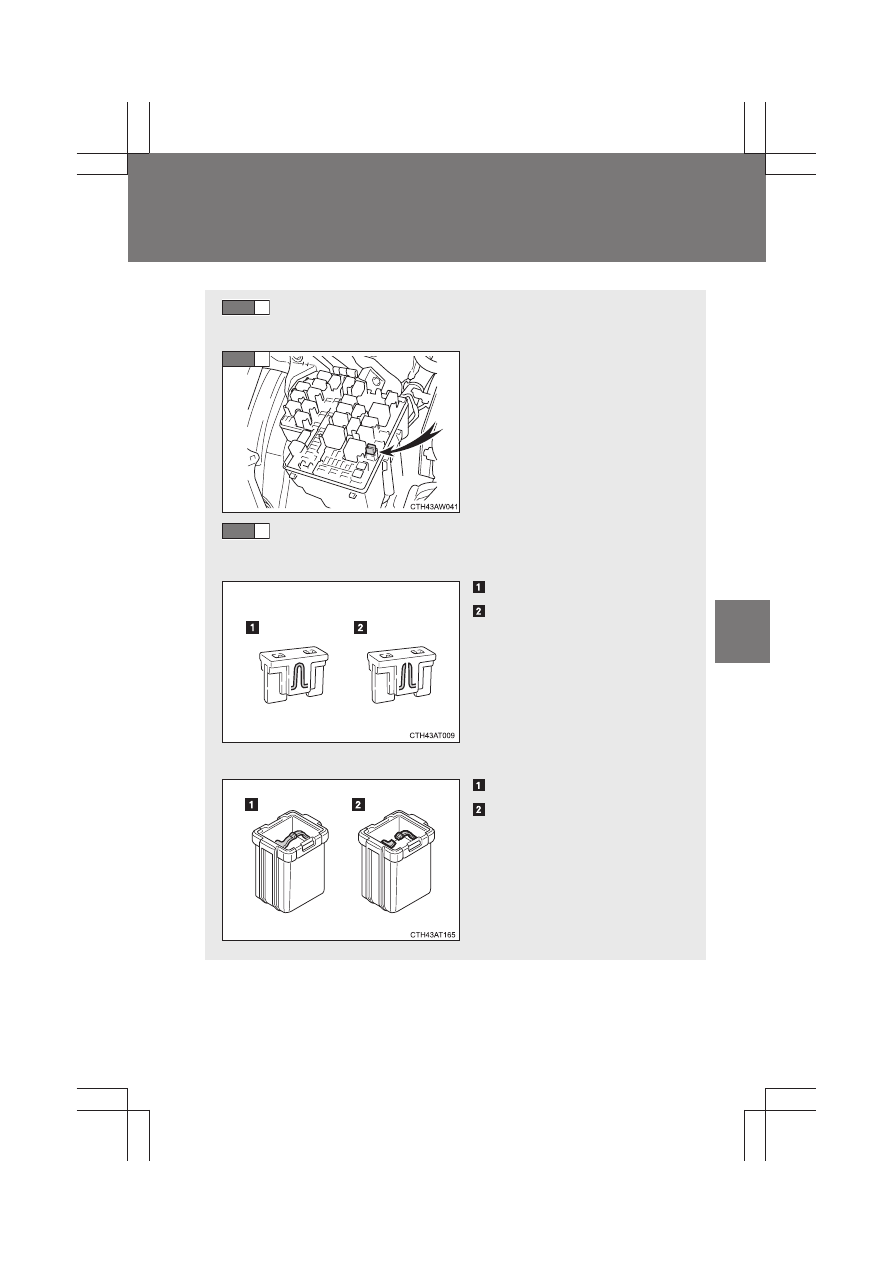
After a system failure, see “Fuse layout and amperage rat-
ings” (
→P. 395) for details about which fuse to check.
Remove the fuse with the pull-
out tool.
Check if the fuse has blown.
Type A
Normal fuse
Blown fuse
Replace it with one of an
appropriate amperage rating.
The amperage rating can be
found on the fuse box lid.
Type B
Normal fuse
Blown fuse
Replace it with one of an
appropriate amperage rating.
The amperage rating can be
found on the fuse box lid.
STEP
3
STEP
4
STEP
5
394
4-3. Do-it-yourself maintenance
BRZ_U
Type C
Normal fuse
Blown fuse
Contact your SUBARU dealer.
Type D
Normal fuse
Blown fuse
Contact your SUBARU dealer.
395
4-3. Do-it-yourself maintenance
4
M
ain
ten
anc
e a
nd
ca
re
BRZ_U
Fuse layout and amperage ratings
■
Engine compartment
Fuse
Ampere
Circuit
1
MIR HTR
7.5 A
Outside rear view mirror defoggers
2
RDI
25 A
Electric cooling fan
3
(PUSH-AT)
7.5 A
Engine control unit
4
ABS NO. 1
40 A
ABS
5
HEATER
50 A
Air conditioning system
6
WASHER
10 A
Windshield washer
7
WIPER
30 A
Windshield wipers
8
RR DEF
30 A
Rear window defogger
9
(RR FOG)
10 A
10
D FR DOOR
25 A
Power window (driver’s side)
11
(CDS)
25 A
Electric cooling fan
12
D-OP
25 A
13
ABS NO. 2
25 A
ABS
14
D FL DOOR
25 A
Power window (passenger’s side)
15
SPARE
See note.
Spare fuse
396
4-3. Do-it-yourself maintenance
BRZ_U
16
SPARE
See note.
Spare fuse
17
SPARE
See note.
Spare fuse
18
SPARE
See note.
Spare fuse
19
SPARE
See note.
Spare fuse
20
SPARE
See note.
Spare fuse
21
ST
7.5 A
Starting system
22
ALT-S
7.5 A
23
(STR LOCK)
7.5 A
Steering lock system
24
D/L
20 A
Power door lock
25
ETCS
15 A
Engine control unit
26
(AT+B)
7.5 A
Transmission
27
(AM2 NO. 2)
7.5 A
Keyless access with push button
start system
28
EFI (CTRL)
15 A
Engine control unit
29
EFI (HTR)
15 A
Multiport fuel injection system/
sequential multiport fuel injection
system
30
EFI (IGN)
15 A
Starting system
31
EFI (+B)
7.5 A
Engine control unit
32
HAZ
15 A
Turn signal lights, hazard warning
flashers
33
MPX-B
7.5 A
Automatic air conditioning system,
gauge and meters
34
F/PMP
20 A
Multiport fuel injection system/
sequential multiport fuel injection
system
35
IG2 MAIN
30 A
SRS airbag system, engine control
unit
36
DCC
30 A
Interior light, remote keyless entry
system, main body ECU
Fuse
Ampere
Circuit
397
4-3. Do-it-yourself maintenance
4
M
ain
ten
anc
e a
nd
ca
re
BRZ_U
Note
One of each of the following spare fuses are provided: 7.5 A, 10 A, 15
A, 20 A, 25 A, 30 A.
37
HORN NO. 2
7.5 A
Horn
38
HORN NO. 1
7.5 A
Horn
39
H-LP LH LO
15 A
Left-hand headlight (low beam)
40
H-LP RH LO
15 A
Right-hand headlight (low beam)
41
H-LP LH HI
10 A
Left-hand headlight (high beam)
42
H-LP RH HI
10 A
Right-hand headlight (high beam)
43
INJ
30 A
Multiport fuel injection system/
sequential multiport fuel injection
system
44
H-LP WASHER
30 A
45
AM2 NO. 1
40 A
Starting system, engine control unit
46
EPS
80 A
Electric power steering
47
A/B MAIN
15 A
SRS airbag system
48
ECU-B
7.5 A
Remote keyless entry system,
main body ECU
49
DOME
20 A
Interior light
50
IG2
7.5 A
Engine control unit
Fuse
Ampere
Circuit

398
4-3. Do-it-yourself maintenance
BRZ_U
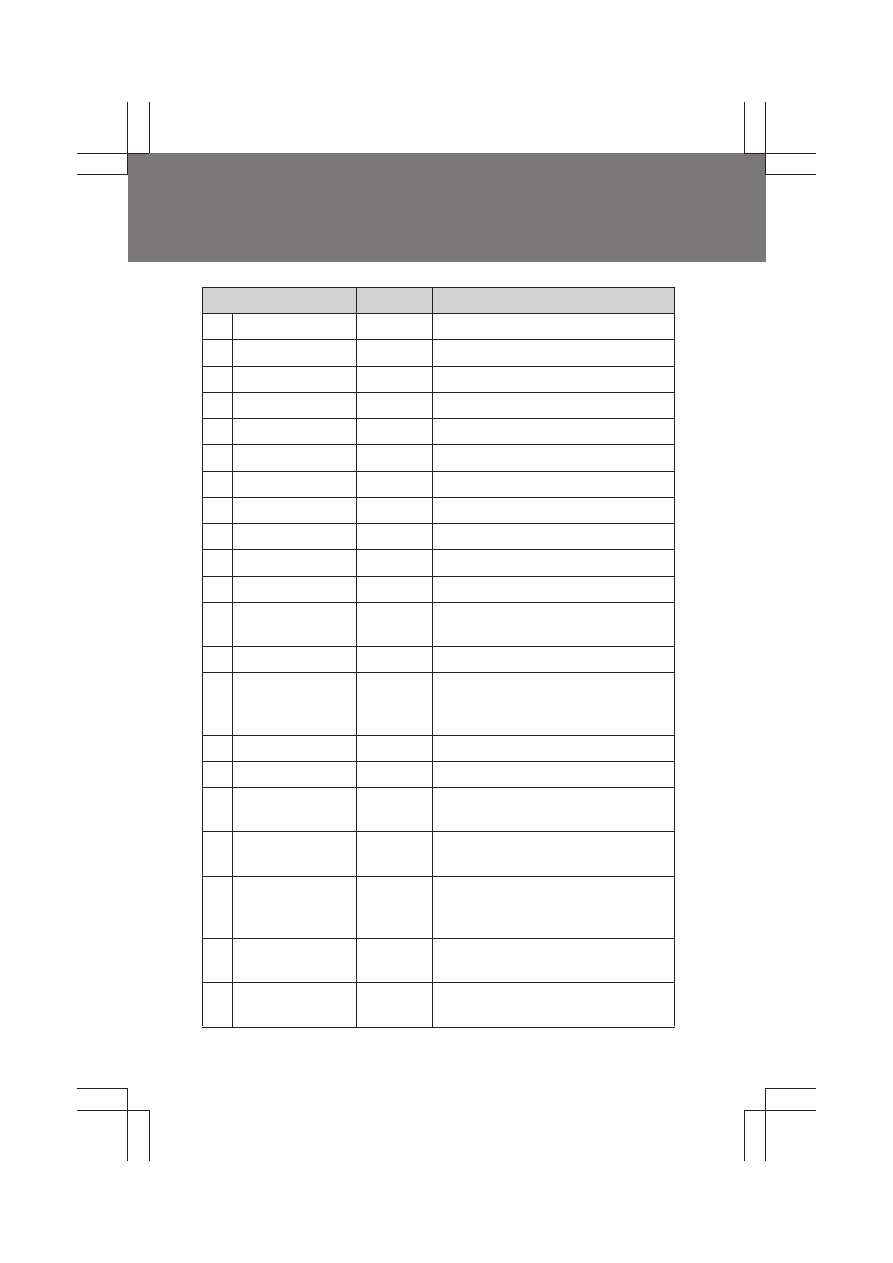
■
Instrument panel
Fuse
Ampere
Circuit
1
ECU ACC
10 A
Main body ECU, outside rear view
mirrors
2
P/POINT No.2
15 A
Power outlet
3
PANEL
10 A
Illumination
4
TAIL
10 A
Tail lights
5
DRL
10 A
Daytime running light system
6
UNIT IG1
10A
7
STOP
7.5 A
Stop lights
8
OBD
7.5 A
On-board diagnosis system
9
HEATER-S
7.5 A
Air conditioning system
10
HEATER
10 A
Air conditioning system
11
FR FOG LH
10 A
Left-hand front fog light
12
FR FOG RH
10 A
Right-hand front fog light
13
BK/UP LP
7.5 A
Back-up lights
14
ECU IG1
10 A
ABS, electric power steering
15
AM1
7.5 A
Starting system
16
AMP
15 A
Audio system
17
AT UNIT
15 A
Transmission
18
GAUGE
7.5 A
Gauge and meters, keyless access
with push button start system
19
ECU IG2
10 A
Engine control unit
20
SEAT HTR LH
10 A
Left-hand seat heater
21
SEAT HTR RH
10 A
Right-hand seat heater
22
RADIO
7.5 A
Audio system
23
P/POINT No.1
15 A
Power outlet
399
4-3. Do-it-yourself maintenance
4
M
ain
ten
anc
e a
nd
ca
re
BRZ_U
■
After a fuse is replaced
●
If the lights do not turn on even after the fuse has been replaced, a bulb
may need replacement. (
→P. 400)
●
If the replaced fuse blows again, have the vehicle inspected by your
SUBARU dealer.
■
If there is an overload in the circuits
The fuses are designed to blow, protecting the wiring harness from damage.
WARNING
■
To prevent system breakdowns and vehicle fire
Observe the following precautions.
Failing to do so may cause damage, and possibly a fire or injury.
●
Never use a fuse of a higher amperage rating than indicated, or use any
other object in place of a fuse.
●
Always use a genuine SUBARU fuse or equivalent.
●
Do not modify the fuse or the fuse box.
CAUTION
■
Before replacing fuses
Have the cause of electrical overload determined and repaired by your
SUBARU dealer.
400
4-3. Do-it-yourself maintenance
BRZ_U
Light bulbs
You may replace the following bulbs by yourself. The difficulty level
of replacement varies depending on the bulb. If necessary bulb
replacement seems difficult to perform, contact your SUBARU
dealer.
■
Preparing a replacement light bulb
Check the wattage of the light bulb being replaced. (
→P. 497)
■
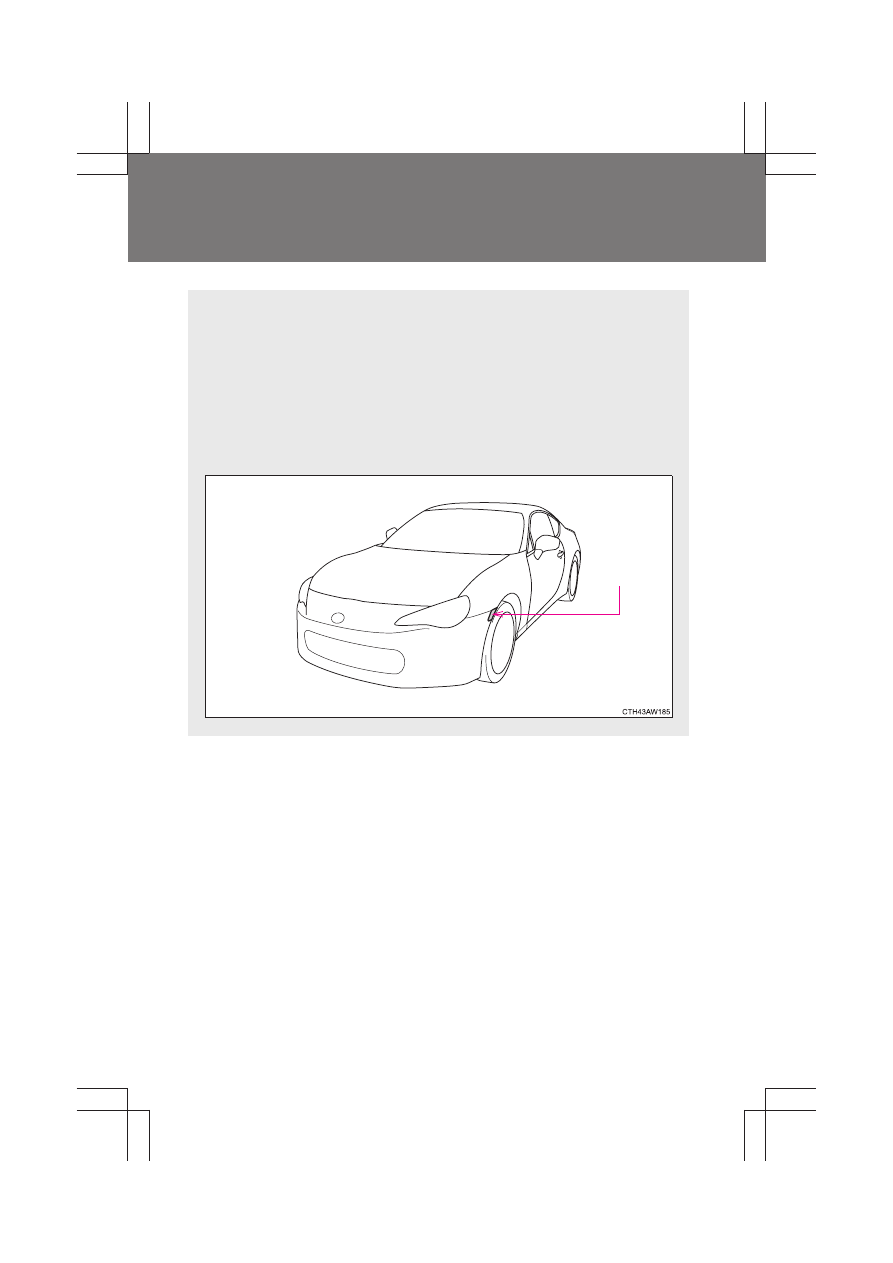
Front bulb locations
Front side
marker lights
401
4-3. Do-it-yourself maintenance
4
M
ain
ten
anc
e a
nd
ca
re
BRZ_U
■
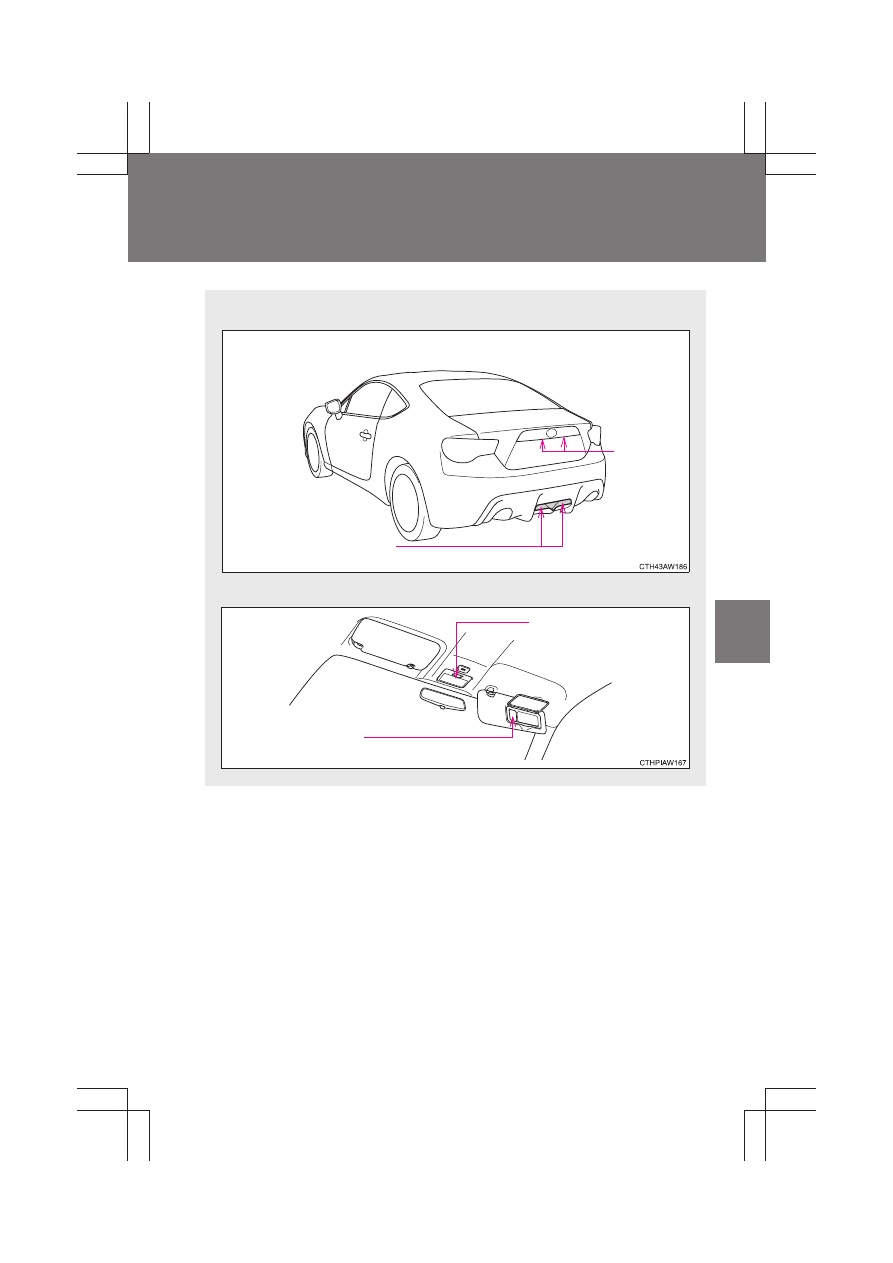
Rear bulb locations
■
Inside bulb locations
Back-up lights
License
plate
lights
Interior light
Vanity lights
(if equipped)
402
4-3. Do-it-yourself maintenance
BRZ_U
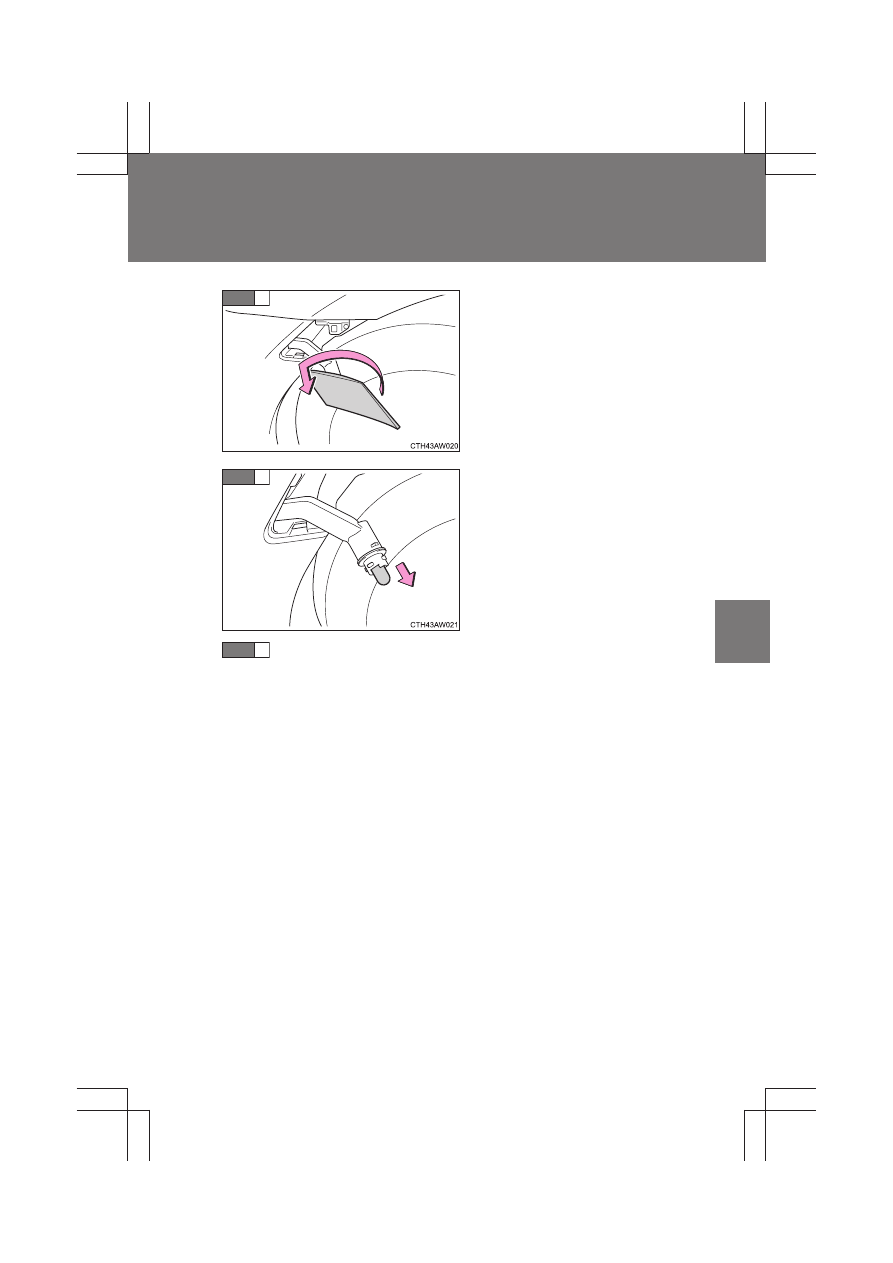
Replacing light bulbs
■
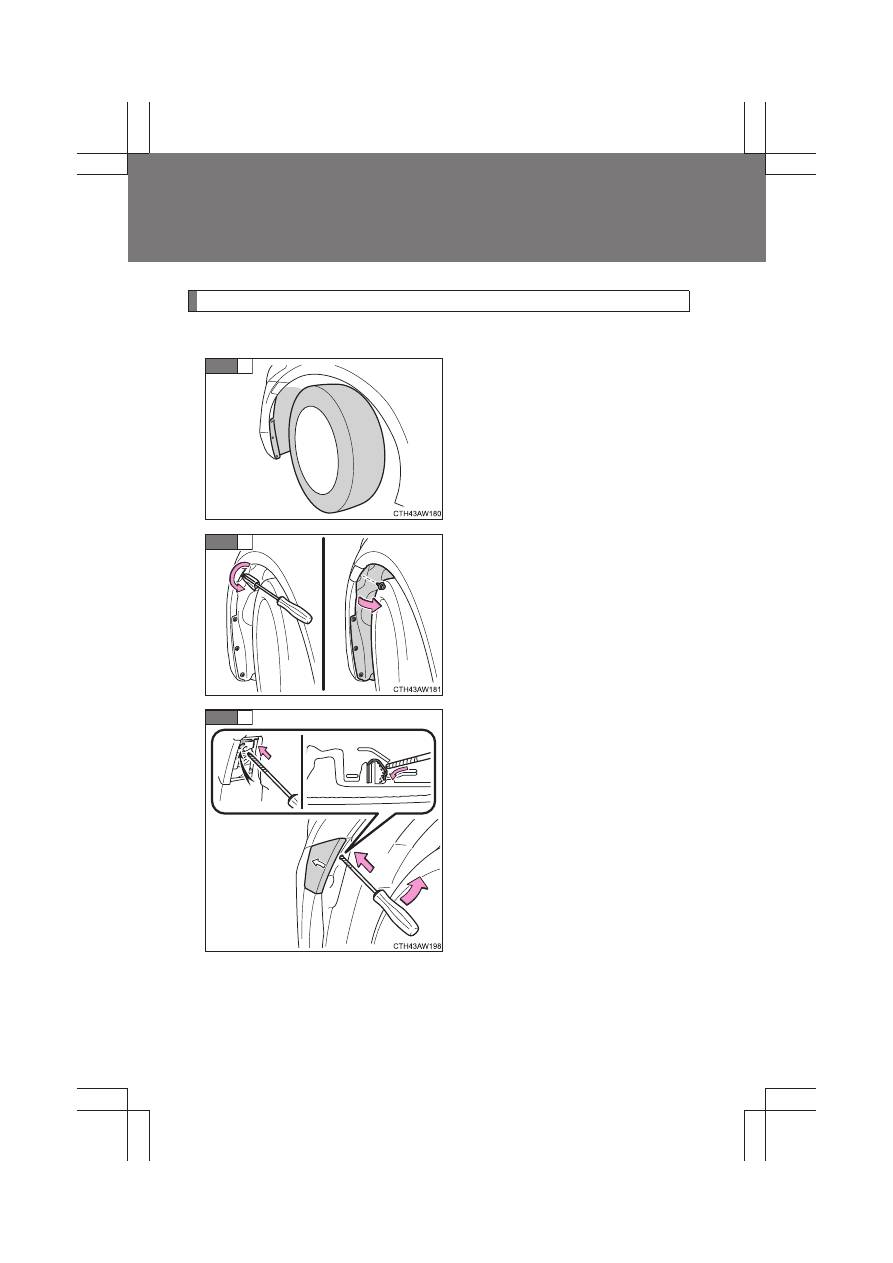
Front side marker lights
Turn the steering wheel in the
opposite direction of the light to
be replaced.
Turn the steering wheel to a point
that allows your hand to easily fit
between the tire and fender liner.
Remove the clips and partly
remove the fender liner.
To prevent damage to the vehicle,
cover the tip of the screwdriver
with a rag.
Release the light's claw.
Insert the screwdriver into the
hole. While firmly pushing the
screwdriver forward, move it
towards the inside of the vehicle.
To prevent damage to the vehicle,
wrap the tip of the screwdriver
with a tape.
STEP
1
STEP
2
STEP
3
403
4-3. Do-it-yourself maintenance
4
M
ain
ten
anc
e a
nd
ca
re
BRZ_U
Pull out the lamp and turn the
lens counterclockwise.
Remove the light bulb.
When installing, reverse the steps listed.
STEP
4
STEP
5
STEP
6
404
4-3. Do-it-yourself maintenance
BRZ_U
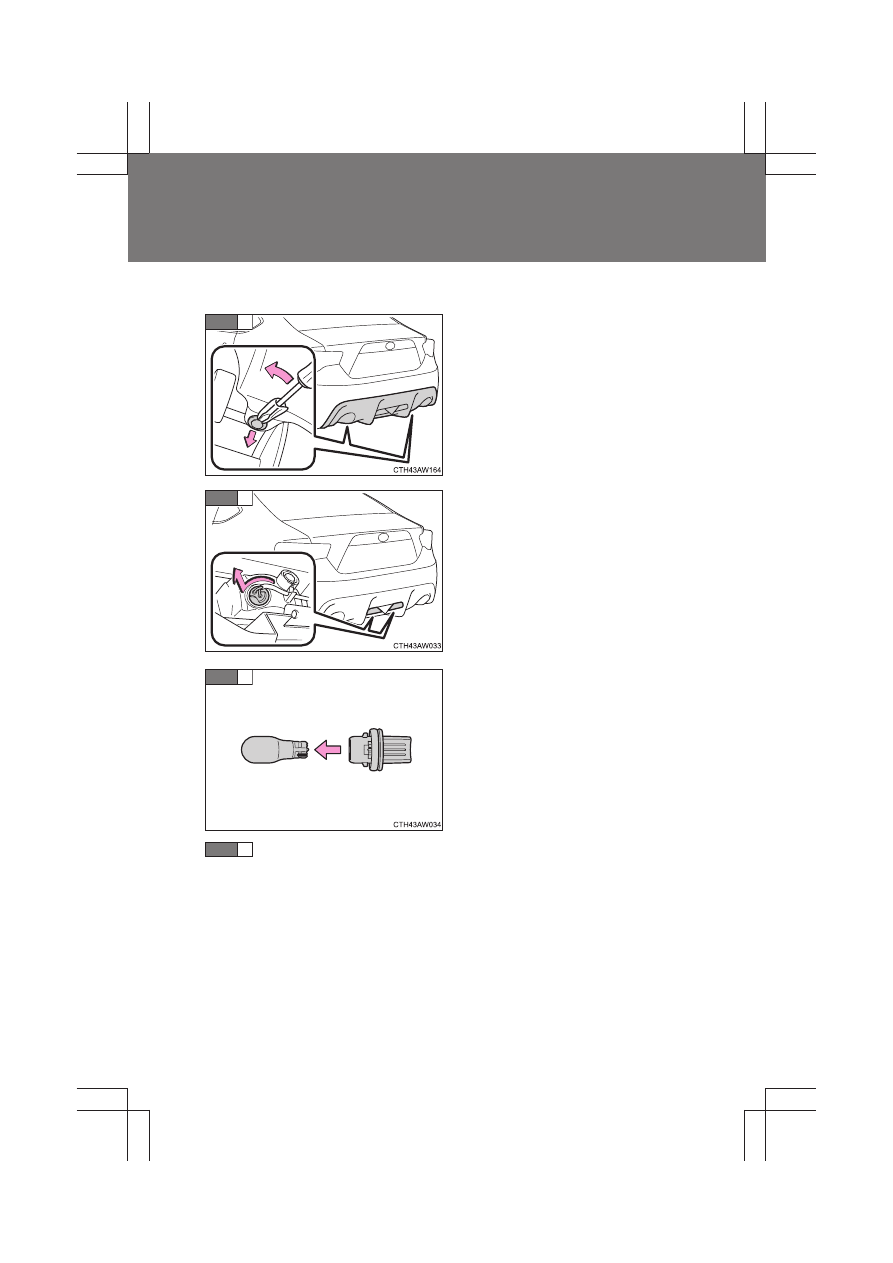
■
Back-up lights
Remove the clips.
To prevent damage to the vehicle,
cover the tip of the screwdriver
with a rag.
Turn the bulb base counterclock-
wise.
Remove the light bulb.
When installing, reverse the steps listed.
STEP
1
STEP
2
STEP
3
STEP
4

405
4-3. Do-it-yourself maintenance
4
M
ain
ten
anc
e a
nd
ca
re
BRZ_U
■
License plate lights
Remove the trunk lid panel cover
clips and partly remove the trunk
lid panel cover.
To prevent damage to the vehicle,
cover the tip of the screwdriver
with a rag.
Turn the bulb base counterclock-
wise.
Remove the light bulb.
When installing, reverse the steps listed.
STEP
1
STEP
2
STEP
3
STEP
4
Нет комментариевНе стесняйтесь поделиться с нами вашим ценным мнением.
Текст