Subaru XV Crosstrek (2016 year). Manual — part 13
tion is represented using an animation of
the traffic lane.
If the ABS is activated, all of the vehicle
’s
wheels will be illuminated in yellow and
the length of operation in seconds and the
number of activations will be displayed in
the bar indicator, located on the lowermost
part of the display.
If the Vehicle Dynamics Control system is
activated, the activated vehicle wheels will
be illuminated in yellow and the operating
indicator
“ ” will appear on the upper right
part of the display. Also, the length of
operation in seconds and the number of
activations will be displayed in the bar
indicator.
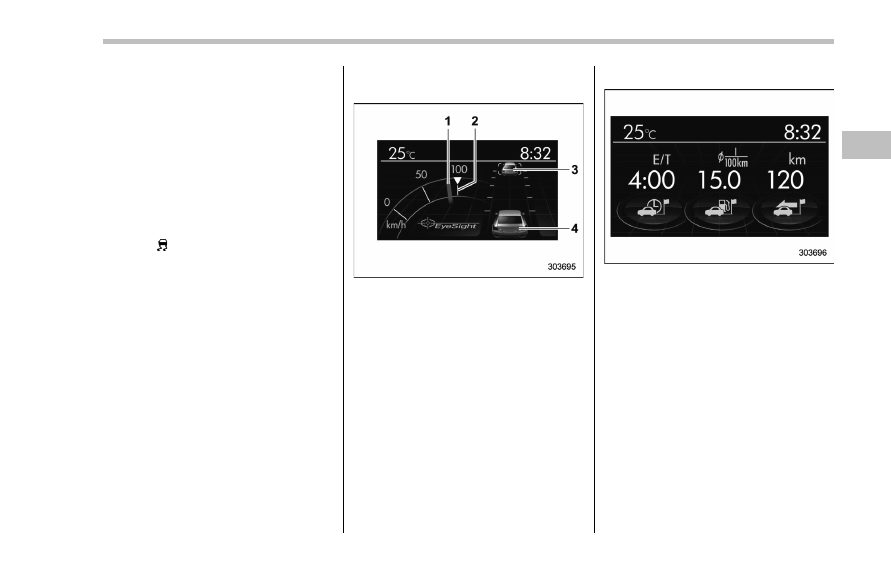
! EyeSight screen (models with
EyeSight system)
1)
Current vehicle speed
2)
Set vehicle speed
3)
Preceding vehicle
4)
Your vehicle
This screen displays the status of the
EyeSight system. For details, refer to the
Owner
’s Manual supplement for the
EyeSight system.
! Triple meter screen
Triple meter screen (display example)
This screen displays up to three optional
pieces of information that can be selected
from the following items.
The items shown in the triple meter screen
can be changed. For details, refer to
“Triple meter setting” F3-70.
Instruments and controls/Multi function display
– CONTINUED –
3-51
Instruments and controls/Multi function display
Item
Details
Average vehicle speed (Average
vehicle speed for the entire driving
time from when the trip meter was
reset)
Lifetime fuel consumption
Engine oil temperature
Accelerator opening ratio
Journey time (the time that has
elapsed since the ignition switch
was turned to the
“ON” position) (if
equipped)
Journey distance (the distance
that has been driven since the
ignition switch was turned to the
“ON” position)
Average fuel consumption for the
entire driving distance from when
the ignition switch was turned to
the
“ON” position
Boost pressure
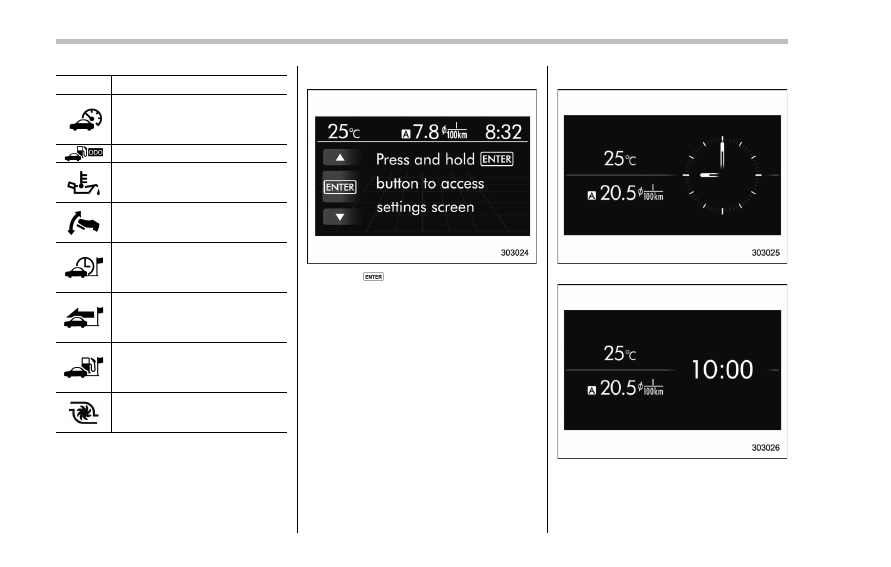
! Guidance screen
When the
button is pressed and held,
the selection screen can be displayed.
The displayed contents can be set or
customized from the selection screen. For
details, refer to
“Selection screen” F3-54.
! Clock/calendar screen
Clock (analog format)
Clock (digital format)
3-52
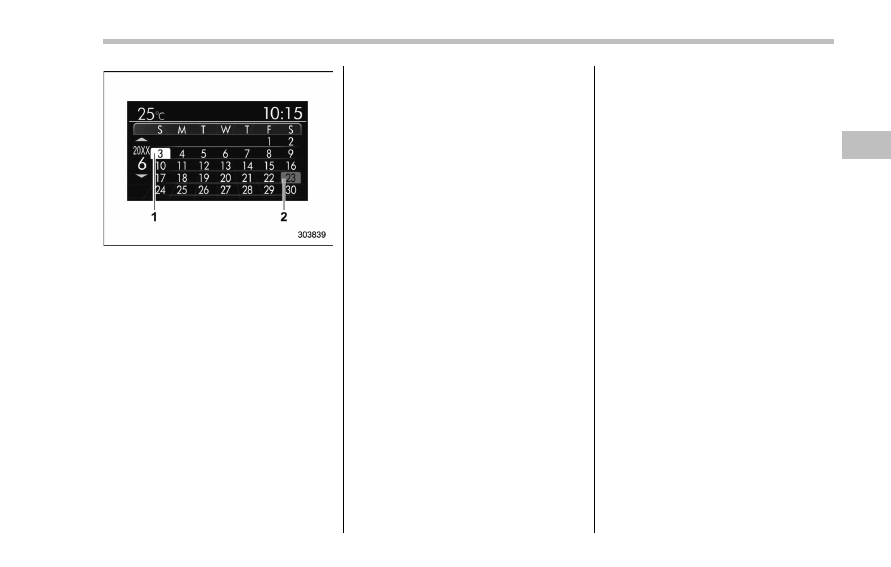
Calendar
1)
Today
’s date
2)
Birthday/Anniversary
In addition to the clock/calendar, the out-
side temperature and average fuel con-
sumption can also be displayed.
You can select clock (analog format),
clock (digital format) or calendar. The
clock/calendar can also be set so that it
is not displayed. For details, refer to
“Clock/calendar screen setting” F3-71.
Instruments and controls/Multi function display
– CONTINUED –
3-53
Instruments and controls/Multi function display
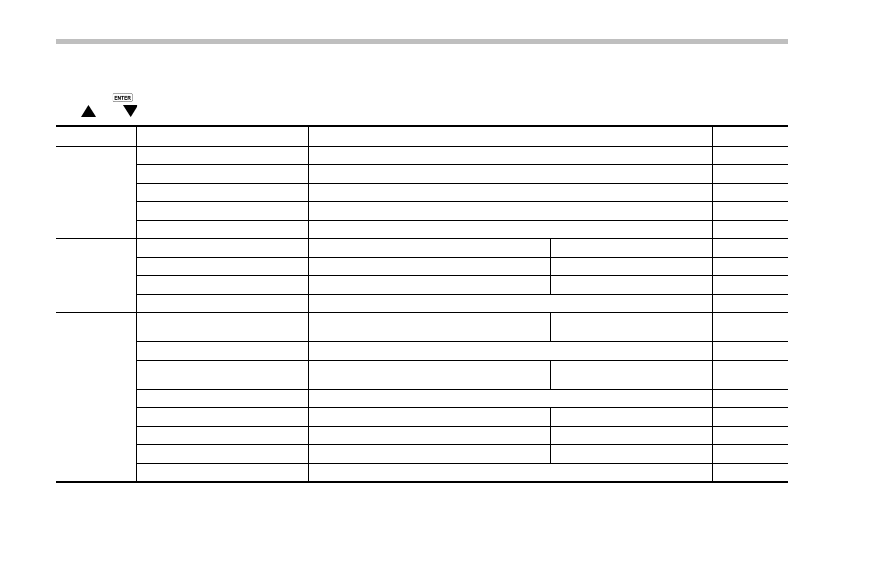
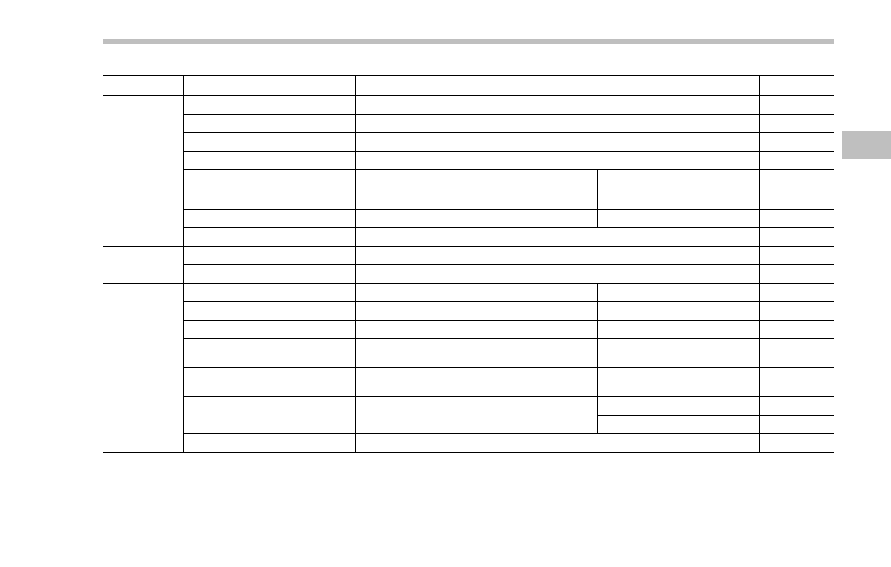
& Selection screen
When the
button is pushed and held, the setting screen for each menu can be displayed. Select the preferred menu by operating
the
“ ” or “ ” switch.
Top menu
Menu option
Description
Page
Time/Date
Time/Date
Set and adjust the time and date. 12h or 24h format can be selected.
3-57
Birthday
Set a birthday.
3-58
Anniversary
Set an anniversary day.
3-60
Daylight Saving Time
Turn the daylight saving time on or off
3-63
Go Back
Return to the top menu.
—
Display
Contrast
Adjust the contrast.
+5
↔ −5
3-64
Screen Off
Turn the screen on or off.
On or Off
3-64
Beep
Adjust the beep sound volume.
High, Low or Off
3-65
Go Back
Return to the top menu.
—
Screen Setting
Top Display
Set and customize the top display information
contents.
Avg Cons, Inst Cons, Range or
Off
3-66
Cons
Customize the fuel consumption information display.
3-67
Eco History
Set and customize the time of logging fuel
consumption history.
30 min, 60 min or 120 min
3-68
Triple Meter
Set and customize the triple meter.
3-70
Clock
Select the clock format.
Analog, Digital, Calendar or Off
3-71
Bypass Screen
Set the bypass screen for each item.
On or Off
3-72
Languages
Select the display language.
English or French
3-73
Go Back
Return to the top menu.
—
3-54
Top menu
Menu option
Description
Page
Maintenance
Engine Oil
Set and adjust the oil maintenance notification date.
3-74
Oil Filter
Set and adjust the oil filter maintenance notification date.
3-75
Tires
Set and adjust the tire maintenance notification date.
3-75
Maintenance Schedule
Set and adjust the vehicle maintenance notification date.
3-75
On/Off
Turn on or off the self-check screen that is
activated when the ignition switch is turned to
the
“ON” position.
On or Off
3-75
Clear All Settings
Clear all settings for maintenance items.
Yes or No
3-76
Go Back
Return to the top menu.
—
Driving History Set
Register and overwrite the driving record.
3-77
Go Back
Return to the top menu.
—
Car Setting
Keyless Buzzer Volume
Set the audible signal volume.
0 (OFF) to 7
3-79
Hazard Warning Flasher
Set the hazard warning flasher.
On or Off
3-79
Defogger
Set and customize the operation of the defogger. 15 minutes or Continuous
3-80
Interior Light
Set and customize the interior light off delay
timer.
10, 20, 30 seconds or Off
3-82
Auto Light Sensor (if equipped)
Set and customize the sensitivity of the auto
light sensor.
Low, Mid, High or Max
3-83
Keyless Access Setting (if
equipped)
Set and customize the keyless access function.
Driver
’s Door Unlock
3-84
Rear Gate Unlock
3-85
Go Back
Return to top menu.
—
Instruments and controls/Multi function display
– CONTINUED –
3-55
Instruments and controls/Multi function display
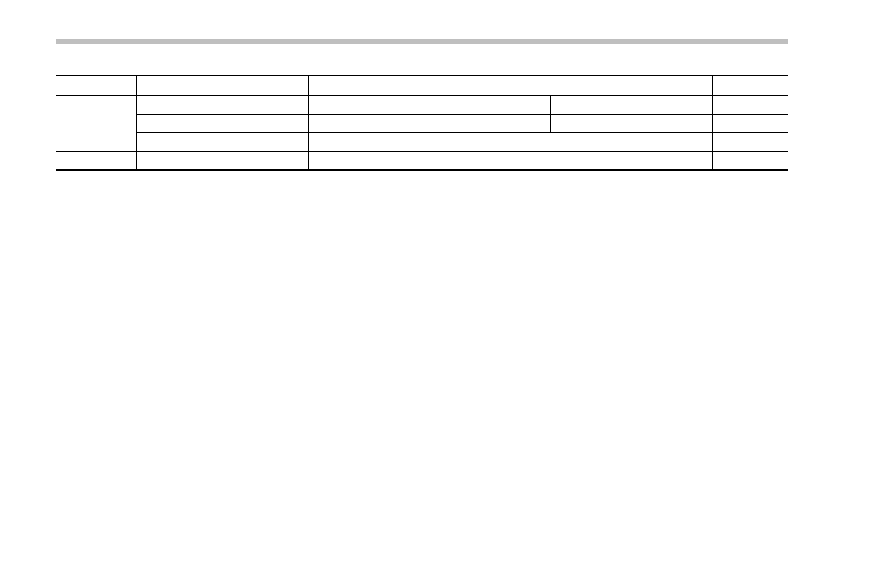
Top menu
Menu option
Description
Page
Initialize
Reset to Defaults
Reset all settings to the default settings.
Yes or No
3-87
Lifetime Fuel Consumption Reset Clear logged lifetime fuel consumption data.
Yes or No
3-88
Go Back
Return to the top menu.
—
Go Back
—
Return to the top menu.
—
3-56
& Date and time settings
The items in the date and time settings
can be set. To change the items, operate
the
“ ” or “ ” switch.
NOTE
. The “Time/Date” item must be set to
display the
“Birthday”, “Anniversary”
and notifications for vehicle mainte-
nance.
. The “Birthday” and “Anniversary”
items can be entered after the
“Date”
item has been set.
. Dates that do not exist in the
Gregorian calendar cannot be set (for
example, April 31).
. If your vehicle is equipped with
genuine SUBARU navigation system,
the clock of navigation system must be
set separately.
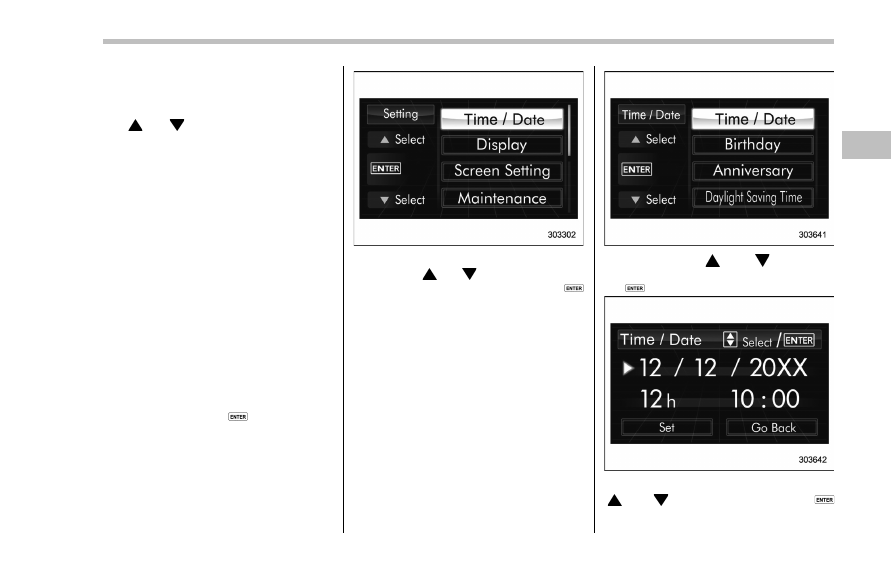
! Preparation for date setting
1. Turn the ignition switch to the
“ON”
position.
2. Push and hold the
button to show
the selection screen.
3. After the selection screen is displayed,
operate the
“ ” or “ ” switch to show the
“Time/Date” item. Then, push the
button.
! Current date and time setting
1. Perform the preparation steps accord-
ing to
“Preparation for date setting” F3-
57.
2. Operate the
“ ” or “ ” switch to
select the
“Time/Date” item. Then push
the
button.
3. Select the item to set by operating the
“ ” or “ ” switch. Then push the
button.
Instruments and controls/Multi function display
– CONTINUED –
3-57
Instruments and controls/Multi function display
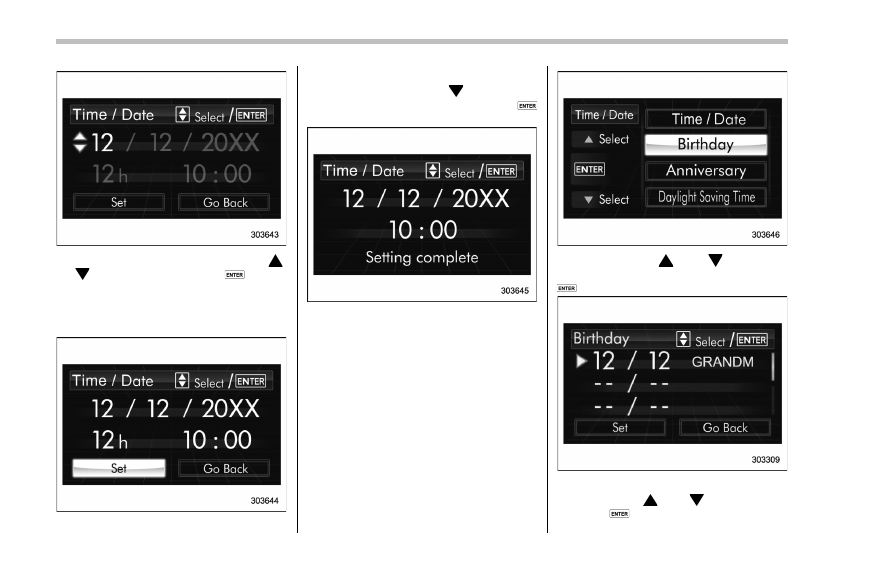
4. Select a number by operating the
“ ”
or
“ ” switch. Then push the
button.
When
“12 h” is selected, the clock will be
set to a 12-hour display. When
“24 h” is
selected, the clock will be set to a 24-hour
display.
5. After entering the date and time, select
“Set” by operating the “ ” switch and
confirm the setting by pushing the
button.
6. The system will notify you that the
setting is complete.
! Birthday setting
1. Perform the preparation steps accord-
ing to
“Preparation for date setting” F3-
57.
2. Operate the
“ ” or “ ” switch to
select the
“Birthday” item. Then push the
button.
3. Select an entry in the list to set by
operating the
“ ” or “ ” switch. Then
push the
button.
3-58
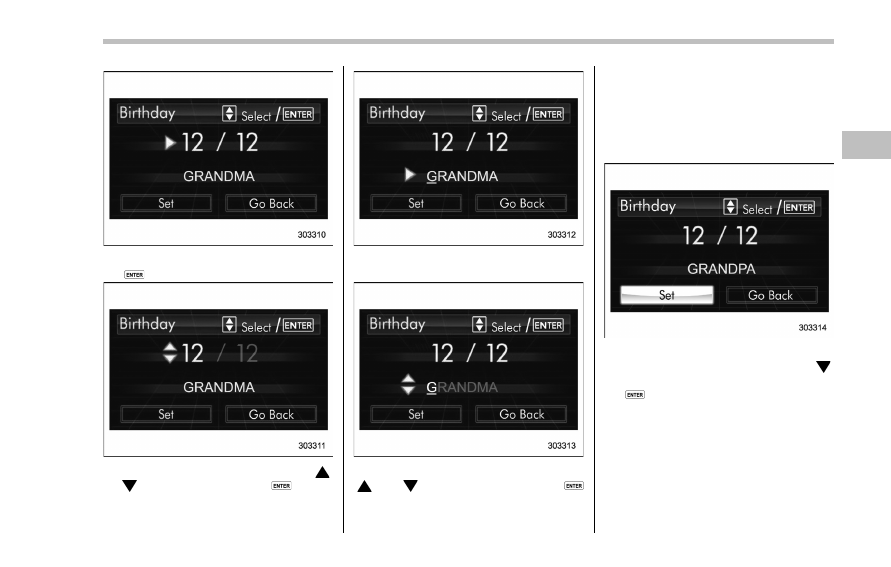
4. The selected item will be shown. Push
the
button to set the selected item.
5. Select numbers by operating the
“ ”
or
“ ” switch. Then push the
button.
6. After entering the date by repeating
step 5, you can enter the name.
7. Select characters by operating the
“ ” or “ ” switch. Then push the
button.
– You can select characters of the
English alphabet (upper case charac-
ters and lower case characters are
available), eleven symbols or blank
spaces.
– The word being edited will be
displayed with an underline.
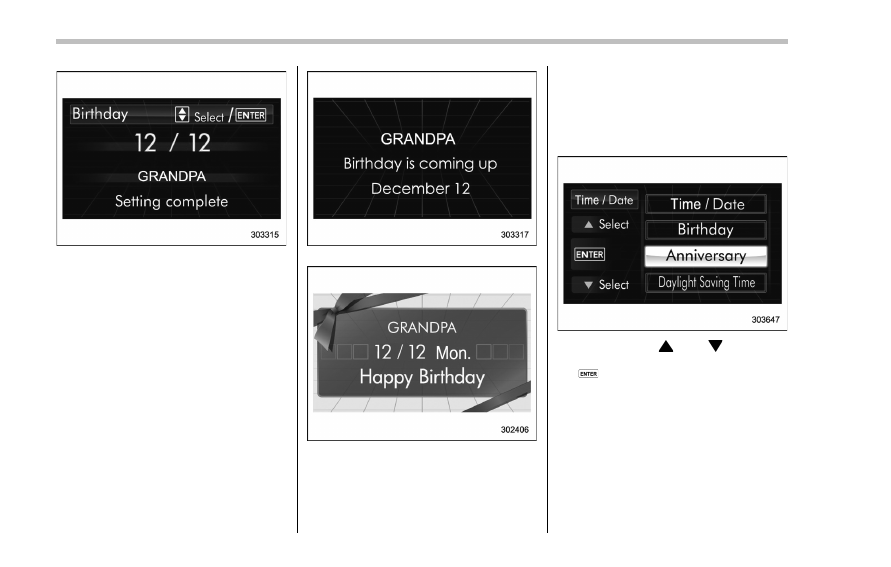
8. After entering the name by repeating
step 7, select
“Set” by operating the “ ”
switch and confirm the setting by pushing
the
button.
Instruments and controls/Multi function display
– CONTINUED –
3-59
Instruments and controls/Multi function display
9. The system will notify you that the
setting is complete.
If a birthday is approaching, the following
screen will be displayed accompanied by
a beep when the ignition switch has been
turned to the
“ON” position. This function
can be set to on or off. For details, refer to
“Bypass screen setting” F3-72.
From 1 to 7 days prior to the birthday
On a birthday (displayed in red)
NOTE
If
“_ _” is selected for either the
“Month” or “Day” item instead of
numbers, the birthday notification will
be deactivated.
! Anniversary setting
1. Perform the preparation steps accord-
ing to
“Preparation for date setting” F3-
57.
2. Operate the
“ ” or “ ” switch to
select the
“Anniversary” item. Then push
the
button.
3-60
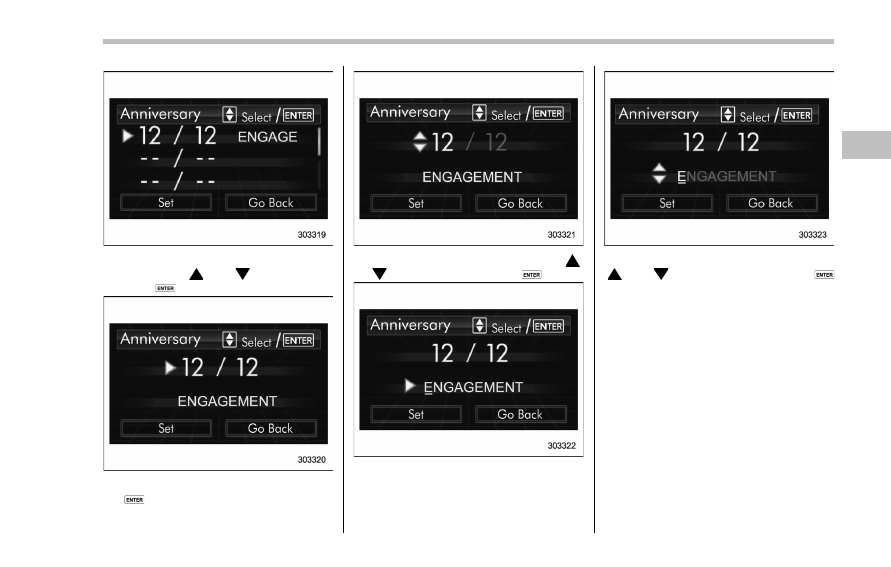
3. Select an entry in the list to set by
operating the
“ ” or “ ” switch. Then
push the
button.
4. The selected item will be shown. Push
the
button to set the selected item.
5. Select numbers by operating the
“ ”
or
“ ” switch. Then push the
button.
6. After entering the date by repeating
step 5, you can enter the name.
7. Select characters by operating the
“ ” or “ ” switch. Then push the
button.
– You can select characters of the
English alphabet (upper case charac-
ters and lower case characters are
available), eleven symbols or blank
spaces.
– The word being edited will be
displayed with an underline.
Instruments and controls/Multi function display
– CONTINUED –
3-61
Instruments and controls/Multi function display
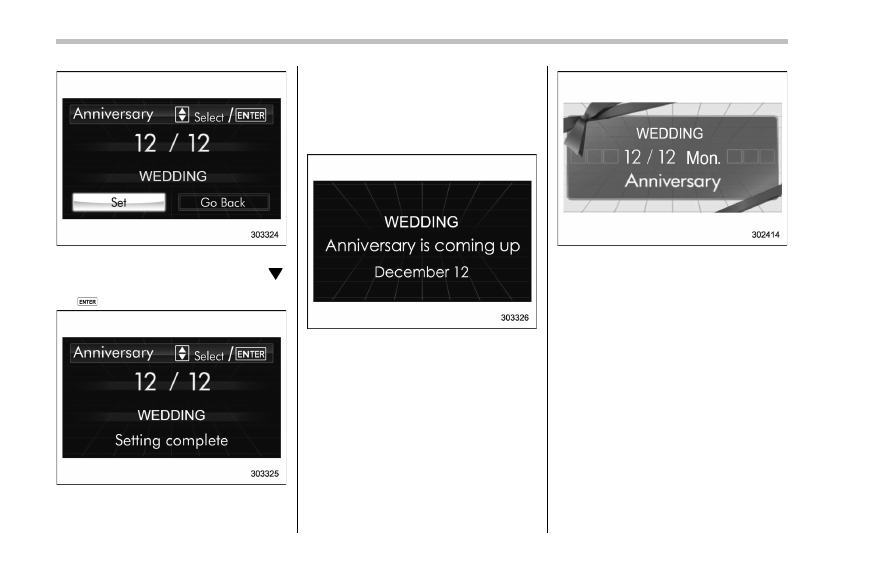
8. After entering the name by repeating
step 7, select
“Set” by operating the “ ”
switch and confirm the setting by pushing
the
button.
9. The system will notify you that the
setting is complete.
If an anniversary is approaching, the
following screen will be displayed accom-
panied by a beep when the ignition switch
has been turned to the
“ON” position. This
function can be set to on or off. For details,
refer to
“Bypass screen setting” F3-72.
From 1 to 7 days prior to the anniversary
On an anniversary (displayed in orange)
NOTE
If
“_ _” is selected for either the
“Month” or “Day” item instead of
numbers, the anniversary notification
will be deactivated.
! Clearing birthday or anniversary
1. Perform the preparation steps accord-
ing to
“Preparation for date setting” F3-57
and display
“Birthday” or “Anniversary” on
the screen.
2. Select the preferred birthday/anniver-
sary.
3. When
“_ _” is selected for either the
“Month” or “Day” item instead of numbers,
the setting of
“Birthday” or “Anniversary”
will be cleared.
3-62
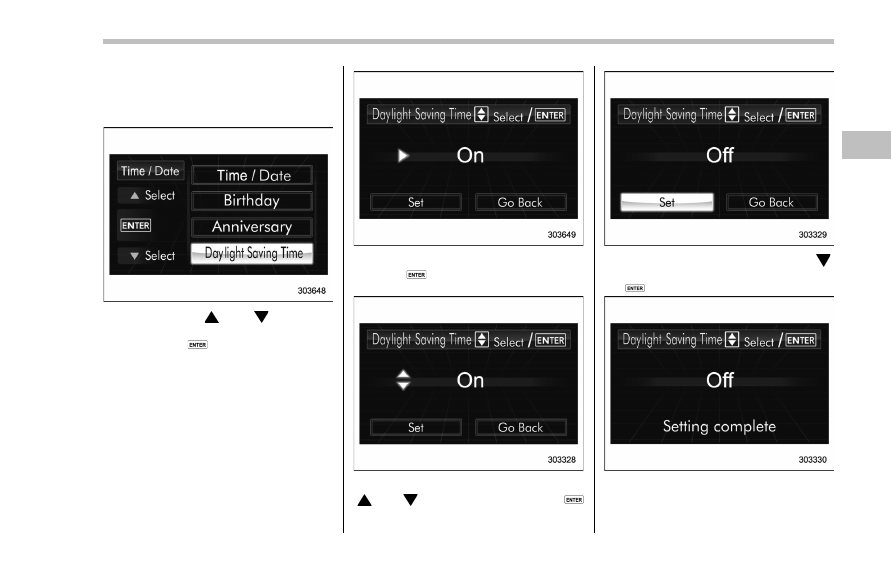
! Daylight saving time setting
1. Perform the preparation steps accord-
ing to
“Preparation for date setting” F3-
57.
2. Operate the
“ ” or “ ” switch to
select the
“Daylight Saving Time” item.
Then push the
button.
3. The current setting will be displayed.
Push the
button to enter the selection
mode.
4. Select
“On” or “Off” by operating the
“ ” or “ ” switch. Then push the
button.
5. Select
“Set” by operating the “ ”
switch, and confirm the setting by pushing
the
button.
6. The system will notify you that the
setting is complete.
Instruments and controls/Multi function display
– CONTINUED –
3-63
Instruments and controls/Multi function display
& Image quality and volume
settings
The image quality and volume settings
can be adjusted. To change the items,
operate the
“ ” or “ ” switch.
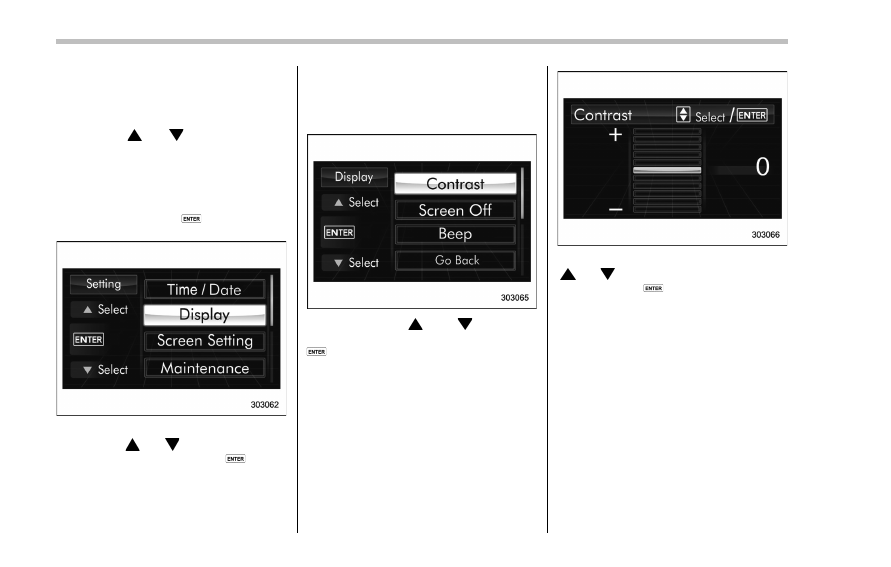
! Preparation for image quality and
volume settings
1. Turn the ignition switch to the
“ON”
position.
2. Push and hold the
button to show
the selection screen.
3. After the selection screen is displayed,
operate the
“ ” or “ ” switch to show the
“Display” item. Then, push the
button.
! Contrast setting
1. Perform the preparation steps accord-
ing to
“Preparation for image quality and
volume settings
” F3-64.
2. Operate the
“ ” or “ ” switch to
select the
“Contrast” item. Then push the
button.
3. Select a contrast level by operating the
“ ” or “ ” switch, and confirm the setting
by pushing the
button.
! Screen OFF setting
1. Perform the preparation steps accord-
ing to
“Preparation for image quality and
volume settings
” F3-64.
3-64
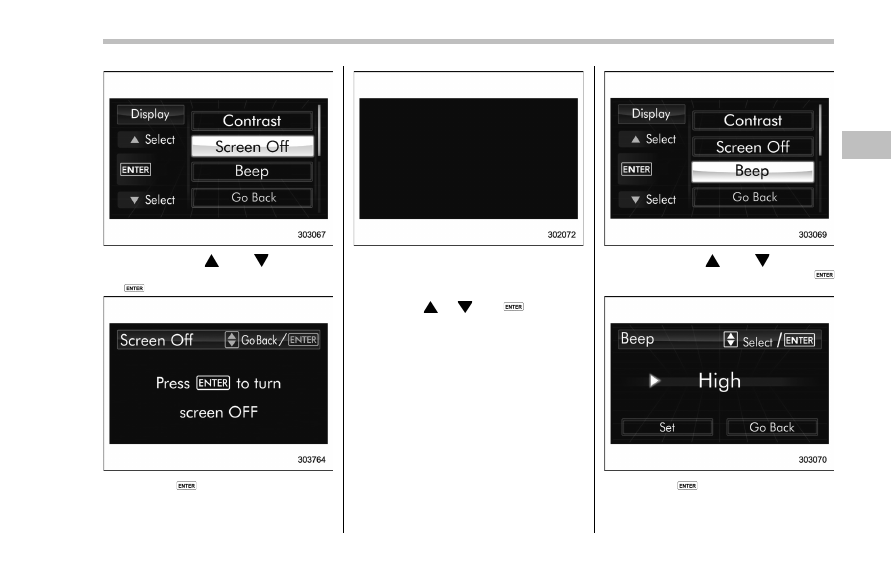
2. Operate the
“ ” or “ ” switch to
select the
“Screen Off” item. Then push
the
button.
3. Push the
button once more.
4. The screen is turned off.
Restoring the screen
When the
“ ”, “ ” or
button is
pushed after the ignition switch is turned
to the
“ON” position, the screen will be
restored. The screen will be restored with
the basic screen that was displayed when
the screen was turned off. While the
screen is off, a warning message will be
displayed if necessary, but other screens
will not be displayed.
! Beep volume setting
1. Perform the preparation steps accord-
ing to
“Preparation for image quality and
volume settings
” F3-64.
2. Operate the
“ ” or “ ” switch to
select the
“Beep” item. Then push the
button.
3. Push the
button.
Instruments and controls/Multi function display
– CONTINUED –
3-65
Instruments and controls/Multi function display
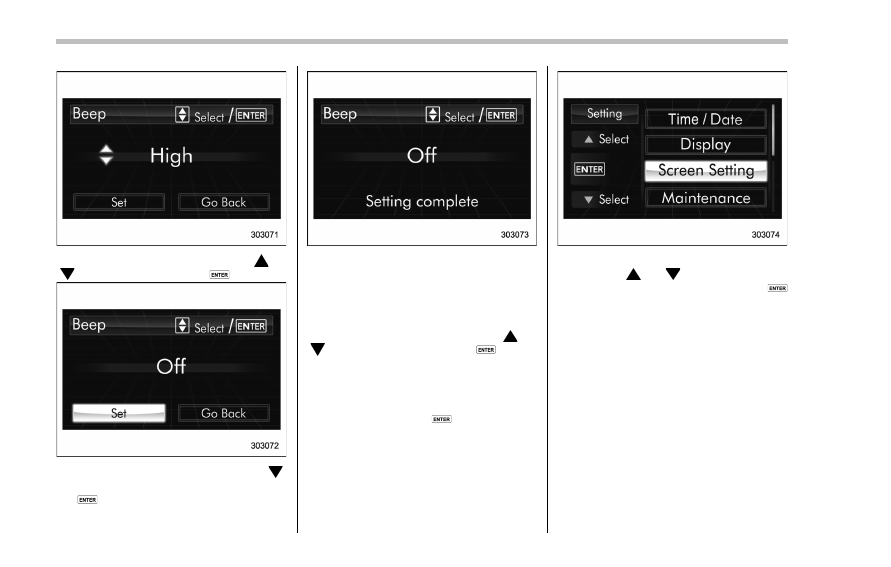
4. Select an item by operating the
“ ” or
“ ” switch. Then push the
button.
5. Select
“Set” by operating the “ ”
switch, and confirm the setting by pushing
the
button.
6. The system will notify you that the
setting is complete.
& Screen settings
The items in screen settings can be set.
To change the items, operate the
“ ” or
“ ” switch, and then push the
button.
! Preparation for screen settings
1. Turn the ignition switch to the
“ON”
position.
2. Push and hold the
button to show
the selection screen.
3. After the selection screen is displayed,
operate the
“ ” or “ ” switch to show the
“Screen Setting” item. Then, push the
button.
! Top display setting
1. Perform the preparation steps accord-
ing to
“Preparation for screen settings”
F3-66.
3-66
Нет комментариевНе стесняйтесь поделиться с нами вашим ценным мнением.
Текст