Subaru Forester (2019). Instruction — part 42
(348,1)
warning light is illuminated. Refer to
“Vehicle Dynamics Control warning light/
Vehicle Dynamics Control operation indi-
cator light” FP176.
.
While the Auto Start Stop warning light
is illuminated. Refer to “Auto Start Stop
warning light/Auto Start Stop OFF indica-
tor light (yellow)” FP186.
When using the Hill start assist system, a
braking effect may be felt even after the
brake pedal has been released.
CAUTION
The braking power of the Hill start
assist system may not be sufficient
when strong braking power is
needed (e.g., when towing a trailer).
NOTE
A slight jolt may be felt when the
vehicle begins to move forward after
being reversed.
7-19. Cruise control (if
equipped)
NOTE
For models with the EyeSight system:
Refer to the Owner’s Instruction supple-
ment for the EyeSight system.
Cruise control enables you to maintain a
constant vehicle speed without holding
your foot on the accelerator pedal and it is
operative when the vehicle speed is 20
mph (30 km/h) or more.
WARNING
Do not use the cruise control under
any of the following conditions.
These may cause loss of vehicle
control.
.
Driving up or down a steep grade
.
Driving on slippery or winding
roads
.
Driving in heavy traffic
.
Towing a trailer
When using the cruise control, al-
ways set the speed appropriately
according to the speed limit, traffic
flow, road conditions, and other
conditions.
NOTE
Make sure the cruise control system is
turned off when the cruise control is not
in use to avoid unintentionally setting
of the cruise control.
&
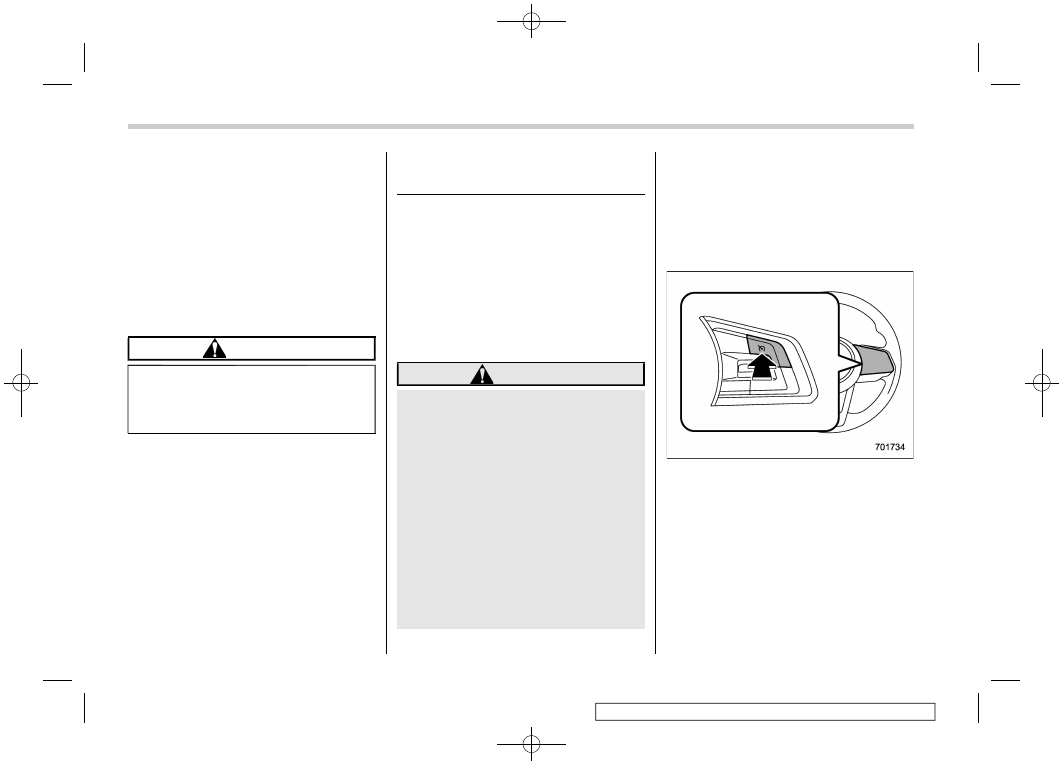
To set cruise control
Cruise control main button
1. Press the cruise control main button.
Cruise control
346
-------------------------------------------------------------------------------------------------------------------------------------------------------------
(349,1)
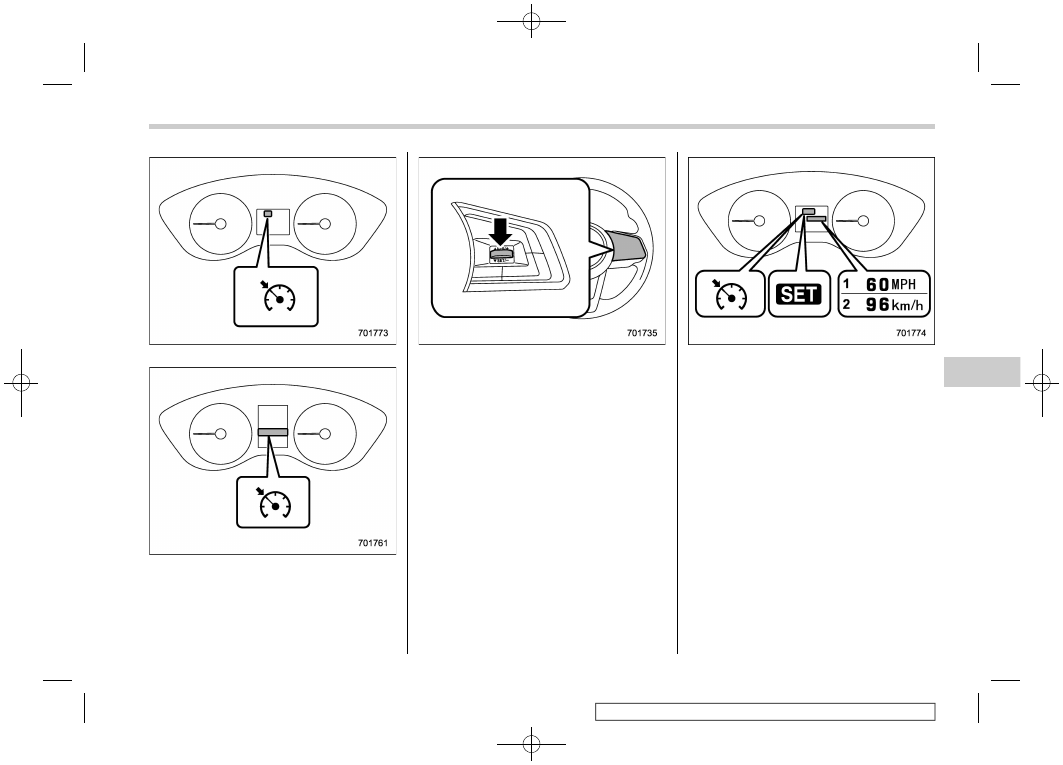
Cruise control indicator light (type A)
Cruise control indicator light (type B)
The cruise control indicator light on the
combination meter will illuminate.
2. Depress the accelerator pedal until the
vehicle reaches the desired speed.
3. Press the “RES/SET” switch to the
“SET” side and release it. Then release the
accelerator pedal.
NOTE
When setting a cruise speed for the first
time during a drive, both “SET” and
“RES” may be used to set the initial
cruise speed.
Cruise control set indicator light (type A)
1)
When setting the displayed unit as
“MPH”.
2)
When setting the displayed unit as
“km/h”.
– CONTINUED –
Cruise control
347
7
Starting
and
operating
-------------------------------------------------------------------------------------------------------------------------------------------------------------

(350,1)
Cruise control set indicator light (type B)
1)
When setting the displayed unit as “MPH”
2)
When setting the displayed unit as “km/h”
At this time, the cruise control set indicator
light is illuminated in the combination
meter. The set speed will be shown on
the combination meter. You can change
the displayed unit by operating the combi-
nation meter display.
.
For type A meter details, refer to
“Combination meter settings” FP163.
.
For type B meter details, refer to
The vehicle will maintain the desired
speed.
Vehicle speed can be temporarily in-
creased while driving with the cruise
control activated. Simply depress the
accelerator pedal to accelerate the vehi-
cle. When the accelerator pedal is re-
leased, the vehicle will return to and
maintain the previous cruising speed.
&
To temporarily cancel the
cruise control
The cruise control can be temporarily
canceled in the following ways.
.
Press the “CANCEL” button.
.
Press the X-MODE switch to activate
the X-MODE (models with X-MODE).
.
Depress the brake pedal.
.
Depress the clutch pedal (MT models
only).
WARNING
For CVT models, you can cancel the
cruise control by shifting the select
lever into the “N” position. However,
do not shift the lever into the “N”
position while driving except in case
of emergency. If the select lever is
shifted into the “N” position, the
engine brake will no longer work.
This could result in an accident.
The cruise control set indicator light in the
combination meter turns off when the
cruise control is canceled.
To resume the cruise control after it has
been temporarily canceled and with vehi-
cle speed of approximately 20 mph (30
km/h) or more, press the “RES/SET”
switch to the “RES” side to return to the
original cruising speed automatically.
The cruise control set indicator light in the
Cruise control
348
-------------------------------------------------------------------------------------------------------------------------------------------------------------
(351,1)
combination meter will automatically illu-
minate at this time.
&
To turn off the cruise control
There are two ways to turn off the cruise
control:
.
Press the cruise control main button
again.
.
Turn the ignition switch to the “ACC” or
“LOCK”/“OFF” position (but only when the
vehicle is completely stopped).
&
To change the cruising speed
!
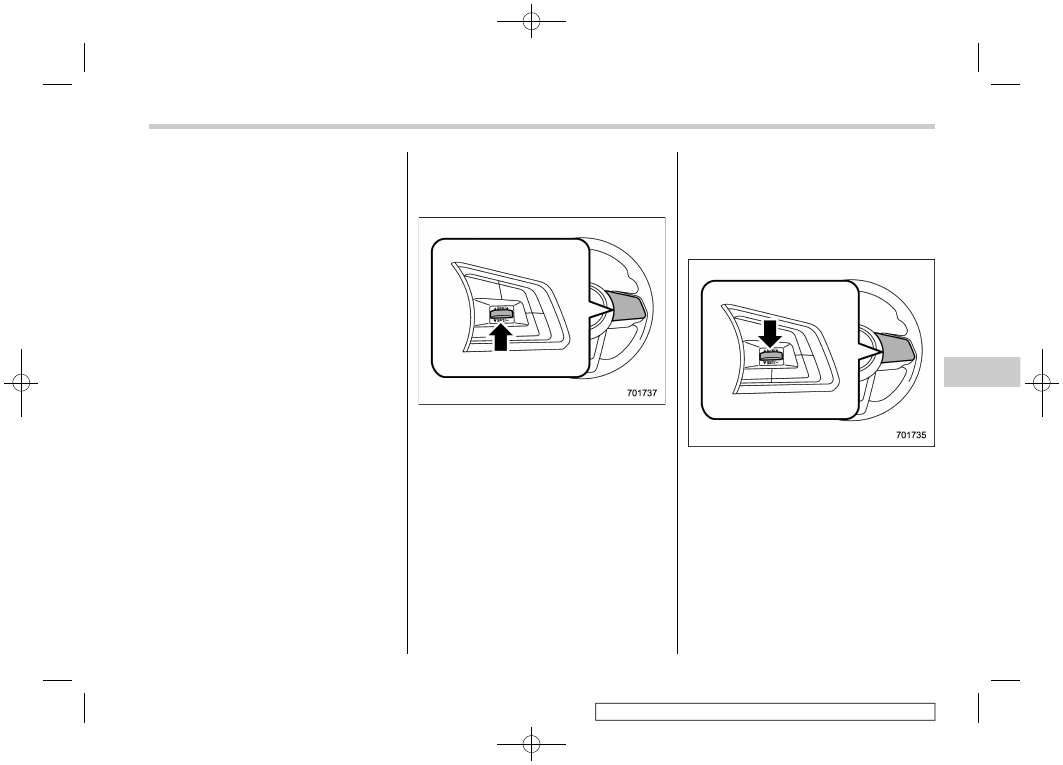
To increase the speed (by the “RES/
SET” switch)
Press the “RES/SET” switch to the “RES”
side and hold it until the vehicle reaches
the desired speed. Then, release the
switch. The vehicle speed at that moment
will be memorized and treated as the new
set speed.
When setting the displayed unit as
“MPH”:
The set speed can be increased 1 mph
(1.6 km/h) each time by pressing the “RES/
SET” switch to the “RES” side.
When setting the displayed unit as
“km/h”:
The set speed can be increased 1 km/h
each time by pressing the “RES/SET”
switch to the “RES” side.
!
To increase the speed (by accelera-
tor pedal)
1. Depress the accelerator pedal to ac-
celerate the vehicle to the desired speed.
2. Press the “RES/SET” switch to the
“SET” side once. Now the desired speed is
set and the vehicle will keep running at that
speed without depressing the accelerator
pedal.
– CONTINUED –
Cruise control
349
7
Starting
and
operating
-------------------------------------------------------------------------------------------------------------------------------------------------------------
(352,1)
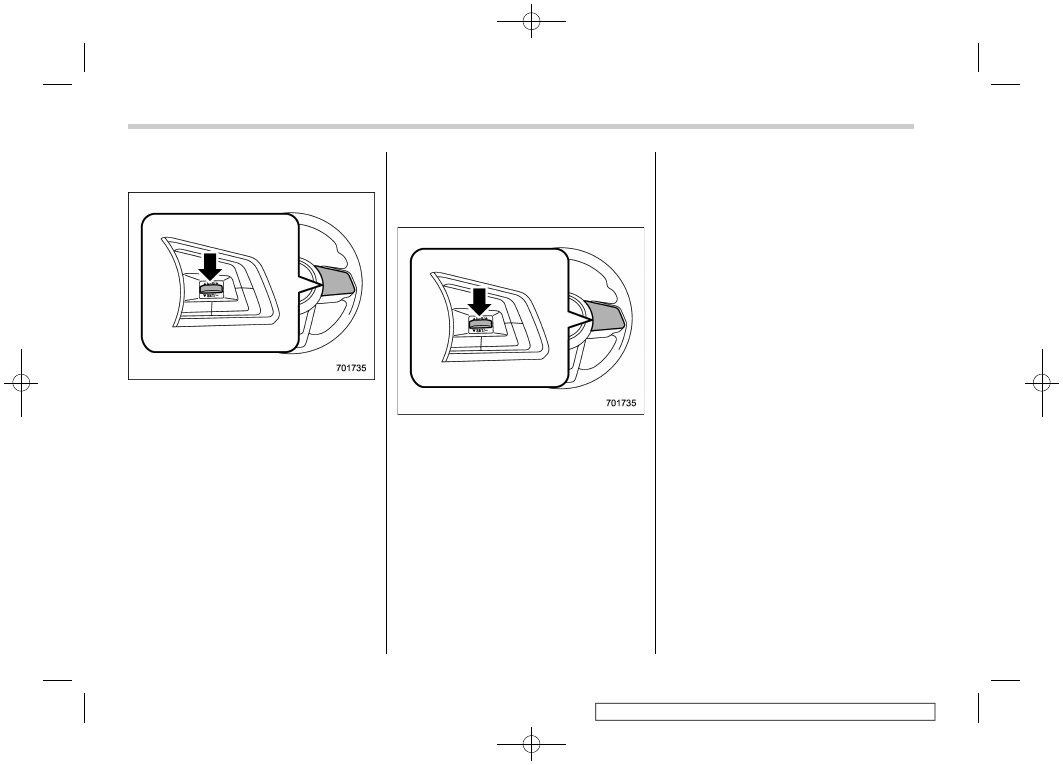
!
To decrease the speed (by the “RES/
SET” switch)
Press the “RES/SET” switch to the “SET”
side and hold it until the vehicle reaches
the desired speed. Then, release the
switch. The vehicle speed at that moment
will be memorized and treated as the new
set speed.
When setting the displayed unit as
“MPH”:
The set speed can be decreased 1 mph
(1.6 km/h) each time by pressing the “RES/
SET” switch to the “SET” side.
When setting the displayed unit as
“km/h”:
The set speed can be decreased 1 km/h
each time by pressing the “RES/SET”
switch to the “SET” side.
!
To decrease the speed (by brake
pedal)
1. Depress the brake pedal to release
cruise control temporarily.
2. When the speed decreases to the
desired speed, press the “RES/SET”
switch to the “SET” side once. Now the
desired speed is set and the vehicle will
keep running at that speed without depres-
sing the accelerator pedal.
&
Cruise control indicator light
Refer to “Cruise control indicator light”
FP185.
&
Cruise control set indicator
light
Refer to “Cruise control set indicator light”
FP186.
Cruise control
350
-------------------------------------------------------------------------------------------------------------------------------------------------------------
(353,1)
7-20. BSD/RCTA (if equipped)
The BSD/RCTA consists of rear radar with
Blind Spot Detection and Rear Cross
Traffic Alert.
These functions enable the system to
detect objects or vehicles to the rear,
drawing attention to the driver when
changing a lane or when driving in reverse.
WARNING
The driver is responsible for driving
safely. Always be sure to check the
surroundings when changing lanes
or reversing the vehicle.
The system is designed to assist the
driver to change lanes or reverse
safely by monitoring the rear and
side areas of the vehicle. However,
you cannot rely on this system alone
in assuring the safety during a lane
change or reversing. Overconfi-
dence in this system could result in
an accident and lead to serious
injury or death. Since the system
operation has various limitations,
the flashing or illumination of the
BSD/RCTA approach indicator light
may be delayed or it may not operate
at all even when a vehicle is present
in a neighboring lane or approach-
ing from either side.
The driver is responsible for paying
attention to the rear and side areas
of the vehicle.
&
System features
BSD/RCTA consists of the following func-
tions.
.
To detect a vehicle in a blind spot on an
adjacent lane or a vehicle approaching at
high speeds (Blind Spot Detection).
.
To detect a vehicle approaching from
the right or left while reversing the vehicle
(Rear Cross Traffic Alert).
The system uses radar sensors for the
above functions.
NOTE
The BSD/RCTA radar sensor has been
certified by the radio wave related laws
of the U.S. and Canada. When driving in
other countries, certification of the
country where the vehicle is driven
must be obtained. For certification in
the U.S. and Canada, refer to “Certifica-
tion for the BSD/RCTA” FP358.
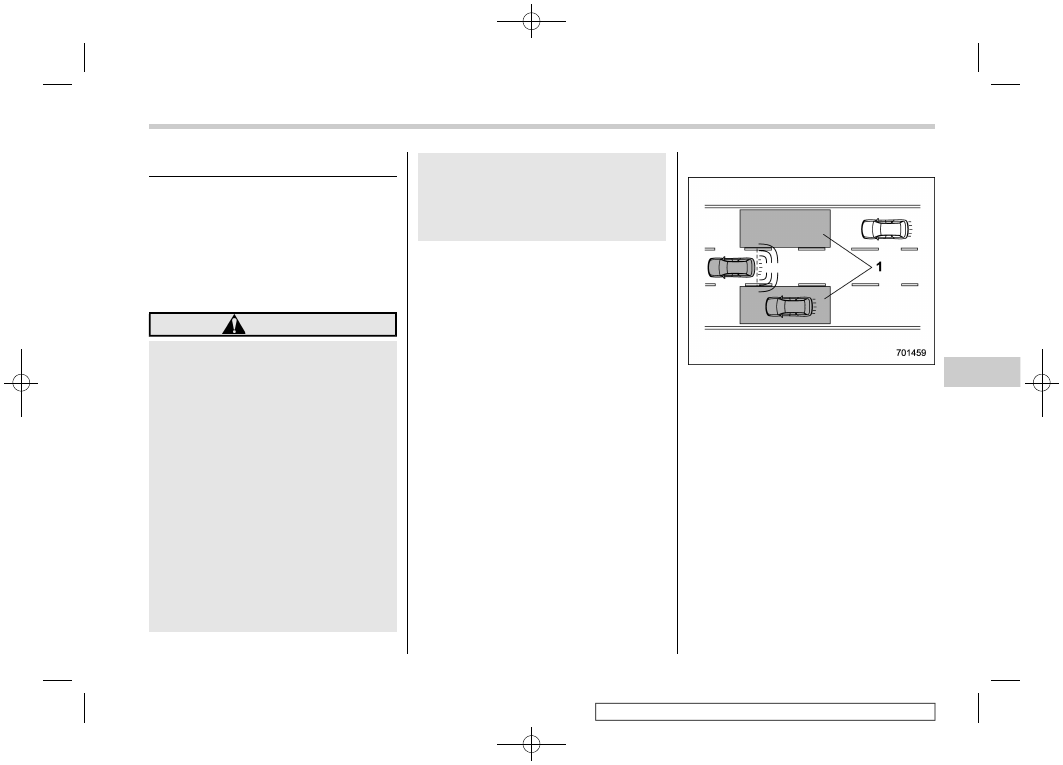
!
Blind Spot Detection (BSD)
1)
Operating range
The system warns the driver of dangers as
follows.
.
If the system detects a vehicle in the
blind spot, the BSD/RCTA approach in-
dicator light(s) on the outside mirror(s) will
illuminate.
– CONTINUED –
BSD/RCTA
351
7
Starting
and
operating
-------------------------------------------------------------------------------------------------------------------------------------------------------------
(354,1)
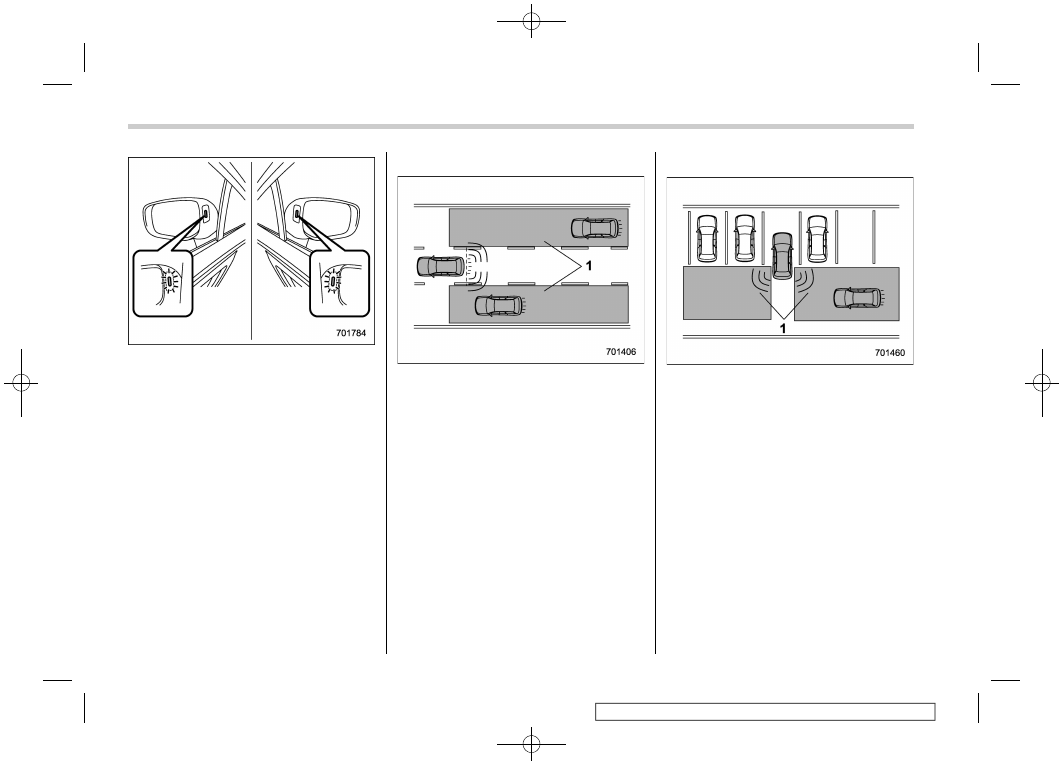
BSD/RCTA approach indicator light
.
If the driver operates the turn signal
lever in the direction which the BSD/RCTA
approach indicator light is illuminating, the
corresponding BSD/RCTA approach indi-
cator light will flash.
!
Lane Change Assist (LCA)
1)
Operating range
The system warns the driver of dangers as
follows.
.
If the system detects a vehicle ap-
proaching at a high speed in the neighbor-
ing lanes, the BSD/RCTA approach indi-
cator light(s) on the outside mirror(s) will
illuminate.
.
If the driver operates the turn signal
lever in the direction which the BSD/RCTA
approach indicator light is illuminating, the
corresponding BSD/RCTA approach indi-
cator light will flash.
!
Rear Cross Traffic Alert (RCTA)
1)
Operating range
The system notifies the driver of another
vehicle approaching from either side when
driving in reverse. This feature helps the
driver check the rear and side areas of the
vehicle when moving backward.
If the system detects a vehicle approach-
ing from either side while moving back-
ward, it warns the driver of dangers in the
following way.
.
The BSD/RCTA approach indicator
light(s) on the outside mirror(s) flashes.
.
A warning buzzer sounds.
.
An icon appears on the rear view
camera screen (audio/navigation monitor)
BSD/RCTA
352
-------------------------------------------------------------------------------------------------------------------------------------------------------------
(355,1)
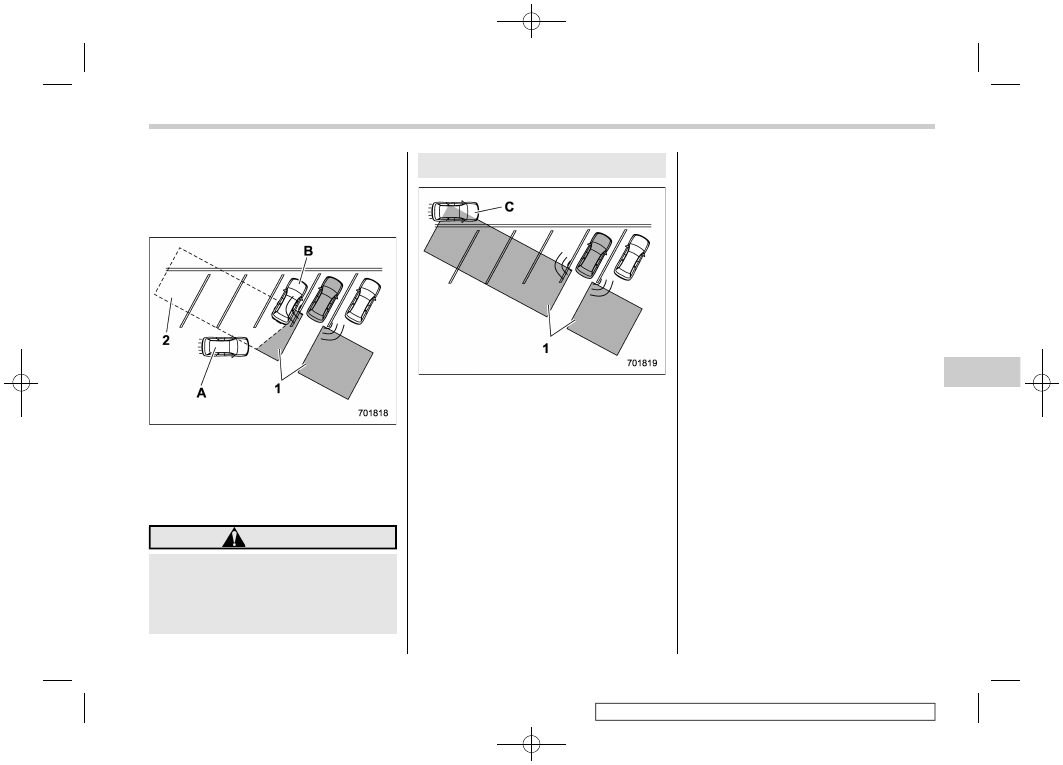
!
Limitations of the detectability of
RCTA
Since the detectability of RCTA is limited,
the RCTA may not operate properly in
angled parking.
Example 1
1)
The detection range of the radar sensors
2)
Area out of detection range of the radar
sensors
A)
Vehicle that may not be detected.
B)
Parked vehicle
WARNING
An approaching vehicle (A) may not
be detected because the detection
range is limited by the parked vehi-
cle (B). Always be sure to check the
surroundings when reversing the
vehicle.
Example 2
1)
The detection range of the radar sensors
C)
Vehicle that may be detected.
NOTE
The system may detect that a vehicle
(C) is passing in front of your vehicle.
Always be sure to check the surround-
ings when reversing the vehicle.
&
System operation
!
Operating conditions
The BSD/RCTA will operate when all of the
following conditions are met.
.
The ignition switch is in the “ON”
position.
.
The BSD/RCTA warning indicator and
BSD/RCTA OFF indicator are turned off.
.
The Eyesight warning indicator is off.
.
The vehicle is driven at speeds above 7
mph (12 km/h) (except when reversing).
.
The select lever is in the “R” position
(when reversing).
The BSD/RCTA will not operate in the
following situations.
.
The BSD/RCTA OFF indicator is on.
.
The vehicle speed is below 7 mph (12
km/h) even when the BSD/RCTA OFF
indicator remains off (except when rever-
sing).
NOTE
.
In the following case, the BSD/RCTA
will stop operating and the BSD/RCTA
warning indicator will appear. If the
BSD/RCTA warning indicator appears,
have your vehicle inspected at a
SUBARU dealer as soon as possible.
– When a malfunction occurs in the
system, including the BSD/RCTA
– CONTINUED –
BSD/RCTA
353
7
Starting
and
operating
-------------------------------------------------------------------------------------------------------------------------------------------------------------
Нет комментариевНе стесняйтесь поделиться с нами вашим ценным мнением.
Текст